background image

38

Scanning Using the Automatic Document Feeder

If the Mode setting in the upper right corner of the window is set 
to 

Professional Mode

, you see a different EPSON Scan settings 

window. For instructions on using Professional Mode, see 
"Selecting Basic Settings" on page 49.

Note:

To change scan modes, see "Changing the Scan Mode" on page 48.

Содержание GT-2500 Series

Страница 1: ...User s Guide NPD1879 00 ...

Страница 2: ...Seiko Epson Corporation and its affiliates shall not be liable against any damagesor problems arising from the use of any options or any consumable products other than those designated as Original Epson Products or Epson Approved Products by Seiko Epson Corporation EPSON is a registered trademark and Exceed Your Vision is a trademark of Seiko Epson Corporation Microsoft and Windows are registered ...

Страница 3: ... Scanned Documents Into Editable Text 15 Available Scanning Methods 16 Using the Start Button 16 Using EPSON Scan 17 Chapter 2 Guide to the Scanner Parts Scanner Parts 19 Lights and Start Button 22 Lights 22 Start Button 23 Chapter 3 Placing Originals on the Scanner Loading Documents in the Automatic Document Feeder 24 Document Specifications 27 Placing Originals on the Document Table 28 Placing L...

Страница 4: ...Area 52 Adjusting the Color and Other Image Settings 58 Selecting the Scan Size 61 Finishing the Scan 65 Chapter 5 Scanning Using the Document Table Starting a Scan With the Start Button 66 Starting a Scan With EPSON Scan 67 Starting a Scan With Another Scanning Program 69 Overview of the EPSON Scan Modes 71 Selecting EPSON Scan Office Mode Settings 72 Selecting EPSON Scan Home Professional Mode S...

Страница 5: ...rk Image Express Card 119 Connecting the Card and Scanner to a Network Hub 122 Setting Up Client Computers for Network Scanning 123 Installing the TCP IP Protocol 123 Scanning Over a Network 130 Starting EPSON Scan Settings 130 Scanning an Image 135 Chapter 8 Maintenance Cleaning the Scanner 136 Replacing the Scanner Lamp 138 Transporting the Scanner 139 Chapter 9 Troubleshooting Reading the Scann...

Страница 6: ...he Back of Your Original Appears in Your Scanned Image 156 Ripple Patterns Appear in Your Scanned Image 156 Characters Are Not Recognized Well When Converted into Editable Text OCR 158 Scanned Colors Differ from the Original Colors 158 Automatic Document Feeder Problems 160 You Cannot Scan Using the Automatic Document Feeder 160 Paper Jams in the Automatic Document Feeder 160 Optional Network Imag...

Страница 7: ...ations System Requirements 170 Windows System Requirements 170 Macintosh System Requirements 171 Scanner Specifications 173 General 173 Mechanical 174 Electrical 174 Environmental 175 Interfaces 175 Standards and Approvals 176 Index ...

Страница 8: ...mation and useful tips on the operation of this product Place the scanner close enough to the computer for the interface cable to reach it easily Do not place or store the scanner or the AC adapter outdoors near excessive dirt or dust water heat sources or in locations subject to shocks vibrations high temperature or humidity direct sunlight strong light sources or rapid changes in temperature or ...

Страница 9: ...on the AC adapter s label and always supply power directly from a standard domestic electrical outlet with the AC power cord that meets the relevant local safety standards When connecting this product to a computer or other device with a cable ensure the correct orientation of the connectors Each connector has only one correct orientation Inserting a connector in the wrong orientation may damage b...

Страница 10: ...ice personnel under the following conditions The AC power cord or plug is damaged liquid has entered the scanner or the AC adapter the scanner or the AC adapter has been dropped or the case has been damaged the scanner or the AC adapter does not operate normally or exhibits a distinct change in performance Do not adjust controls that are not covered by the operating instructions Unplug the scanner...

Страница 11: ...es users The lamp s in this product contain mercury Hg Please consult your state and local regulations regarding disposal or recycling Do not put in the trash Restrictions on Copying Observe the following restrictions in order to ensure the responsible and legal use of your scanner Copying of the following items is prohibited by law Bank bills coins government issued marketable securities governme...

Страница 12: ...le and respectful by obtaining the permission of the copyright holder before copying published material ENERGY STAR compliance As an ENERGY STAR Partner Epson has determined that this product meets the ENERGY STAR guidelines for energy efficiency The International ENERGY STAR Office Equipment Program is a voluntary partnership with the computer and office equipment industry to promote the introduc...

Страница 13: ...cument Feeder ADF built into your scanner This lets you quickly scan and save documents on your computer withoutplacing each page individually See Loading Documents in the Automatic Document Feeder on page 24 to get started You can still place one page originals or valuable photos and documents directly on the document table whenever you need to scanthem See PlacingOriginals ontheDocumentTable onp...

Страница 14: ...ave them as one PDF file on your computer EPSON Scan displays an editing page so you can view the pages as you scan them and reorder rotate or delete them as necessary You can also place one page at a time on the document table and scan and save it as a PDF file See Scanning to a PDF File on page 99 for instructions ...

Страница 15: ...u can scan a document and convert the text into data that you can edit with a word processing program This process is called OCR Optical Character Recognition To scan and use OCR you need to use an OCR program such as Adobe Acrobat See Converting Scanned Documents into Editable Text on page 109 for instructions ...

Страница 16: ...o work Using the Start Button N e w F o r a s i n g l e s c a n n e r The a Start button on the scanner automatically opens your scanning software so you can scan your document or photo to a file To scan using the ADF and the a Start button see Starting a Scan With the Start Button on page 34 To scan from the document table using the a Start button see Starting a Scan With the Start Button on page...

Страница 17: ...canning settings for documents and photos and check their effects with a preview image Available only when you are scanning from the document table Professional Mode gives you total control of your scanning settings and lets you check their effects with a preview image You can use EPSON Scan as a standalone program to scan your documents or photos directly to files on your computer To scan documen...

Страница 18: ...ou scan with another TWAIN compliant program such as Adobe Acrobat To scan documents using the ADF see Starting a Scan With Another Scanning Program on page 39 To scan documents or photos placed on the document table see Startinga Scan With AnotherScanningProgram onpage 69 ...

Страница 19: ...hapter 2 Guide to the Scanner Parts Scanner Parts N e w F o r a s i n g l e s c a n n e r a Automatic Document Feeder ADF b Paper support c Edge guides d Error light e Ready light f a Start button g power button h scanner transportation lock h g f e d b a c ...

Страница 20: ...20 Guide to the Scanner Parts a underside of ADF b document table c carriage home position c a b ...

Страница 21: ...Guide to the Scanner Parts 21 2 2 2 2 2 2 2 2 2 2 2 2 a DC inlet b USB interface connector c ADF cable do not disconnect d optional interface card slot a b c d ...

Страница 22: ... s status Ready light Error light Meaning On Off Ready to scan images Flashing Off Initializing or scanning On On A command error has occurred See Reading the Scanner Lights on page 140 for more information Flashing Flashing A fatal error has occurred See Reading the Scanner Lights on page 140 for more information Off Off The scanner is off ...

Страница 23: ... opens your scanning software so you can scan your image to a program or file Before using the a Start button make sure you have installed EPSON Scan To scan using the ADF and the a Start button see Starting a Scan With the Start Button on page 34 To scan from the document table using the a Start button see Starting a Scan With the Start Button on page 66 ...

Страница 24: ...ess See Document Specifications on page 27 for details Only load sheets that are all the same size cCaution Do not feed photographs or valuable original artwork into the ADF Misfeeding may wrinkle or damage the original Scan high quality color or halftone documents on the document table instead Remove any documents from the document table and make sure there is no dust on the glass before loading ...

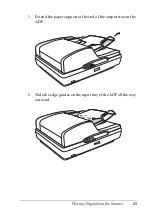
Страница 25: ...Placing Originals on the Scanner 25 3 3 3 3 3 3 3 3 3 3 3 3 1 Extend the paper support at the end of the output tray on the ADF 2 Slide the edge guides on the input tray of the ADF all the way outward ...

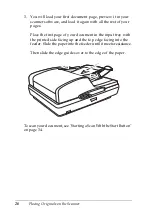
Страница 26: ... all the rest of your pages Place the first page of your document in the input tray with the printed side facing up and the top edge facing into the feeder Slide the paper into the feeder until it meets resistance Then slide the edge guides over to the edge of the paper Toscanyourdocument see StartingaScanWiththeStartButton on page 34 ...

Страница 27: ...The document has no staples paper clips or other objects attached to it these may damage the feeder mechanism The document has no folds The document has no cut out areas The document is not a multipart form or bound The document has no rear carbon coating Paper name Size A4 210 297 mm 8 3 11 7 inches Letter 215 9 279 4 mm 8 5 11 inches Legal 215 9 355 6 mm 8 5 14 inches B5 182 257 mm 7 2 10 1 inch...

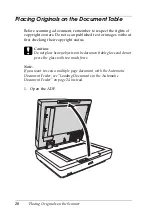
Страница 28: ... scan published text or images without first checking their copyright status cCaution Do not place heavy objects on the document table glass and do not press the glass with too much force Note If you want to scan a multiple page document with the Automatic Document Feeder see Loading Documents in the Automatic Document Feeder on page 24 instead 1 Open the ADF ...

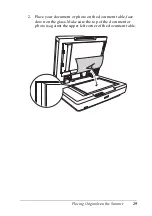
Страница 29: ...s on the Scanner 29 3 3 3 3 3 3 3 3 3 3 3 3 2 Place your document or photo on the document table face down on the glass Make sure the top of the document or photo is against the upper left corner of the document table ...

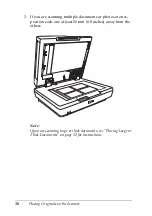
Страница 30: ...3 If you are scanning multiple documents or photos at once position each one at least 20 mm 0 8 inches away from the others Note If you are scanning large or thick documents see Placing Large or Thick Documents on page 32 for instructions ...

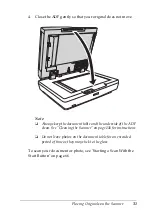
Страница 31: ...ove Note Always keep the document table and the underside of the ADF clean See Cleaning the Scanner on page 136 for instructions Do not leave photos on the document table for an extended period of time as they may stick to the glass To scan your document or photo see Starting a Scan With the Start Button on page 66 ...

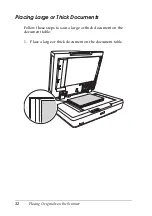
Страница 32: ...32 Placing Originals on the Scanner Placing Large or Thick Documents Follow these steps to scan a large or thick document on the document table 1 Place a large or thick document on the document table ...

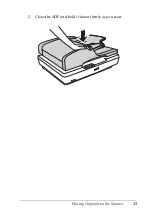
Страница 33: ...Placing Originals on the Scanner 33 3 3 3 3 3 3 3 3 3 3 3 3 2 Close the ADF and hold it down firmly as you scan ...

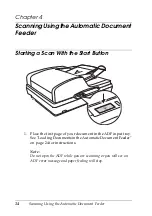
Страница 34: ...an With the Start Button N e w F o r a s i n g l e s c a n n e r 1 Place the first page of your document in the ADF input tray See LoadingDocuments inthe AutomaticDocumentFeeder on page 24 for instructions Note Do not open the ADF while you are scanning or you will see an ADF error message and paper feeding will stop ...

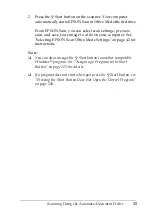
Страница 35: ...tings preview scan and save your image to a file on your computer See Selecting EPSON Scan Office Mode Settings on page 42 for instructions Note You can also reassign the a Start button to another compatible Windows program See Assigning a Program to the Start Button on page 115 for details If a program does not start when you press the a Start button see Pressing the Start Button Does Not Open th...

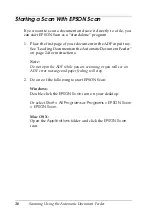
Страница 36: ...ADF input tray See LoadingDocuments inthe AutomaticDocumentFeeder on page 24 for instructions Note Do not open the ADF while you are scanning or you will see an ADF error message and paper feeding will stop 2 Do one of the following to start EPSON Scan Windows Double click the EPSON Scan icon on your desktop Or select Start All Programs or Programs EPSON Scan EPSON Scan Mac OS X Open the Applicati...

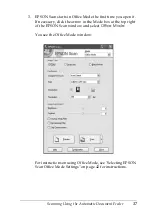
Страница 37: ...in Office Mode the first time you open it If necessary click the arrow in the Mode box at the top right of the EPSON Scan window and select Office Mode You see the Office Mode window For instructions on using Office Mode see Selecting EPSON Scan Office Mode Settings on page 42 for instructions ...

Страница 38: ...ing in the upper right corner of the window is set to Professional Mode you see a different EPSON Scan settings window For instructions on using Professional Mode see Selecting Basic Settings on page 49 Note To change scan modes see Changing the Scan Mode on page 48 ...

Страница 39: ...4 for instructions Note Do not open the ADF while you are scanning or you will see an ADF error message and paper feeding will stop 2 Start your scanning program Double click the program icon from your desktop if it is available or do one of the following Windows Select Start All Programs or Programs program folder program icon Mac OS X Open the Applications folder select the program folder and cl...

Страница 40: ...your scanner will not work correctly 5 EPSON Scan starts in Office Mode the first time you open it If necessary click the arrow in the Mode box at the top right of the EPSON Scan window and select Office Mode You see the Office Mode window For instructions on using Office Mode see Selecting EPSON Scan Office Mode Settings on page 42 for instructions ...

Страница 41: ...ck their effects with a preview image EPSON Scan opens in this mode the first time you use it See Changing the Scan Mode on page 48 for instructions on switching to Office Mode See Selecting EPSON Scan Office Mode Settings on page 42 for scanning steps Professional Mode gives you total control of your scanning settings and lets you check their effects with a preview image Professional Mode is best...

Страница 42: ...can in Office Mode follow these steps to select your EPSON Scan settings 1 Select whether the Image Type of your document pages is Color Grayscale or Black White 2 Select Auto Detect ADF Single sided or ADF Double sided as the Document Source setting 3 Select the size of your original document as the Size setting ...

Страница 43: ...The ADF then ejects your first page 6 Place your first document page on top of the rest of the pages then load the entire document up to 50 pages into the ADF 7 If necessary you can draw a marquee a line marking the scan area around the portion of your document page that you want to scan in the Preview window For instructions on creating and adjusting a marquee see Adjusting the Scan Area Marquee ...

Страница 44: ...lable mode s and description Brightness Adjusts the overall image lightness and darkness Contrast Adjusts the difference between the light and dark areas of the overall image Unsharp Mask Filter Turn on to make the edges of image areas clearer for an overall sharper image Turn off to leave softer edges Descreening Filter Removes the rippled pattern that can appear in subtly shaded image areas such...

Страница 45: ...eed to select the location name and format of the scanned image file you want to save 1 In the FileSaveSettings window specifythe location in which you want to save your scanned image Click the My Documents or My Pictures buttons Windows or the Documents or Pictures button Mac OS X If you want to select another folder click Other then click Browse Windows or Choose Mac OS X and select the folder ...

Страница 46: ...sion Explanation BITMAP BMP Windows only A standard image file format for Windows Most Windows programs including word processing programs can read and prepare images in this format JPEG JPG A compressed file format in which the compression level can be selected The JPEG format lets you highly compress image data However the higher the compression the lower the image quality Any lost image quality...

Страница 47: ...s can be saved as one PDF file When you save color or grayscale images in PDF you can select a compression level You can also edit the scanned images before saving them See Scanning to a PDF File on page 99 for details PICT PCT Macintosh only A standard image file format for Macintosh Most Macintosh programs including word processing programs can read and prepare images in this format PRINT Image ...

Страница 48: ...starts scanning The scanned image is automatically saved in the file and location you chose Changing the Scan Mode To change the scan mode click the arrow in the Mode box at the top right of the EPSON Scan window Then select the mode you want to use from the list that appears Note When you scan using the ADF only Office Mode and Professional Mode are available It is best to scan using Office Mode ...

Страница 49: ... Selecting Basic Settings When you start EPSON Scan in Professional Mode you see the main EPSON Scan window Professional Mode Before you scan your document you need to select these basic settings Original settings These tell EPSON Scan the type of document you are scanning ...

Страница 50: ... 3 Click the arrow to open the Image Type list and select the detailed image type you are scanning 4 EPSON Scan selects a default resolution setting based on the original and destination settings you select See Selecting the Scan Resolution on page 51 to continue scanning Image Type setting Type of image you are scanning 48 bit Color Color photo that you may want to modify in a 48 bit image editin...

Страница 51: ...u will enlarge the images as you scan them increase the Target Size setting If you will enlarge the images in EPSON Scan so you can use them at a larger size you can accept the Resolution setting selected by EPSON Scan based on your original and destination settings You will scan the images at their original size but then enlarge them later in an image editing program If you plan to enlarge your i...

Страница 52: ...d your basic settings and resolution in Professional Mode you can preview the first page of your document and select or adjust the area of the image you want to scan EPSON Scan displays the preview image in a separate Preview window on your screen Follow these steps to preview and adjust the first page of your document in Professional Mode What you will do with the scanned image Suggested scan res...

Страница 53: ...ard the bottom of the EPSON Scan window The ADF loads your first document page then EPSON Scan prescans it and displays it in the Preview window The ADF then ejects your first page 2 Place your first document page on top of the rest of the pages then load the entire document up to 50 pages into the ADF ...

Страница 54: ...tomatically create a marquee that is proportioned to that size See Selecting the Scan Size on page 61 for instructions To zoom in on an image click inside the scan area and click the Zoom button EPSON Scan prescans again and displays a larger preview on the Zoom tab To adjust the image quality click the image and make the adjustments as described in Adjusting the Color and Other Image Settings on ...

Страница 55: ... line that appears on the edges of your preview image to indicate the scan area You can move the marquee adjust its size and create multiple marquees on one image to scan different image areas in separate scan files Follow these steps 1 To draw a marquee move your cursor over a preview image The pointer becomes a set of cross hairs ...

Страница 56: ...ouse button and drag the cross hairs over the image to the opposite corner of the desired scan area Then release the mouse button You see the moving dotted line of the marquee 3 Do one of the following to adjust the marquee To move the marquee position your cursor inside the marquee The pointer becomes a hand Click and drag the marquee to the desired location ...

Страница 57: ...traight orangleddouble arrow Clickanddragtheedgeorcorner to the desired size Note To restrict movement of the marquee to vertical or horizontal only hold down the Shift key as you move the marquee To restrict sizing of the marquee to the current proportions hold down the Shift key as you resize the marquee To delete the marquee click inside it and click the delete marquee icon ...

Страница 58: ... image quality Before you make adjustments be sure to click the image or marquee for the area you want to adjust You also need to scroll down to the Adjustments area of the main EPSON Scan window The table below describes the settings available in Professional Mode For details on adjusting these settings click Help in the EPSON Scan window When you are finished making adjustments you can size your...

Страница 59: ...e Auto Exposure button To turn it on continuously click the Configuration button click the Color tab and select Continuous auto exposure You can adjust the level of exposure adjustment using the slider Unsharp Mask Filter Turn on to make the edges of image areas clearer for an overall sharper image The level of sharpness is adjustable Turn off to leave softer edges Descreening Filter Removes the r...

Страница 60: ...or details To undo any image quality adjustments you make to the preview image click the Reset button if available turn off the setting or preview your image again Tone Correction Provides a graphical interface for adjusting tone levels individually For advanced users only Click the Tone Correction button to use the Tone Correction settings Color Palette Provides a graphical interface for adjustin...

Страница 61: ...eirsizeas you scanthem Youdothis usingthe Target Size setting in Professional Mode Professional Mode Ifyouare goingto scan yourimage to a particular size you should select the Target Size setting after previewing it but before adjusting your scan area indicated by the marquee This sets the scan area to the correct proportions so your image will not be cropped unexpectedly ...

Страница 62: ...ing and Adjusting the Scan Area on page 52 Then follow these steps to select the Target Size setting 1 You can choose a predefined scan size from the Target Size list Click the arrow in the list and select the size you want A marquee dotted line proportioned for that size appears on your preview image ...

Страница 63: ...w in the list and select Customize You see the Target Size window Type a name for your custom size enter the size click the Save button then click OK Your new size appears in the Target Size list 3 You can fine tune the size using additional tools Click the Windows or r Mac OS X next to Target Size to display these tools To size your image by a certain percentage adjust the Scale value ...

Страница 64: ...can click and drag the marquee to the area in the image you want to scan For details see Adjusting the Scan Area Marquee on page 55 The marquee proportions are retained as you adjust it If you need to rotate the marquee for a landscape or portrait image click the orientation icon Not available if you are scanning at the Original Target Size Note For more information about using the Target Size too...

Страница 65: ...hat happens after you scan depends on how you started your scan If you started your scan by running EPSON Scan as a standalone program you see the File Save Settings window This lets you select the name and location of your saved scan files See Selecting File Save Settings on page 45 for details If you started your scan from a scanning program such as Adobe Acrobat your scanned images open in the ...

Страница 66: ... on the document table See Placing Originals on the Document Table on page 28 for instructions 2 Press the a Start button on the scanner Your computer automatically starts EPSON Scan in Office Mode the first time From EPSON Scan you can select scan settings preview scan and save your image to a file on your computer See Selecting EPSON Scan Office Mode Settings on page 72 for instructions ...

Страница 67: ...rt Button Does Not Open the Correct Program on page 145 Starting a Scan With EPSON Scan If you want to scan an image and save it directly to a file you can start EPSON Scan as a standalone program 1 Place your document or photo on the document table See Placing Originals on the Document Table on page 28 for instructions 2 Do one of the following to start EPSON Scan Windows Double click the EPSON S...

Страница 68: ... Scan Office Mode Settings on page 72 for instructions If the Mode setting in the upper right corner of the window is set to Home Mode or Professional Mode you see a different EPSON Scan settings window For instructions on using Home or Professional Mode see Selecting Basic Settings on page 79 Note To change scan modes see Changing the Scan Mode on page 78 ...

Страница 69: ... your scanning program Double click the program icon from your desktop if it is available or do one of the following Windows Select Start All Programs or Programs program folder program icon Mac OS X Open the Applications folder select the program folder and click the program icon 3 Open the File menu and select the Import or Acquire option See your scanning program help for instructions on starti...

Страница 70: ... Scan Office Mode Settings on page 72 for instructions If the Mode setting in the upper right corner of the window is set to Home Mode or Professional Mode you see a different EPSON Scan settings window For instructions on using Home or Professional Mode see Selecting Basic Settings on page 79 Note To change scan modes see Changing the Scan Mode on page 78 ...

Страница 71: ...uments and photos and check their effects with a preview image Home Mode is best when you want to preview images of documents or photos before scanning them You can size the image as you scan adjust the scan area and adjust many image settings including color restoration See Changing the Scan Mode on page 78 for instructions on switching to Home Mode See Selecting Basic Settings on page 79 for sca...

Страница 72: ...ode on page 78 for instructions on switching to Professional Mode See Selecting Basic Settings on page 79 for scanning steps Selecting EPSON Scan Office Mode Settings After you start EPSON Scan in Office Mode follow these steps to select your EPSON Scan settings ...

Страница 73: ...n See the table below for some guidelines 5 Click the Preview button toward the bottom of the EPSON Scan window EPSON Scan prescans your page and displays it in the Preview window 6 In the Preview window draw a marquee a line marking the scan area aroundtheportion ofyourdocument page thatyou want to scan For instructions on creating and adjusting a marquee see Adjusting the Scan Area Marquee on pa...

Страница 74: ...mode s and description Brightness Adjusts the overall image lightness and darkness Contrast Adjusts the difference between the light and dark areas of the overall image Unsharp Mask Filter Turn on to make the edges of image areas clearer for an overall sharper image Turn off to leave softer edges Descreening Filter Removes the rippled pattern that can appear in subtly shaded image areas such as in...

Страница 75: ... to select the location name and format of the scanned image file you want to save 1 In the FileSaveSettings window specifythe location in which you want to save your scanned image Click the My Documents or My Pictures buttons Windows or the Documents or Pictures button Mac OS X If you want to select another folder click Other then click Browse Windows or Choose Mac OS X and select the folder ...

Страница 76: ...Explanation BITMAP BMP Windows only A standard image file format for Windows Most Windows programs including word processing programs can read and prepare images in this format JPEG JPG A compressed file format in which the compression level can be selected The JPEG format lets you highly compress image data However the higher the compression the lower the image quality Any lost image quality data...

Страница 77: ... be saved as one PDF file When you save color or grayscale images in PDF you can select a compression level You can also edit the scanned images before saving them See Scanning to a PDF File on page 99 for details PICT PCT Macintosh only A standard image file format for Macintosh Most Macintosh programs including word processing programs can read and prepare images in this format PRINT Image Match...

Страница 78: ...s automatically saved in the file and location you chose Changing the Scan Mode To change the scan mode click the arrow in the Mode box at the top right of the EPSON Scan window Then select the mode you want to use from the list that appears Note The mode you select remains in effect when you start EPSON Scan the next time For instructions on scanning using these modes see Home or Professional Mod...

Страница 79: ...Scanning Using the Document Table 79 5 5 5 5 5 5 5 5 5 5 5 5 Selecting Basic Settings When you start EPSON Scan in Home or Professional Mode you see the main EPSON Scan window Home Mode ...

Страница 80: ...or photo you need to select these basic settings Original settings These tell EPSON Scan the type of document or photo you are scanning Destination settings These tell EPSON Scan how you plan to use your scanned image so it can select the correct default resolution scan quality for you ...

Страница 81: ... the arrow to open the Document Source list and select Document Table for scanning from the document table glass Then click the arrow in the Auto Exposure Type list and select Document or Photo 2 Do one of the following to select your destination setting s Home mode Click the button for the way you plan to use the scanned image in the Destination box Screen Web for images you will view only on a c...

Страница 82: ...Selecting the Scan Resolution on page 83 to continue scanning Image Type setting Type of image you are scanning 48 bit Color Color photo that you may want to modify in a 48 bit image editing program 24 bit Color Color photo Color Smoothing Color graphics such as a chart or graph 16 bit Grayscale Black and white photo with many shades of gray 8 bit Grayscale Black and white photo with just a few sh...

Страница 83: ...r you will enlarge them before or after you scan Follow these guidelines You will not be enlarging the images If you will scan the images at 100 size or smaller and will not enlarge them later you can accept the Resolution setting selected by EPSON Scan based on your original and destination settings You will enlarge the images as you scan them increase the Target Size setting If you will enlarge ...

Страница 84: ...diting program change the Resolution setting to 600 dpi in EPSON Scan Click the arrow next to the Resolution list and select the number of dots per inch at which you want to scan See the table below for some guidelines After selecting the Resolution you can preview your image and make any necessary adjustments See Previewing and Adjusting the Scan Area on page 85 to continue scanning What you will...

Страница 85: ...de you can preview your image and select or adjust the area of the image s you want to scan EPSON Scandisplaysthepreview image s in aseparate Previewwindow on your screen Follow these steps to preview your image s in Home or Professional Mode 1 Click the Preview button toward the bottom of the EPSON Scan window EPSON Scan prescans your image s and displays them in the Preview window ...

Страница 86: ...roportioned to that size See Selecting the Scan Size on page 94 for instructions You can then copy the marquee and place it on each image you will scan at that size To zoom in on an image click inside the scan area and click the Zoom button EPSON Scan prescans again and displays a larger preview on the Zoom tab Your other images are still previewed at the original size on the Preview tab To adjust...

Страница 87: ... that appears on the edges of your preview image to indicate the scan area You can move the marquee adjust its size and create multiple marquees on one image to scan different image areas in separate scan files Follow these steps 1 To draw a marquee move your cursor over a preview image The pointer becomes a set of cross hairs ...

Страница 88: ...utton and drag the cross hairs over the image to the opposite corner of the desired scan area Then release the mouse button You see the moving dotted line of the marquee 3 Do one of the following to adjust the marquee To move the marquee position your cursor inside the marquee The pointer becomes a hand Click and drag the marquee to the desired location ...

Страница 89: ...e to vertical or horizontal only hold down the Shift key as you move the marquee To restrict sizing of the marquee to the current proportions hold down the Shift key as you resize the marquee 4 Todraw multiplemarquees upto50 you can justdrawthem as describedinsteps 1through3 orclickthe copymarquee icon to create additional marquees of the same size You can move and resize all the marquees as descr...

Страница 90: ...e area you want to adjust In Professional Mode you also need to scroll down to the Adjustments area of the main EPSON Scan window The table below describes the settings available in Home and or Professional Mode For details on adjusting these settings click Help in the EPSON Scan window When you are finished making adjustments you can size your scanned images see Selecting the Scan Size on page 94...

Страница 91: ...lider to adjust the Contrast setting In Professional Mode click the Image Adjustment button to access the Contrast setting Saturation Professional only Adjusts the density of colors in the overall image Click the Image Adjustment button to access the Saturation setting Color Balance Professional only Adjusts the balance of red green and blue colors in the overall image Click the Image Adjustment b...

Страница 92: ...hlight shadow and gamma levels individually For advanced users only Click the Histogram Adjustment button to use the Histogram settings Tone Correction Professional only Provides a graphical interface for adjusting tone levels individually For advanced users only Click the Tone Correction button to use the Tone Correction settings Color Palette Professional only Provides a graphical interface for ...

Страница 93: ...tain settings may not be available or may be automatically selected depending on the type of image you are previewing and other settings you have selected You can customize how certain EPSON Scan settings behave by clicking the Configuration button and changing settings in the window that appears See EPSON Scan Help for details To undo any image quality adjustments you make to the preview image cl...

Страница 94: ...e Document Table Selecting the Scan Size You can scan your images at their original size or you can reduce orenlarge theirsize as you scan them You do this usingtheTarget Size setting in Home or Professional Mode Home Mode ...

Страница 95: ... Target Size setting after previewing it but before adjusting your scan area indicated by the marquee This sets the scan area to the correct proportions so your image will not be cropped unexpectedly For instructions on previewing your image s see Previewing and Adjusting the Scan Area on page 85 Then follow these steps to select the Target Size setting ...

Страница 96: ...ed line proportioned for that size appears on your preview image 2 If you need to create a scan size that is not in the Target Size list you can create a custom size Click the arrow in the list and select Customize You see the Target Size window Type a name for your custom size enter the size click the Save button then click OK Your new size appears in the Target Size list ...

Страница 97: ...Then adjust the marquee or enter new width height measurements 4 Once you have selected your scan size you can click and drag the marquee to the area in the image you want to scan For details see Adjusting the Scan Area Marquee on page 87 The marquee proportions are retained as you adjust it If you need to rotate the marquee for a landscape or portrait image click the orientation icon Not availabl...

Страница 98: ...ed your scan If you started your scan by running EPSON Scan as a standalone program you see the File Save Settings window This lets you select the name and location of your saved scan files See Selecting File Save Settings on page 75 for details If you started your scan from a scanning program such as Adobe Acrobat your scanned image s open in the program window Click Close to close the EPSON Scan...

Страница 99: ...obat 7 you may not be able to use the ADF to scan multiple pages Use the document table to scan your pages individually or scan multiple pages using EPSON Scan as described below 1 Place your original document on the scanner See one of these sections for instructions If you are scanning using the ADF load the first page of your document See Loading Documents in the Automatic Document Feeder on pag...

Страница 100: ...settinginthetoprightoftheEPSONScanwindow is not set to Professional Mode click the arrow in the box and select Professional Mode 4 If you are scanning using the ADF select ADF Single sided or ADF Double sided as the Document Source setting If you are scanning one page on the document table select Document Table ...

Страница 101: ...e guidelines Image Type setting Type of image you are scanning 48 bit Color Color photo that you may want to modify in a 48 bit image editing program 24 bit Color Color photo Color Smoothing Color graphics such as a chart or graph 16 bit Grayscale Black and white photo with many shades of gray 8 bit Grayscale Black and white photo with just a few shades of gray Black White Document with black text...

Страница 102: ... in the Preview window The ADF then ejects your first page Place your first document page on top of the rest of the pages then load the entire document up to 50 pages into the ADF 9 In the Preview window draw a marquee a line marking the scan area around the portion ofyourdocumentpage that you want to scan if necessary For instructions on creating and adjusting a marquee see one of the following s...

Страница 103: ...g Color Balance Adjusts the balance of red green and blue colors in the overall image Click the Image Adjustment button to access the Color Balance setting Auto Exposure Click the Auto Exposure button To turn it on continuously click the Configuration button click the Color tab and select Continuous auto exposure You can adjust the level of exposure adjustment using the slider Unsharp Mask Filter ...

Страница 104: ... individually For advanced users only Click the Tone Correction button to use the Tone Correction settings Color Palette Provides a graphical interface for adjusting mid tone levels such as skin tones without affecting the highlight and shadow areas of the image For advanced users only Click the Color Palette button to use the Color Palette settings Threshold Adjusts the level at which the black a...

Страница 105: ... Scanner Features 105 6 6 6 6 6 6 6 6 6 6 6 6 12 The File Save Settings window appears Select PDF as the file type setting The current Paper Size Orientation Margin and Compression setting are displayed below it ...

Страница 106: ...ttings click the Options button You see the EPSON PDF Plug in Settings window Select the settings that match your document and click OK You return to the File Save Settings window 14 Whenyouarefinishedselectingfilesettings clickOK EPSON Scan scans your pages and displays this window ...

Страница 107: ...nd click Scan When you are finished click Edit page and go to step 16 If you have finished scanning and want to save the file without editing the pages click Save File and go to step 18 16 You see the Editing Page window displaying thumbnail images of each scanned page If you want to include all the document pages in your PDF file as they currently look go to step 17 Ifyouwanttoinclude onlysomeoft...

Страница 108: ... select the pages Thenclickthe leftor rightrotateicontorotate them or the delete icon to delete them Note The delete icon is not available when all document pages are selected 17 When you have finished editing your document pages click OK Your document is saved in a PDF file in the location you selected 18 Click Close to exit EPSON Scan ...

Страница 109: ... types of documents or text are difficult for OCR software to recognize such as Items that have been copied from other copies Faxes Text with tightly spaced characters or line pitch Text that is in tables or underlined Cursive or italic fonts and font sizes less than 8 points Scanning Using an OCR Program Follow these steps to scan and convert text using an OCR program See your OCR program documen...

Страница 110: ...he Image Type Select 300 dpi as the Resolution Preview and adjust the scan area if necessary If you are scanning using the ADF see Selecting EPSON Scan Office Mode Settings on page 42 If you are scanning from the document table see Selecting EPSON Scan Office Mode Settings on page 72 Home Mode Select Magazine Newspaper or Text Line Art as the Document Type Select Black White or Color as the Image ...

Страница 111: ... scanning from the document table see Previewing and Adjusting the Scan Area on page 85 Note If the characters in your text are not recognized very well you can improve recognition by adjusting the Threshold setting If you are scanning using the ADF see Adjusting the Color and Other Image Settings on page 58 for instructions If you are scanning from the document table see Adjusting the Color and O...

Страница 112: ...omatically as you scan them Follow these steps to restore colors using EPSON Scan 1 Place your original photo on the document table See Placing Originals on the Document Table on page 28 for instructions Note Do not load photos into the ADF 2 Start EPSON Scan See one of these sections for instructions Starting a Scan With EPSON Scan on page 67 Starting a Scan With Another Scanning Program on page ...

Страница 113: ...e scan mode see Changing the Scan Mode on page 78 4 Select the basic settings for the type of original s you are scanning then select the destination setting for the way you will use your image s See Selecting Basic Settings on page 79 for instructions 5 Click the Preview button to preview your image s then select your scan area See Previewing and Adjusting the Scan Area on page 85 for instruction...

Страница 114: ...Restoration checkbox Professional Mode Scroll down to the Adjustments area and click the Color Restoration checkbox 7 Make any other necessary image adjustments See Adjusting the Color and Other Image Settings on page 90 for instructions 8 Size your image as necessary See Selecting the Scan Size on page 94 for instructions ...

Страница 115: ... you press it the first time You can assign the a Start button to any Windows program that supports scanner events such as Adobe Acrobat If you have a compatible program it will appear in the selection window If you want to assign a different program to the a Start button follow the steps below The steps you use depend on the version of Windows you have Assigning a Program With Windows XP 1 Click ...

Страница 116: ...n 6 In the Start this program list choose the program you want to assign Only compatible programs appear in the list Note If you want to be given a choice of programs whenever you press the a Start button click the Prompt for which program to run button instead If you want to disable the button from opening a program click the Take no action button instead 7 Click Apply then click OK ...

Страница 117: ...Windows 98SE Me or 2000 1 Click Start Settings Control Panel 2 Double click the Scanners and Cameras icon 3 Do one of the following Windows Me Right click your scanner icon and click Properties Windows 98SE and 2000 Select your scanner icon and click Properties You see this window ...

Страница 118: ...ign Only compatible programs appear in the list Note If you want to be given a choice of programs whenever you press the a Start button select more than one program in the list If you want to disable the button from opening a program click the Disable device events button instead 7 Click Apply then click OK Note With Windows 2000 restart your computer before using the newly assigned a Start button...

Страница 119: ...any other optional card in your scanner or you may damage your scanner To use the Network Image Express Card disconnect the USB cable from the scanner otherwise the scanner may not work properly Do not connect the USB cable while an Ethernet cable is already connected to the RJ 45 connector on the Network Image Express Card 1 Turn off the scanner cCaution Do not install or uninstall the Network Im...

Страница 120: ... the two screws securing the shield plate using a Phillips head screwdriver then remove the shield plate Be sure to keep the screws in case you re install the shield plate later 4 Insert the Network Image Express Card in your scanner s optional interface slot ...

Страница 121: ...r s power cord into an electrical outlet 7 To initialize the Network Image Express Card turn on the scanner while holding down the Reset button on the card for 10 seconds The red status light and green data light come on Note Be sure to initialize the Network Image Express Card whenever you install or re install it in the scanner 8 Turn off the scanner ...

Страница 122: ...work hub cCaution You must use a Category 5 shielded twisted pair cable to connect the Network Image Express Card to prevent a malfunction DonotconnecttheNetworkImageExpressCarddirectly to a computer connect it only to a network hub Do not connect or disconnect the network cable when the scanner is turned on Do not connect the USB cable while an Ethernet cable is already connected to the RJ 45 con...

Страница 123: ...uters for Network Scanning To allow networking you must install a Network Interface Card and a Network Interface Card NIC driver on each client computer in the network See the documentation that came with the card for instructions Then follow the instructions in this section to set up the TCP IP protocol on the client computers Installing the TCP IP Protocol Windows XP or 2000 Note The screen shot...

Страница 124: ...124 Using the Optional Network Image Express Card 1 Windows XP Click Start right click My Network Places and select Properties Windows 2000 Right click the My Network Places icon and select Properties ...

Страница 125: ...Using the Optional Network Image Express Card 125 7 7 7 7 7 7 7 7 7 7 7 7 2 Double click Local Area Connection 3 Click Properties ...

Страница 126: ...et Protocol TCP IP box is checked in the Local Area Connection Properties window If Internet Protocol TCP IP does not appear in the list go to step 5 If it does appear go to Scanning Over a Network on page 130 5 Click Install The Select Network Component Type window appears ...

Страница 127: ... Card 127 7 7 7 7 7 7 7 7 7 7 7 7 6 Select Protocol from the list and click Add 7 Select Internet Protocol TCP IP and click OK 8 Make sure the Internet Protocol TCP IP box is checked and click OK Then go to Scanning Over a Network on page 130 ...

Страница 128: ...Using the Optional Network Image Express Card Windows 98SE or Me 1 Click Start point to Settings and select Control Panel 2 Double click the Network icon 3 Click the Configuration tab in the Network window ...

Страница 129: ...7 7 7 4 Make sure TCP IP is included in the network components list If TCP IP appears in the list go to Scanning Over a Network on page 130 otherwise go to step 5 5 Click Add The Select Network Component Type window appears 6 Select Protocol from the list and click Add ...

Страница 130: ... EPSON Scan Settings Make sure your Epson scanner and Network Image Express Card are turned on and working properly Then follow the steps below to use the EPSON Scan Settings program to enable network scanning Note With Windows 2000 and XP you need to log on with administrator privileges to install the software With Windows 2000 XP and Mac OS X you need to log on using administrator privileges to ...

Страница 131: ...while using your scanner 1 Obtain the IP address or host name of the Network Image Express Card from your network administrator 2 Start EPSON Scan Settings Windows Click Start All Programs Windows XP or Programs Windows Me 98SE and 2000 EPSON Scan EPSON Scan Settings Mac OS X Click the EPSON Scan Settings icon in the Utility folder ...

Страница 132: ...132 Using the Optional Network Image Express Card 3 Select EPSON GT 2500 from the Select Scanner drop down list 4 Click the Network radio button then click the Add button ...

Страница 133: ...age Express Card 133 7 7 7 7 7 7 7 7 7 7 7 7 5 In the Add window choose the Network Image Express Card s IP address under Search for addresses or click the Enter address radio button and type in the address Then click the OK button ...

Страница 134: ...rk Image Express Card 6 In the EPSON Scan Settings window click the Test button to check the connection If everything works properly you see a successful connection message in the Scanner Status box 7 Click OK to save the settings ...

Страница 135: ... and the client computer 2 On the client computer double click the EPSON Scan icon on the desktop Windows or open it from the Applications folder Mac OS X 3 Select your desired mode and scanning settings then do one of the following to start your scan Click the Scan button on the EPSON Scan window Press the a Start button on the scanner Note In a network environment the a Start button on the scann...

Страница 136: ...from the scanner 3 Clean the outer case with a cloth dampened with mild detergent and water 4 If the glass surface of the document table gets dirty clean it with a soft dry cloth If the glass surface is stained with grease or some other hard to remove material use a small amount of glass cleaner and a soft cloth to remove it Wipe off all remaining liquid Make sure that no dust builds up on the sur...

Страница 137: ... 137 8 8 8 8 8 8 8 8 8 8 8 8 5 If the underside of the ADF gets dirty clean it as described in step 4 Also be sure to clean the left side of the document table a underside of ADF b left side of document table a b ...

Страница 138: ...to spill liquid into the scanner mechanism or electronic components This could permanently damage the mechanism and circuitry Do not spray lubricants inside the scanner Never open the scanner case Replacing the Scanner Lamp N e w F o r a s i n g l e s c a n n e r The luminosity of the scanner lamp declines over time If the lamp breaks or becomes too dim to operate normally the scanner stops workin...

Страница 139: ... to prevent damage 1 Plug in the scanner connect it to your computer turn on the scanner using its power button and wait until the lights stop flashing 2 When the Ready light is green turn off the scanner using its power button 3 On the side of the scanner slide the transportation lock to the locked position to secure the scanner carriage 4 Attach the protective materials then repack the scanner i...

Страница 140: ...nected to your computer properly or your software is not fully installed See the Start Here sheet that came with your scanner for instructions on installing the scanner software and connecting the scanner to your computer The scanner transportation lock is locked Slide the lock to the unlock position See the Start Here sheet that came with your scanner for instructions After trying these solutions...

Страница 141: ...rt on page 169 for details Scanner Problems See your Start Here sheet for instructions on setting up your scanner If you have problems operating the scanner make sure The scanner is turned on by pressing its power button The power cord is securely plugged into an electrical outlet The power outlet works If necessary test it by plugging in another electrical device and turning it on If you still ha...

Страница 142: ... Connect the scanner directly to the computer s USB port or through one hub only The scanner may not work properly when your computer is in standby mode Windows or sleep mode Mac OS X Restart EPSON Scan and try scanning again The scanner may not work properly if you upgrade your operating system but do not reinstall EPSON Scan See Uninstalling Your Scanning Software on page 164 for instructions on...

Страница 143: ...rimped Your system may not work properly if you use a USB cable other than the one that came with your scanner so try using that cable The scanner may not work properly when connected to the computer through more than one USB hub Connect the scanner directly to the computer s USB port or through one hub only Check to see if your computer system meets the requirements for the scanner interface you ...

Страница 144: ...he following Windows XP or 2000 Click the Hardware tab then click the Device Manager button Windows Me or 98SE Click the Device Manager tab 3 Scroll down and click Universal Serial Bus controllers If a USB Universal Host Controller and USB Root Hub are listed Windows supports USB 4 Try scanning again If your scanner still is not recognized contact your dealer or a qualified servicer for assistance...

Страница 145: ...ist box and Start this program is selected For Windows Me 98SE and 2000 users Click the Events tab in your scanner s Properties window and make sure the Disable device events check box is clear Also make sure the desired button is selected in the Scanner events list box and the desired application in the Send to this application list is selected In Mac OS X make sure you did not install the scanne...

Страница 146: ...Feeder on page 24 for solutions Scanning Software Problems Note Some EPSON Scan settings may be unavailable or grayed out based on your scanner s capabilities the currently selected settings or the currently installed optional accessories If you see a message on your screen telling you that your scanner can work faster with a USB 2 0 connection close the message box You can still use your scanner ...

Страница 147: ... Software on page 164 for instructions on uninstalling and reinstalling it Make sure that EPSON Scan is selected in your scanning program If you are scanning with the ADF see Starting a Scan With Another Scanning Program on page 39 If you are scanning from the document table see Starting a Scan With Another Scanning Program on page 69 for instructions In the Windows Device Manager make sure your s...

Страница 148: ...r s icon and reinstall EPSON Scan by following the instructions in your Start Here sheet Windows 98SE and 2000 Double click the Scanners and Cameras icon in Control Panel Delete your scanner from the list of installed devices and reinstall EPSON Scan following the instructions in your Start Here sheet The scanner may not work properly when your computer is in standby mode Windows or sleep mode Mac...

Страница 149: ...SB 2 0 port with your scanner make sure it meets the system requirements See System Requirements on page 170 for details Try scanning your original at a lower Resolution setting to speed up scanning If you are scanning with the ADF see Selecting the Scan Resolution on page 51 If you are scanning from the document table Selecting the Scan Resolution on page 83 for instructions ...

Страница 150: ... 0 1 inch You See Only a Few Dots in Your Scanned Image Make sure the document is placed on the scanner s document table with the side to be scanned facing down See Placing Originals on the Document Table on page 28 for details When scanning with the Black White setting in Home or Professional Mode change the Threshold setting See Adjusting the Color and Other Image Settings on page 90 for instruc...

Страница 151: ...Note Do not press down on the document table with any force You may need to clean the underside of the ADF as described in Cleaning the Scanner on page 136 If you still have the problem contact your dealer Straight Lines in Your Image Come Out Crooked Make sure the document lies perfectly straight on the document table Align the vertical and horizontal lines with the scales at the top and side of ...

Страница 152: ...e sure you do not move the document or scanner while scanning Make sure the scanner is placed on a flat stable surface Select Unsharp Mask Filter in EPSON Scan s Office or Professional Mode window If you are scanning with the ADF see Adjusting the Color and Other Image Settings on page 58 for instructions If you are scanning from the document table see Adjusting the Color and Other Image Settings ...

Страница 153: ...see Adjusting the Color and Other Image Settings on page 90 for instructions Try selecting the following settings in the Configuration window Color Control Continuous auto exposure and Recommended Value on the Color tab See EPSON Scan Help for details Increase the Resolution setting If you are scanning with the ADF see Selecting the Scan Resolution on page 51 for instructions If you are scanning f...

Страница 154: ...nt is very thick or warped at the edges cover the edges with paper to block external light as you scan Your Scanned Image is Too Dark Change the Display Gamma setting to match your output device such as a monitor or printer in the EPSON Scan Configuration window See EPSON Scan Help for details ...

Страница 155: ...ings in the Configuration window Color Control Continuous auto exposure and Recommended Value on the Color tab See EPSON Scan Help for details Check the Brightness setting in EPSON Scan If you are scanning with the ADF see Adjusting the Color and Other Image Settings on page 58 for instructions If you are scanning from the document table see Adjusting the Color and Other Image Settings on page 90 ...

Страница 156: ... Type settings are correct for your original If you are scanning with the ADF see Selecting Basic Settings on page 49 for details If you are scanning from the document table see Selecting Basic Settings on page 79 for details Ripple Patterns Appear in Your Scanned Image A ripple pattern called moiré may appear in a scanned image of a printed document It is caused by interference from the differing...

Страница 157: ...he Color and Other Image Settings on page 58 for instructions If you are scanning from the document table see Adjusting the Color and Other Image Settings on page 90 for instructions Select a lower Resolution setting If you are scanning with the ADF see Selecting the Scan Resolution on page 51 for instructions If you are scanning from the document table see Selecting the Scan Resolution on page 83...

Страница 158: ... Scanned Documents into Editable Text on page 109 for instructions Check your OCR software manual to see if there are any settings you can adjust in your OCR software Scanned Colors Differ from the Original Colors Change the Image Type setting in EPSON Scan Select different combinations of this setting and the others mentioned below If you are scanning with the ADF see Selecting Basic Settings on ...

Страница 159: ...ng See EPSON Scan Help for details Check the color matching and color management capabilities of your computer display adapter and software Some computers can change the palette of colors on your screen See your software and hardware manuals for details Use the color management system for your computer ICM for Windows or ColorSync for Mac OS X With Windows add a color profile that matches your mon...

Страница 160: ...r instructions If the ADF is open close it and try scanning again If you are scanning from Adobe Acrobat 7 you may not be able to use the ADF to scan multiple pages Use the document table to scan your pages individually or scan multiple pages using EPSON Scan as described on page 99 Paper Jams in the Automatic Document Feeder If paper jams inside the ADF open the ADF and remove any paper from the ...

Страница 161: ... 9 9 9 9 9 9 3 Open the top cover of the ADF 4 Flip open the paper guide and remove the jammed paper Do not pull the paper too hard or it may tear making it more difficult to remove If you cannot remove the paper easily go to step 5 ...

Страница 162: ...feeder rotate the ejecting roller as shown below to release the paper then gently remove it If more of the paper extends into the output tray gently pull the paper out in the direction shown If necessary rotate the ejecting roller as shown below to release the paper ...

Страница 163: ...Troubleshooting 163 9 9 9 9 9 9 9 9 9 9 9 9 6 After you have removed the paper close the top cover of the ADF ...

Страница 164: ...install your scanner software to solve certain problems or if you upgrade your operating system Uninstalling EPSON Scan Follow the instructions in the section for your operating system to uninstall EPSON Scan Windows Note The illustrations in this section show Windows XP screens They may be different from the screens for your operating system To uninstall programs in Windows XP or 2000 you need to...

Страница 165: ...d Remove Programs icon Windows Me 98SE or 2000 4 Click EPSON Scan in the list of currently installed programs and click Change Remove Windows XP or 2000 or Add Remove Windows Me or 98SE 5 When the confirmation window appears click Yes 6 Follow the on screen instructions to uninstall EPSON Scan In some cases a message may appear to prompt you to restart the computer If so make sure Yes I want to re...

Страница 166: ...e EPSON Scan folder 4 Double click the EPSON Scan Installer icon Note If the Authorization window opens click the key icon enter the administrator s name and password click OK and click Continue 5 When you see the license agreement click Accept The Installer window appears 6 Select Uninstall from the pull down menu at the top and click the Uninstall button ...

Страница 167: ...button 2 Disconnect the scanner s USB cable from your computer 3 Open the Windows Control Panel and double click the Add or Remove Programs icon Windows XP or the Add Remove Programs icon Windows Me 98SE or 2000 4 Click GT2500 User s Guide in the list of currently installed programs and click Change Remove Windows XP or 2000 or Add Remove Windows Me or 98SE 5 When the confirmation window appears c...

Страница 168: ...your local EPSON web site for the latest drivers FAQs manuals and other downloadables Epson s Technical Support Web Site provides help with problems that cannot be solved using the troubleshooting information in your product documentation If you have a Web browser and can connect to the Internet access the site at http support epson net ...

Страница 169: ... Warranty Document for information on how to contact EPSON Customer support They will be able to help you much more quickly if you give them the following information Product serial number The serial number label is usually on the back of the product Product model Product software version Click About Version Info or similar button in the product software Brand and model of your computer Your compu...

Страница 170: ...ard compatible with USB 1 1 System Microsoft Windows XP Home Edition or Professional or 2000 Professional Operating systems upgraded from Windows Me 98SE or 95 are not supported by the software USB 2 0 Host Driver by Microsoft must be used Interface USB port Type A built into the main board Display SVGA or higher resolution monitor 800 600 16 bit High Color screen resolution or higher Color and to...

Страница 171: ...t High Color screen resolution or higher Color and tone reproduction are subject to the display capability of your computer system including the video card display monitor and software See your system documentation for details System PowerPC based Macintosh computers running Mac OS X 10 2 7 or later Fast User Switching on Mac OS X 10 3 is not supported Intel based Macintosh computers with Rosetta ...

Страница 172: ...stem UFS for Mac OS X You must install EPSON Scan on a disk or in a partition that does not use UFS System Mac OS X 10 2 or later Fast User Switching on Mac OS X 10 3 is not supported Interface Macintosh USB Display Color monitor with 800 600 screen resolution or higher and 32 000 or more colors Color and tone reproduction are subject to the display capability of your computer system including the...

Страница 173: ... paper capacity 50 sheets of 75 g m2 paper Maximum total thickness under 5 mm 0 2 inches Paper types Bond paper fine quality paper check paper and recycled paper Scanning resolution 1200 dpi main scan 1200 dpi with Micro Step sub scan Output resolution 50 to 4800 dpi in 1 dpi increments 7200 dpi and 9600 dpi Scanning speed 300 dpi B W 0 4 msec per line 300 dpi Color 1 2 msec per line Image data 16...

Страница 174: ...hes Depth 395 mm 15 6 inches Height 200 mm 7 9 inches Weight Approximately 10 kg 22 lb Input voltage DC 24 to 26 4 V Rated voltage DC 24 V Rated current 1 4 A Power consumption 43 W operating 15 W stand by mode 5 W sleep mode 100 120 V model A371B 220 240 V model A311E Rated input voltage AC 100 to 120 V AC 220 to 240 V Rated input current 0 8 A 0 4 A Rated frequency 50 to 60 Hz Rated output volta...

Страница 175: ...ut condensation Operating conditions Ordinary office or home conditions Avoid operating the scanner in direct sunlight near a strong light source or in extremely dusty conditions Interface type Universal Serial Bus Specification Revision 2 0 Electrical standard Full Speed mode 12 Mbits per second and Hi Speed mode 480 Mbits per second of Universal Serial Bus Specification Revision 2 0 Connector ty...

Страница 176: ...del EMC FCC Part 15 Subpart B Class B CAN CSA CEI IEC CISPR 22 Class B EMC Directive 89 336 EEC EN 55022 Class B EN 55024 EMC AS NZS CISPR22 Class B Safety UL 60950 1 CAN CSA C22 2 No 60950 1 EMC FCC Part 15 Subpart B Class B CAN CSA CEI IEC CISPR22 Class B Low Voltage Directive 73 23 EEC EMC Directive 89 336 EEC EN 60950 1 EMC EN55022 Class B EN61000 3 2 EN61000 3 3 EN55024 ...

Страница 177: ...Technical Specifications 177 B B B B B B B B B B B B Australian model Safety AS NZS 60950 1 EMC AS NZS CISPR22 Class B ...

Страница 178: ...programs to 115 function 23 location 19 scanning with 66 scanning with ADF 34 C Cleaning the scanner 136 Color Restoration 112 Contacting EPSON 169 Contacting Epson 169 Converting scan to editable text 109 Customer support 169 D DC inlet 21 Descreening Filter 156 Distorted image 152 Documents or photos large 32 loading into ADF 24 placing on scanner 28 restoring color in 112 scanning 66 scanning A...

Страница 179: ...65 image settings 90 image settings ADF 58 marquee 87 marquee ADF 55 modes overview 71 modes overview ADF 41 overview 17 previewing 73 85 previewing ADF 43 52 problems 146 resolution 73 83 resolution ADF 43 51 scan area 85 scan area ADF 52 scanning with 67 scanning with ADF 36 scan size 73 94 scan size ADF 42 61 selecting settings 75 selecting settings ADF 45 uninstalling 164 Errors scanner 140 F ...

Страница 180: ...eviewing 85 resolution 83 scan area 85 scan size 94 L Lamp replacing 138 Large documents 32 Lights scanner error indications 140 status 22 Lock scanner 19 139 M Maintaining scanner 136 Mode changing 78 Mode changing ADF 48 N Network Image Express Card client computer setup 123 connecting scanner to 122 installing 119 problems using 164 scanning over network 130 TCP IP protocol 123 ...

Страница 181: ...s 71 EPSON Scan modes ADF 41 scanner features 13 scanner software 16 P Paper jam Automatic Document Feeder 160 Parts scanner 19 PDF file scanning to 99 Photos or documents faded 112 large 32 loading into ADF 24 placing on scanner 28 restoring color in 112 scanning 66 scanning ADF 34 scanning to PDF 99 thick 32 Power cord connector 21 Previewing 73 85 Previewing ADF 43 52 Problems solving 140 autom...

Страница 182: ...ee adjusting ADF 55 previewing 85 previewing ADF 52 resolution 83 resolution ADF 51 scan area 85 scan area ADF 52 scan size 94 scan size ADF 61 R Resolution selecting 73 83 selecting ADF 43 51 Restoring color 112 Ripple pattern 156 S Scanner cleaning 136 connecting to Network Image Express Card 122 features 13 lights 22 loading documents in ADF 24 lock 19 maintaining 136 parts 19 placing documents...

Страница 183: ...canning with another program ADF 39 system requirements 170 uninstalling 164 Scan quality problems 150 Service 169 Settings selecting EPSON Scan 75 selecting EPSON Scan ADF 45 Specifications AC adapter 173 documents in Automatic Document Feeder 27 scanner 173 technical 170 Start button assigning program to 115 function 23 location 19 scanning with 66 scanning with ADF 34 System requirements 170 T ...

Страница 184: ...dex Thick documents 32 Transportation lock 19 139 Transporting the scanner 139 Troubleshooting 140 U Uninstalling software 164 USB connector location 21 problems 141 specifications 175 system requirements 170 ...

Отзывы: