Epson Stylus SX230 series / SX235W series / SX430W series / SX440W series
Revision B
Disassembly/Reassembly
Detailed Disassembly/Reassembly Procedure for each Part/Unit
34
Confidential
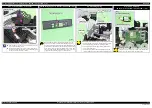
Panel Buttons (SX230 series/SX430W series)
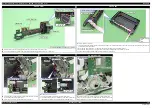
When attaching the Select Button to the Panel Housing Upper
Assy, attach the Select Button with its side without any rib
downward.
Select Button (back)
Rib
No rib here.
Start button
Stop Button
Select Button
OK Button
Power Button
Home Button
The side without any rib must be the side of
down arrow.
Panel Housing Upper Assy
Panel Board w/Touch Panel (SX440W series)
When installing the Panel Board Unit to the Panel Housing Upper
Assy, insert the Panel Board Unit under the ribs (x3) of the Panel
Housing Upper Assy, and then align the dowels (x2) of the Panel
Housing Upper Assy with the positioning holes of the Panel Board
Unit.
Panel Housing Upper Assy
Rib
Positioning hole
Dowel
Panel Board Unit
Dowel and positioning hole
Dowel and positioning hole
Main Board
Do not damage or contaminate the MAC Address Label.
Install the Main Board with the PE Sensor Lever to the rear.
After installing the Main Board, make sure the lever part of the
PE Sensor Lever is aligned with the slit of the PE Sensor.
Attach the MAC Address Label to the Shield Plate on the
position shown above.
MAC Address Label
Shield Plate
Position of MAC Address Label
PE Sensor Lever
Main Board
PE Sensor
Paper Guide Front Unit
When installing the Paper Guide Front Unit, align the
positioning holes (x2) of the Paper Guide Front Unit with the
dowels (x2) of the Frame Base.
Tighten the screws in the order indicated in the figure above.
Dowel and positioning hole
C.B.P-TITE SCREW 3x10 F/ZN-3C (6 ± 1 kgf·cm)
Paper Guide Front
1
2
LD Roller Assy (1)
Install the LD Roller Assy with the following condition in order to avoid the Change Lever and Paper Back Lever.
Using a screw driver or the like, hold the Paper Back Lever to the rear as shown above not to let it touch the LD Roller Assy.
Push the Change Lever to the front to keep it in the hole of the Main Frame.
LD Roller Assy
Paper Back Lever
Change Lever
Cam
Main Frame
Rear of printer
LD Roller Assy (2)
If each part shown above comes off when removing the LD Roller
Assy, attach them back in place as shown in the figure above.
LD Roller
LD Roller Shaft
Extension Spring
Clutch
Spur gear
EJ Roller Gear
The rib on the contact point of the EJ Roller Gear with the EJ
Roller is deformed when removing the EJ Roller Gear. Therefore,
make sure to replace it with a new one when removing it in order to
maintain the paper feed accuracy.
EJ Roller Gear
Can not be reused because the rib
of the EJ Roller Gear is deformed
once removed from the EJ Roller.
Содержание Epson Stylus NX330
Страница 9: ...Confidential CHAPTER 1 TROUBLESHOOTING ...
Страница 19: ...Confidential CHAPTER 2 DISASSEMBLY REASSEMBLY ...
Страница 41: ...Confidential CHAPTER 3 ADJUSTMENT ...
Страница 52: ...Confidential CHAPTER 4 MAINTENANCE ...
Страница 58: ...Confidential CHAPTER 5 REFURBISHMENT ...
Страница 60: ...Confidential CHAPTER 6 APPENDIX ...


