background image

5 Installing the Projector

Make sure to follow the steps below to install the wall mount. If you ignore these steps, the wall mount could 
fall and cause personal injury or property damage.

1.

Install the wall plate

1.

Determine where you want to install the wall plate, and then mark that position on the wall.

2.

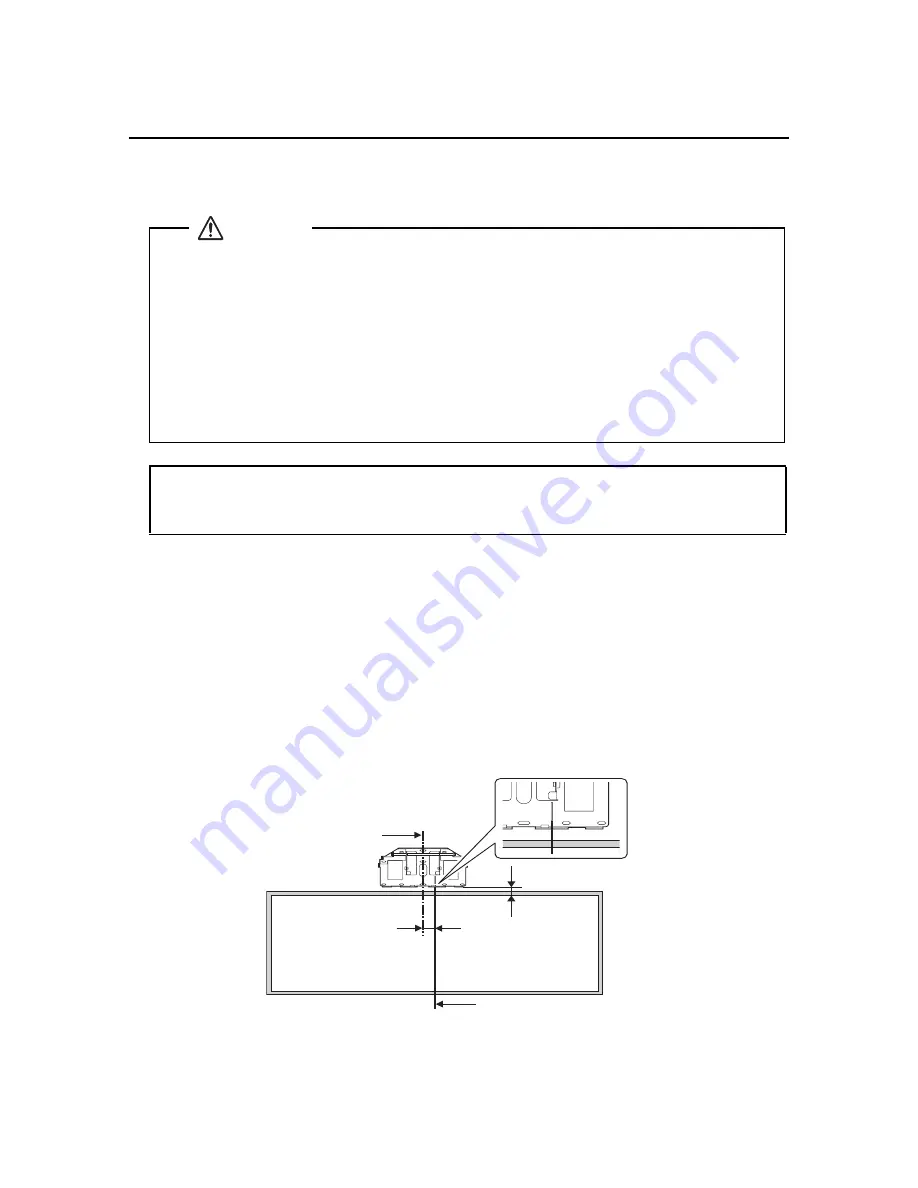
Align the marked line on the wall plate with the vertical center of the whiteboard, as shown in the 
illustration below. The line is 3.1 inches (8 cm) to the right of the vertical center of the wall plate. 
Allow at least a 2 inch (5 cm) gap (PowerLite 525W/535W and BrightLink 536Wi) or a 5.5 inch 
(14 cm) gap (PowerLite 520/530) between the top of the whiteboard and the bottom of the wall 
plate. However, if you are using the maximum (tele) screen size, refer to the tables on the previous 
pages.

After installing, you can slide the projector horizontally 1.8 inches (4.5 cm) by using the slider on 
the adjustment unit. See “Turn on the projector and check the image” on page 28 for more details.

q

At the point where the wall mount is installed, make sure there is a gap of 16 to 26 
inches (410 to 660 mm) from the top of the image projected onto the white board to 
the ceiling. See “Positioning the Projector” on page 12 for more details.

When you mount the projector on the wall with the wall mount, the wall requires enough 
strength to hold the projector, the wall mount, and the cables. This wall mount should be 
installed on a concrete wall. Confirm the weight of the projector, the wall mount, and the 
cables before installation, and maintain the strength of the wall. If the wall is not strong 
enough, reinforce the wall before installation.

Install the wall mount so that it can sufficiently support the weight of the projector and 
wall mount, and resist any horizontal vibration. Use M8 nuts and bolts. Nuts and bolts 
smaller than M8 could cause the wall mount to fall.

Epson accepts no responsibility for any damage or injury caused by lack of wall strength or 
inadequate installation.

Warning

Center of the whiteboard

Center of the wall plate

3.1 in. (8 cm)

2.0 in. (5 cm)

Содержание ELPMB45

Страница 1: ...ELPMB45 Installation Guide ...

Страница 2: ...at if ignored could possibly result in personal injury or even death due to incorrect handling This symbol indicates information that if ignored could possibly result in personal injury or physical damage due to incorrect handling This symbol indicates related or useful information This symbol indicates helpful tips Symbol indicating an action that must not be done Symbol indicating an action that...

Страница 3: ...ete wall Confirm the weight of the projector and the wall mount before installation and maintain the strength of the wall If the wall is not strong enough reinforce the wall before installation If you need to loosen any screw while installing be careful not to drop the projector or the mount If the wall mount or projector falls it could cause personal injury or property damage Inspect the wall mou...

Страница 4: ...ent lights or air conditioners Some kinds of fluorescent lights could interfere with the remote control of the projector Install the projector away from direct sunlight and other bright light sources It is recommended to keep VGA computer cable length less than 66 feet 20 meters to reduce external noise Do not install the wall mount in a location where the operating temperature for your projector ...

Страница 5: ...te to the wall Gather the tools and parts you need before you begin installation Shape Name Quantity M4 12 mm hexagon socket head cap bolt with washer 1 M4 12 mm hexagon socket head cap bolt without washer 6 M4 12 mm hexagon socket head cap bolt with washer spring washer 5 M8 16 mm hexagon socket head cap bolt without washer 7 Hexagonal wrenches Wall plate cover Adjustment Wall plate Projector att...

Страница 6: ...t range 7 to 17 arm length minimum 17 to 7 arm length maximum Horizontal rotation adjustment range 0 to 5 Horizontal roll adjustment range 0 to 5 Horizontal slide adjustment range 0 to 1 8 inches 45 mm Vertical tilt adjustment Horizontal rotation adjustment Horizontal roll adjustment Horizontal slide adjustment Vertical angle adjustment 18 in 457 mm 8 0 in 203 mm 4 2 in 107 mm 3 0 in 75 mm 0 6 in ...

Страница 7: ...kers LAN device Microphone USB cable for computer video and audio output or interactive features Document camera Epson DC 06 Computer Computer VGA or HDMI cable for computer video output Connection example Dedicated USB cable supplied with document camera Audio cable not included LAN cable not included For the best performance connect your computer to the projector using a VGA or HDMI cable For In...

Страница 8: ...re is available on the Epson Projector Software CD that came with the projector or at epson com support U S or epson ca support Canada If your network includes a wireless router users can connect to the projector on the network wirelessly from computers using EasyMP Network Projection software Users can also connect wirelessly from an iPad iPhone or iPod touch using the optional Epson iProjection ...

Страница 9: ...er is on and the VGA HDMI connection can be used when the teacher or another user wants to work with the document camera without turning on the computer Using a Switch Box You can use a switch box or control box to connect various video inputs to the projector However the primary computer should always be connected directly to the projector with a USB cable for interactivity and another cable for ...

Страница 10: ...hance the sound from your presentation you can connect the projector to amplified or self powered external speakers The volume can be controlled using the projector s remote control If you want to output audio from the external speakers or use the microphone when the projector is turned off you need to adjust the Standby Setup settings in the projector s Extended menu In Standby mode you can outpu...

Страница 11: ... may appear on the sides of the board Refer to the tables on the following pages and install the mount and projector to project images at the appropriate size The values are only a guide The recommended projection distance is 27 6 to 46 9 inches 70 to 119 cm The values in the measurement tables are based on a 2 4 inch 6 cm thick whiteboard Make sure your whiteboard is no more than 2 4 inch 6 cm th...

Страница 12: ...2 in 5 cm 17 7 in 45 cm 4 7 in 12 cm 28 7 in 73 cm 3 9 in 10 cm 19 3 in 49 cm 6 3 in 16 cm 70 in 28 4 in 72 cm 2 in 5 cm 17 3 in 44 cm 4 3 in 11 cm 32 3 in 82 cm 2 in 5 cm 17 7 in 45 cm 5 1 in 13 cm 29 1 in 74 cm 3 9 in 10 cm 19 3 in 49 cm 6 3 in 16 cm 71 in 29 in 73 cm 2 in 5 cm 17 3 in 44 cm 4 3 in 11 cm 32 7 in 83 cm 2 in 5 cm 18 1 in 46 cm 5 1 in 13 cm 29 5 in 75 cm 3 9 in 10 cm 19 7 in 50 cm ...

Страница 13: ...m 8 3 in 21 cm 90 in 37 in 94 cm 2 4 in 6 cm 18 5 in 47 cm 5 5 in 14 cm 42 1 in 107 cm 2 8 in 7 cm 19 3 in 49 cm 6 3 in 16 cm 38 2 in 97 cm 4 7 in 12 cm 21 3 in 54 cm 8 3 in 21 cm 91 in 37 4 in 95 cm 2 4 in 6 cm 18 9 in 48 cm 5 5 in 14 cm 42 5 in 108 cm 2 8 in 7 cm 19 7 in 50 cm 6 3 in 16 cm 38 6 in 98 cm 4 7 in 12 cm 21 3 in 54 cm 8 3 in 21 cm 92 in 37 8 in 96 cm 2 4 in 6 cm 18 9 in 48 cm 5 9 in ...

Страница 14: ...14 cm 22 4 in 57 cm 9 4 in 24 cm 106 in 43 7 in 111 cm 2 8 in 7 cm 19 7 in 50 cm 6 7 in 17 cm 44 9 in 114 cm 5 5 in 14 cm 22 8 in 58 cm 9 8 in 25 cm 107 in 44 1 in 112 cm 2 8 in 7 cm 19 7 in 50 cm 6 7 in 17 cm 45 3 in 115 cm 5 5 in 14 cm 22 8 in 58 cm 9 8 in 25 cm 108 in 44 5 in 113 cm 2 8 in 7 cm 20 1 in 51 cm 6 7 in 17 cm 45 7 in 116 cm 5 5 in 14 cm 22 8 in 58 cm 9 8 in 25 cm 109 in 44 9 in 114 ...

Страница 15: ...ce range A Vertical adjustment range B Distance from top of projected image to ceiling range C 16 10 WXGA 50 84 in 27 6 46 9 in 70 119 cm 0 6 7 in 0 17 cm 20 1 26 in 51 66 cm 4 3 XGA 44 74 in 27 2 46 9 in 69 119 cm 0 6 7 in 0 17 cm 20 1 26 in 51 66 cm 16 9 Widescreen 48 82 in 27 2 46 9 in 69 119 cm 2 9 1 in 5 23 cm 17 7 23 6 in 45 60 cm Center of the whiteboard Center of the wall plate 3 1 in 8 cm...

Страница 16: ... 73 cm 0 8 in 2 cm 16 5 in 42 cm 3 5 in 9 cm 31 5 in 80 cm 6 7 in 17 cm 22 1 in 56 cm 9 1 in 23 cm 67 in 31 1 in 79 cm 5 1 in 13 cm 20 1 in 51 cm 7 1 in 18 cm 29 1 in 74 cm 0 8 in 2 cm 16 5 in 42 cm 3 5 in 9 cm 31 9 in 81 cm 6 7 in 17 cm 22 4 in 57 cm 9 1 in 23 cm 68 in 31 5 in 80 cm 5 1 in 13 cm 20 5 in 52 cm 7 1 in 18 cm 29 5 in 75 cm 0 8 in 2 cm 16 5 in 42 cm 3 5 in 9 cm 32 3 in 82 cm 6 7 in 17...

Страница 17: ...11 8 in 30 cm 88 in 41 3 in 105 cm 6 3 in 16 cm 22 4 in 57 cm 9 4 in 24 cm 38 6 in 98 cm 0 8 in 2 cm 17 7 in 45 cm 4 3 in 11 cm 42 5 in 108 cm 8 7 in 22 cm 23 6 in 60 cm 12 2 in 31 cm 89 in 41 7 in 106 cm 6 3 in 16 cm 22 4 in 57 cm 9 4 in 24 cm 39 4 in 100 cm 0 8 in 2 cm 17 7 in 45 cm 4 3 in 11 cm 42 9 in 109 cm 8 7 in 22 cm 23 6 in 60 cm 12 2 in 31 cm 90 in 42 1 in 107 cm 6 3 in 16 cm 22 8 in 58 ...

Страница 18: ...2 cm 18 5 in 47 cm 5 1 in 13 cm 101 in 44 9 in 114 cm 0 8 in 2 cm 18 5 in 47 cm 5 1 in 13 cm 102 in 45 3 in 115 cm 0 8 in 2 cm 18 5 in 47 cm 5 1 in 13 cm 103 in 45 7 in 116 cm 0 8 in 2 cm 18 5 in 47 cm 5 1 in 13 cm 104 in 46 1 in 117 cm 0 8 in 2 cm 18 5 in 47 cm 5 1 in 13 cm 105 in 46 5 in 118 cm 0 8 in 2 cm 18 5 in 47 cm 5 5 in 14 cm 106 in 46 9 in 119 cm 0 8 in 2 cm 18 9 in 48 cm 5 5 in 14 cm Sc...

Страница 19: ...size range Projection distance range A Vertical adjustment range B Distance from top of projected image to ceiling range C 16 10 WXGA 44 74 in 27 6 46 9 in 70 119 cm 0 7 1 in 0 18 cm 19 7 25 6 in 50 65 cm 4 3 XGA 46 78 in 27 2 46 5 in 69 118 cm 2 8 7 in 5 22 cm 17 7 23 6 in 45 60 cm 16 9 Widescreen 43 72 in 27 6 46 9 in 70 119 cm 2 9 1 in 5 23 cm 17 7 23 6 in 45 60 cm Center of the whiteboard Cent...

Страница 20: ... ENO 2650 77 inches Hitachi Cambridge Board 77 Hitachi StarBoard FX DUO 77 SMART Board 680 SMART BoardX880 INTERWRITE BOARD 1077 TeamBoard RT TMWM6250CL EM INTERWRITE Dual board 1277 77 5 inches RM ClassBoard2 77 5 78 inches PolyVision TS 600 TS620 TSL620 PolyVision TS610 Promethean ActivBoard 178 378 79 inches INTERWRITE Dual Board 1279 80 inches RM Classboard 85 82 inches Hitachi StarBoard FX 82...

Страница 21: ...he projector and check the image on page 28 for more details q At the point where the wall mount is installed make sure there is a gap of 16 to 26 inches 410 to 660 mm from the top of the image projected onto the white board to the ceiling See Positioning the Projector on page 12 for more details When you mount the projector on the wall with the wall mount the wall requires enough strength to hold...

Страница 22: ...les of the following diameters and depths at the points you marked 5 Use a device such as a dust pump to clean out concrete dust from the hole 6 Position the wall plate on the wall and insert M8 60 mm expansion anchors into the holes Attach the nut and tap it with a hammer until the core touches the top of the anchor 7 Tighten the nut with a wrench to secure the wall plate to the wall Drill diamet...

Страница 23: ...using a hexagonal wrench M8 and four M8 16 mm hexagon socket head cap bolts Tighten the screws firmly q You need to change the position of the adjustment unit screws B if you are using the wall mount with a product other than the PowerLite 520 525W 530 535W or BrightLink 536Wi projectors Arm unit Adjustment unit M8 16 mm hexagon socket head cap bolt M4 12 mm hexagon socket head cap bolt Arm plate ...

Страница 24: ...may be used in the future Otherwise each time you need to connect another device you will need to remove the projector from the mount to connect additional cables q Route the USB cable so that the type B connector emerges on the projector side Epson recommends labeling any duplicate cables so that additional connections can be more easily identified Arm unit Vertical adjustment screw Problems may ...

Страница 25: ...n the adjustment unit as shown below q Tighten the screws firmly M4 12 mm hexagon socket head cap bolt with washer spring washer 5 Projector lens side Attachment plate When installing or adjusting the wall mount do not use adhesives to prevent the screws from loosening and do not use lubricants or oils on the projector slide plate This may cause the case to crack and the projector to fall resultin...

Страница 26: ...e arm position temporarily by tightening the screw on top 8 Connect the power cord and other cables to the projector Connect any necessary cables such as the power cord computer cable HDMI cable audio cables and USB cable to the projector If you are planning to run the cables inside the wall make sure you follow all local electrical codes If you are running the cables outside the wall use a cable ...

Страница 27: ... top to bottom 3 Loosen the screws on the adjustment unit A B C and D as shown below to adjust the image position 4 Adjust the vertical angle of the arm using screw E on the bottom of the arm plate The arm rises when you tighten the screw and lowers when you loosen it Cable cover Arm plate A Vertical tilt adjustment 7 to 17 arm length minimum 17 to 7 arm length maximum B Horizontal roll adjustment...

Страница 28: ...and M8 11 Attach the arm cover Secure the arm cover with a hexagonal wrench M4 and an M4 12 mm hexagon socket head cap bolt Tighten all screws firmly Otherwise the projector or wall mount may fall and cause personal injury or property damage Warning M4 12 mm hexagon socket head cap bolt Arm cover ...

Страница 29: ...ely Wall plate cover M4 12 mm hexagon socket head cap bolt 3 Wall plate cover Only a specialist should remove or reinstall the projector for maintenance and repairs Refer to the projector User s Guide for instructions on maintenance and repairs Caution Never loosen the bolts and nuts after installation Regularly confirm that the screws have not become loose If you find any loose screws tighten the...

Страница 30: ... enables the pens to work Both software programs are included with the BrightLink projector or can be downloaded from the following sites For details on installing the software and calibrating the pens see the online User s Guide After installation of the projector is complete make sure you leave the remote control batteries and software CD s in the room with the projector For BrightLink models al...

Отзывы: