background image

Wired (Ethernet) Network Setup

45

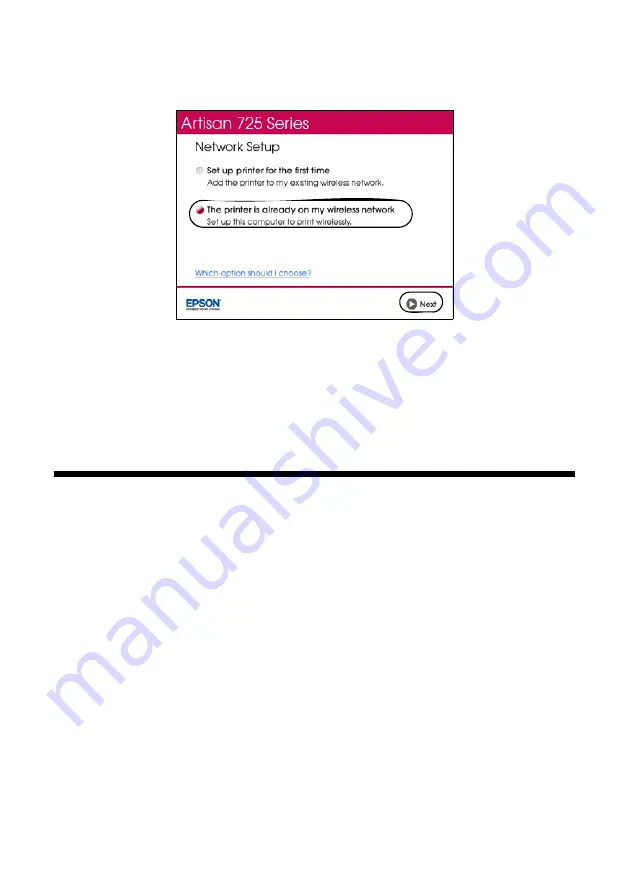
6. When you see this screen, select 

The printer is already on my wireless 

network

, then click 

Next

.

7. Wait while the software is installed.

8. Follow the instructions on the screen to install the rest of your software.

9. When installation is complete, remove the CD and restart your computer.

Wired (Ethernet) Network Setup

Follow these steps to set up your product for the first time or, if your product is 
already on your wired network, to set up additional computers to print to the 
product.

Note:

If you’re having trouble setting up your product, see “Network Problems” on page 49.

1. Make sure your product is turned on.

Note: 

If you previously set up the product on a wireless network, you must disable the 
wireless connection before you can connect to a wired network. Press Home, 
select Setup, and select 

Network Settings

 > 

Wireless LAN Setup

 > 

Disable 

Wireless LAN

. Select 

Yes

, then press 

OK

.

2. Insert the product software CD.

3.

Windows 7 and Windows Vista:

 If you see the AutoPlay window, click 

Run 

Setup.exe

. When you see the User Account Control screen, click 

Yes

 or 

Continue

.

Содержание Artisan 725

Страница 1: ...Artisan 725 Series Quick Guide Basic Copying Printing and Scanning Maintenance Network Setup Solving Problems ...

Страница 2: ... a Memory Card or External Drive 16 Inserting Your Camera s Memory Card 16 Inserting a USB Flash Drive 17 Selecting and Printing Photos 18 Printing from a Mobile Device 20 Printing a Photo Using Epson iPrint 20 Printing From Your Computer 21 Printing in Windows 21 Printing With a Macintosh 23 Selecting the Correct Paper Type 26 Scanning a Document or Photo 27 Quick Scanning With the Scan Button 27...

Страница 3: ...hecking the Ink Levels 33 Purchasing Epson Ink Cartridges 34 Replacing Ink Cartridges 35 Network Setup 37 Wireless Network Setup 37 Wired Ethernet Network Setup 45 Solving Problems 48 Checking for Software Updates 48 Problems and Solutions 49 Where To Get Help 53 Notices 55 Copyright Notice 62 ...

Страница 4: ... do not use any objects such as a pencil or pen The blue status light at the bottom of the panel flashes when the product is operating or performing routine maintenance Note If the blue status light flashes rapidly check the control panel for error messages Turn product on off Return to main menu Crop photos change number of photos displayed Turn View Auto Correct on off Display detailed settings ...

Страница 5: ...l panel down Caution To avoid damaging the product always press and hold the button to lower the control panel Don t try to push it down without pressing the button Icon Meaning The product is connected to a wired network The product is connected to a wireless network The current photo is cropped The Fix Red Eye setting is on for the current photo or all photos Reminds you whether View Auto Correc...

Страница 6: ... load up to 20 sheets Check your online User s Guide for detailed information about sheet capacity for each paper size and type 1 Pull out the paper cassette Then slide back the photo tray and lift it up 2 Squeeze the edge guides and slide them out Then insert paper with the glossy or printable side face down Note Load letterhead or pre printed paper face down with the top edge at the back of the ...

Страница 7: ...Loading Paper 7 3 Slide the left edge guide against the paper 4 Adjust the front edge guide to your paper size 5 Lower the photo tray Make sure the paper stack fits under the edge guide ...

Страница 8: ...nd slide them out Then insert photo paper with the glossy or printable side face down 7 Slide the left edge guide against the paper Then adjust the front edge guide to your paper size Note Make sure the paper fits under the edge guide 8 Keep the cassette flat as you insert it ...

Страница 9: ...urchase genuine Epson ink and paper at Epson Supplies CentralSM at www epson com ink3 U S sales or www epson ca Canadian sales You can also purchase supplies from an Epson authorized reseller To find the nearest one call 800 GO EPSON 800 463 7766 Paper name Size Part number Sheet count Epson Ultra Premium Photo Paper Glossy Borderless 4 6 inches S042181 S042174 60 100 Borderless 5 7 inches S041945...

Страница 10: ...20 50 100 Epson Ultra Premium Presentation Paper Matte Letter 8 5 11 inches S041341 50 Epson Premium Presentation Paper Matte Borderless 8 10 inches S041467 50 Letter 8 5 11 inches S041257 S042180 50 100 Epson Premium Presentation Paper Matte Double sided Letter 8 5 11 inches S041568 50 Epson Presentation Paper Matte Letter 8 5 11 inches S041062 100 Legal 8 5 14 inches S041067 100 Epson Bright Whi...

Страница 11: ...n the scanner glass with the top against the back left corner For scanning you can place multiple small photos on the scanner glass at the same time as long as they are at least 1 2 inches 1 6 inches 30 40 mm in size Place them at least 1 4 inch 5 mm apart Note If the edges of your document or photo are cut off move the document or photo 1 4 inch 5 mm away from the corner of the scanner glass 2 Cl...

Страница 12: ...enu then OK to select Paper and Copy Settings The Layout setting should be With Border and the Paper Size should be Letter To print on both sides of the page select 2 Sided Printing press OK then press u or d to choose Off or On To adjust the copy size press d to select Reduce Enlarge press OK then press u or d to choose Custom Size to select a percentage using or Actual Size Auto Fit Page to auto...

Страница 13: ... paper for instant photo reprints You can also restore colors in faded photos print with or without borders convert photos to black and white and crop your photos 1 Place one or two photos on the scanner glass Place them at least 1 4 inch 5 mm apart 2 Load 4 6 inch or 5 7 inch paper in the photo tray or 8 10 inch or letter size Epson photo paper in the main tray Load it printable side down 3 Press...

Страница 14: ...our paper press Display Crop To resize the image area press or To move the image area use the arrow buttons To check the zoomed image press OK When you finish cropping your photo press OK 10 Press OK again to continue 11 To change any of the settings displayed on the screen press x Menu and then OK to select Paper and Copy Settings Note To clear previously used copy settings press y Stop Clear Set...

Страница 15: ...o best effect select Fix Photo then press OK Press u or d to choose Fix Photo On If you want to create a black and white copy of a color photo select Filter press OK then press u or d and choose B W Then press OK 12 After you finish selecting your settings press x Menu 13 When you re ready to copy press x Start To cancel copying press y Stop Clear Settings Note When you scan with your computer you...

Страница 16: ...h as coloring book pages ruled paper and graph paper and note paper personalized with your favorite photos Print directly from your camera if it supports PictBridge printing Inserting Your Camera s Memory Card 1 Insert the card into the correct slot as shown Insert just one card at a time Note If your memory card requires an adapter attach it before inserting the card into the slot Otherwise the c...

Страница 17: ...Drag the removable disk icon from your desktop into the trash Note If your printer is connected to your Macintosh over a network do not drag the icon to the trash 3 Pull the card straight out of its slot Inserting a USB Flash Drive You can print from an external storage device connected to the product such as a USB flash drive external hard drive or CD burner Note Epson cannot guarantee the compat...

Страница 18: ...Printing Photos 1 Load Epson photo paper See page 9 for a list 2 Press Home until Print Photos is selected then press OK 3 Select View and Print Photos and press OK 4 Press l or r to move through your photos and display one you want to print Tip If View Auto Correct Off appears at the top of the display screen press the View Auto Correct button to preview how your printouts will look with Fix Phot...

Страница 19: ...gs press x Menu Note For the best quality printing leave Fix Photo in the Photo Adjustments menu turned on This automatically adjusts brightness contrast and saturation to best effect Fix Photo uses a sophisticated face recognition technology to optimize photos that include faces For this to work both eyes and the nose must be visible in the subject s face without sunglasses If your photo includes...

Страница 20: ...e front of your Epson product You must use a USB cable designed to work with the mobile device For charging make sure your mobile device complies with USB 2 0 standards Devices that draw more than 500 mA may damage your Epson product Epson cannot guarantee the compatibility of your device Contact the manufacturer of your device for more information Printing a Photo Using Epson iPrint After you hav...

Страница 21: ...e page 48 for instructions Printing in Windows 1 Open a photo or document in a printing program and select the print option 2 Select your product then click the Preferences or Properties button Note If you see a Setup Printer or Options button click it Then click Preferences or Properties on the next screen 3 On the Main tab select the basic print settings Make sure you choose the correct paper Ty...

Страница 22: ...lick the Page Layout tab You can print double sided automatically with letter or A4 size plain paper or Epson Bright White Paper Select Auto as the 2 sided printing setting Note The Manual setting performs two sided printing without the duplexer When you use this setting the printer software prompts you to reload the printed pages If you re printing double sided on plain paper and you notice that ...

Страница 23: ...eps below to print from Mac OS X 10 5 to 10 6 Note If you re printing from Mac OS X 10 4 see your online User s Guide for instructions 1 Open a photo or document in a printing program 2 Open the File menu and select Print 3 Select your product as the Printer setting 4 Click d to expand the Print window if necessary Cancel printing Check ink cartridge status Click to expand Select your Epson produc...

Страница 24: ... printing from Preview you see the settings shown below 6 Choose Print Settings from the pop up menu then select the following print settings 7 Choose any other printing options you may need from the pop up menu See the online User s Guide for details Note To reduce or remove red eye effects in photos choose Color Options from the pop up menu click Advanced Settings and select Fix Red Eye Copy and...

Страница 25: ...ing If you re printing on plain paper and you notice that ink smears or bleeds through the page click Adjustments then reduce the print density and increase the ink drying time 9 Click Print 10 To monitor your print job click the printer icon in the dock Select your print job then select an option to cancel pause or resume printing if necessary Pop up menu Click here Cancel printing Selectthe prin...

Страница 26: ...Bright White Paper Epson Ultra Premium Photo Paper Glossy Ultra Premium Photo Paper Glossy Epson Premium Photo Paper Glossy Premium Photo Paper Glossy Epson Photo Paper Glossy Photo Paper Glossy Epson Presentation Paper Matte Presentation Paper Matte Epson Premium Photo Paper Semi gloss Premium Photo Paper Semi gloss Epson Ultra Premium Photo Paper Luster Ultra Premium Photo Paper Luster Epson Pre...

Страница 27: ...ress OK 4 Press u or d to select one of the following options Scan to Memory Card automatically creates a JPG image or PDF and saves it to an inserted memory card Scan to PC automatically creates a JPG image and saves it to your computer ideal for scanning photos Scan to PC PDF automatically creates a PDF file and saves it to your computer ideal for scanning documents Scan to PC Email automaticall...

Страница 28: ...Epson Scan software provides four scanning modes Full Auto Mode scans quickly and easily using automatic settings Home Mode previews your image and provides preset options for scanning Office Mode previews your image and scans text documents quickly Professional Mode previews your image and provides a full array of tools 1 Open the document cover and place your original face down on the scanner gl...

Страница 29: ...olor photo as you scan click the Customize button then check the Color Restoration box If you want to see more scan settings select Home Office or Professional mode If you are scanning from Epson Scan directly the image is scanned and you see its icon in Windows Explorer or Macintosh Finder If you are scanning from an application the scanned image opens in your application window Click here to cha...

Страница 30: ...rom Scanner from the File menu then select your product For network scanning select Import From Scanner Include Networked Devices Then select Import From Scanner again and select your product 2 If you would like to select scan settings such as Color Restoration and file save settings click Show Details 3 Click the Scan button to begin scanning Your image is saved to the folder selected in the Scan...

Страница 31: ...les 1 Load letter or A4 size plain paper in the main paper tray 2 Press Home until Setup is selected then press OK 3 Press u or d to select Maintenance then press OK 4 Select Nozzle Check then press OK You see this screen 5 Press x Start 6 Check the nozzle check pattern that prints to see if there are gaps in the lines 7 If there are no gaps the print head is clean Select Finish Nozzle Check then ...

Страница 32: ...t Maintenance then press OK 4 Select Head Cleaning then press OK 5 Press x Start Cleaning takes about 2 minutes When it s finished you see a message on the display screen Caution Never turn off the printer during a cleaning cycle or you may damage it 6 Select Nozzle Check Then press x Start to run a nozzle check and confirm that the print head is clean 7 Select Finish Cleaning and press OK when yo...

Страница 33: ...n Replace any expended cartridges before printing or copying To check ink levels from the display screen at any time follow these steps 1 Press Home until Setup is selected then press OK 2 Select Ink Levels then press OK You see a screen like this 3 Press OK to exit In Windows a message may appear on your computer screen when you try to print when ink is low This window can optionally display ink ...

Страница 34: ...n printer damage Yields vary considerably based on images printed print settings paper type frequency of use and temperature For print quality a small amount of ink remains in the cartridge after the replace cartridge indicator comes on The printer ships with full cartridges and part of the ink from the first cartridges is used for priming the printer For best printing results use up a cartridge w...

Страница 35: ...have obtained a replacement or the ink remaining in the print head nozzles may dry out If you remove a low or expended cartridge you cannot reinstall and use it 1 Turn on the product If a cartridge is low or expended you see a message on the display screen Note which cartridges need to be replaced and press OK If you re replacing an expended ink cartridge follow the instructions on the display scr...

Страница 36: ...artridges out of the reach of children and don t drink the ink 4 Remove the cartridge from the package Do not touch the green chip on the side 5 Remove the yellow tape from the bottom of the cartridge Caution Do not remove any other labels or seals or ink will leak 6 Insert the new cartridge into the holder and push it down until it clicks into place 7 Close the scanner Note If you see a warning m...

Страница 37: ...om which you want to print For the first installation we recommend using a USB cable not included to simplify wireless setup After the printer is connected to the network you will be prompted to remove the cable If you are using Mac OS X 10 6 or don t have a USB cable you will need to use the control panel on the printer to select wireless settings instead Note If you have trouble setting up your ...

Страница 38: ... note them correctly If you don t know your network name SSID or network password contact the person who set up your wireless network 1 Make sure your product is turned on 2 Insert the product software CD 3 Windows 7 and Windows Vista If you see the AutoPlay window click Run Setup exe When you see the User Account Control screen click Yes or Continue Windows XP When you see the Software Installati...

Страница 39: ...nection and click Next 6 When you see this screen select Set up printer for the first time then click Next 7 Mac OS X 10 6 At the next screen click Next Then skip to Setting Up With the Control Panel on page 41 to set up the product without using a temporary USB connection ...

Страница 40: ...o not connect the USB cable yet 9 At the next screen click Next 10 Do one of the following If you selected Using temporarily USB cable connection continue following the instructions on the screen If you selected Using printer buttons continue with Setting Up With the Control Panel on page 41 Note If you see a firewall alert message click Unblock or Allow to let EpsonNet Setup continue Do not selec...

Страница 41: ...see this screen use the product s buttons to select the name of your wireless network then press OK When you re finished click Next If your network name isn t listed try the following Make sure that your wireless router or access point is turned on and working correctly Press y Back to return to the previous screen select Setup Wizard then repeat step 2 If you still can t find the network name in ...

Страница 42: ...to enter your network password 4 Follow the on screen instructions to finish selecting network settings Note If you see a firewall alert message click Unblock or Allow to let EpsonNet Setup continue Do not select Ask Me Later Keep Blocking or Block If you see a network setup failed message the network password may have been entered incorrectly If your password has uppercase or lowercase letters or...

Страница 43: ... ab12 symbols or spaces and to delete characters Important Network names are case sensitive Be sure to enter uppercase letters ABC or lowercase letters abc correctly 3 When you re done entering your network name select Done and press OK 4 Continue with step 3 on page 42 to enter your network password Setting Up Additional Computers 1 Make sure your product is turned on 2 Insert the product softwar...

Страница 44: ...44 Network Setup 4 When you see this screen click Install Note If you re using a Macintosh your screen will look different 5 When you see this screen select Wireless connection and click Next ...

Страница 45: ...our wired network to set up additional computers to print to the product Note If you re having trouble setting up your product see Network Problems on page 49 1 Make sure your product is turned on Note If you previously set up the product on a wireless network you must disable the wireless connection before you can connect to a wired network Press Home select Setup and select Network Settings Wire...

Страница 46: ... When you see this screen do one of the following For a first time installation select Set up printer for the first time then click Next If the printer has already been set up for network printing and you want to be able to print from an additional computer choose The printer is already on my Ethernet network then click Next 7 For first time installation only Connect the product to your router acc...

Страница 47: ... not select Ask Me Later Keep Blocking or Block 11 If you see a screen showing more than one printer select the product you would like to set up then click Next 12 Wait while EpsonNet Setup configures your product for the network 13 If you see an Installation Complete screen that includes a Print Test Page button click it to print a test page 14 Click Finish 15 Follow the instructions on the scree...

Страница 48: ...ser s Guide for more detailed help Checking for Software Updates Periodically it s a good idea to check Epson s support website for free updates to your product software Open your online User s Guide and select Download the Latest Software or visit Epson s support website at epson com support U S or epson ca support Canada With Windows you can select Driver Update on the Maintenance tab in the pri...

Страница 49: ...iled Try moving the product to a different location If your wireless router doesn t broadcast its network name SSID see page 43 for instructions on manually entering your wireless network name Make sure there aren t any access restrictions such as MAC address filtering set on the wireless router If access restrictions are set register the product s MAC address on the router Print a Network Status ...

Страница 50: ... selected then press OK 2 Press u or d to select Network Settings then press OK 3 Press u or d to select Confirm Network Settings then press OK 4 Press x Start to print a network status sheet Printing and Copying Problems Make sure your paper is loaded printable side down usually the whiter brighter or glossy side Don t load paper above the edge guides Make sure the type of paper you loaded matche...

Страница 51: ...u re copying place the document flat against the scanner glass Clean the scanner glass with a soft dry lint free cloth paper towels are not recommended or use a small amount of glass cleaner on a soft cloth if necessary Do not spray glass cleaner directly on the glass Paper Feeding Problems If paper jams when printing check the following 1 Open the scanner and remove paper as shown including any t...

Страница 52: ...ttach the cover and close the scanner 4 Pull out the paper cassette and remove any jammed paper in the cassette or inside the printer 5 Remove the auto duplexer then remove any jammed paper 6 Replace the auto duplexer as shown ...

Страница 53: ...ructions The ink cartridges may be low on ink Check your ink levels see page 33 and replace cartridges if necessary see page 35 Where To Get Help Epson Technical Support Internet Support Visit Epson s support website at epson com support U S or epson ca support Canada and select your product for solutions to common problems You can download drivers and documentation get FAQs and troubleshooting ad...

Страница 54: ...hours of support are subject to change without notice Toll or long distance charges may apply Purchase Supplies and Accessories You can purchase genuine Epson ink paper and accessories at Epson Supplies Central at www epson com ink3 U S sales or www epson ca Canadian sales You can also purchase supplies from an Epson authorized reseller To find the nearest one call 800 GO EPSON 800 463 7766 ...

Страница 55: ...switch or timer Do not let the power cord become damaged or frayed Place it to avoid abrasions cuts fraying crimping and kinking Do not place objects on top of it and do not allow it to be stepped on or run over Be careful to keep the cord straight at each end If damage occurs to the plug replace the cord or consult a qualified electrician If you use an extension cord with the product make sure th...

Страница 56: ...quid on the product Do not use the product near water Do not use with wet hands Adjust only those controls that are covered by the operating instructions Except as specifically explained in your documentation do not attempt to service the product yourself Never disassemble modify or attempt to repair the product by yourself except as specifically explained in the documentation Do not adjust contro...

Страница 57: ...vision problems see a doctor immediately Do not put your hand inside the product or touch any cartridges during printing Do not try to move the print head by hand or you may damage the product Before transporting the product make sure the print head is in the home far right position and the ink cartridges are in place Install a new ink cartridge immediately after removing an expended one Leaving c...

Страница 58: ...ts authorized service center where the printer will be repaired and sent back to you You are responsible for packing the printer and for all costs to and from the Epson authorized service center When warranty service involves the exchange of the printer or a part the item replaced becomes Epson property The replacement printer or part may be new or refurbished to the Epson standard of quality and ...

Страница 59: ...L OR CONSEQUENTIAL DAMAGES RESULTING FROM THE USE OR INABILITY TO USE THE EPSON PRODUCT WHETHER RESULTING FROM BREACH OF WARRANTY OR ANY OTHER LEGAL THEORY IN NO EVENT SHALL EPSON OR ITS AFFILIATES BE LIABLE FOR DAMAGES OF ANY KIND IN EXCESS OF THE ORIGINAL RETAIL PURCHASE PRICE OF THE PRODUCT In Canada warranties include both warranties and conditions Some jurisdictions do not allow limitations o...

Страница 60: ...ass B digital device Each product marketed is identical to the representative unit tested and found to be compliant with the standards Records maintained continue to reflect the equipment being produced can be expected to be within the variation accepted due to quantity production and testing on a statistical basis as required by 47CFR 2 909 Operation is subject to the following two conditions 1 t...

Страница 61: ...ing measures Reorient or relocate the receiving antenna Increase the separation between the equipment and receiver Connect the equipment into an outlet on a circuit different from that to which the receiver is connected Consult the dealer or an experienced radio TV technician for help WARNING The connection of a non shielded equipment interface cable to this equipment will invalidate the FCC Certi...

Страница 62: ...ignated as Original Epson Products or Epson Approved Products by Seiko Epson Corporation In addition to software program rights owned by Seiko Epson Corporation this product also includes open source software Refer to OSS pdf on your product software CD ROM for a list of open source software and software license terms applied to this printer Responsible Use of Copyrighted Materials Epson encourage...

Страница 63: ......

Страница 64: ...CPD 28000 Printed in XXXXXX ...

Отзывы: