EPSON Stylus COLOR 900/900N
Chapter 5 Adjustments
151
5. Set the blue platen gap lever to the rear to raise the carriage and
widen the platen gap.
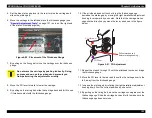
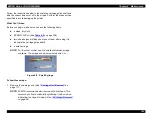
6. Move the carriage to the left and place the thickness gauge (see
on page 121) on top of the right end
of the platen (front paper guide).
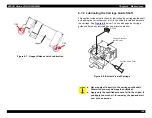
Figure 5-50. Placement of the Thickness Gauge
7. By pulling on the timing belt, move the carriage over the thickness
gauge.
8. Move the PG lever forward to lower the carriage.
9. By pulling on the timing belt, slide the carriage back and forth to see
if it makes contact with the thickness gauge.
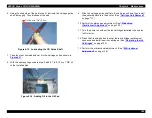
10. If the printhead does not touch or drag the thickness gauge,
decrease the platen gap by moving the right parallelism adjustment
bushing lever upward by one notch. Note that the carriage moves
opposite the direction you move the lever, as shown in the figure
below:
Figure 5-51. PG Adjustment
11. Repeat the steps 5 through 10 until the printhead touches or drags
the thickness gauge.
12. Move the PG lever to the rear and then slide the carriage over to the
left, away from the thickness gauge.
13. Increase the platen gap by rotating the right parallelism adjustment
bushing down from the current position by one notch.
14. By pulling on the timing belt, move the carriage once again over the
thickness gauge. Slide the carriage back and forth to make sure the
thickness gauge does not move.
C A U T I O N
Do not move the carriage by pushing it directly. Doing
so presses down on the carriage and prevents you
from performing the adjustment correctly.
F r o n t P a p e r G u i d e
T h i c k n e s s G a u g e ( 1 . 1 4 m m )
C a p U n i t
P G N a r r o w e r
P G W i d e r
P u l l o u t w a r d o n t a b
b e f o r e r o t a t i n g b u s h i n g .
Содержание 900N
Страница 1: ...EPSONStylusCOLOR900 900N Color ink jet printer TM SC900 N 6 59 0 18 ...
Страница 8: ... 37 5 PRODUCTDESCRIPTION ...
Страница 37: ... 37 5 OPERATINGPRINCIPLES ...
Страница 67: ... 37 5 TROUBLESHOOTING ...
Страница 89: ... 37 5 DISASSEMBLYANDASSEMBLY ...
Страница 121: ... 37 5 ADJUSTMENTS ...
Страница 156: ... 37 5 MAINTENANCE ...
Страница 169: ... 37 5 APPENDIX ...
Страница 178: ...EPSON Stylus COLOR 900 900N Chapter 7 Appendix 175 7 3 Component Layout Figure 7 2 C265 Main Board Component side ...
Страница 179: ...EPSON Stylus COLOR 900 900N Chapter 7 Appendix 176 Figure 7 3 C265 Main Board Soldering side ...
Страница 180: ...EPSON Stylus COLOR 900 900N Chapter 7 Appendix 177 Figure 7 4 C265 PSB Board Figure 7 5 C265 PSE Board ...
Страница 181: ...EPSON Stylus COLOR 900 900N Chapter 7 Appendix 178 Figure 7 6 C265 PNL Board ...
Страница 195: ...06 03 01 02 for S E ASIA 03 03 05 03 04 EPSON STYLUS COLOR 900 No 7 10056 Rev 01 ...
Страница 197: ......
Страница 198: ......
Страница 199: ......
Страница 200: ......
Страница 201: ......


