54
GBU-ECO-MF-V01
Note: The manufacturer reserves the right to modify this unit's operation andspecifications without prior notice.
2
Страница 1: ...GBU ECO MF V01 GB User s Manual ECO MULTIFUNCTION Scale...
Страница 2: ...d 34 9 1 12 Erasing the Ram 35 9 1 13 Erasing the Eeprom 36 9 2 2ndLEVELMENU 38 9 2 1 Programming the 2nd level password 39 9 2 2 Enabling the 2nd level password 39 9 2 3 RS Connection 40 9 2 4 TPV Ty...
Страница 3: ...ramming and memorizing 20 coded unit weights Semi automatic cumulative coded numeric and manual numeric tare RS 232 connection for external communication NOTE The RS 232 PC cable must be connected bef...
Страница 4: ...ts 2 Price display 6 digits 3 Amount display 7 digits 4 Semi automatic tare indicator 5 Numeric or coded tare indicator 6 Special scale indications 7 Zero weight indicator 8 Net weight indicator 9 Sta...
Страница 5: ...Scale ON OFF key Numeric keys for entering numeric data Forward cursor for options with preset values Back cursor for options with preset values Menu scroll forward cursor Menu scroll backward cursor...
Страница 6: ...5 GBU ECO MF V01 Tares Recall memorized levels and unit weights Sequential viewing of Over Under and Target values Entry in part counting by comparison Autozero...
Страница 7: ...starts a cycle tests it counts from 0 to 9 Upon completing the test the scale autozeroes and stops in the normal work mode 0000000 000000 00000 Max 15 kg Min 100 g e 5 g I I I kg kg Pcs T PT 9999999 9...
Страница 8: ...a prior semi automatic tare it is not possible to perform a numeric tare and vice versa In this basic mode the display shows the net weight and value of the tare 5 1 SEMI AUTOMATIC AND CUMULATIVE TAR...
Страница 9: ...the key again the tare semi automatic or cumulative is fixed In this case the indicator will blink to indicate that the tare is fixed To erase the tare remove the weight from the platform and if the t...
Страница 10: ...the section Semi Automatic Tare So long as the tare is not fixed it will be possible to recall any other coded tare If a Coded Numeric tare is fixed it will not be possible to recall another Coded Nu...
Страница 11: ...are of 0 300 kg To fix or erase the tare proceed in the same manner as for the previous cases 5 4 TARE LIMITS MAXIMUM TARE CAPACITY NORMAL MULTI RANGE 3 kg 3 kg Not available 6 kg 6 kg 1 kg 12 kg 6000...
Страница 12: ...ode the scale gives a visible and audible indication of weight values between two given values called Under and Over and a central value called Target 6 1 MEMORIZED LEVELS To recall a memorized level...
Страница 13: ...ght of 0 100 kg and a weight on the platform of 0 050 kg High dashes if the weight exceeds the Over weight value memorized for example a memorized Over weight of 0 500 kg and a weight on the platform...
Страница 14: ...e will beep intermittently if the option is enabled and will display arrows pointing downwards for example an Under Weight of 0 100 kg a Target value of 0 500 kg and a weight on the platform of 0 300...
Страница 15: ...grammed confirm by pressing the key 7 BASIC MODE PART COUNTING In this work mode it is possible to work with Semi Automatic Tare and Coded Numeric Tare The procedure is similar to that explained in th...
Страница 16: ...from the memory maximum 20 codes or entering it manually 7 1 MEMORIZED UNIT WEIGHTS To recall a memorized unit weight enter the unit weight s code using the numeric keypad for example code 1 and then...
Страница 17: ...for example with a weight of 1 000 kg on the platform and an unit weight of 100 g 7 2 ENTERING A MANUAL UNIT WEIGHT To enter a manual unit weight press the key 0 0 000 0 000 Max 15 kg Min 100 g e 5 g...
Страница 18: ...ale has a resolution of 60000 internal points and a full scale error Em Em Sm 100 2 Pdm Where Em error converted to weight Sm scale step Pdm weight shown on part display Always provided that the parts...
Страница 19: ...ght calculated in one of the 20 codes reserved for unit weights The procedure is as follows From the part counting mode with a sample of parts on the platform Press the key to enter the part counting...
Страница 20: ...and confirm with the key You will now return to the normal Part counting operating mode 7 4 DISPLAYING THE UNIT WEIGHT When operating with memorized unit weights or entering an unit weight you have th...
Страница 21: ...he key the scale will display dashes for a brief period To zero immediately absorbing whatever weight might be on the platform 10 000 weight unit Max 15 kg Min 100 g e 5 g I I I kg kg Pcs T PT Max 15...
Страница 22: ...u you must press the key from any basic work mode You will be prompted for the password if it is enabled Enter the 6 digit password programmed using the numeric keys and then confirm with the key You...
Страница 23: ...hrough the menu the first parameter you will find will be to choose the basic work mode 9 1 1 Basic Work Mode You can choose between 3 basic work modes Weight Tare Levels and Part Counting By default...
Страница 24: ...ation at any time and return to the Menu Mode by pressing the key 9 1 2 Programming Tares You can program up to 20 coded numeric tares When you are in the option Press the key The scale will prompt fo...
Страница 25: ...ng the key The scale will prompt you to program the next Tare You can exit the option at any time saving the data confirmed so far by pressing the key 9 1 3 Programming Levels You can program up to 20...
Страница 26: ...You will now have 2 options A Confirm the value with the key and program the Under value of the following level B Confirm the value with the key and program the next level value You can erase the dat...
Страница 27: ...Under value You can erase the data item entered if it is incorrect using the key You can abort the operation at any time returning to the Menu Mode by pressing the key If you choose option B you will...
Страница 28: ...Under value 9 1 4 Programming Unit Weights You can program up to 20 coded unit weights While you are in the option Press the key to enter the option The scale will prompt you for the Unit Weight numb...
Страница 29: ...red the value confirm by pressing the key The scale will then prompt you to program the next unit weight You can exit the option at any time saving the data confirmed so far by pressing the key NOTE T...
Страница 30: ...he option Press the key to enter the option The present beep status will be displayed Toggle between ON enabled and OFF disabled pressing the and keys Confirm the status and return to the Menu by pres...
Страница 31: ...re in the option Press the key to enter the option Enter the time in seconds with the numeric keys from 0 to 999 The value 0 will leave the standby disabled After entering the desired value press the...
Страница 32: ...e option s present status will be displayed Toggle between ON enabled and OFF disabled pressing the and keys Confirm the status and return to the Menu by pressing the key You can exit the option at an...
Страница 33: ...ill be displayed Toggle between ON enabled and OFF disabled pressing the and keys Confirm the status and return to the Menu by pressing the key You can exit the option at any time without confirming t...
Страница 34: ...Menu which is described in a later section 9 1 10 Programming the 1st Level password This option allows you to program the password for access to the 1st Level Menu While you are in the option Press...
Страница 35: ...essing the key You can also erase the data entered to rectify it by pressing the key 9 1 11 Enabling the 1st Level password This option enables or disables the password giving access to the 1st Level...
Страница 36: ...the option at any time without confirming the data item and return to the Menu by pressing the key 9 1 12 Erasing the Ram This option allows you to erase the Ram s variables While you are in the opti...
Страница 37: ...e erase and will restart You can exit the option at any time without confirming the data item and return to the Menu by pressing the key 9 1 13 Erasing the Eeprom This option allows you to erase the m...
Страница 38: ...s been selected you will return to the Menu Mode without erasing If YES has been selected the scale will perform the erase and will restart You can exit the option at any time without confirming the d...
Страница 39: ...is programmed Enter the 6 digit password programmed using the numeric keys and then confirm with the key You will now enter the 2nd level Menu At this point you are now in the 2nd level Menu in this M...
Страница 40: ...s next programmable parameter by pressing the key You can exit the option at any time without confirming the data item and return to the Menu by pressing the key You can also erase the data item ente...
Страница 41: ...y pressing the key You can exit the option at any time without confirming the data item and return to the Menu by pressing the key 9 2 3 RS Connection This selects the scale s RS 232 connection type O...
Страница 42: ...CONX TYPE 0 TYPE 1 TYPE 2A TYPE 2B TYPE 7 TYPE 8 TYPE 9 TYPE 10 9 2 4 TPV Type only if the connection type is TYPE 0 This selects the communication type when operating with the TYPE 0 connection Selec...
Страница 43: ...he value by pressing the or keys and confirm with the key You will now go to the next parameter to be programmed Possible values Default value WAITING WAITING AUTOMAT MANUAL 9 2 6 Automatic weight tra...
Страница 44: ...alue WAITING WAITING MANUAL 9 2 7 Time Out only if the transmission mode is MANUAL and type of TPV is TYPE B This selects the Time Out value time waited to receive an answer after sending the weight w...
Страница 45: ...Time Limit value time waited for a stable weight when operating with the MANUAL transmission mode Select the value by pressing the or keys and confirm with the key You will now go to the next paramete...
Страница 46: ...er to be programmed Possible values Default value BASIC BASIC EXTEND 9 2 10 Baud Rate only if the connection type is different from NO CONX This selects the communication speed of the RS 232 channel B...
Страница 47: ...ible values Default value 2400 9600 4800 9600 19200 9 2 11 Parity only if the connection type is different from NO CONX This selects the communication s parity type Select the value by pressing the or...
Страница 48: ...ta transmitted and received Select the value by pressing the or keys and confirm with the key You will now go to the next parameter to be programmed Possible values Default value 7 8 8 9 2 13 Number o...
Страница 49: ...o the next parameter to be programmed Possible values Default value 1 1 2 When you confirm this parameter with the key all the parameters will be considered confirmed and the scale will return to the...
Страница 50: ...on is negative add 10 to the value obtained DIG POS 4 5 0 4 10 5 9 4 4 0 4 4 0 8 3 0 8 3 5 3 2 0 3 2 1 4 1 0 4 1 3 6 0 0 6 0 6 Look up the values in the table and their position will give the digit of...
Страница 51: ...DATA TOO LARGE If the set weight is less than 20000 net points If a Plu greater than 100 is requested If an item is programmed with a value greater than that allowed 62 DATA TOO SMALL If the set weigh...
Страница 52: ...ing on the scale 1 4 2 Rx 5 GND 3 Tx Scale ON OFF button External supply RS 232 connector connector Calibration button access hole The scale can be powered from an external power supply through its ex...
Страница 53: ...utomatic Back Light option 25 of the time lit up to 120 h ENVIRONMENTAL NOTICE This scale can operate with alkaline or rechargeable batteries To protect the environment do not throw the batteries away...
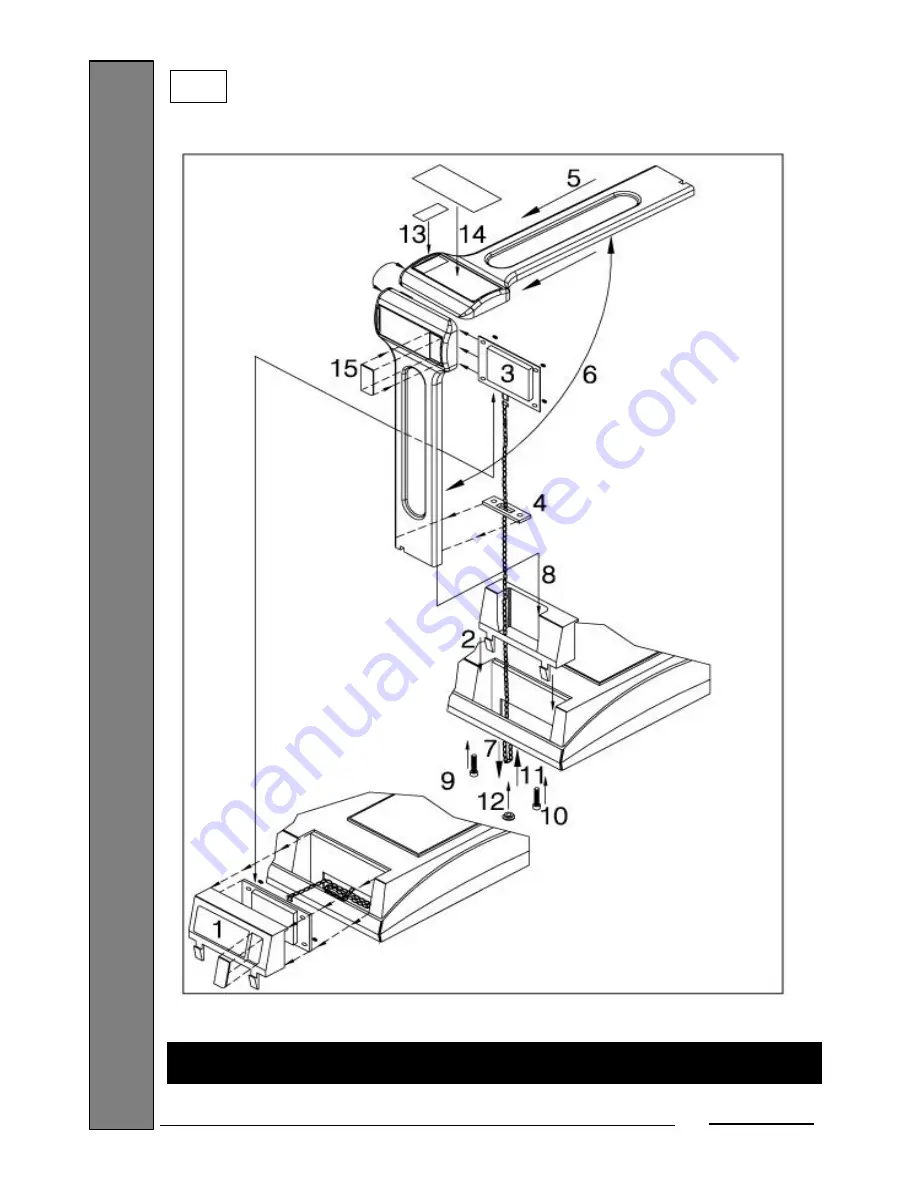
Страница 54: ...53 GBU ECO MF V01 14 ASSEMBLY OF ELEVATED COLUMN for model with column BLANCO 1...
Страница 55: ...54 GBU ECO MF V01 Note The manufacturer reserves the right to modify this unit s operation and specifications without prior notice 2...
Страница 56: ...omponents Faults caused by incorrect installation Damage caused by negligence wear and tear or errors as a result of repairs carried out by unauthorized personnel If the details on this card have been...
Страница 57: ...8 28037 MADRID TEL 91 754 30 14 FAX 91 754 48 26 e mail info epelsa com CTRA SANTA CRUZ DE CALAFELL 35 08830 SANT BOI DE LLOBREGAT BARCELONA SPAIN TEL 93 654 62 12 FAX 93 654 54 53 e mail info epel i...