background image

5

GB

Radiator mounting on the stand

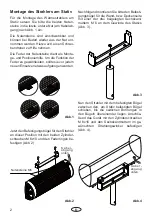
Insert  the  supplied  nuts  into  the  closest  to 
the  edge  groove  on  the  bottom  side  of  the 
radiator (bottom side is where the mains ca-
ble connection is). For details please obser-
ve the pic. 1

The  nuts  have  oval-shaped  rear  surface 
and may be, if necessary, removed from the 
groove.  For  this  use  a  sharp  object  like  a 
screwdriver  and  proceed  in  the  reverse  or-
der to pic. 1.

The  nuts  have  attached  springs  aimed  to 
facilitate the positioning and securing in the 
groove.  In  order  to  improve  the  functionali-
ty of these springs by every new installation 
they  should  be  bent  slightly  away  from  the 
nut.

Pic.2

nuts M6

Now attach the other mounting bracket half 
through the central hole to the stand (threa-
ded pin on the upper side). Use the supplied 
hexagonal M6 nut (as shown on pic. 3).

Pic.3

Now  take  the  radiator  with  the  attached 
mounting  bracket  and  position  it  over  the 
stand so that the triangle bracket ends slide 
between the corresponding ends of the bra-
cket mounted on the stand.

Move the radiator slightly to line up the side 
holes  in  both  brackets  and  connect  them 
(from outside to inside) with the two supplied 
cylindrical  bolts  M  6x16  and  hexagonal  M6 
nuts. Refer to pic. 4 for details. Before tighte-
ning the nuts you can adjust the angle of the 
radiator to point it to the preferred direction

Pic.4

mains 
cable

mains 
cable

Now  take  the  mounting  bracket  half  (the 
smaller one with triangle ends) and place it 
along the bottom side of the radiator. Line up 
the nuts in the groove with the correspondi-
ng holes in the bracket. Screw the bracket to 
the nuts using 2 cylindrical bolts M 6x10 and 
lock washers (as shown on pic. 2).

Pic.1

Содержание Stativ Terra Vita II

Страница 1: ...1 D Druck Nr 29524126 25 12 Stativ Terra Vita II D Montageanweisung Assembly instruction GB RU...

Страница 2: ...rden Abb 2 Nutensteine M6 Nachfolgend montieren Sie bitte den Befesti gungsb gel f r die Wand bzw Deckenseite mit einer der drei beigelegten Sechskant muttern M 6 an dem Gewinde des Stativs Abb 3 Abb...

Страница 3: ...en Gebrauch entstanden sind entf llt ebenfalls der Garantieanspruch Bei Garantieanspr chen ist sowohl die Serien nummer sowie die Artikelnummer zusammen mit der Ger tebezeichnung und einer aussag kr f...

Страница 4: ...are bitte nicht benutzen Lassen Sie sich von dem Transportunternehmen eine schriftliche Best ti gung ber den Schaden aus stellen Melden Sie den Schaden bitte umgehend telefonisch bei Ihrem H ndler Die...

Страница 5: ...ed pin on the upper side Use the supplied hexagonal M6 nut as shown on pic 3 Pic 3 Now take the radiator with the attached mounting bracket and position it over the stand so that the triangle bracket...

Страница 6: ...ell as the article code number and type name with expressive description of the fault This warrenty covers damaged parts but no defects due to wear and tear In case of complaint please return the equi...

Страница 7: ...ng articles or missing ac cessories He will discuss with you the individual case and try for immediate and customer friendly so lution For economic returns within Germany you will get an RMA number fr...

Страница 8: ...8 RU 1 2 6 6 3 3 6 16 6 4 4 6 10 2 1...

Страница 9: ...9 RU 121471 928 7 495 564 8772 564 8773 995 9744 775 9965 7 495 564 8773 info eos werke ru www eos werke ru EOS Saunatechnik GmbH 35759 2 3...

Страница 10: ...10 RU RMA RMA RMA 3 2 2 RMA 1...

Отзывы: