background image

32

GB

1

2

4

6

5

3

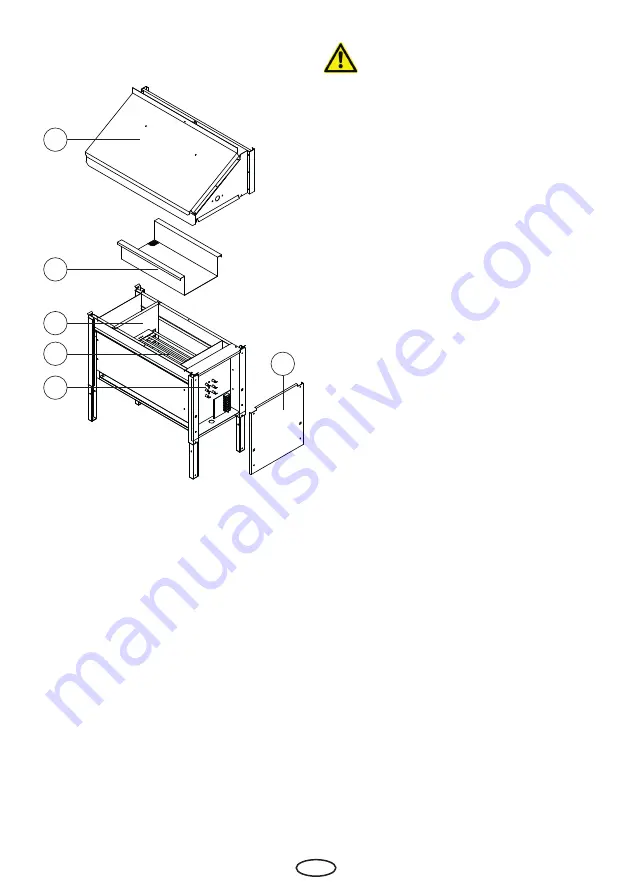
Fig. 9

1.  Air deflector
2.  Rock store
3.  Supports for heating elements
4.  Heating elements
5.  Fastening nuts for heating elements
6.  Terminal box cover panel

 Attention!

The water infusion effect always occurs re-
tarded. For a steam shock effect pour some 
water into the funnel with a sauna ladle.

Then, the water is led across the sauna rocks in 

the oven by the silicone connecting hose and 

evenly distributed over the rocks through the 

infusion gutter.

Now the steam will quickly rise with the hot up-

rising air flow and will spread around the sauna 

cabin from top down, delivering the famous 

„loylu“ steam shock effect.

Attention! Do not pour too much water at once. 

Be aware that the steam is hot and the steam 

shock effect always occurs retarded, which 

may cause scalding, particularly at the upper 

benches.

Remember that the sauna rocks must heat up 

again after each infusion in order to produce an 

intensive steam. Therefore, wait approximately 

8 to 10 minutes for the next infusion.

Always dilute essences with water as advised 

by the manufacturer (check the packaging for 

details). Never use pure essences!

Explosion drawing

Содержание Invisio Mini

Страница 1: ...INNOVATIVE SAUNA TECHNOLOGY MADE IN GERMANY Druck Nr 29344586 08 19 Invisio Mini D Montage und Gebrauchsanweisung Assembly and operating instruction Руководство по монтажу и эксплуатации EN RU ...

Страница 2: ...2 Deutsch 3 English 20 Русский 37 ...

Страница 3: ...htungsschema 8 Montage 9 Technische Daten 10 Mindestabstände 10 Montage Basismontage 11 13 Montage des Aufgusstrichters 13 Montage Abschluss 13 Inbetriebnahme 14 Wartung Heizstäbe wechseln 14 15 Saunasteine 16 Wartung und Pflege 16 Service Adresse 18 Recycling 18 Gewährleistung 18 Allgemeine Servicebedingungen ASB 19 ...

Страница 4: ... Kabine nach außen gedrückt Hierdurch entsteht das typische Saunaklima bei dem in Ihrer Sauna direkt unter der Decke Temperaturen von ca 110 C erreicht werden die durch das Temperaturgefälle in der Kabine auf ca 30 40 C im Fußbereich sinken Daher ist es nicht ungewöhnlich wenn z B am Temperaturfühler über dem Ofen 110 C herrschen dasThermometer welches ca 20 25 cm unter der Kabinendecke an der Sau...

Страница 5: ...einbehälter ver ursacht Brandgefahr Der Saunaofen ist vor jeder Inbetriebnah me insbesondere bei Fernwirken auf si Wichtige Hinweise Bei unsachgemäßer Montage be steht Brandgefahr Lesen Sie bitte diese Montageanleitung sorgfältig durch Be achten Sie besonders die Maßangaben und die nachfolgenden Hinweise Dieses Gerät kann von Kindern ab 8 Jah ren und darüber sowie von Personen mit verringerten phy...

Страница 6: ...geeignet Werden als Anschlussleitung einadrige Leitungen verwendet müs sen diese durch ein biegsames mit dem Schutzleiter verbundenes Metallrohr ge schützt werden Den Mindestquerschnitt der Anschlussleitung und die geeignete Kabinengröße im Verhältnis zur An schlussleistung in kW entnehmen Sie der Tabelle Bei der Montage des Saunaheizgerätes ist darauf zu achten dass der senkrechte Abstand zwische...

Страница 7: ...nschluss Diese Arbeit wird Ihr Elektroinstallateur ohne weitere Erklärung gemäß dem v g Anschluss schema und nach dem in dem jeweiligen Steuergerät eingeklebten Schaltbild durch führen können Beachten Sie jedoch dass stromführende Lei tungen aus Sicherheitsgründen nicht sichtbar an den Kabineninnenwänden verlegt werden dürfen Bei den meisten Saunakabinen sind deswegen bereits in dem Wandelement mi...

Страница 8: ...rbus Saunabus reserviert U V W N PE Gr Sensor Limiter Saunaheizgerät Sauna heater Poêle de sauna Печь для сауны max 9 kW Netz Mains Réseau Сеть 230 V AC N fan light L N L N L1 L2 L3 N W V U N N WB WM 3 4 S1S1 N STB Saunasteuergerät Control unit Boîtier de commande Пульт управления Sensorbus Saunabus reserviert Saunaheizgerät Saunaheater U V W N PE Gr Sensor Limiter 3 0 kW 4 5 6 0 kW ...

Страница 9: ...rgerät Ofen Inviso Mini 3 0 kW 230V N AC 50 Hz 1 x 16 5 x 2 5 5 x 1 5 4 5 kW 6 0 kW 400V 3N AC 50 Hz 3 x 16 Alle Angaben zu Leitungsquerschnitten sind Mindestquerschnitte in mm Kupferleitung Technische Daten Invisio Mini Einbaumaße H B T in cm für Kabinen volumen Mindestmaß der Be und Entlüftung Gewicht ohne Steine und Verpackung Steinfüllung LSG erforderlich zu verwenden mit den Steuergeräten 3 0...

Страница 10: ...den dass unbeabsichtigt Gegenstände auf den Ofen fallen Entgegen den Angaben zu Fühlermontage IhresSaunasteuergerätes wirdderOfenfühler wie in der Abbildung gezeigt montiert Mindestabstände Montagebeispiel Seitenansicht Technische Daten Spannung 230V N AC 50 Hz 400V AC 3N 50 Hz Leistungsaufnahme 3 0 kW 4 5 6 0 kW Höhe 650 710 770 mm Breite 660 mm Tiefe 380 mm Steinfüllung 15 kg Ableitstrom max 0 7...

Страница 11: ...offenen Seite nach oben in die seitlich am Ofen angebrauchten Führungen einschieben Die Füße mit je einer Schraube 4 2x9 5 in der gewünschten Höhe fixieren Anschließend die beiden Schrauben der Anschlusskasten Abde ckung wieder anbringen 3 Steinkorb befüllen Mitgelieferte Steine zunächst unter fließendem Wasser waschen Stellen Sie den Ofen an seine endgültige Po sition Den Ofen an die Rückwand sch...

Страница 12: ...efestigen Sie diese mit jeweils 2 Schrauben 4 2x9 5 proSeiteanderAbdeckung Luftleithaube Das Gefälle der Aufgussrinne muss von dem Aufgussanschluß wegführen 6 Montage Aufgusstrichter Stecken Sie das mitgelieferte Wasserrohr Win kelstück in die seitliche Öffnung des Ofens über die Aufgussrinne Befestigen Sie den Trichter an geeigneter Stelle z B Trennwand oder Rückseite einer Aufguss klappe mit 2 S...

Страница 13: ...ung Klemmenun terlage Anschließend den Anschlusskasten wieder mit der Abdeckung und den 4 Schrauben ver schließen 9 TrennwandundSchutzgittermontieren Montieren Sie dieTrennwand so dass die vorge gebenenMindestabständeeingehaltenwerden Siehe Abb 1 Seite 8 und Abb 8 Trennwand gehört nicht zum Lieferumfang des Ofens Überprüfen Sie die Trennwand auf festen Sitz Befestigen Sie das mitgelieferte Schutzg...

Страница 14: ...kung des Anschlusskastens entfer nen 4 Schrauben lösen 5 Steine entfernen 6 Steinkorb herausnehmen 7 Die 2 Befestigungsschrauben des Aufla gebleches für die Heizstäbe lösen und dieses nach außen schieben 8 Elektrische Steckverbindungen vom Heiz stab abziehen 9 Haltemutter am Heizstab lösen 10 Heizstab nach innen herausziehen 11 NeueHeizstäbeinvorgeseheneÖffnungen stecken 12 Heizstäbe mit Haltmutte...

Страница 15: ...eichmäßig in der Kabine ver teilt und führt somit zu einem angenehmen Aufgussempfinden DenkenSiedaran dasssichdieSaunasteinenach jedemAufgusserstwiederneuerhitzenmüssen um einen intensiven Dampfstoss zu erzeugen Warten Sie daher ca 8 bis 10 Minuten bis zum nächsten Aufguss Essenzenbzw AufgussmittelnurnachHerstelle rangaben dem Aufgusswasser beifügen 1 Abdeckung Luftleithaube 2 Steinkorb 3 Auflageb...

Страница 16: ... Achtung Brandgefahr Wartung und Pflege Dieses Saunaheizgerät ist aus korrosionsarmen Materialen gefertigt Damit Sie lange Freude mit Ihrem Saunaheizgerät haben sollten Sie das Gerät warten und pflegen Dabei müssen Sie darauf achten dass die im Ansaugbereich befindlichen Öffnungen und Abstrahlbleche immer frei sind Diese können sich durch das Ansaugen der Frischluft leicht mit Flusen und Staub zus...

Страница 17: ... FI Schalter ab gesichert werden Nach dem heutigen Stand der Technik ist es nicht sinnvoll dampfdichte Rohrheizkörper für Saunaöfen einzusetzen Es kann vorkommen dass die Magnesiumoxidfüllung der Heizkör per durch den dampfdiffusen Silikonverschluss etwas Feuchtigkeit aus der Umgebungsluft zieht welches in wenigen Fällen zum Auslösen des FI Schutzschalters führen kann Dies ist ein Physikalischer V...

Страница 18: ...cycling Bitte diese Adresse zusammen mit der Montageanwei sung gut aufbewahren Damit wir Ihre Fragen schnell und kompetent beantwor ten können geben Sie uns immer die auf dem Typen schild vermerkten Daten wieTypenbezeichnung Artikel Nr und Serien Nr an Nicht mehr gebrauchte Geräte Leuchtmittel sind gem Richtlinie 2012 19 EU bzw ElektroG zum Recyceln bei einer Wertstoffsammelstelle abzugeben Nicht ...

Страница 19: ... sind für den Stückgut versand Palette konzipiert Wir weisen an dieser Stelle ausdrücklich darauf hin dass unsereVerpackungen nicht für den Einzelversand per Paketdienst geeignet sind Für Schäden die aufgrund von unsachgemäßer Verpackung im Einzelversand entstehen übernimmt der Hersteller keine Haftung VI Herstellergarantie Wir übernehmen die Herstellergarantie nur sofern In stallation Betrieb und...

Страница 20: ...stallation Technical specifications 27 Minimal clearances 27 Installation basic steps 28 29 Installation of the infusion funnel 29 Installation final steps 30 Commissioning first switching 31 Replacement of heating elements 31 32 Sauna stones 33 Maintenance and care 33 Service address 35 Recycling 35 Warranty 35 General Terms and Conditions of Service 36 ...

Страница 21: ...or compati bility with one another Please note all data and information provided by your sauna supplier The sauna heating units warm your sauna cab in through means of heated air convection To this end fresh air from the air intake vent is drawn in rises upon warming convection and is then circulated through the cabin A part of the used air is pushed out through the exhaust vent in the cabin This ...

Страница 22: ...ble low resin untreatedmaterials e g spruce Only a sauna heater with the appropriate power output may be installed in the sau na cabin Please provide air intake and vent open ings in each sauna cabin The air intakes must always be positioned behind the sauna heater approx 5 to 10 cm above the floor The minimum dimensions of the air intake and vent openings are stated in the table Theductventsareal...

Страница 23: ...na ceiling is maintained Please see also the dimensions diagram for the clearance between the lower edge of the sauna heater and the floor On heaters with bases this clearance is maintained via the base or legs of the device Floor heating in the sauna cabin increases the surface temperature of the flooring Please see the dimensions information for the respective sauna heater for the clearance betw...

Страница 24: ... through the hole to the control unit The cable and all other connecting cables mains power cables and cabin lighting should be installed in installation ducts or also be protected against damage on the outside of the cabin e g by lay ing them in installation pipes or attaching wood cover strips The sauna heater when made use of time pre set and remote control may only be used with an appropriate ...

Страница 25: ...W N PE Gr Sensor Limiter Saunaheizgerät Sauna heater Poêle de sauna Печь для сауны max 9 kW Netz Mains Réseau Сеть 230 V AC N fan light L N L N L1 L2 L3 N W V U N N WB WM 3 4 S1S1 N STB Saunasteuergerät Control unit Boîtier de commande Пульт управления Sensorbus Saunabus reserviert Saunaheizgerät Saunaheater U V W N PE Gr Sensor Limiter 3 0 kW 4 5 6 0 kW Connection plan example ...

Страница 26: ...trol unit to sauna heater Inviso Mini 3 0 kW 230V N AC 50 Hz 1 x 16 5 x 2 5 5 x 1 5 4 5 kW 6 0 kW 400V 3N AC 50 Hz 3 x 16 All cable details are minimal core dimensions in mm of a standard copper wire cable Invisio Mini Dimensions H xW x D cm fForsaunavolume Min size of air intake and exhaust vent Net weight w o rocksandpackage Rock volume Power extension required Suitable control units 3 0 kW 65 7...

Страница 27: ...rill 4 heater feet 1 polybag with 4 flat head screws 1 warning shield 1 set of sauna rocks approx 15 kg The minimal inner height of the sauna cabin shall be 1 90 m The horizontal gap between the sauna heater and the cabin wall must be at least 4 cm The distance between partition wall or sauna bench or other flammable materials and the sauna heater shall be as shown below on Fig 1 The supplied safe...

Страница 28: ...the appropriate openings in the side corners of the heater housing Fixate each foot with a 4 2x9 5 screw at the re quiredheight Afterthisinsertbackthescrewsof the terminal box panel and secure them 3 Fill the stones into the rock store Rinsethesuppliedstoneswithclearwaterbefore filling them into the heater Placetheheateratitsdesignatedposition Move it against the rear sauna wall The spacers at the...

Страница 29: ...ith 2 screws Payattentionthatthefunnelshouldbeplaced well above the gutter level The mounting place of the funnel should exclude the risk of its accidental touching because it may be very hot Risk of burning Connect the funnel and the connector with the silicone tube The tube should decline to the connector the contact with the heater must be avoided 4 Mount the water infusion gutter The gutter ma...

Страница 30: ...pening in the bot tom of the terminal box and close the terminal box compartment 9 Partition wall and safety grill Installthepartitionwall screen sothatthesafe ty gaps as given on Fig 1 page 8 are observed Make sure that the heater s hot air exit opening is lined up properly with the screen wall gap The partition wall does not belong to the deliv ery scope of the sauna heater Ensurethatthepartitio...

Страница 31: ...up and remove the gutter 2 6 Remove the sauna rocks 7 Remove the support 3 2 screws 12 2 Remove the upper heating element Notice Always remove the upper heating element 4 10 Pull off the cable contacts from the heating elements 11 Undo the fixation nut of the heating element 12 Pull the heating element inwards and take it out 12 3 Removing other heating elements 13 Remove the rocks store 7 14 Repe...

Страница 32: ...e steam will quickly rise with the hot up rising air flow and will spread around the sauna cabin from top down delivering the famous loylu steam shock effect Attention Do not pour too much water at once Be aware that the steam is hot and the steam shock effect always occurs retarded which may cause scalding particularly at the upper benches Remember that the sauna rocks must heat up again after ea...

Страница 33: ...y daily commercial use we recommend to check the condition of sauna stones every 2 3 months and to reshuffle them By home use the sauna stones need to be checked and reshuffled at least once per year Never add more essences or vola tile oils than advised on the packaging Never use alcohol or undiluted concen trates Caution Fire hazard The sauna heating unit is made of low corro sion material To en...

Страница 34: ...o other electrical units will be protected by this ELCB Under current manufacturing technology it is not reasonable to use heating elements for sau na heaters which do not collect moisture from the surrounding air It is therefore possible that a little bit of moisture from the surrounding air may reach the magnesium oxide filling in the heating elements during transport or storage and may cause th...

Страница 35: ... your questions quickly and compe tently please provide the information printed on the type shield including the model item no and serial no in all inquiries Equipment commissioning date ____________________________ Stamp and signature of the authorized electrician Recycling Devices or lighting elements that will not be used any longer have to be handed in at a recycling station according to regul...

Страница 36: ...products is designed for the ship ping of individually packed goods pallet We expressly point out that our packaging is not suitable for individual shipments via parcel post The manufacturer shall accept no liability for damage incurred as a result of improper packaging in an individual shipment VI Manufacturer s Guarantee The manufacturer s guarantee shall apply only in the event that installatio...

Страница 37: ...ания 39 Подключение к Подключение производится 40 План подключений 41 Схема внутренней разводки 42 Монтаж 44 48 Tехнические данные 43 Порядок установки 43 Монтаж заливной воронки 48 Камни для сауны 49 Профилактика и уход 50 Адрес сервисного центра 50 Гарантия 50 Общие условия обслуживания ASB 51 ...

Страница 38: ...пература достигает 110 оС а внизу на полукабинытемпература приблизительно на 30 оС 40 оС ниже Поэтому бывает часто температурный зонд показывает 110 оС а термометр установленный на стенке на расстоянии приблизительно 20 25 см от потолка кабины показывает только 85 оС Как правило установив максимальную температуру на верхней лавке вы будете иметь 80 оС 90 оС Обратите также внимание в кабине непосре...

Страница 39: ...й сауны к сети нагревательное приспособление устройство управления освещение и т д может выполнять только электрик имеющий Указания При неквалифицированном монтаже может возникнуть опасность возгорания Прочитайте пожалуйста внимательно следующие указания и технические характеристики Этот прибор могут использовать дети от 8 лет а также лица с ограниченными физическими сенсорными или умственными воз...

Страница 40: ...у нижней границы печи и полом также в зависимости от конструкции печи В опорном исполнении это расстояние задается через цоколь Следует иметь в виду что сама печь не должна устанавливаться на легко воспламеняющихся покрытиях например дерево пластмасса и т п Наиболее подходящим половым покрытием для саун является керамическая плитка Расстояние между защитной решеткой печи или лавкой и другими легко...

Страница 41: ... V W N PE Gr Sensor Limiter Saunaheizgerät Sauna heater Poêle de sauna Печь для сауны max 9 kW Netz Mains Réseau Сеть 230 V AC N fan light L N L N L1 L2 L3 N W V U N N WB WM 3 4 S1S1 N STB Saunasteuergerät Control unit Boîtier de commande Пульт управления Sensorbus Saunabus reserviert Saunaheizgerät Saunaheater U V W N PE Gr Sensor Limiter 3 0 кВт 4 5 6 0 кВт План подключений ...

Страница 42: ...равления печь Inviso Mini 3 0 кВт 230V N AC 50 Hz 1 x 16 5 x 2 5 5 x 1 5 4 5 кВт 6 0 кВт 400V 3N AC 50 Hz 3 x 16 Все данные по поперечным сечениям проводов это минимальные поперечные сечения в мм для медных проводов Tехнические данные Invisio Mini Размеры В x Ш x Г см Для сауны Мин размер притока и вытяжки Вес без камней и упаковки Объем камней Расширение мощности Подходящие пульты управления 3 0 ...

Страница 43: ...в шлан гом и соединительным патрубком 90 1 защитная решетка 4 ножки 1 пакетик с 4 шурупами 1 табличка с предупредительной надписью 1 комплект камней 15 кг Минимальная высота кабины сауны должна составлять внутри 1 90 м Боковоерасстояниедовозгораемыхпредметов и поверхностей должно быть не менее 4 см Прочиеминимальныезазорыданынарисунке1 Находящаясявкомплектепоставкизащитная решетка должна быть уста...

Страница 44: ... открытой стороной наверх в продольные пазы по углам корпуса печи Закрепите каждую ножку шурупом 4 2x9 5 на необходимой высоте После этого поставьте боковую панель на прежнее место и закрепи те её двумя шурупами 3 Уложите камни в короб печи Перед укладкой камней прополощите их в чистой проточной воде Установите печь на предусмотренное место Придвиньте её к задней стенке сауны Специ альные уголки а...

Страница 45: ... шурупов При необходи мости воронка должна быть отгорожена небольшой перегородкой чтобы исклю чить случайное прикосновение Монтажноеместоворонкидолжно исключать случайное прикосновение к ней пользователей сауны Риск ожога Соедините воронку и патрубок силиконо вым шлангом Убедитесь с плотном кре пление шланга 4 Установите желоб для воды Желоб для распределения воды можно установить с уклоном налево...

Страница 46: ...т указаний в инструкции на пульт управлениядатчиктемпературыдолженбыть установлен по центру над печью на боковой стене сауны 10 см ниже кромки перегородки как показано на рис 1 Подключениедатчикапроизводитсясогласно инструкции на пульт управления сауной 8 Электрическое подключение Удалите 4 шурупа 4 2x9 5 и снимите боковую накладку закрывающую клеммную коробку Произведите подключения согласно схем...

Страница 47: ...упов 4 Снять накладку клемной коробки 8 4 шурупа 5 Снять желоб печи 2 6 Вынуть камни 7 Снять подставки 3 2 шурупа 12 2 Демонтаж верхнего нагрев элемента Указание Верхний элемент 4 должен быть демонтирован если необходима замена других элементов 10 Снимите клеммные контакты с эле мента 11 Открутите фиксирующую гайку на торце элемента 12 Вытяните элемент внутрь печи и наверх 12 3 Демонтаж прочих эле...

Страница 48: ...у соединительному шлангу вода подается через камни в печь и бла годаря разливочному желобу равномерно распределяется по камням Затем за счет восходящего горячего воздуха пар поднимается вверх из за перегородку и равномерно распределяется в кабине и такимобразомобеспечиваетсяклассический эффект образования банного пара Подождите около 8 10 минут до следующего подлива воды чтобы камни успели прогрет...

Страница 49: ...ло 100 г воды на куб метр объема сауны После поливания камней водой следует подождать 10 минут чтобы камни могли вновь достаточно прогреться При ежедневной коммерческой эксплуатации мы рекомендуем проверять и перекладывать камни в печи каждые 2 3 месяца При эксплуатации в домашних саунах камни в печи следует проверять и перекладывать не менее одного раза в год При употреблении ароматических эссен ...

Страница 50: ...ирменной табличке обозначение типа номер артикула и серийный номер Изготовитель EOS Saunatechnik GmbH Schneiderstriesch 1 35759 Driedorf Germany Германия Дата покупки Печать и подпись дилера Адрес сервисного центра в РФ ООО EOC Премиум СПА Технологии 108811 Москва Киевское ш БП Румянцево 928 г Телефоны 7 495 66 55 192 8 800 1000 539 info eos sauna ru www eos sauna ru ...

Страница 51: ...собоевнимание на то что наша упаковка не предназначена для штучной отправки службами доставки За ущерб возникший во время доставки оборудования из за его ненадлежащей упаковки производитель ответственности не несет VI Гарантия производителя Мы берем на себя гарантию производителя только в том случае если монтаж эксплуатация и техоб служивание были произведены в соответствии с данными производителя...

Отзывы: