background image

QUICK ST

AR
T GUIDE 

QUICK ST

AR

T GUIDE 

19

AMULET HYBRID DVR – FRONT PANEL

6

1

2

3

4

5

6

7

Availability of certain features is dependent on your service provider.

A

MULE

T H

Y

BRID DVR

A

MULE

T H
Y

BRID DVR

POWERING UP

  SETTING UP REMOTE CONTROL

1.

2. 

3.

4.

Locate the two AA batteries and remote control in the acces-

sory box
To open the battery cover, press down on the battery cover 

latch and slide it off
Insert the AA batteries, matching the "+" and "-" marks on the 

batteries to the "+" and "-" marks on the interior of the remote 

control
Snap the battery cover back onto the remote control

Solid Blue indicates the unit is on
Solid Red indicates the unit is in standby mode
Flashing Blue indicates the unit is starting up
Press button once to put unit in standby mode, press 

again to resume
To restart the device, press and hold button for at

least 5 seconds or longer

Blue dot indicates that Ethernet or Wi-Fi network connec-

tion is active

Clock displays current time set by your service provider. It 

may not display time during the restart process

Blue dot indicates a TV program is currently recording

Blue dot indicates current program is playing in HD (720p 

or higher) resolution

Use Back, Menu, OK and Directional buttons to help with 

navigating the user interface without a remote control

To connect USB devices such as USB Flash Drive, 

External USB Hard Drive

Button

Status LED

4-Digit LED

 Status LED

Status LED

Capacitive 

Touch Panel

 USB 2.0 

Connector

6

3

POWER

LINK

CLOCK

RECORD

HD

7-way Navigation 

+ MENU

 USB 2.0

Содержание Amulet 400

Страница 1: ...400 450 SERIES QUICK START GUIDE ...

Страница 2: ... OWNER OF THE MATERIALS TO AVOID VIOLATING THE LAW WHICH COULD RESULT IN DAMAGES OR OTHER REMEDIES TRADEMARKS Entone and the tagline Connecting the Home are trademarks of Entone Inc All other trademarks or registered trademarks belong to their respective owners CHANGES The material in this document is for information only and is subject to change without notice While reasonable efforts have been m...

Страница 3: ... 2 4 6 7 8 OVERVIEW High Definition TVs Standard Definition TVs 10 12 CONNECTING VIDEO Cable or ATSC Antenna 14 CONNECTING TV SOURCE TV Stereo A V Receiver Surround Sound 15 16 CONNECTING AUDIO Wired Wireless 17 18 CONNECTING NETWORK Declaration of Conformity 21 Setting up Remote Control Connecting to Power Source 19 20 POWERING UP 1 ...

Страница 4: ...it into your outlet consult an electrician for replacement of the obsolete outlet Protect the power cord from being walked on or pinched particularly at plugs convenience receptacles and the point where they exit from the apparatus Only use attachments accessories specified by the manufacturer Use only with the cart stand tripod bracket or table specified by the manufacturer or sold with the appar...

Страница 5: ...tall near any heat sources such as radiators heat registers stoves or other apparatus including amplifiers that produce heat Do not block cooling vents Do not place the equipment in a closed in wall unit When you disconnect a cable pull on its connector or on its strain relief loop not on the cable itself Some cables have a connector with locking tabs if you are disconnecting this type of cable pr...

Страница 6: ...Q U ICK S TAR T G UID E WHAT S INCLUDED 4 2xAA Batteries for Remote Control URC Quick Reference Guide Universal IR Remote Control Amulet Quick Start Guide Amulet Hybrid DVR AMULE T HYBRI D DVR ...

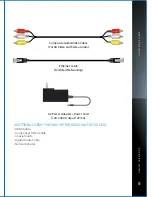
Страница 7: ...S THAT MAY BE REQUIRED NOT INCLUDED HDMI Cable Component Video Cable Coaxial Cable Digital Audio Cable Network Router Composite Audio Video Cable For SD Video and Stereo Audio Ethernet Cable For Wired Networking AC Power Adapter Power Cord 100 240V Output 12V 5A ...

Страница 8: ... dot indicates that Ethernet or Wi Fi network connec tion is active Clock displays current time set by your service provider It may not display time during the restart process Blue dot indicates a TV program is currently recording Blue dot indicates current program is playing in HD 720p or higher resolution Use Back Menu OK and Directional buttons to help with navigating the user interface without...

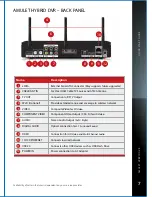
Страница 9: ...Video COMPONENT VIDEO Component Video Output Y Pb Pr for HD Video AUDIO Stereo Audio Output Left Right DIGITAL AUDIO Optical connection for 5 1 Surround Sound HDMI Connection for HD Video and Multi Channel Audio 10 100 ETHERNET Connects to wired network USB 2 0 Connects other USB devices such as USB Flash Drive POWER IN Power connection to AC Adapter Name Description 1 2 3 4 5 7 9 10 12 11 8 6 Ava...

Страница 10: ...Q U ICK S TAR T G UID E 8 REMOTE CONTROL 1 2 3 4 5 6 8 10 11 13 14 15 16 17 18 12 9 7 AMULE T HYBRI D DVR ...

Страница 11: ...ys on screen information about the current TV VOD DVR program ARROW KEYS Navigates up down left and right within the on screen guide or menus OK Executes the currently selected menu option Exits the current menu item or back to LIVE TV Displays the on screen program guide Changes channel up down or goes page up down within on screen program guide Changes channel to the most recently viewed channel...

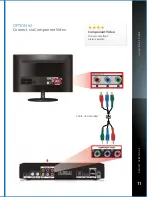
Страница 12: ...option then proceed to TV Source 10 OPTION 1 Recommended Connect via HDMI This connection provides both Video and Multi Channel Audio If you have selected HDMI for your Video then proceed to page 14 Cable not included Delivers the best video audio quality via a single cable AMULE T HYBRI D DVR ...

Страница 13: ...Q UICK S TAR T GU ID E 11 OPTION 2 Connect via Component Video Component Video Delivers excellent picture quality S VIDEO AMULE T HYBRID DVR Cable not included ...

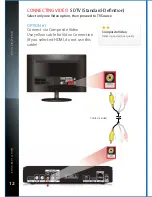
Страница 14: ...ion Select only one Video option then proceed to TV Source OPTION 1 Connect via Composite Video Use yellow cable for Video Connection If you selected HDMI do not use this cable S VIDEO Composite Video Delivers good picture quality Cable included AMU LE T HYBRI D DVR ...

Страница 15: ...13 CONNECTING VIDEO SDTV Standard Definition Select only one Video option then proceed to TV Source OPTION 2 Connect via Coaxial S VIDEO Coaxial Cable Delivers good picture quality ANT IN Cable not included AMULE T HYBRID DVR ...

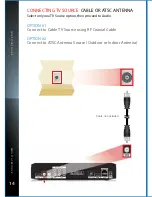
Страница 16: ...VR OPTION 2 Connect to ATSC Antenna Source Outdoor or Indoor Antenna CONNECTING TV SOURCE CABLE OR ATSC ANTENNA OPTION 1 Connect to Cable TV Source using RF Coaxial Cable Select only one TV Source option then proceed to Audio Cable not included ...

Страница 17: ...TION 1 Connect to TV s Stereo Audio Use red white cables for Audio Connection if you selected Component Video or Composite Video If you selected HDMI do not use these cables Select only one Audio option then proceed to Networking Cable included AMUL E T HYBRID DVR ...

Страница 18: ...Q U ICK S TAR T G UID E 16 AMULE T HYBRID DVR OPTION 2 Connect to an A V Receiver for Digital 5 1 Surround Sound CONNECTING AUDIO A V RECEIVER Surround Sound Cable not included ...

Страница 19: ... E 17 AMU LE T HYBRID DVR CONNECTING NETWORK WIRED OPTION 1 Connect to a Wired Network via DSL Cable Modem or Network Router Select only one Networking option then proceed to Powering up Router not included Cable included ...

Страница 20: ...HYBRID DVR OPTION 2 Connect to a Wireless Network via a Wireless Network Router or Access Point Attaching and adjusting the Antenna angle will help achieve better coverage and range CONNECTING NETWORK WIRELESS Wireless Router not included ...

Страница 21: ... AA batteries and remote control in the acces sory box To open the battery cover press down on the battery cover latch and slide it off Insert the AA batteries matching the and marks on the batteries to the and marks on the interior of the remote control Snap the battery cover back onto the remote control ...

Страница 22: ... TO POWER SOURCE 1 1 2 3 4 Connect the power cord to the POWER connector on the back of the Amulet Hybrid DVR Connect the AC power adapter to a power outlet Press the power button on the front of the Amulet Hybrid DVR to turn unit ON Follow the on screen instructions 2 ...

Страница 23: ...TA A label on the bottom of this equipment contains among other information the Ringer Equivalence Number REN and the product identifier For products approved after July 23 2001 the product identifier is in the format US AAAEQ TXXXX The digits represented by are the REN without a decimal point e g 03 is a REN of 0 3 The REN is used to determine the number of devices that may be connected to a tele...

Страница 24: ... may consist of any combination of devices subject only to the requirement that the sum of the Ringer Equivalence Numbers of all the devices does not exceed 5 0 Before installing this equipment users should ensure that it is permissible to be connected to the facilities of the local Telecommunication Company The equipment must also be installed using an acceptable method of connection The customer...

Страница 25: ...NOTES ...

Страница 26: ...NOTES ...

Страница 27: ......

Страница 28: ...or service marks of others All information contained in this document is subject to change without notice Information contained in this document is provided on an as is basis In no event will Entone be liable for damages arising directly or indirectly from any use of the information contained in this document Subject to change without notice ...

Отзывы: