SNS-TAG-HPA / SNS-TAG-LPA Installation Guide 3-1
3
Configuration
Once
a
TAG
appliance
is
physically
installed
into
a
rack,
you
need
to
connect
a
monitor
and
a
USB
keyboard,
connect
the
power
cord
and
network
cable,
and
power
it
on
(see
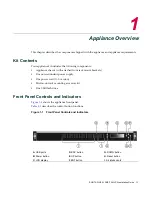
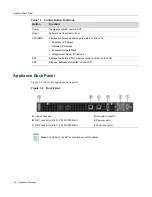
Figure 1
‐
1
and
Figure 1
‐
2
).
Then,
you
must
go
through
the
initial
configuration
process
described
in
this
chapter.
This
chapter
also
includes
information
on
how
to
change
your
appliance
settings
following
your
initial
configuration,
Changing
Trusted
Access
Gateway
Settings
on
page 3
‐
3.
Pre-Configuration Tasks
The
following
information
is
needed
prior
to
executing
any
of
the
steps
in
this
chapter:
•
Appliance
Hostname,
IP
address,
and
netmask
•
Gateway
IP
address
•
Management
Server
IP
address
Configure the Appliance
To
configure
the
appliance
to
run
the
Trusted
Access
Gateway
software:
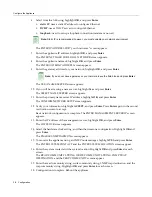
1.
Login
as
root
,
with
no
password,
and
then
press
Enter
.
You
will
receive
a
warning
that
there
is
no
root
password
detected,
and
be
asked
if
you
would
like
to
set
a
root
password.
2.
Highlight
Yes,
and
press
Enter
.
3.
Enter
the
new
password,
re
‐
enter
the
password,
and
press
Enter
.
The
CONFIGURE
NETWORK
screen
appears.
4.
Highlight
Yes
to
configure
your
network,
and
press
Enter
.
The
ENTER
HOSTNAME
screen
appears.
5.
Enter
the
hostname
for
the
appliance,
then
highlight
OK
and
press
Enter
.
The
SETUP
IP
ADDRESS
FOR
“your
host
name”
screen
appears.
Note:
To upgrade the pre-installed software, go to the Enterasys Networks web site to download the
latest version of the Enterasys Sentinel Trusted Access Gateway image. For instructions, refer to
Chapter 4
,
Upgrading Trusted Access Gateway Software
.
Note:
Enterasys recommends that all passwords be at least eight characters in length.
Содержание Sentinel SNS-TAG-HPA
Страница 2: ......
Страница 14: ...xii...
Страница 16: ...xiv...
Страница 28: ...Rack Mounting 2 6 Installation...
Страница 32: ...Changing Trusted Access Gateway Settings 3 4 Configuration...
Страница 34: ...4 2 Upgrading Trusted Access Gateway Software...


