background image

Entegris, Inc.   |   P/N 01-1040855  |   Rev. E 02/18

3

PRIMELOCK FITTING HANDHELD INSERTION TOOL


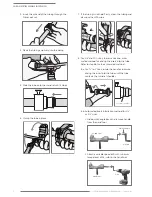
  iii.  Slowly depress the drill trigger clockwise, 

driving the insert into the tube until the  
tube contacts the mandrel shoulder.


  iv.  Reverse the drill’s direction and slowly 

depress the drill trigger counterclockwise 
until the mandrel is free from the tube 
assembly. Unclamp the tube.

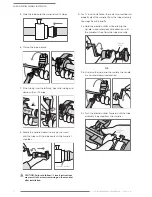
9. For 3⁄8" to 1 1⁄2" sizes, rotate the handle in a 

counterclockwise direction until the mandrel is 
free from the tube assembly. Unclamp the tube.

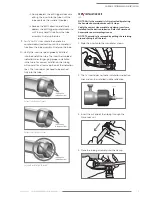
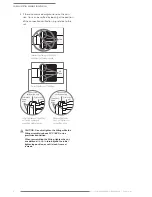
10.  Verify the insert has been properly installed 

into the end of the tube. The insert has molded 
indication lines for gauging proper installation  
in the tube. For correct installation, the tubing  
will cover all or at least a portion of the indication 
lines. The insert does not need to be pushed  
fully into the tube.

FOR 

1

4

" INSTALLATION ONLY

NOTE: Verify the mandrel is fully retracted by rotating  
the handle counterclockwise until it stops.

Verify the correct size mandrel and clamp inserts are 
installed for the desired tube size. Refer to PrimeLock 
Accessories on www.entegris.com.

NOTE: The mandrel is removed by pulling the retaining  
pin and sliding it off the tool.

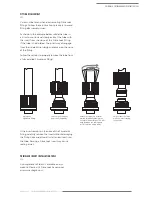
1.  Slide the insert onto the mandrel as shown.

2. The 1⁄4" insert does not have installation indication 

lines and can be installed in either direction.

3. Insert the cut end of the tubing through the 

PrimeLock nut.

4. Place the tubing assembly into the clamp.

Installation 
indication lines

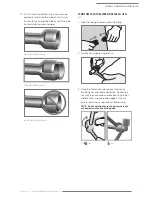
Correct installation of insert.

Correct installation of insert.

Installation 
indication lines

Incorrect installation of insert.

Installation 
indication lines

Insert

Содержание PrimeLock

Страница 1: ...icked or scratched INSTRUCTIONS For 3 8 to 11 2 PrimeLock Fittings NOTE Verify the mandrel is fully retracted by rotating the handle counterclockwise until it stops Verify the correct size mandrel and clamp inserts are installed for the desired tube size Refer to PrimeLock Accessories on www entegris com NOTE The mandrel is removed by pulling the retaining pin and sliding it off the tool 1 Slide t...

Страница 2: ... For 11 4 and 11 2 sizes there is a second auto mated method for driving the insert into the tube Refer to step 8b for the automated method 8a For 3 8 to 1 sizes rotate the handle clockwise driving the insert into the tube until the tube contacts the mandrel shoulder 8b Automated insert installation method for 11 4 or 11 2 sizes i Slide quick couple back and remove handle from the hand tool ii Att...

Страница 3: ...ver all or at least a portion of the indication lines The insert does not need to be pushed fully into the tube FOR 1 4 INSTALLATION ONLY NOTE Verify the mandrel is fully retracted by rotating the handle counterclockwise until it stops Verify the correct size mandrel and clamp inserts are installed for the desired tube size Refer to PrimeLock Accessories on www entegris com NOTE The mandrel is rem...

Страница 4: ...4 insert instructions may result in the insert remaining on the mandrel after installation 9 For 1 4 insert installation there are two methods to properly eject the mandrel from the tube assembly See steps 9a or 9b and 9c 9a Hold the ejection collar while rotating the handle in a counterclockwise direction until the mandrel is free from the tube assembly OR 9b Unclamp the tube and then rotate the ...

Страница 5: ...insert Incorrect installation of insert COMPLETING THE FITTING CONNECTION FOR ALL SIZES 1 Slide the tubing assembly onto the fitting 2 Start by hand tightening the nut 3 Place the PrimeLock wrench over the ribs of the fitting nut and rotate clockwise Tighten the nut until the connection verification ring creates audible clicks and the leading edge of the nut travels under the connection verificati...

Страница 6: ...ed condition When reassembling the fitting tighten the nut an additional 1 4 to 1 3 turn beyond the initial tightening position or until a leak free seal is made Incorrect tightening of the fitting additional tightening required Correct tightening of the fitting Initial tightening of the fitting nut travels underneath connection verification ring Maximum tightening limit nut bottoms out on the fitting ...

Страница 7: ... steps to properly remove the tube from a fully installed PrimeLock fitting If the insert remains on the nose of the PrimeLock fitting carefully remove the insert without damaging the fitting nose and discard Install a new insert into the tube Reusing a PrimeLock insert may cause sealing issues PRIMELOCK INSERT INSTALLATION TOOLS A complete set of tools is available on our website Please visit Pri...

Страница 8: ...gris Terms and Conditions of Sale To view and print this information visit entegris com and select the Terms Conditions link in the footer www entegris com P N 01 1040855 Rev E 02 18 Entegris the Entegris Rings Design Pure Advantage and other product names are trademarks of Entegris Inc as listed on entegris com trademarks All third party product names logos and company names are trademarks or reg...

Отзывы: