


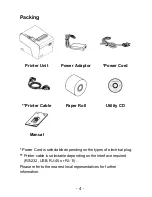


-
5 -
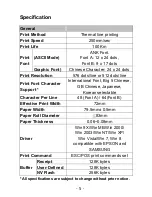
Specification
General
Print Method
Thermal line printing
Print Speed
250mm/sec
Print Life
100 Km
Print
Font
(ASCII Mode)
ANK Font.
Font A: 12 x 24 dots,
Font B: 9 x 17 dots
Graphic Font)
Chinese Character: 24 x 24 dots
Print Resolution
576 dots/line or 512 dots/line
Print Font Character
Support *
International Font, Big 5 Chinese,
GB Chinese, Japanese,
Korean selectable
Character Per Line
48 (Font A) / 64(Font B)
Effective Print Width
72mm
Paper Width
79.5mm± 0.5mm
Paper Roll Diameter
≦
83mm
Paper Thickness
0.06~0.08mm
Driver
Win 9X/Win ME/Win 2000/
Win 2003/Win NT/W in XP/
Win Vista/Win 7, Win 8
compatible with EPSON and
SAMSUNG
Print Command
ESC/POS print commands set
Buffer
Receipt
128K bytes
User-Defined
128K bytes
NV Flash
256K bytes
* All specifications are subject to change without prior notice.
Содержание PRP-188
Страница 1: ...Save the user manual for future reference Thermal Receipt Printer Instruction Manual ...
Страница 2: ......
Страница 4: ......
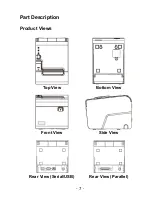
Страница 12: ... 8 Dimensions ...
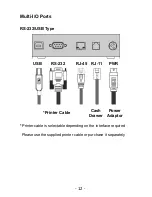
Страница 17: ... 13 Parallel Type Parallel Port RJ 11 PWR Printer Cable Cash Drawer Power Adaptor ...
Страница 19: ... 15 Baud Rate Setting DIP 7 DIP 8 19200 Default 9600 115200 38400 ...
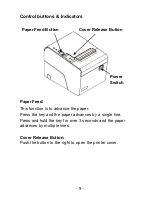
Страница 23: ... 19 3 Replace the Cover and tear out the paper ...
Страница 26: ... 22 4 Click Next to continue ...
Страница 27: ... 23 5 Select the Operating System For example select Windows XP for Windows XP version Click Next to continue ...
Страница 29: ... 25 1 Select Module Number Select the proper Printer Model Number ...
Страница 33: ... 29 Access sub menu Ports and click to select the correct port for your printer Click OK to exit ...
Страница 44: ... 40 4 As the location of the driver is specified Click Next to continue ...
Страница 45: ... 41 5 Start Notification Click Continue Anyway to continue ...
Страница 46: ... 42 6 The wizard is installing the driver ...
Страница 54: ... 50 Printer Status This menu displays the printer status and can perform print test ...
Страница 60: ... 56 2 Access submenu Port and click Add Port 3 Select Standard TCP IP Port and click New Port and proceed ...
Страница 62: ... 58 6 Additional Port Information Select Custom and click Setting to continue ...
Страница 64: ... 60 8 Click Finish to complete ...
Страница 71: ... 67 ...
Страница 72: ...20121110 ...