


-
33 -
Parallel Pin Assignment
Pin
Signal
Signal
Source
Description
1
/STB
HOST
The HOST (computer)
presents the data on the
data lines and pulses STB.
2
DATA0
HOST
Indicates Data Bit 0 ~ Data
Bit 7 (8 bits)
3
DATA1
4
DATA2
5
DATA3
6
DATA4
7
DATA5
8
DATA6
9
DATA7
10
nAck
Printer
Acknowledge Signal
(Indicates that the printer
has received the data
successfully and ready to
receive the next data).
11
BUSY
Printer
Printer is busy and cannot
receive data from the
HOST.
12
PE
Printer
Printer Paper is out.
13
Select
Printer
High electric potential.
14, 15
N.C.
---
---
16, 17
GND
---
Ground
18
Logic-H
Printer
High electric potential.
19 ~ 30
GND
---
Ground
31
N.C.
---
---
32
nFault
Printer
Printer Error Signal
33
GND
---
Ground
34 ~ 36
N.C.
---
---
Содержание PRP-188
Страница 1: ...Save the user manual for future reference Thermal Receipt Printer Instruction Manual ...
Страница 2: ......
Страница 4: ......
Страница 12: ... 8 Dimensions ...
Страница 17: ... 13 Parallel Type Parallel Port RJ 11 PWR Printer Cable Cash Drawer Power Adaptor ...
Страница 19: ... 15 Baud Rate Setting DIP 7 DIP 8 19200 Default 9600 115200 38400 ...
Страница 23: ... 19 3 Replace the Cover and tear out the paper ...
Страница 26: ... 22 4 Click Next to continue ...
Страница 27: ... 23 5 Select the Operating System For example select Windows XP for Windows XP version Click Next to continue ...
Страница 29: ... 25 1 Select Module Number Select the proper Printer Model Number ...
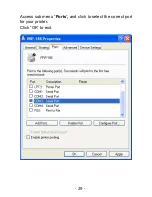
Страница 33: ... 29 Access sub menu Ports and click to select the correct port for your printer Click OK to exit ...
Страница 44: ... 40 4 As the location of the driver is specified Click Next to continue ...
Страница 45: ... 41 5 Start Notification Click Continue Anyway to continue ...
Страница 46: ... 42 6 The wizard is installing the driver ...
Страница 54: ... 50 Printer Status This menu displays the printer status and can perform print test ...
Страница 60: ... 56 2 Access submenu Port and click Add Port 3 Select Standard TCP IP Port and click New Port and proceed ...
Страница 62: ... 58 6 Additional Port Information Select Custom and click Setting to continue ...
Страница 64: ... 60 8 Click Finish to complete ...
Страница 71: ... 67 ...
Страница 72: ...20121110 ...