Ensemble Designs Avenue 9430 Скачать руководство пользователя страница 4

Model 9430 Flexible Matrix Router

Page 4

The subnet mask must be set in accordance with the size and topology of your network. 
The default setting as received from the factory is for a smaller network: 255.255.255.0. For 
a larger network, a typical setting is 255.255.0.0. If in doubt, use the setting for a  
larger network. 

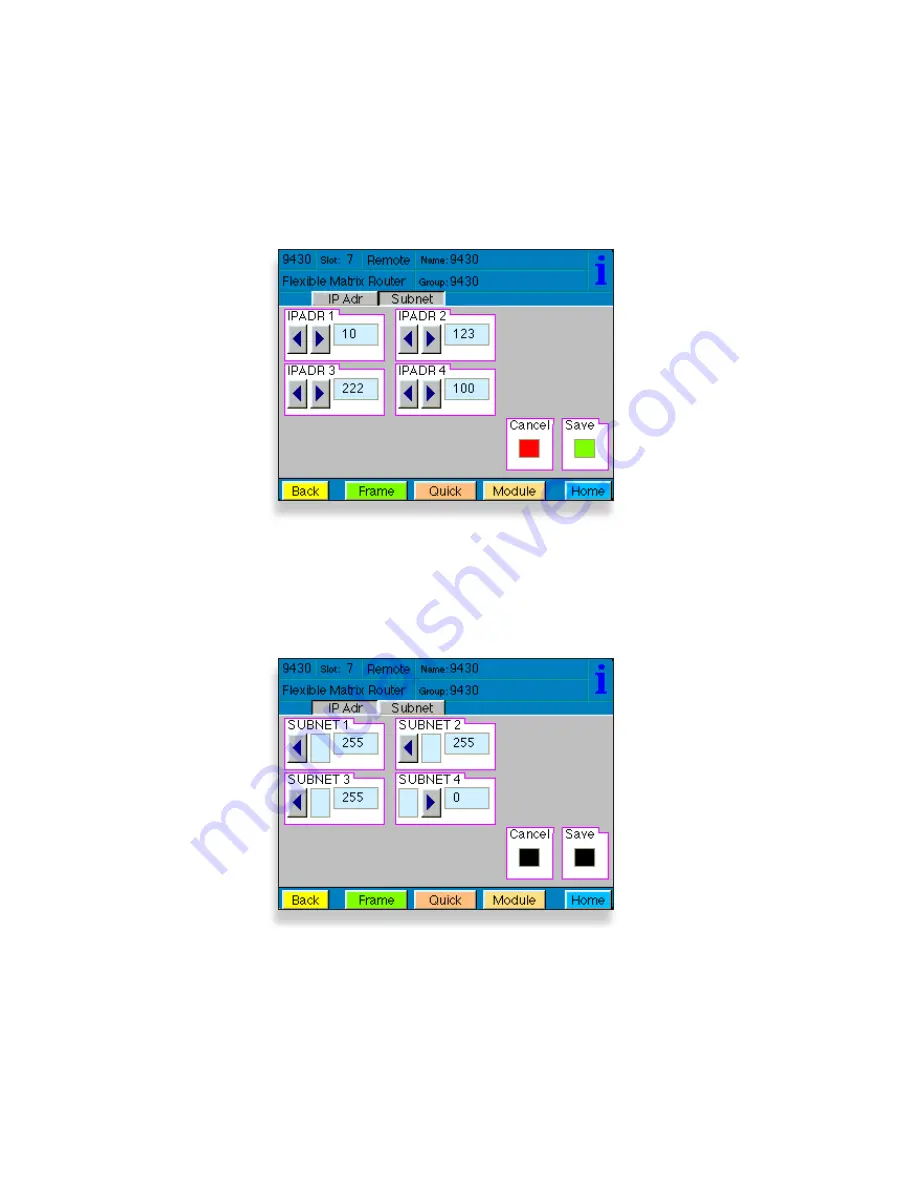
To Set the Subnet Mask

1.  From the Subnet menu, modify the settings as needed. Use the arrow buttons to 

change the settings, or touch each number field to use the pop-up keypad. 

2.  When finished, press Save. Both the Cancel and Save buttons turn black to indicate 

that your new settings have been saved. 

You can now browse to the 9430 from a computer on your network as described in the  
next step. 

2.  From the IP Adr menu, enter the IP address you want to use that is compatible with 

your own network. The simplest method is to touch each number field, using the  
pop-up keypad to enter the new numbers. For example, you may want to change the 
IP address to something like the following: 10.123.222.100. 

3.  Press Save. Both the Cancel and Save buttons turn black to indicate that your new 

settings have been saved. 

Note that when using Avenue PC instead of the Touch Screen interface, after entering 
numbers into the number fields, you will need to hit the “enter” or “return” key for the 
change to register. 

A new IP address has been entered, but not yet saved 

The Subnet menu showing typical settings for a smaller network 

Содержание Avenue 9430

Страница 1: ...essential steps for getting started with your new Avenue 9430 Flexible Matrix Router Step 1 Connecting Network Cables Step 2 Assigning the Router a New IP Address Step 3 Establishing Initial Control P...

Страница 2: ...Three Slots Leaving Room for Seven Additional Processing Modules RS 232 or Ethernet Control to Avenue Control Panel Master Control or Automation System 9435 Clean Switch Sub Module 9430 ROUTER 9440 E...

Страница 3: ...onnecting the 9430 to RS 232 and 100 Mb Ethernet interfaces Step 2 Assigning the Router a New IP Address and Subnet Mask When you initially power up the 9430 as received from the factory it will take...

Страница 4: ...saved You can now browse to the 9430 from a computer on your network as described in the next step 2 From the IP Adr menu enter the IP address you want to use that is compatible with your own network...

Страница 5: ...r functions To Create an Initial Control Point 1 Navigate to the 9430 s new IP address with your browser The Control Point Needed window displays 2 From the Control Point Needed window enter the name...

Страница 6: ...s Control Points window 5 From the left navigation panel click Network The Settings Network window displays 6 Set the Gateway and DNS Server parameters according to your network configuration In gener...

Страница 7: ...by the Ethernet connection using PoE Power over Ethernet provided that you have a PoE enabled Ethernet switch to insert power into the Ethernet cables A portion of the rear of the 1RU Router Control P...

Страница 8: ...yellow button to access the Mode menu settings The Set Network Mode screen displays 2 Use the Up and Down navigation buttons to select either Static or DHCP 3 Press Enter to exit the Mode menu When c...

Страница 9: ...ackground Creating a Control Point for the 5830 Control Panel 1 Navigate to the 9430 s IP address with your web browser The Router Control page displays 2 Click Settings from the drop down menu The Se...

Страница 10: ...Input Port 8 Input Port 7 Input Port 3 Input Port 2 Input Port 6 Input Port 5 Network Serial 9440 Router Expansion 2 I O Port 21 I O Port 26 I O Port 30 9430 I O Port 29 I O Port 22 I O Port 25 I O Po...

Отзывы: