background image


18 

II.9.


System Settings 

To enter system settings menu. 
 

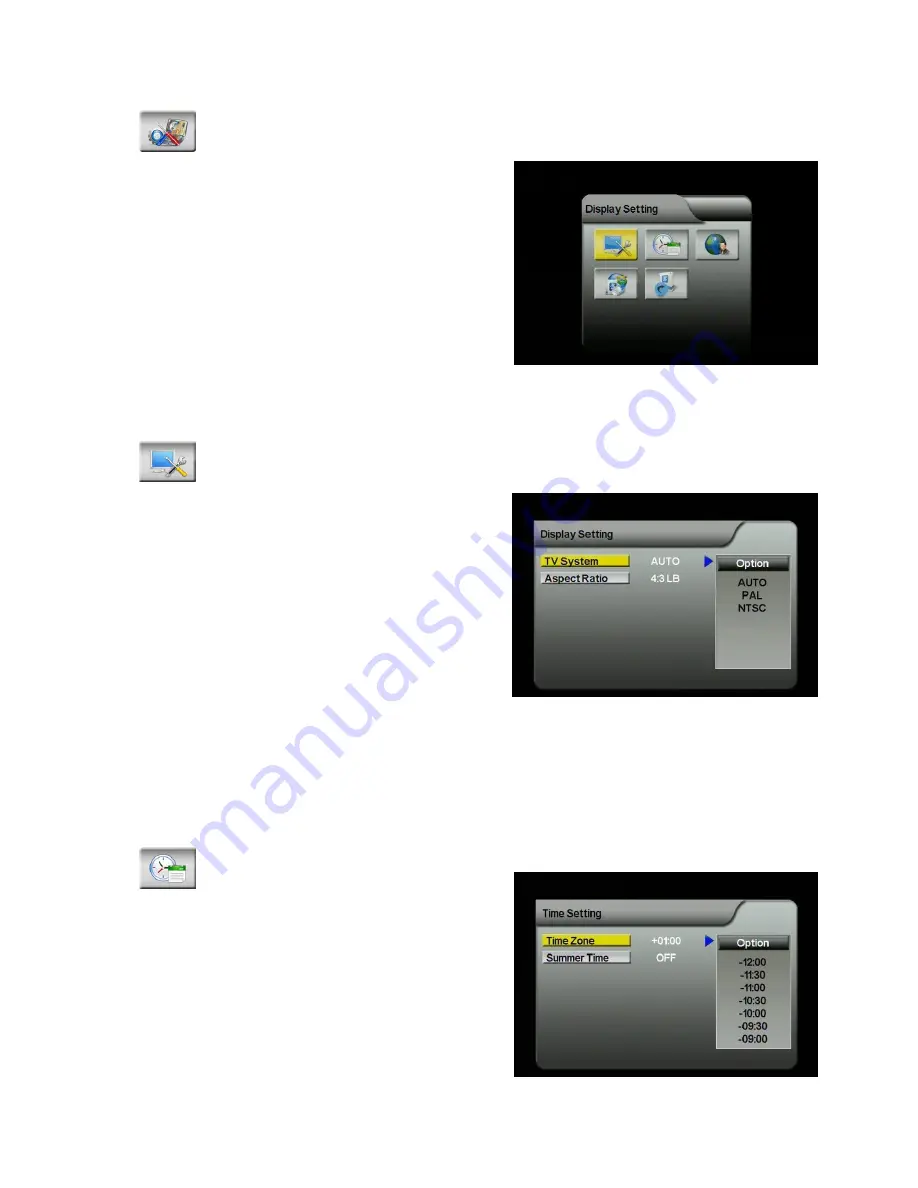
In  this  menu  you  can  have  access  to 
display  setting,  region/language  settings, 
time settings, software version, and reset 
default. 


II.9.1


Display Setting 

To set up TV system (PAL, NTSC, AUTO) and the aspect ratio. 


1.


Browse  the  System  Settings  menu 
screen  using  [CH

]  /  [CH

]  / 

[VOL

]  /  [VOL

]  buttons  to 

highlight  the  item  you  want  to 
adjust. 

2.


Press [VOL

] button and use [CH

/[CH

]  to  scroll  up  and  down  the 

options. 

3.


Select  one  by  pressing  the  [OK] 
button or exit the setting by pressing the [EXIT]/[MENU] button. 

4.


After adjusting, press [EXIT]/[MENU] button to exit the “Display Settings”. 


II.9.2


Time Setting 

To set time and summer time settings. 
 

1.


Browse  the  System  Settings  menu 
screen  using  [CH

]  /  [CH

]  / 

[VOL

]  /  [VOL

]  buttons  to 

highlight “Time Setting”. Press [OK] 
to enter. 

2.


Press  [VOL

]  button  and  use 

[CH

]/[CH

] to scroll up and down 

Содержание EH-DVB1

Страница 1: ......

Страница 2: ...k you vehicle in a safe location and make necessary adjustment Do not push objects of any kind into this product through openings as they may touch dangerous voltage points or short out parts that could result in a fire or electric shock Do not put this unit near the liquids Electrical shock could result Also this unit damage smoke and overheat could result from splashing liquids on receiver Be su...

Страница 3: ...ort If any solid object or liquid fall into the cabinet unplug the unit and have it checked by qualified personnel before operating it any further On Placement Do not install the in car DVB T receiver where it may obstruct the driver s vision ii impair the performance of any of the vehicle s operating systems or safety features including air bags hazard lamp buttons or iii impair the driver s abil...

Страница 4: ...ram List 13 II 3 Automatic Channel Search 14 II 4 DVB T Audio Settings 14 II 5 Channel Information 15 II 6 Channel Management 15 II 7 Subtitle 17 II 8 Teletext 17 II 9 System Settings 18 II 9 1 Display Setting 18 II 9 2 Time Setting 18 II 9 3 Region Language 19 II 9 4 Software Version 19 II 9 5 Reset Default 19 III Trouble Shooting Q A 20 IV Specification 21 ...

Страница 5: ...wer the infrared receiver module and digital TV audio video signal output 4 Software Upgrade earphone connection jack for software upgrade use Warning Make sure all Power Cables are connected correctly Warning Please connect the antennas before switching the unit on If you turn the unit on before connecting the antennas the receiver may not receive any signal Please connect the antennas first and ...

Страница 6: ...rear of the vehicle Please refer to the Diagram below for some of our recommendations Rear Location Front Location 1 Behind the Rear Bumper providing it s not Metal 2 Bottom of Rear Windscreen 3 Top of Rear Windscreen 4 Top of Front Windscreen 5 Bottom of Front Windscreen 6 Behind the Front Bumper providing that it s not Metal Once a suitable position is found carefully route the antenna cables to...

Страница 7: ...ursor right 18 PREVIEW Enter preview mode in DVB T TV 19 PLAY PAUSE Select play or pause 20 AUDIO Select second language and stereo audio 21 INFO Display digital TV system information 22 AUTO To scan channels automatically 23 MANUAL To manually select channels 24 ENTER To enter the selected channel number 25 TTX To display teletext content 26 YELLOW BUTTON Select page up in the EPG mode or the hot...

Страница 8: ...8 o Connection cable o Remote control o IR extension cable o 2 pcs active antennas optional Accessories ...

Страница 9: ... IR Sensor will illuminate GREEN and the operation LED on the unit will also illuminate Green NOTE If the Operation LED does not turn on please check if the remote battery is inserted properly If the LED on the IR extension cable remains Red please check if the remote battery is inserted correctly If it s still not working please refer to the trouble shooting section Step 2 Press CH CH VOL VOL but...

Страница 10: ... at present 1 Use CH CH buttons to highlight the item 2 Use VOL button to set the highlight item 3 Press CH CH buttons to scroll up and down the options 4 Select one by pressing the OK button or exit the setting by pressing the EXIT MENU button NOTE Time zone setting will be automatically updated once the Region setting is changed ...

Страница 11: ...able DVB T channels 1 Use CH CH buttons to highlight the Auto Search item 2 Press OK button to start Step 6 Job well done You can now sit back and enjoy your mobile TV NOTE Keep OK button pressed to change the aspect ratio of current TV program ...

Страница 12: ...rigger DVB T TV Menu Use CH CH VOL VOL buttons to browse DVB T menu to highlight Radio menu item and then press OK button to enter the radio mode 2 Press CH CH buttons to select your preferred radio channel 3 The radio service will instantly start ...

Страница 13: ...ystem setting II 1 Radio To switch to DVB T Radio program II 2 Program List To display channel information preview the program and to access the Electronic Program Guide EPG 1 Browse the TV menu screen using CH CH VOL VOL buttons to highlight Program List option Press OK button to enter NOTE you can also press EPG button to enter Program List while enjoying DVB T TV Radio 2 Press CH CH buttons to ...

Страница 14: ...nel search II 4 DVB T Audio Settings To select either master or secondary language as well as the audio channel of current service 1 Browse the TV menu screen using CH CH VOL VOL buttons to highlight the audio option Press OK button to enter the audio menu NOTE you can also press AUDIO button to enter Channel Information while enjoying DVB T TV Radio 2 Use VOL VOL buttons to select stereo left rig...

Страница 15: ... and to edit the TV channel listing using skip move lock and delete functions 1 Browse the TV menu screen using CH CH VOL VOL buttons to highlight the Channel Management option 2 Press OK button to enter Channel Management menu 3 Press CH CH buttons to scroll up down the channel list Press OK button to enter the editing menu for a chosen channel 4 Press EXIT MENU button to exit anytime Skip a Chan...

Страница 16: ...16 Users can restore the channels by deactivating the function ...

Страница 17: ...he MOVE visual button on screen by pressing VOL VOL buttons 2 Use CH CH buttons to move the channel up or down in the list 3 Press OK button to save the new listing Channel Delete 1 After entering the channel editing menu select the DELETE visual button on screen by using VOL VOL buttons 2 Press OK button to delete the channel NOTE this function will permanently delete the channel from the current...

Страница 18: ... VOL VOL buttons to highlight the item you want to adjust 2 Press VOL button and use CH CH to scroll up and down the options 3 Select one by pressing the OK button or exit the setting by pressing the EXIT MENU button 4 After adjusting press EXIT MENU button to exit the Display Settings II 9 2 Time Setting To set time and summer time settings 1 Browse the System Settings menu screen using CH CH VOL...

Страница 19: ...wse the System Settings menu screen using CH CH VOL VOL buttons to highlight the item you want to adjust 2 Press VOL button and use CH CH to scroll up and down the options 3 Select one by pressing the OK button or exit the setting by pressing the EXIT MENU button 4 After adjusting press EXIT MENU button to exit the Region Language Settings II 9 4 Software Version To display system s software versi...

Страница 20: ... They can differ depending on the area In DVB T mode all of the channels show no signal or random mosaic tiles appear on the display Some TV channels signal quality is too low Please use active antennas instead of passive antennas for better reception quality The antennas are not properly connected Please check the connection of the antennas No DVB T service is provided in the area Check your coun...

Страница 21: ... standard ETS 3 00 7 44 DVB T compliance Video Audio decoder MPEGII S W Feature OSD Language English German French Portuguese Spanish Italian Dutch Finnish Features DVB T TV Radio Auto Channel Search Multi Language EPG Channel Preview Teletext Subtitle Interface Power AV IR Port Connector interface between ARA and monitor Software Upgrade Earphone jack plug in port for software upgrade use Power I...

Отзывы: