background image

Page | 17


OPERATION


Break

In


Fires


• 

This


wood


burning


unit


is


constructed


of


heavy


gauge


steel


and


cast


iron


and


is


built


to


last


a


long


time.


However,


in


order


to


ensure


no


excessive


thermal


stresses


are


induced


on


the


metal


during


the


first


fire,


three


break

in


fires


should


be


burned,


each


one


slightly


hotter


than


the


last.


These


break

in


fires


will


not


only


help


the


stove


body


acclimate


to


the


high


temperatures


of


the


fire,


but


will


also


slowly


cure


the


high


temperature


stove


paint,


which


will


ensure


the


high


quality


finish


lasts


for


years.


• 

This


stove


has


a


single


air


control


rod


which


regulates


the


wood


burn


rate;


when


the


primary


air


control


slide


is


pulled


all


the


way


out


of


the


unit,


the


stove


will


burn


more


slowly


and


put


out


heat


over


a


longer


time


period.


Conversely,


when


the


air


control


slide


is


pushed


all


the


way


in,


the


unit


will


burn


more


quickly


and


put


out


a


larger


amount


of


heat


over


a


relatively


shorter


time


period.


Do


not


attempt


to


modify


the


range


of


air


control


adjustment


for


any


reason.


• 

The


first


break

in


fire


should


be


just


a


large


kindling


fire,


getting


the


stove


to


about


300

°

F


as


measured


by


a


magnetic


thermometer


on


the


right


or


left


side


of


the


stove,


above


the


door.


Once


this


temperature


has


been


reached,


allow


the


fire


to


die


out


with


the


air


control


open.


The


second


and


third


break

in


fires


should


be


a


bit


larger,


with


some


small


dry


splits


added


to


the


kindling


load.


The


temperature


goal


during


these


fires


is


about


350

°

F


450

°

F;


don’t


let


the


fire


get


hotter


than


that.


Continuous


Operation


• 

After


the


break

in


fires


are


complete,


this


unit


is


ready


for


continuous


operation.


When


burning


the


stove


continuously,


do


not


allow


ash


and


coals


to


accumulate


higher


than


the


air


hole


in


the


dog


box.


Excessive


coaling


is


often


a


result


of


burning


wood


at


too


high


a


burn


rate,


and


the


coal


bed


should


be


allowed


to


burn


down


before


reloading


the


stove


with


fresh


wood.


• 

Combustion


air


is


delivered


to


the


stove


at


two


locations:


The


majority


of


the


primary


combustion


air


enters


the


firebox


via


the


air

wash


system


which


keeps


the


glass


clean


and


feeds


the


primary


combustion


flames


on


the


top


surfaces


of


the


wood;


some


primary


combustion


air


is


feed


into


the


coal


bed


via


the


dog


box


hole


in


the


bottom,


front


box


of


the


stove.


(This


air


is


supplied


from


under


the


unit.)


Every


effort


must


be


taken


to


maintain


the


area


in


front


of


this


hole


free


of


ash.


• 

When


loading


the


stove


for


a


long


term


burn,


it


is


most


useful


to


rake


a


“v”


in


the


center


of


the


coal


bed,


to


allow


the


primary


air


bleed


hole


to


push


air


all


the


way


to


the


rear


of


the


unit.


• 

After


loading


the


stove


with


a


full


firebox


of


fresh


wood,


it


is


important


to


operate


the


unit


with


the


air


control


in


the


full


open


position


to


properly


char


the


wood


load


and


drive


off


the


initial


moisture


in


the


fresh


wood.


Once


the


wood


has


been


properly


charred


and


is


completely


ignited,


the


air


control


can


then


be


set


to


the


desired


heat


output


level.


• 

This


unit


also


offers


a


new


feature.


When


loading


the


stove


for


a


long


low


burn,


you


can


set


the


air


control


damper


to


allow


the


unit


to


heat


up


and


get


a


good


burn


going


before


the


air


is


closed


off


to


the


low


position.


Simply


pull


the


rod


out


to


low


and


turn


it


counter

clockwise


until


you


hear


a


slight


“click”


(about


a


quarter


of


a


turn).


When


it


is


ready


the


damper


will


shut


itself.


This


will


work


for


low


and


medium


low


settings.


Содержание THE MADISON 15-SSW01

Страница 1: ...ance Keep children furniture fixtures and all combustibles away from any heating appliance SAVE THESE INSTRUCTIONS SAFETY NOTICE Failure to follow these instructions can result in property damage bodily injury or even death For your safety and protection follow the installation instructions outlined in this manual Contact your local building or fire officials about restrictions and installation in...

Страница 2: ...Purchase Date of Manufacture Serial Number This information can be found on the safety tag attached to the rear of the unit Have this information on hand if you phone the factory or your dealer regarding this product Keep children away CAUTION Supervise children in the same room as this appliance Alert children and adults to the hazards of high temperatures Do NOT operate with protective barriers ...

Страница 3: ...tenance Stove Maintenance 20 Inspecting Gaskets 21 Finish 21 Replacing Components Glass 22 Burner Tubes 23 Ceramic Fiberboards 23 Door Hinges 23 Heat Shield Back Panel 23 Other Components 24 Optional Accessories AC 16 AC 30 Blower 24 Side Heat Shield 24 Troubleshooting Guide Troubleshooting 25 Illustrated Parts Detail Parts List 26 Exploded Parts Diagram 27 Brick Layout 28 Warranty Sample Tag 29 W...

Страница 4: ...er while remaining simple our stoves are designed to perform extremely efficiently helping deliver more heat from less fuel Please look at our vast Help section on our website and call our Technical Support Department at 800 245 6489 if you need any help with your unit We are nearly always able to walk you through any installation issues repairs problems or other questions that you may have Wishin...

Страница 5: ...tified Particulate Emissions 2 49 grams hr Efficiency 72 HHV 78 LHV Tested To UL 1482 ULC S627 00 Maximum burn times are heavily dependent on the type of wood burned in the stove as such these numbers may vary The maximum heating capacity of this unit can vary greatly based on climate construction style insulation and a myriad of other factors Use this information in conjunction with a BTU loss ca...

Страница 6: ...eeping the entire chimney system inside the heated envelope of the home will ensure a strong easy to initiate draft in the chimney Although exterior chimney systems often function properly they are more likely to suffer from cold down drafts at start up or provide weak draft to the unit Also consider the cross sectional area of the chimney although existing masonry chimneys can often be used a lar...

Страница 7: ... C D E F in mm in mm in mm in mm in mm in mm Single Wall Chimney Connector Unprotected Surface 21 5 546 1 29 736 6 12 304 8 7 5 190 5 9 5 241 3 19 482 6 Double Wall Chimney Connector Unprotected Surface N A N A N A N A N A N A Single Wall Chimney Connector Unprotected Surface with side shields 17 5 445 5 25 635 12 304 8 7 5 190 5 5 5 139 7 15 381 Double Wall Chimney Connector Unprotected Surface w...

Страница 8: ...ial to be certain your installation meets local and national fire codes and if you re uncertain about how to safely install the stove we strongly recommend contacting a local NFI certified installer to perform the installation ALWAYS install vent pipe in strict adherence to the instructions and clearances included with your venting system DO NOT connect this wood stove to a chimney flue which also...

Страница 9: ...tric or stovepipe damper with this unit Never use single wall or double chimney connector as a chimney system never pass either type of chimney connector through a combustible wall without carefully following the manufacturer s instructions and those listed in the following page on Wall Pass Throughs NEVER pass chimney connector through an attic floor closet or roof Only use 24 gauge MSG black sin...

Страница 10: ...INSTALLATION Wall Pass Throughs In Canada the installation must conform to CAN CSA 8365 when passing through combustible construction Page 10 ...

Страница 11: ...wall chimney connector joint check manufacturer s recommendations when double wall chimney connector is used Drill three holes in the flue collar of the unit and attach the chimney connector to the unit using sheet metal screws holes should be pre drilled in flue collar from factory Properly attach the prefabricated chimney system to the home in strict accordance with the prefabricated chimney sys...

Страница 12: ...at each single wall chimney connector joint check manufacturer s recommendations when double wall chimney connector is used Drill three holes in the flue collar of the unit and attach the chimney connector to the unit using sheet metal screws holes should be pre drilled in flue collar from factory Properly attach the prefabricated chimney system to the home in strict accordance with the prefabrica...

Страница 13: ...himney connector is used Drill three holes in the flue collar of the unit and attach the chimney connector to the unit using sheet metal screws holes should be pre drilled in flue collar from factory Avoid numerous elbows and excessive horizontal runs as both will lead to poor draft and increased creosote accumulation Horizontal runs of chimney connector must never exceed 4 0 ft and the overall le...

Страница 14: ...t in a zero 0 clearance fireplace The manufacturer will not be held responsible for an accident resulting from this stove being installed on a hearth constructed of a combustible material Inspect your fireplace to ensure it is in proper working order and free of any obstructions Prior to installation remove the existing damper or wire it to fasten it open Venting Your Stove Direct Connect When thi...

Страница 15: ...rk Arrestor Class A Chimney System Roof Flashing and Storm Collar Joist Shield Firestop Mobile Home Approved Double Wall Chimney Connector Use silicone to create a vapor barrier where the chimney passes through to exterior HUD CFR 3280 Part 24 as well as any applicable local codes Outside Combustion Air The use of outside combustion air is mandatory when installing this wood stove in a mobile or m...

Страница 16: ...r protector only serves to keep ashes and sparks from landing on combustible flooring near the unit A hearth rug is NOT an approved substitute for a proper hearth pad No R Value is necessary For the US The floor protector must extend at least 16 in from the front of the fuel opening 8 in from the sides of the door opening and 8 in from the rear of the unit For Canada The floor protector must exten...

Страница 17: ... is ready for continuous operation When burning the stove continuously do not allow ash and coals to accumulate higher than the air hole in the dog box Excessive coaling is often a result of burning wood at too high a burn rate and the coal bed should be allowed to burn down before reloading the stove with fresh wood Combustion air is delivered to the stove at two locations The majority of the pri...

Страница 18: ...eration temperatures and that the secondary combustion system is functioning properly Additionally follow the guidelines below for acceptable blower speeds When using the optional room air convection blower Part No AC 16 or you can upgrade to the AC 30 the blower should be operated as follows depending on heat output level Burn Rate High Medium High Medium Medium Low Low Blower Speed AC 16 High Hi...

Страница 19: ...ng this unit with the loading door latched loosely or open will allow excessive combustion air to reach the fire and will result in dangerously high unit temperatures High unit temperatures can damage the unit void the warranty or ignite creosote deposited in the chimney system by previous slow burning fires The natural draft that pulls air through this unit and allows the fire to burn uses the in...

Страница 20: ...ns Thoroughly clean the chimney system and the chimney connector system Since the chimney connector is generally exposed to high exhaust temperatures inspect it carefully for leaks and weak spots replace any questionable pieces In the case of straight through the roof chimney system be certain to remove the ceramic fiber baffles before pushing the chimney sweeping brush down into the firebox Force...

Страница 21: ...skets should only be replaced with equivalent fiberglass gaskets purchased from England s Stove Works specifically for this unit Gaskets 1 Door This unit comes with a rope gasket around the door that should be replaced at least every year To replace the door gasket Part AC DGKHD the old gasket must first be removed entirely prior to adding the new adhesive you may have to scrape the old cement fro...

Страница 22: ...y be light and water is normally sufficient to remove the deposits If stubborn soot persists use a cleaner made specifically for this purpose Do not scrape the glass or use abrasive cleaners 3 Rinse the glass with clean water and dry the glass before resuming normal operation Glass Replacement 1 Remove the door from the stove and rest it face down on a firm work surface 2 Using a 5 16 wrench remov...

Страница 23: ...e hinges on this unit were designed to be adjustable The plates are secured using a bolt and nut To adjust the hinge plates in or out first remove the door then use a socket and open ended wrench one on the nut and one on the bolt head and loosen the bolt nut Slide the plate in out as desired and then use the socket and wrench to tighten the bolt nut Use care when adjusting hinges If enough room i...

Страница 24: ...ttest regions of the stove and transfer it into the home The mounting screws for the blower are installed into the rear convection channel at the factory mounting the blower only requires a 5 16 open end or socket wrench to remove these screws and install the blower When routing the power cord take care to keep away from hot areas of the unit and remember that this blower is for use only with the ...

Страница 25: ...rating Stove at Low Burn Rate 8 Wood Loaded Too Close to Glass Coals build up in firebox 9 Operating Stove at High Burn Rates 7 1 Operate the stove at higher burn rates to allow the air wash system to keep the glass clean 8 1 Never load wood so that it is touching the ceramic glass viewing window 9 1 Reduce combustion air control and allow coals to burn down before reloading Fire burns out of cont...

Страница 26: ...S 2 Not shown Large Upgrade Blower optional AC 30 1 Not shown Small standard blower AC 16 1 12 Glass gasket kit 3 4 flat AC GGK 1 16 Door gasket kit 3 4 high density AC DGKHD 1 3 Front burner tube AC W01FBT 1 17 Middle burner tube AC W01MBT 1 4 Rear burner tube AC W01RBT 1 13 Glass size 12 75 X 16 75 AC G50 1 2 Ceramic fiberboard AC W01CFB 2 Not shown Small spring handle Nickel Brass AC SH4N AC SH...

Страница 27: ...Page 27 ILLUSTRATED PARTS DIAGRAM 16 ...

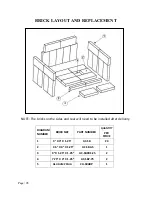
Страница 28: ...the sides and rear will need to be installed after delivery DIAGRAM NUMBER BRICK SIZE PART NUMBER QUANTITY PER STOVE 1 9 X 4 X 1 25 AC SB 24 2 4 5 X 4 X 1 25 AC SB4 5 1 3 9 X 1 25 X 1 25 AC SB9X1 25 2 4 7 75 X 4 X 1 25 AC SB7 75 2 5 ASH DUMP PLUG CA 30ADP 1 ...

Страница 29: ...cture Date and Serial Number in the blank spaces on this sample tag for future reference This sample tag also shows the safety info such as UL ULC testing standard etc for your local officials or anyone else who may need reference information ...

Страница 30: ...ith the product including any cost or expense providing substitute equipment or service during periods of malfunction or non use 4 All liability for any consequential damage for breach of any written or implied warranty is disclaimed and excluded 5 This warranty does not cover internal wear parts of the combustion system including the vermiculite firebox lining and gaskets Some states do not allow...

Страница 31: ...urchase Use any of these three easy ways to send your warranty information in Mailing Address England s Stove Works Inc Technical Support Department P O Box 206 Monroe Virginia 24574 Fax Number 434 929 4810 Twenty four hours a day Online Registration Visit our warranty registration website at http www englanderstoves com warranty warranty html WARRANTY CARD LOCATED ON NEXT PAGE ...

Страница 32: ......

Страница 33: ...City State Zip Code Unit Information Refer to the sticker on the back of the manual or box to complete this section IX Model Number Purchase Date X Purchase Price XI Serial Number Mfg Date Purchase Questions How did you first hear about our product Please check one Word of Mouth Burn Trailer Demonstration Internet Other Where did you receive information about our product Via Telephone Dealer Name ...

Страница 34: ......

Страница 35: ...s matières combustibles CONSERVEZ CES INSTRUCTIONS AVIS DE SÉCURITÉ Le non respect de ces instructions peut causer des dommages matériels des blessures ou même la mort Pour votre sécurité et votre protection suivez les instructions pour l installation décrites dans ce guide Communiquez avec les autorités locales en matière de construction ou le service d incendie afin de connaître les restrictions...

Страница 36: ...enseignements sont inscrits sur l étiquette de sécurité fixée à l arrière de l appareil Ayez ces renseignements à portée de la main si vous appelez le fabricant ou votre détaillant au sujet de ce produit Gardez les enfants à l écart Surveillez les enfants qui se trouvent dans la même pièce que cet appareil Prévenez les enfants et les adultes des risques que représentent les températures élevées N ...

Страница 37: ...des joints d étanchéité 22 Fini 22 Remplacement des composants Vitre 23 Tubes de brûleur 24 Panneaux en fibres de céramique 24 Charnières de porte 24 Écran thermique et panneau arrière 24 Autres composants 25 Accessoires en option Ventilateur AC 16 ou AC 30 25 Écran thermique latéral 25 Guide de dépannage Dépannage 26 Illustration détaillée des pièces Liste des pièces 27 Vue éclatée des pièces 28 ...

Страница 38: ...nt de conception simple nos poêles ont un rendement extrêmement efficace qui permet de produire plus de chaleur avec moins de combustible Si vous avez besoin d aide au sujet de votre appareil veuillez consulter la vaste section d aide de notre site Web ou appeler notre service de soutien technique au 1 800 245 6489 Nous sommes presque toujours en mesure de vous guider que ce soit pour l installati...

Страница 39: ...rticules 2 49 g h Efficacité 72 PCS PCI de 78 Testé selon les normes UL 1482 ULC S627 00 La durée maximale de combustion dépend fortement du type de bois brûlé dans le poêle ces valeurs peuvent donc varier La capacité maximale de chauffage de cet appareil peut varier considérablement selon le climat le type de construction l isolation et de nombreux autres facteurs Combinez les renseignements expo...

Страница 40: ...era un tirage fort et facile à amorcer dans la cheminée Bien que les systèmes de cheminée extérieurs fonctionnent souvent de façon adéquate ils subissent plus souvent le contre tirage d air froid à l allumage ou sont fréquemment la cause d un tirage faible de l appareil Tenez compte également de la section transversale de la cheminée Même si les cheminées en maçonnerie existantes peuvent souvent ê...

Страница 41: ...in A B C D E F mm po mm po mm po mm po mm po mm po Raccord de cheminée à paroi simple sur une surface non protégée 546 1 21 5 736 6 29 304 8 12 190 5 7 5 241 3 9 5 482 6 19 Raccord de cheminée à paroi double sur une surface non protégée S O S O S O S O S O S O Raccord de cheminée à paroi simple sur une surface non protégée avec écrans latéraux 445 5 17 5 635 25 304 8 12 190 5 7 5 139 7 5 5 381 15 ...

Страница 42: ...s n êtes pas certain de pouvoir installer le poêle de façon sécuritaire nous vous suggérons fortement de faire appel à un installateur local certifié par le NFI National Fireplace Institute des États Unis Installez TOUJOURS le tuyau de ventilation en respectant rigoureusement les instructions et les indications sur les dégagements qui accompagnent le système de ventilation Ne raccordez PAS le poêl...

Страница 43: ... de registre de tirage sur cet appareil N utilisez jamais de raccord de cheminée à paroi simple ou double comme système de cheminée Ne faites jamais passer un raccord de cheminée dans un mur combustible sans respecter à la lettre les instructions du fabricant et celles indiquées à la page suivante concernant les traversées de mur Ne faites JAMAIS passer un raccord de cheminée à travers un grenier ...

Страница 44: ...INSTALLATION Traversées de mur Au Canada l installation doit respecter la norme CAN CSA 8365 en cas de traversée de matériaux de construction combustibles Page 10 ...

Страница 45: ...n raccord de cheminée à paroi double Percez trois trous dans la buse de l appareil et fixez le raccord de cheminée à l appareil au moyen de vis à tôle les trous devraient généralement être prépercés dans la buse à l usine Fixez correctement le système de cheminée préfabriqué à la maison en respectant précisément les instructions du fabricant du système de cheminée préfabriqué Évitez de trop nombre...

Страница 46: ...e raccord de cheminée à paroi simple vérifiez les recommandations du fabricant lors de l utilisation d un raccord de cheminée à paroi double Percez trois trous dans la buse de l appareil et fixez le raccord de cheminée à l appareil au moyen de vis à tôle les trous devraient généralement être prépercés dans la buse à l usine Fixez correctement le système de cheminée préfabriqué à la maison en respe...

Страница 47: ...reil et rendre l installation sécuritaire Utilisez un adaptateur de conception adéquate pour relier le raccord de cheminée à paroi simple ou double au manchon d emboîtement en maçonnerie Avant d utiliser l appareil faites inspecter la cheminée en maçonnerie existante afin de vous assurer que son utilisation est sécuritaire et que les distances minimales avec les matériaux combustibles sont respect...

Страница 48: ...ns un foyer dont le dégagement est nul 0 Le fabricant ne sera pas tenu responsable d un accident causé par l installation de ce poêle sur un âtre fabriqué avec un matériau combustible Inspectez votre foyer pour vous assurer qu il est en bon état de fonctionnement et qu il est exempt d obstructions Avant l installation retirez le registre existant ou fixez le à l aide d un câble pour le maintenir o...

Страница 49: ...le Le poêle à bois doit être raccordé au système de cheminée à l aide d un raccord de cheminée à paroi double homologué UL pour l utilisation dans une maison mobile ou préfabriquée Observez attentivement toutes les indications relatives au dégagement mentionnées à la section appropriée du présent guide ET respectez les exigences du fabricant du système de ventilation concernant les distances minim...

Страница 50: ...ation de votre poêle vous pouvez utiliser d autres matériaux à condition d observer les règles suivantes o Le tuyau utilisé pour le raccordement d air extérieur doit être en métal et avoir une épaisseur minimale de 0 53 mm acier doux de calibre 25 et un diamètre intérieur d environ 7 cm o Conservez la longueur de tuyau courte et utilisez une fixation sur chaque joint de tuyau o Un écran ou un autr...

Страница 51: ... les étincelles de tomber sur le plancher combustible près de l appareil Un tapis pour âtre n est PAS approuvé pour remplacer un protecteur d âtre approprié Aucune valeur d isolation thermique R n est nécessaire Pour les États Unis Le protecteur de plancher doit dépasser d au moins 40 64 cm à l avant de l ouverture pour le combustible de 20 32 cm sur les côtés de l ouverture de porte et de 20 32 c...

Страница 52: ...ises s accumuler plus haut que le trou d air dans le boîtier de crampon Une quantité excessive de braises signifie souvent qu une trop grande quantité de bois brûle à un taux de combustion trop élevé et vous devriez laisser le lit de braises brûler avant d ajouter une nouvelle charge de bois au poêle L air comburant entre dans le poêle par deux endroits La majorité de l air comburant primaire entr...

Страница 53: ...vez également les directives ci dessous pour connaître les vitesses appropriées du ventilateur Lorsque vous utilisez le ventilateur de convection de l air en option n de pièce AC 16 ou la nouvelle version AC 30 celui ci doit fonctionner comme suit selon le degré de chaleur Taux de combustion Élevé Moyennement élevé Moyen Moyennement bas Bas Vitesse du ventilateur AC 16 Élevée Élevée Basse Basse Ba...

Страница 54: ...ment est fermée et bien verrouillée Le fonctionnement de cet appareil pendant que la porte de chargement est ouverte ou mal verrouillée causera l acheminement vers le feu d une quantité excessive d air comburant ce qui fera augmenter dangereusement la température de l appareil Une température élevée peut endommager l appareil ou enflammer la créosote accumulée dans le système de cheminée par les f...

Страница 55: ...instructions Nettoyez à fond le système de cheminée et le système de raccord de cheminée Étant donné que le raccord de cheminée est généralement soumis à des températures d évacuation élevées vérifiez la présence de fuites et de points faibles puis remplacez les pièces dont l état est douteux Dans le cas d un système de cheminée complètement droit jusqu au toit assurez vous de retirer les déflecte...

Страница 56: ...ialement conçus pour cet appareil par England s Stove Works Joints d étanchéité 1 Porte Cet appareil est muni d un joint d étanchéité cordé de 19 05 mm autour de la porte qui doit être remplacé au moins tous les ans Pour remplacer le joint d étanchéité de la porte n de pièce AC DGKNC retirez d abord le vieux joint en entier Avant d ajouter le nouvel adhésif vous devrez peut être gratter la vieille...

Страница 57: ...ôts sur la vitre et ils peuvent habituellement être nettoyés avec de l eau Si de la suie tenace persiste utilisez un nettoyant spécialement conçu pour l enlever Vous ne devez pas gratter la vitre ni la nettoyer avec un produit abrasif 3 Rincez la vitre avec de l eau propre et séchez la avant de faire fonctionner le poêle à nouveau Remplacement de la vitre 1 Retirez la porte du poêle et placez la s...

Страница 58: ...vers l intérieur ou vers l extérieur retirez d abord la porte puis desserrez le boulon et l écrou à l aide d une douille de 1 2 po et d une clé à fourches de 1 2 po une sur l écrou et une sur la tête de boulon Faites coulisser la plaque vers l intérieur ou vers l extérieur puis serrez le boulon et l écrou à l aide de la douille et de la clé Soyez vigilant lors du réglage des charnières Si vous ne ...

Страница 59: ...sférer dans la maison Les vis de montage du ventilateur sont installées dans le profilé de convection arrière à l usine Le montage du ventilateur n exige qu une douille ou une clé à fourches de 5 16 po pour retirer ces vis et installer le ventilateur Lors de l acheminement du cordon d alimentation prenez soin de le garder à l écart des zones chaudes de l appareil et n oubliez pas que ce ventilateu...

Страница 60: ... de la vitre Accumulation de braises dans 9 Utilisation du poêle la chambre de combustion à un taux de combustion élevé 7 1 Faites fonctionner le poêle à un taux de combustion plus élevé afin de permettre au système autonettoyant de conserver la vitre propre 8 1 Ne chargez jamais le bois de sorte qu il touche à la fenêtre en verre vitrocéramique 9 1 Réduisez l admission d air comburant et permette...

Страница 61: ... option AC 30 1 Non illustré Petit ventilateur de série AC 16 1 12 Trousse de joint d étanchéité de vitre plat de 19 05 mm AC GGK 1 16 Trousse de joint d étanchéité de porte haute densité de 19 05 mm AC DGKHD 1 3 Tube de brûleur avant AC W01FBT 1 17 Tube de brûleur central AC W01MBT 1 4 Tube de brûleur arrière AC W01RBT 1 13 Dimensions de la vitre de AC G50 1 2 Panneau en fibres de céramique AC W0...

Страница 62: ...Page 28 SCHÉMA DES PIÈCES 16 ...

Страница 63: ...e installés après l accouchement NUMÉRO DE SCHÉMA DIMENSIONS DES BRIQUES NUMÉRO DE PIÈCE QUANTITÉ PAR POÊLE 1 22 86 cm x 10 16 cm x 3 18 cm AC SB 24 2 11 43 cm x 10 16 cm x 3 18 cm AC SB4 5 1 3 22 86 cm x 3 18 cm x 3 18 cm AC SB9X1 25 2 3 19 69 cm x 10 16 cm x 3 18 cm AC SB7 75 2 5 Trappe a cendres CA 30ADP 1 ...

Страница 64: ...areil dans les espaces prévus à cet effet sur cette étiquette pour référence ultérieure Cette étiquette comprend également des renseignements de sécurité comme la norme d essai UL ULC au Canada à l intention de vos représentants locaux ou de toute autre personne qui peut en avoir besoin ...

Страница 65: ...aration pendant les périodes de mauvais fonctionnement ou de non utilisation du produit 4 Le fabricant déclinera toute responsabilité pour les dommages consécutifs en cas de violation de toute garantie écrite ou implicite 5 Cette garantie ne couvre pas l usure des pièces internes du système de combustion y compris le revêtement en vermiculite de la chambre à combustion et les joints d étanchéité C...

Страница 66: ... achat originale Il y a trois moyens faciles de nous faire parvenir cette information Adresse postale England s Stove Works Inc Technical Support Department P O Box 206 Monroe Virginia 24574 États Unis Télécopieur 1 434 929 4810 24 heures par jour Enregistrement en ligne Consultez notre page d enregistrement de la garantie sur notre site Web à http www englanderstoves com warranty warranty html LA...

Страница 67: ...eignements sur l appareil Veuillez consulter l étiquette à l arrière du guide ou de la boîte pour remplir cette section IX Numéro de modèle Date d achat X Prix d achat XI Numéro de série Date de fabrication Questions relatives à l achat Comment avez vous entendu parler de notre produit Veuillez cocher l une des réponses suivantes De bouche à oreille Démonstration Sur Internet Autre À quel endroit ...

Отзывы: