background image

Web Admin User Manual


- 81 - 


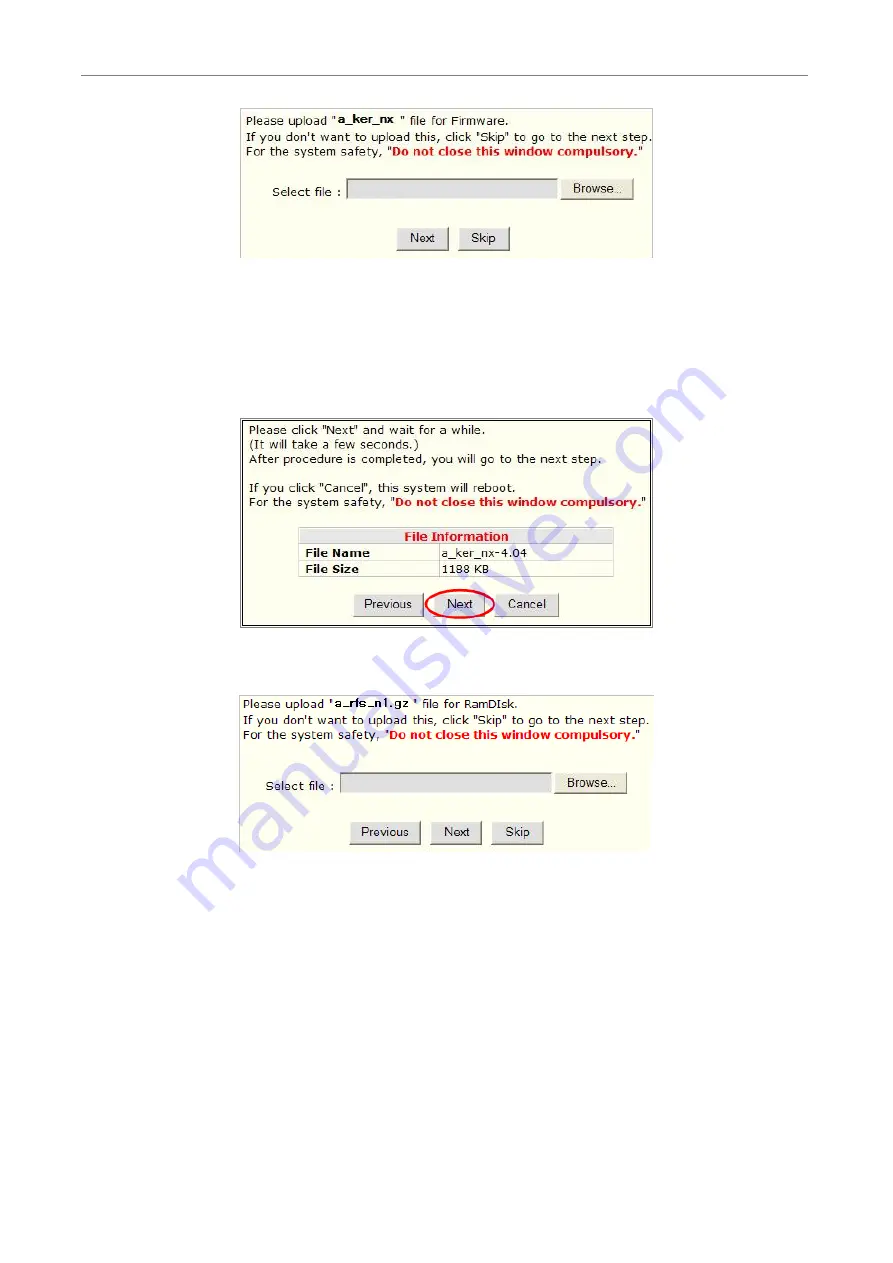
Now you can check the file name and the size in the new window. If you want to go back to 

the previous stage, click the 

Previous

 button. Click the 

Next

 button to update the firmware 

right away and proceed to next stage. If you want to stop the update process, click the 

Cancel


button. 


The next window is for locating the RAM Disk Update file. 


Go through the same steps as in Firmware Update, and do the same in update process for 

System and Web Update

 files. 

After all the update processes pare finished, the window for 

Factory Default

 is displayed. If 

there was no problem in the entire update processes and you want to continue, click 

Next


button. If you’re not sure about the system update, you can restore the Factory Default 

condition by clicking 

Factory Default

 button. 

Содержание PXB-2180Z03

Страница 1: ...INSTALLATION AND OPERATION MANUAL for PXB 2180Z03...

Страница 2: ...Table of contents 1 Safety Instructions and Notes 2 General Descriptions 3 Supplied Items 4 Part names 5 Installation Instructions 6 Setup Menu 7 Specifications 8 Dimensional Drawings 3 3 5 5 7 11 25...

Страница 3: ...he instruction manual may cause harmful interference to radio communications Operation of this equipment in a residential area is likely to cause harmful interference in which case the user will be re...

Страница 4: ...lens at night The camera should never be operated beyond the technical specifications This can lead to destruction The camera should never be operated in the water 2 General Descriptions This Network...

Страница 5: ...on Enhanced Sensitivity by DSS technology Menu Control via either Local Joystick or WEB OSD Menu CVBS Video output BNC for Easy installation and Maintenance H 264 MJPEG dual streaming with TI DM365 36...

Страница 6: ...era 1x Installation and Operating Instructions 1x Mounting template 1x Easy Bracket 1x 3mm Hex L wrench 4x anchors 4x Wall fixing screws 4x M4 Wrench Bolts 1x Video Sub out cable 1x Coupler for RJ45 C...

Страница 7: ...stalled on the wall Peg for Easy bracket Hook must be placed upwardly Fixing screw for Sunshield x2 IR LED Window Bracket Foot Foot mount Hole x4 Arm assembly Sunshield panel Bracket Lock OSD cover Ho...

Страница 8: ...Insert the anchors to the drilled holes 3 Match the EASY BRACKET to the drilled position 4 Fix the EASY BRACKET by using Wall fixing screws 5 Connect hook to peg 6 Fix Bracket Foot to EASY BRACKET by...

Страница 9: ...the AC adapter to AC outlets to avoid an improper reset from power jitter and a damage from the surge voltage when no load When PoE and Local power are connected Local power has priority 5 3 Power Su...

Страница 10: ...9 5 3 1 EMI Ferrite Core Connections Please connect EMI Ferrite Core as below photos 50mm 50mm...

Страница 11: ...0 2 min 90 max for wall ceiling installation respectively with reference to the ceiling when the inclination of camera module is 0 that is the image is aligned horizontally 3 Inclination limit Horizon...

Страница 12: ...first time set the PC s address as 192 168 1 XX for example IP Address 192 168 1 20 Subnet Mask 255 255 255 0 Enter the camera s IP address in the URL bar of the Web browser window and hit Enter Ente...

Страница 13: ...ter the installation is successfully completed Smart Viewer window will be displayed Assigning an IP address To assign an IP address to the camera proceeded as follows Click Network Configuration on t...

Страница 14: ...tMask Gateway DNS1 DNS2 and click apply for saving settings After apply program will ask closing web browser for updates which will take 20 30 seconds For DHCP DHCP server must exist in the network en...

Страница 15: ...ration menu Default ID for admin account is fixed as root and not allowed to change In Old Password field enter the current password In both New Password and Confirm Password fields enter the same new...

Страница 16: ...in your web browser Only ADVANCED CAMERA MENU access and control are available by using joy stick on the side of the camera on a service monitor To control Full Set up menu access WEB Device Configura...

Страница 17: ...led by an automatic shutter control IRIS Level menu is activated when EXPOSURE MODE is set to IRIS Priority Lower IRIS LEVEL will close more Iris and increase the field of depth in the daytime but sig...

Страница 18: ...l video frames and defining and eliminating them consecutively at low light Higher setting reduces noise much more but results in losing the sharpness and the tail effect or the motion blur for the fa...

Страница 19: ...rroring or flipping No Mirror Flip Video is reversed upside down Mirror No Flip Ver Video is reversed left and right Mirror Flip HV Video is reversed left and right and upside down When the video is r...

Страница 20: ...elements may move and deviate from its calibrated position by the shock or vibration for example during the transportation LENS INIT checks the positions for zoom and focus at both of the end position...

Страница 21: ...message MOVING SMART MOTION ZOOM ON enables to Automatic Zoom IN OUT when motion is detected and also enables MOTION OSD to ON Area to be zoomed in by SMART MOTION ZOOM can be set at MOTION SMART MOT...

Страница 22: ...it from compensation Lower HLC LEVEL cut out video from the lower level BLC POSITION SET Improves the visibility for the dark object by the bright back light Outside area of BLC window can over satur...

Страница 23: ...the corner of ceiling can zoom the center of the floor in a room and result in losing the image of door on the side wall However SMART MOTION ZOOM can be set to see the door side and zoom in that area...

Страница 24: ...nd zoom in that area without missing the IMPORTANT security point POINTING ZOOM can be activated by the joystick operations of for zoom in and for zoom out or Zoom in out button on WEB while SMART MOT...

Страница 25: ...s f9 22mm F1 6 wide F2 3 tele Zoom Ratio Optical 2 4X Digital 32X Zoom Day Night True Day Night by ICR LEDs Built in 4pcs x 855nm High Power IR LEDs Focus Auto Zoom Push Manual Exposure Control Auto I...

Страница 26: ...ideo Encoding H 264 MJPEG dual streaming Protocol HTTP TCP UDP IP ARP ICMP RTP RTSP multicast Telnet ftp PPPoE SMTP e mail DHCP NTP uPNP etc ONVIF PSIA support Transmission Control VBR CBR 32K 12M bps...

Страница 27: ...26 8 Dimensional Drawings Unit mm...

Страница 28: ...Smart Viewer User s Manual I Smart Viewer User s Manual Version 1 1 0 5...

Страница 29: ...rs are familiar with Microsoft Windows operating systems and Web browsers such as Internet Explorer It is also assumed that the users are well aware of how to install and use the network equipment suc...

Страница 30: ...Channel Control Bar NVS or Network Camera only XIII 5 Video Control XIII 5 1 Display method XIII 5 2 OSD Channels Buttons XIII 5 2 1 Saving as Image File XIII 5 2 2 Saving as Video File XIV 5 2 3 Man...

Страница 31: ...Smart Viewer User s Manual IV 8 2 Server XXIII 8 3 Video XXIII 8 4 Audio XXIV 8 5 PTZ Function XXV 8 6 Relay Output XXV 8 7 Others XXV...

Страница 32: ...Model and supporting function 1 2 Key Features Displays live video streams transmitted from Servers Plays audio transmitted from Servers Transmits audio from PC with Smart Viewer to Servers Stores liv...

Страница 33: ...ble it s possible to manually install the program file in advance and connect to the Serve rlater 2 1 1 Installing on Web Browser Click Live View after access to Server on Internet Explorer If you re...

Страница 34: ...displayed 2 1 2 Manual Installation When the Internet connection is not available or having some difficulties you can manually download and install the Smart Viewer program file Execute the downloaded...

Страница 35: ...played Click the Finish button 2 2 Uninstalling Smart Viewer There are two ways to uninstall Smart Viewer program from your computer Before uninstalling close all the Internet Explorer windows 2 2 1 U...

Страница 36: ...er User s Manual IX If the uninstalling is successful the following window will be displayed Click OK to finish 2 2 2 Uninstalling on Control Panel Click Start button on the screen then select the Con...

Страница 37: ...X In the Control Panel window double click the Add or Remove Programs icon You will see the Currently installed programs list Click Smart Viewer button and then click Change Remove button It will star...

Страница 38: ...rver on Internet Explorer and select Live View on the main menu The appearance of Smart Viewer window varies depending on what type of Server is connected to Network Video Server Network Camera Server...

Страница 39: ...e rate video pause storing images or video Relay Output control audio mute FES data indication Audio Control Bar Adjust audio control of Server and volume of MIC and Speaker PTZ Control Bar Control PT...

Страница 40: ...layed as the original resolution Use the scroll wheel of mouse for zooming in and out If the video becomes larger than the window size a small screen is displayed to show location of the window in the...

Страница 41: ...er Live video currently displayed can be captured and recorded as a video file in AVI format Select a live view you want to save and click Rec Avi button on OSD Channel Buttons Clicking it again will...

Страница 42: ...le will be generated in SMI subtitle format which puts time stamp every second When you play back the recorded video the time stamp will be displayed as a subtitle on the video screen as shown the pic...

Страница 43: ...l Buttons or by running SmartPlayer program To finish push the button again Max duration is 1 minute and recording will be stopped after 1 minute 5 2 4 Instant Playback For the Products with local sto...

Страница 44: ...will appear for extended features as shown below 5 3 1 Pausing Live Video Click the Pause button to stop and resume live view video Set the beginning of video data Instant playback will scan 1 min aft...

Страница 45: ...pported 5 3 3 Image Rotation By using this feature you can make mirrored horizontal or flipped vertical image from the original 5 3 4 Navigate on Mini Window Mini window helps users to find which port...

Страница 46: ...disconnect the audio connection click the Disconnected button You can use volume control slider to adjust the audio level 6 1 3 Mute Audio Select the Mute Audio from the pop up menu on the Live View...

Страница 47: ...be able to use a Joystick to control PTZ device if your computer has a Joystick connected to it Connect a PTZ enabled camera to the Server go to the Admin menu of the Web page and then set up the PTZ...

Страница 48: ...Step and Continuous modes Step mode Camera moves as much as previously defined each time This mode is effective for remote cameras with slow network condition Continuous mode Camera keeps moving while...

Страница 49: ...screen mode Press ESC key to return to normal mode Display image size as it is Zoom in out through mouse scroll is available Clicking wheel button will show original image size keys such as can be us...

Страница 50: ...A It is cause by deleting any part of Smart Viewer Uninstall and reinstall Smart Viewer 8 2 Server Q It shows a message saying that Failed to retrieve server information from Smart Viewer or unauthori...

Страница 51: ...have enough space in hard drive Q Video recording stopped by itself A Video can be saved up to 10 minutes It automatically stops recording if it exceed the 10 minutes It also stops recording when imag...

Страница 52: ...d features 8 6 Relay Output Q Relay Output button won t be activated A The second channel of Dual Stream can be controlled only after Primary channel is set up for Relay Output control Also make sure...

Страница 53: ...Web Admin User Manual Version 4 15...

Страница 54: ...2 Time Setup 10 2 3 Step 3 Network Setup 11 2 4 Step 4 IP CCTV DNS 11 2 5 Step 5 Recording Configuration for NVR series 11 2 6 Finish 11 3 System Configuration Menu 11 3 1 Server Name Setup 12 3 2 Dat...

Страница 55: ...tus 21 4 5 Network Status Notify 22 4 6 IP CCTV DNS Setup 24 4 7 Port Forwarding UPnP 25 4 8 RTP RTSP Setup 26 4 9 SNMP Setup for Cameras 26 5 Device Configuration 29 5 1 Serial Ports 29 5 1 1 Serial...

Страница 56: ...h Input 50 6 1 6 Alarm Output Service Configuration 51 6 1 7 Alarm Output Service Configuration for each Output 51 7 Recording Configuration 59 7 1 SD Configuration 59 7 2 Recording Configuration 59 7...

Страница 57: ...ut This Document This document is prepared for users of Network Cameras It is assumed that the users are familiar with network equipment such as LAN Hub router and having basic knowledge of network te...

Страница 58: ...1 Admin Menu of Servers After connecting server on the web browser you ll find the web page as shown below The rightmost item of the menu is Admin where you can set up the most of features in the Serv...

Страница 59: ...n you can change the password to a new one Now the Admin Menu will be displayed as shown below This will guide you to the top level menu items which are Quick System Network Device Advanced Recording...

Страница 60: ...e n a n a Date Time Admin Password Access Control User Registration Network Configuration Network Configuration n a n a FTP Telnet Server Network Ports Bandwidth Control View Network Status Network St...

Страница 61: ...ork cameras E mail Camera 1 Camera 2 FTP Buffered Camera 1 Camera 2 FTP Periodic Camera 1 Camera 2 Sensor Notification Camera 1 Camera 2 Alarm Output Camera 1 Camera 2 Sensor Notification Input 1 Inpu...

Страница 62: ...ng Quick Configuration gives you the menu as below You can perform each setup by clicking the one you would like to configure 2 1 Step 1 Changing Server Name Click Server Name on System Configuration...

Страница 63: ...see how to set up 2 5 Step 5 Recording Configuration Each camera can be configured for recording option in this section 2 6 Finish Save configuration You need to save all the changes to the Flash Memo...

Страница 64: ...erial number firmware version and Web image version As an administrator you can change the name of the server name but other values are not allowed to change To change the server name enter a new serv...

Страница 65: ...ged Date and Time setting simply click Apply button to take it into effect immediately If you want to retrieve the exact current time from NTP server on the network click Get NTP Server Time button Cl...

Страница 66: ...password with a new one the existing network connection made with old password to Server is lost now You will have to reconnect to the Server using new password 3 4 Access Control Click Access Contro...

Страница 67: ...n both Password and Confirm Password fields enter the identical password respectively The password must be between 4 and 23 alphanumeric characters In Name filed enter the user s name that must be up...

Страница 68: ...p between 1 and 4 Alarm Control Determine if Alarm control is to be allowed PTZ Control Determine if PTZ Control is to be allowed Audio Control Determine if Audio Control is to be allowed Playback Det...

Страница 69: ...nment which is static IP dynamic IP DHCP or PPPoE For wireless LAN additional configuration is necessary to have a connection with wireless AP In the case of wireless models users have to choose betwe...

Страница 70: ...Network configuration will show variables Below picture is for products without wireless LAN For static IP select static IP and input values for IP address NetMask Gateway DNS1 DNS2 and click apply fo...

Страница 71: ...ation PPPoE is used to connect Network Camerasto PPPoE modem provided by ISP Since PPPoE needs verification ID and password are necessary to access network Type ID and PW FTP Telnet Server Configurati...

Страница 72: ...ontrol is for limiting maximum network traffic If it is enabled with certain limit maximum data size transferred from Network Cameras won t exceed bandwidth limit set by users If transferred data is e...

Страница 73: ...added for wireless models Note This bandwidth control feature works fairly well in M JPEG video transmission But for MPEG 4 and H 264 dropping data packets may cause low quality of video so it is rec...

Страница 74: ...s network status will be emailed to a specific person in case of the following events When it is set to Dynamic IP on Network Configuration menu and the Server has been given a new dynamic IP address...

Страница 75: ...ill show the message was sent from the Server as a notification Now enter the email addresses of the recipients in the Recipient fields up to 3 persons In the User Defined Message box you may put a me...

Страница 76: ...TV DNS server http www ipcctvdns com and register Network Cameras with MAC address and Product Key Those information can be found from IP CCTV DNS Setup menu Enable service and click Apply If it is co...

Страница 77: ...s to IPCCTVDNS server and IP CCTV DNS service should be enabled There are 3 options in UPNP Port Forwarding Manual User Assigned Port is used when users can access network router hub and manually assi...

Страница 78: ...ayer or VLC program can be used for this but it may not be supported in the environment within firewall There are two types of usages one for Unicast address condition and the other for Multicast addr...

Страница 79: ...ch module number applied Service Enable Start RTSP service Disable Stop RTSP service RTSP Port In normal case use default port number 554 to connect to RTSP service If not using port 554 enter the por...

Страница 80: ...configure network status of a network device SNMP V1 and V2 are supported over MIB2 standard and few functions are not supported SNMP Trap can function when SNMP V1 V2 is enabled SNMP V1 V2 Enable Sta...

Страница 81: ...nput Mode When serial ports are in Serial Input Mode Server can be triggered by the external sensors to send images from the camera by email or FTP It can also activate Alarm Output by input from sens...

Страница 82: ...d as shown below Current Port This shows the name of the port currently configured Current Protocol This shows the protocol being used only RS 232 can be displayed Serial Input Model You can select th...

Страница 83: ...ing from sensor Initial String Data The initial string from sensor Speed Delay select Enable if sensor input needs delay Internal process delay The amount of delay for sensor input Sensor Aiming Posit...

Страница 84: ...by RS 232 or RS 485 422 communication In the picture below serial output mode can be selected among By Pass X10 or Z256 5 1 3 Transparent Mode When there are two Server s present on the network they...

Страница 85: ...used to send data Peer IP IP address of other Server Network Port Network port number of the server Data Start Pattern Data start pattern Not used if unchecked Data Size Data size in single transfer...

Страница 86: ...s menu is used to set up the selection of video format data added to video data encoding speed audio control image resolution video quality motion detection and etc Click Camera Motion on Device Confi...

Страница 87: ...mation to be contained in it Video with Flexible Extra System data If Enabled video data will contain Flexible Extra Data from COM port Video with user defined message If Enabled video data will conta...

Страница 88: ...s compressed in every second You can control the network traffic with this parameter For Secondary Stream it can be set to manner of 1 2 1 4 1 8 of the primary stream Image Size Select the resolution...

Страница 89: ...Web Admin User Manual 37 Camera Name Enter the name of the channel in up to 21 alphanumeric or up to 10 Unicode letters Image Quality Setup...

Страница 90: ...Encoded frames have different data size from each other Image Quality one of 6 quality levels Low Compression Highest High Normal Low Lowest GOP Structure Distance between I Frames That is filled with...

Страница 91: ...oy stick on the side of the camera and a service monitor or by entering the Admin menu in your web browser To access the OSD menu click Camera Motion in the Device Configuration menu and click Camera...

Страница 92: ...sets how sensitively the motion detection works for the motion detection functionality It can be between 100 and 100 while 100 is the most sensitive Motion Detection This decided whether the Motion De...

Страница 93: ...ect DI Status DO Control on Device Configuration menu to configure the behavior of those Input and Output ports DI DO functionality can be set to either Normal Open or Normal Closed type as follows No...

Страница 94: ...models have 1 Alarm output port and they act like a push button When you click On button it is essentially like the push button pressed When you click Off button it is like the push button not presse...

Страница 95: ...advanced services in Advanced Configuration menu There are two types of advanced service one is Buffered Service and the other is Periodic Service In Buffering Service a series of images are continuo...

Страница 96: ...Web Admin User Manual 44 In Periodic Service only the image alarm sensor status after an event schedule is reported to you upon the server is triggered...

Страница 97: ...ring speed If it s set to Fastest the server will store images as fast as it can Each cannel can be set with different values This configuration applies to E mail and FTP Buffered and click Save butto...

Страница 98: ...lect Enable if SMTP server requires ID and password User ID Enter User ID to log in to SMTP server Password Enter Password to log in to SMTP server Sender Enter email address of the sender 1st Recipie...

Страница 99: ...go to Advanced Services for buffer setup Pre Alarm Images The number of image frames to store before Alarm Post Alarm Images The number of image frames to store after Alarm Pre Alarm Speed This field...

Страница 100: ...8 After finishing setup click Save button to apply If you don t want to change click Back button Condition Schedule Event Configuration NONE Don t Send INT Decimal HEX Hexadecimal BIN Binary IPA IP Ad...

Страница 101: ...ws what service this condition is for Module ID Module ID for current setup Camera ID Channel ID for current setup Enable Disable Select Enable to use Condition otherwise select Disable Always This Co...

Страница 102: ...e Directory Name The directory in FTP server where the data will be uploaded You should make the directory in the FTP server before using the service Base File Name The base file name of the data to b...

Страница 103: ...h day Hour If Directory Name is checked new directory name is created with hour If File Name is checked new file name is created with hour Minute If checked new file name is created with minute Sec If...

Страница 104: ...to Advanced Services for video buffer setup Pre Alarm Images The number of image frames to store before Alarm Post Alarm Images The number of image frames to store after Alarm Pre Alarm Speed This fi...

Страница 105: ...Base Directory Name The directory in FTP server where the data will be uploaded You should make the directory in the FTP server before using the service Base File Name The base file name of the data...

Страница 106: ...d new directory name is created with day If File Name is checked new file name is created with day Hour If Directory Name is checked new directory name is created with hour If File Name is checked new...

Страница 107: ...on Condition 1 Condition 3 Select a condition for FTP Periodic service to be activated Up to 3 conditions can be set respectively FTP Interval msec Time interval between each image upload service Afte...

Страница 108: ...ice Mode Select network mode for CGI Select one among HTTP TCP or UDP Main IP address Enter IP address to use in CGI or other functions Aux1 Aux 3 IP address Enter 3 more addresses to use in CGI or ot...

Страница 109: ...changes and go back to the previous page 6 1 5 Sensor Notification Service Configuration for Each Input Item Description CGI Name or Alarm Port Message Enter the contents of CGI when it is used Click...

Страница 110: ...on to apply the change and continue to the next page Clicking Back button will cancel the changes and go back to the previous page 6 1 7 Alarm Output Service Configuration for each Output Item Descrip...

Страница 111: ...run Recording Configuration Enter Recording Configuration menu then click the SD Information to find out the SD card s format information If entire SD Information is shown as None that means the SD ca...

Страница 112: ...atted or not To perform formatting the unformatted one click the SD card Then the following window will be displayed Click the Partition and Format button then a pop up window will be shown to confirm...

Страница 113: ...formatting SD card is finished click the Reboot button to restart the system After about 30 seconds the system will be rebooted You will be able to see the following information when you log in to the...

Страница 114: ...items include motion detection recording 24 hour continuous recording event driven recording and etc It displays the information of the recording capable servers such as VS Module ID IP Devices Server...

Страница 115: ...l 63 Click on Camera 1 and it will display the screen for detailed configuration such as recording speed camera name Pre and Post alarm image speed After configuring them properly click the Save butto...

Страница 116: ...Web Admin User Manual 64...

Страница 117: ...the video Click Disable otherwise Server Module ID Server ID number of the added VS Module ID IP Devices Camera Number Camera number to select Camera Name The name of the camera selected Use up to 31...

Страница 118: ...Web Admin User Manual 66...

Страница 119: ...olled by configured event Schedule and Event Recording is controlled by both schedule and event Schedule Week Set day of week Time Set time Date Set date Event Alarm Sensor Each of 1 2 3 4 refers to t...

Страница 120: ...Enable on Recording Service field for recording to be made by recording condition setup If you want to prevent recording from starting even though recording conditions are configure select it as Disab...

Страница 121: ...Recording Speed 1 fps Pre Alarm Count 5 Post Recording Speed 10 fps Post Alarm Count 5 Post Recording Speed is in effect So the recording speed is 10 fps when Motion is detected Also Pre Recording Sp...

Страница 122: ...one condition is valid After configuration is finished click the Save button to apply the change and return to previous screen Now you will notice that the Recording Configuration is made If the video...

Страница 123: ...ed to the HDD 7 3 View Recording Profile When it s needed to check recording configurations which have been made to each camera it may take quite some time to go through the menu tree In this case you...

Страница 124: ...on the menu The following will be displayed Now you are to choose the action between two options If you want the Server to keep recording without interruption select Circulation In this setting the ol...

Страница 125: ...y putting a check on Restrict Duration If chosen to use a time setting menu will be enabled to enter in days The default is 90 days and it can be changed between 1 and 3650 For instance if it s set to...

Страница 126: ...Periodic Notification Select Enable if you want to receive the SD capacity information on specific Day of week and Time Day Time Set the Day of week and Time you want to receive email notification Ab...

Страница 127: ...tion This feature is useful when there are configurations for multiple cameras and you want to clear them all It d take quite a time to delete them one by one You can clear all the contents of Recordi...

Страница 128: ...g file save the changed value during the configuration reboot restore the factory default condition and update the system 8 1 System Log System log file provides you the information about when and who...

Страница 129: ...nd saving the configuration To reboot click Reboot on Utilities menu A confirmation screen will be displayed as shown Click Save Configuration button otherwise click Back button to cancel the rebootin...

Страница 130: ...t condition you can do it here Network configuration is not affected by this action Click Factory Default on Utilities menu A confirmation screen will be displayed as shown Click Factory Default butto...

Страница 131: ...d have proper image files ready in your PC Click System Update on Utilities menu then the following window will be displayed From the Start buttons displayed choose the one that meets your needs All F...

Страница 132: ...to proceed the update otherwise click Cancel In the next window enter the location of the Firmware Image file to update with You can use the Browse button to navigate the directories in your PC to fi...

Страница 133: ...cel button The next window is for locating the RAM Disk Update file Go through the same steps as in Firmware Update and do the same in update process for System and Web Update files After all the upda...

Страница 134: ...Only Update Click the Start button next to Web Only Update item on the menu and a confirmation window will appear Click OK button to proceed the update otherwise click Cancel The rest of the process...

Страница 135: ...n the menu and a confirmation window will appear Click OK button to proceed the update otherwise click Cancel In the next window enter the location of the System Image file to update with You can use...

Страница 136: ...If Skip button is clicked it will go to the next step without updating the file Check the file name and the size of Config Image file If Previous button is clicked it ll go back to start of file loca...

Страница 137: ...file after clicking Edit button which is found on the right of the file name Click Save button to save the Config file Click Close button to close the editing window If you click Next button a window...

Страница 138: ...27...

Отзывы: