ENDEVCO 7310A Скачать руководство пользователя страница 4

IM7310A Rev A 


          4 

April 7

th

, 2020 

2.0


Product Description 

The ENDEVCO Model 7310A is an angular rate sensor that utilizes unique silicon MEMS gyroscope technologies with custom 
electronics and packaging and provides reliable sensing performance even under excessive shock and vibration 
environments. This angular rate sensor is designed specifically for automotive safety testing and other system designs 
requiring accurate measurement of angular velocity. As is the practice with all instrumentation, certain electrical 
precautions should be followed with pre-installation check-up, mounting and recalibration. 

3.0


Materials Required 

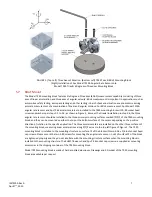
All the materials used in the mounting of the Model 7310A angular rate sensor are supplied with the unit in the shipping 
container.  These materials, as shown in Figure 1, include: 


(1) Allen wrench for 0-80 screws- Endevco P/N EHM2156 (1pc) 


(2) 0-80 x 3/8 inch Socket Head Cap Screws- Endevco P/N EH863 (2pc) 


(3) Size 0, Flat Washers- Endevco P/N EHW196 (2pc) 

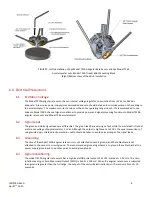
For triaxial angular rate measurements, or Six Degrees of Freedom (6DoF) measurements, the user should consider the 
Model 7930 Triax & Six Degrees of Freedom Mounting Block which is available as an optional accessory. 

4.0


Pre-installation Check-up 

Before installation of the angular rate sensor, it should be checked to insure proper operation.  A simple Output Voltage 
test can be conducted with minimal test equipment.  Place the unit on the flat surface of a vibration-free table top, apply 
the specified excitation voltage to the angular rate sensor (see data sheet for proper wiring hook-up) and measure the 
output with a voltage meter. Allow the unit to warm-up for one minute before the output voltage measurement.  

The output voltage should be measured on the three tests listed in Table 1. The voltage of +OUT(Green) and –OUT(WHITE) 
with respect to GND(Black) should fall in range of +2.3V ~ +2.6V, and the voltage of +OUT(Green) with respect to –
OUT(White) should be within -100mV ~ +100mV. 


Table 1. Output Voltae test for sensor check-out 

If this initial check does not give a proper reading, which indicates a possible malfunction, and the reason for the erroneous 
reading cannot be found, please contact 

mailto:[email protected]

  for troubleshooting or return. 

5.0


Mounting 

When mounting the Model 7310A angular rate sensor, it is best to utilize the proper techniques and tools listed to ensure 
optimum performance.  For triaxial angular rate measurements and 6DoF measurements, the Model 7930 Triaxial 
Mounting Block is available - see paragraph 5.6 and 5.7 below. 

Connection 

Voltage 

+OUT(Green) with respect to GND(Black) 

+2.3V ~ +2.6V 

-OUT(White) with respect to GND(Black) 

+2.3V ~ +2.6V 

+OUT(Green) with respect to –OUT(White) 

-100mV ~ +100mV 

Содержание 7310A

Страница 1: ...IM7310A Rev A April 7th 2020 7310A Angular Rate Sensor IM7310A Instruction manual ...

Страница 2: ... and evaluations were conducted EMC standards EN 55011 Class A conducted and radiated RF emissions EN 61000 3 2 Harmonic current emissions EN 61000 3 3 Voltage fluctuations and flicker EN 61000 4 2 Electrostatic discharge immunity EN 61000 4 3 Radiated electromagnetic field immunity EN 61000 4 4 Fast transient burst immunity EN 61000 4 6 Conducted RF immunity EN 61000 4 11 Voltage dips short inter...

Страница 3: ...Pre installation Check up 4 5 0 Mounting 4 5 1 Mounting Surface 5 5 2 Screw Mount 5 5 3 Adhesive Mount 6 5 4 Cable 6 5 5 Electrical Connection 6 5 6 Triaxial Mount 6 5 7 6DoF Mount 7 6 0 Electrical Precautions 8 6 1 Excitation Voltage 8 6 2 Signal Leads 8 6 3 Grounding 8 6 4 Signal Conditioning 8 7 0 Recalibration 9 8 0 Questions 9 ...

Страница 4: ... of the angular rate sensor it should be checked to insure proper operation A simple Output Voltage test can be conducted with minimal test equipment Place the unit on the flat surface of a vibration free table top apply the specified excitation voltage to the angular rate sensor see data sheet for proper wiring hook up and measure the output with a voltage meter Allow the unit to warm up for one ...

Страница 5: ...n wrench EHM2156 alloy steel black oxide finish as shown in Figure 1 Remove the unit from the shipping container Place the unit on the mounting surface and align the mounting holes Slide the washers over the screws Using the supplied wrench or a torque wrench tighten the screws to 4 lbf in 0 45 Nm This is roughly equivalent to finger tight with the supplied wrench The Model 7310A angular rate sens...

Страница 6: ...Electrical Connection Connect the unit to the signal conditioner using the following lead designation Red Excitation Green Output White Output Black Ground Excitation Endevco Model 136 3 channel signal conditioner is an optional accessory and is recommended to be used with Model 7310A 5 6 Triaxial Mount For triaxial angular rate measurements the Model 7930 Triax Six Degrees of Freedom Mounting Blo...

Страница 7: ...the three angular rate sensors should be installed to the three primary mounting surfaces marked of the 7930 mounting block and they can be mounted on either the top or the bottom surface of the sensor depending on the positive direction of rotation in the specific application The three accelerometers are installed on the other three surfaces of the mounting block measuring linear accelerations al...

Страница 8: ... signal leads are differential The green lead has a varying output while the white lead is fixed at a reference voltage of approximately 2 5 Vdc Although the output is high level at 2 Vdc the usual precautions of using twisted pair shielded instrumentation cable should be taken to avoid noise pickup on the signal leads 6 3 Grounding The case of the model 7310A angular rate sensor is not attached t...

Страница 9: ...use shorter calibration intervals Contact Endevco for local calibration facility information or return the 7310A unit to Endevco for recalibration Endevco maintains an angular rate recalibration service with A2LA traceability in the United States Dirty units may be wiped clean using a damp cloth and a solvent such as acetone 8 0 Questions If you have any questions regarding the use of this or any ...

Отзывы: