background image

ENXDVR-

4C User’s Manual V-2 

47 

Channel Dynamic Effect 

Enables or disables the channel moving effects during channel dynamic drag and 
drop. 

Menu Dynamic Effects 

This pertains to the setting for the sub-menu to scroll in (when the 


icon is clicked) 

or


scroll out (when the 


icon is clicked). If enabled,  the sub-menu would roll out 

smoothly and if disabled, the sub-menu would have a more abrupt appearance on the 
screen. 

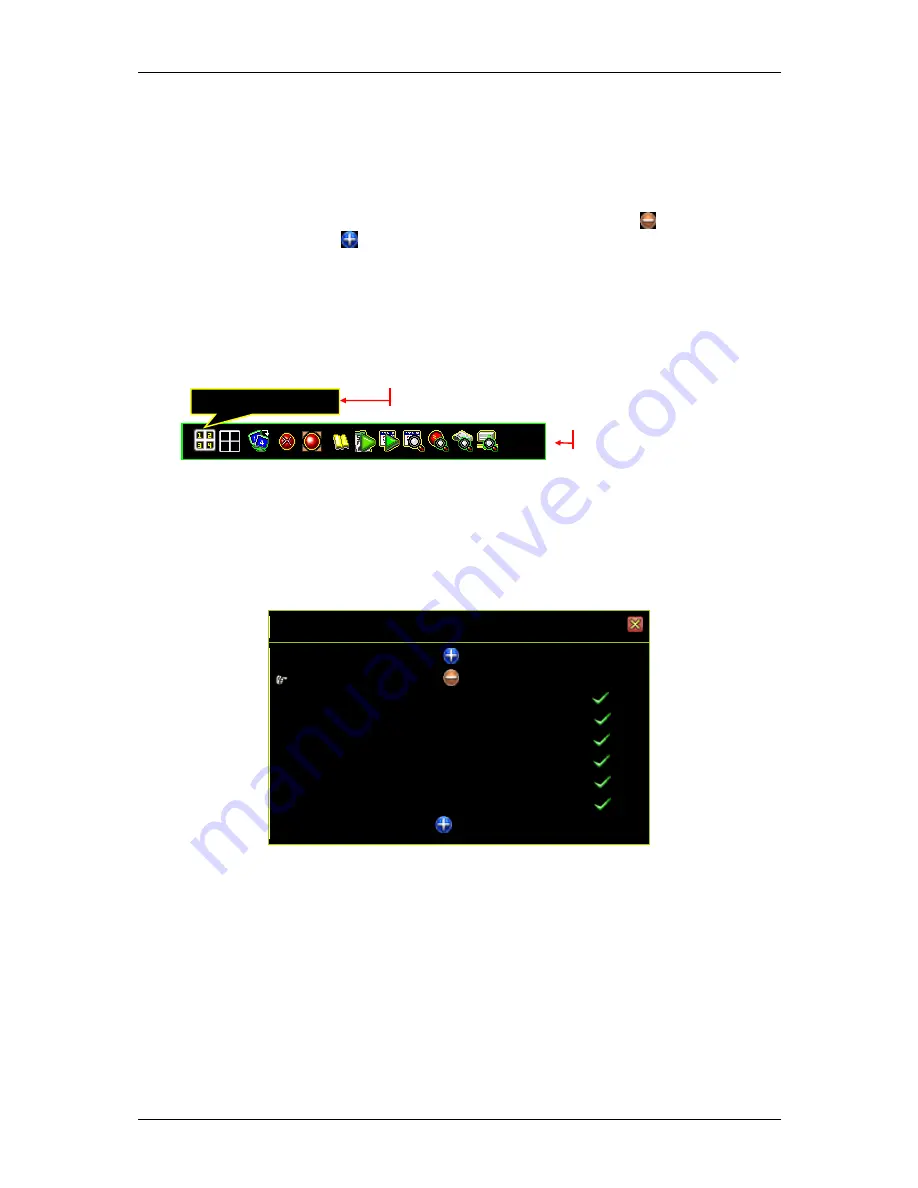
Icon Help 

Enables or disables the help icon text description to appear when the mouse hovers 
over the icons. 


Error Message 

Enables or disables system to show the log when an error occurs. 

Status Bar Information 

Determines how system status information is set and shown. 


VIEW SETUP                          


System Display Setup


 State Bar Information


All State Bar Information                          [

ON] 

Record Light                                             [

ON] 

Network Information                                 [

ON] 

Hard Drive Information                              [

ON] 

Date/Time Information                              [

ON] 

Rotate Information                                     [

ON] 

Channel Information


Default Location 

Icon Help 

Icons 

Содержание ENXDVR-4C

Страница 1: ...1 ENXDVR 4C Digital Surveillance in a Box 4 Channel Digital Video Recorder With Four CCD Security Cameras User s Manual ...

Страница 2: ...tention and care The information it contains has been thoroughly verified The text was complete and correct at the time of printing Due to further product development however the contents of this document may change without prior notice Encore Electronics Inc accepts no liability for damages resulting directly or indirectly from errors omissions or discrepancies between this guide and the product ...

Страница 3: ...nu 20 Channel Setup 22 Channel Number 22 Basic Settings 22 Standard Color Adjustment 24 Special Color Adjustment 25 Record Setup 26 Auto Record 26 Activate Performance Gains 26 Record Scheduler 26 Total Power 29 Auto Settings Adjustment 31 Channel Recording Setup 31 Detector Setup 32 Channel Number 32 Alarm Setup Optional 33 Motion Setup 35 Sensor Setup Optional 39 Authentication Setup 43 System S...

Страница 4: ...ch 76 Data Backup 78 PC Player 80 System Information 83 Record Information 84 Hard Drive Information 85 Network Information 86 Network Connectivity 87 PC Connection through LAN 88 Dynamic DNS Service Overview 90 Register with Dynamic DNS 90 Create a Dynamic DNS Account in dyndns com 91 Setup Router 94 Setup the DynDNS Settings to the DVR 94 Email Notification 95 PCViewer 96 PCViewer Operation 97 I...

Страница 5: ...hing channel display 119 Quick Operation Guide 119 Connecting to the ENXDVR 4C 120 SecuViewer for Android Mobile Devices 122 Install SecuViewer for Android 122 SecuViewer for Android Interface Overview 123 Switching channel display 123 Quick Operation Guide 124 Connecting to the DVR 124 Install SecuViewer for Blackberry OS 126 SecuViewer for BlackBerry OS Interface Overview 128 Switching channel d...

Страница 6: ...ENXDVR 4C User s Manual V 2 6 Chapter 1 Overview ...

Страница 7: ... where you purchase this product ENXDVR 4C Kit package contains the following Encore Surveillance DVR Box Encore Infra red CCD Cameras 4 pieces USB Mouse 100 240VAC In 12VDC Out Power Adaptor with separate power cable Setup Disc Remote Control 2x AAA Batteries for remote control Optional IR Extender cable for remote control User Manual Quick Installation Guide ...

Страница 8: ...o connect to the DVR s Video In ports These cameras are equipped with 24 LED IR s for clear and crisp night vision videos It automatically switches to color during day or bright light and to black and white during low light or night recordings No need for extra power adapter for each individual camera ENXDVR 4C DVR supplies power thru the Ethernet network cable connected to each RJ45 channel ports...

Страница 9: ...R on Lens 3 6 mm Angle View 90 Mini Focal Distance 20 cm AGC Built in White Balance Auto Gain Control Auto S N Ratio 48 dB AGC Off Elctronic Shutter Auto 1 50 1 60 1 100 000 sec Video Output 1 0Vp p Composite Video Output 75Ohm IR LED 24 Units Infrared LED f 5mm 850mm IR Distance In Effect 10 15 m IR Illumination 0Lux IR On Environmental Resistance 1P66 Waterproof Operating Temperature 4 F to 122 ...

Страница 10: ... recording of playback 7 FF Fast forward through video 8 PLAY Start video playback 9 MENU Enter a menu or exit 10 UP DOWN LEFT RIGHT Move through lists or change the settings of choices 11 Enter Select Change and confirm values 12 AUTO Start automatic screen view rotation 13 MODE Changes to split screen mode 14 ZOOM OUT Not available in DVR mode 15 ZOOM IN Not available in DVR mode 16 1 2 8 Channe...

Страница 11: ...ly 6 SENSOR Sensor ports marked 1 4 and a common ground marked G Optional 7 ARM ALARM Alarmport Alarm1 and Alarm 1 Optional 8 485 and RS 485 RS 485 connector typically for PTZcameras and keyboards Optional 9 VGA OUT VGA output DB 9 port for the LCD monitor 10 VIDEO OUT Video output port for the security monitor 11 AUDIO IN and OUT Connectors of audio input for microphone and output for speaker 12 ...

Страница 12: ...ENXDVR 4C User s Manual V 2 12 ...

Страница 13: ...ENXDVR 4C User s Manual V 2 13 Chapter 2 Getting Started ...

Страница 14: ...cure the DVR cover Two screws in the back of the DVR box as shown in the picture and four screws in the bottom of the DVR not shown in the pictures Step 2 Remove the screws that secure the hard disk bracket to its mount on the DVR Step 3 Secure the hard disk to the bracket with screws Most hard drive when purchase comes with screws that fit to their individual brands Top Cover ...

Страница 15: ... connect the hard disk data cable and power cable to the DVR board Step 5 Connect the other end of the hard disk data and power cables to the hard disk itself Secure the bracket on to its mount Step 6 Place cover back on the DVR and secure with screws ...

Страница 16: ...tions Format the hard drive only when The hard drive is brand new or the hard drive is pulled out from a computer or another DVR unit If the hard drive has been used on another device or from a PC or another DVR all the data in it will be erased when continue formatting It is always a good practice to back up the data before continuing with the format Do not format the hard drive when If the hard ...

Страница 17: ... point to give you instant access to video information and DVR functions When cameras are installed and hooked up the four division quadrant screen will be filled with the live video streaming for each camera channel and not black as shown below The Status Bar The Status Bar can be found on the top of the screen It contains the status and notification icons of the surveillance system 1 2011 06 06 ...

Страница 18: ...ing Stop Force Record Start Network connected USB disk connected Network disconnected Hard drive overwrite enabled Hard drive status Channel display rotation enabled XX Percentage of hard drive already used 2010 06 0 3 Current date 15 37 47 Current time Ico n Function Ico n Function Channel Views Load default channel display location 4 channel split view 1 5 Split View Auto channel rotation Main M...

Страница 19: ...to interchange the video camera connectors This function cannot be use using the supplied remote control This function is also applicable for all kinds of Split View Drag and Drop Channel Repositioning Move the cursor onto the channel square you would like to shift Press left button of the mouse a hand icon will appear and drag the channel square to the new position Release the mouse button to dro...

Страница 20: ...her default user accounts power with default password 999999 police 111111 and guest 000000 and the rest of the user accounts added to the system Example When prompted for password to enter the DVR settings and you enter 999999 you will be logged in as power user and so on NOTE It is a good practice to create a backup admin user account with a different username and password in case the default ad...

Страница 21: ...thorization for each user System Setup Set the status icons display languages date time rotation time button beep tone input device speed and other relevant system features Hardware Setup Configures error message checks hard drive information overwrite settings network settings Audio and screen settings Utility Tools To format USB devices update firmware export event logs and to restore system set...

Страница 22: ...t the icons for 4Ch to individually setup of each channel The channel icon will turn green when selected and will turn to white when not selected Select icon if you desire to have all settings setup pertains to all channels as a group When this icon is selected the Channel Name will be grayed out and cannot be defined Basic Settings Active Channel Activate one channel or all of the channels Active...

Страница 23: ...ame for each channel The channel name is limited to 24 characters Press the icon Default Name to select a channel name from the list defined by the system Room Hall Door Lift Area Floor Entry and Point Press the icon to switch to big letters Press the icon to enter the channel name The channel name will appear on the channel square NOTE You may also define the name by using buttons on IR remote Ki...

Страница 24: ...ursor icon up down right left Press Default to load or to restore to the default location Standard Color Adjustment Adjust the video color parameters for each channel or simultaneously for all channels CHANNEL SETUP Channel Number Basic Setting Standard Color Adjustment Brightness 10 Contrast 10 Hue 16 Saturation 16 Sharpness 8 Special Color Adjustment Brightness Default is 10 Press the button to ...

Страница 25: ...Color Adjustment Special Color Adjustment Activate Special Color Disable Start Time 06 00 End Time 21 00 Brightness 12 Contrast 12 Hue 16 Saturation 20 Sharpness 12 Activate Special Color Disable Default Disable Special Color Adjustment Enable Enable Special Color Adjustment Start Time The start time for the special color setting End Time The end time for the special color setting Brightness Defau...

Страница 26: ...m auto increase the recording power to the heavy loading channel from the not triggered or not recording channels Enable this function makes Record Performance Gains at Channel Recording Setup is validated Record Scheduler Record Scheduler is a menu charting the recording schedule of a particular channel or all channels for the whole day 24 hours and the entire week 7 days Default setting is Time ...

Страница 27: ... during this duration NOTE This feature is not included in the 4 channel ENXDVR 4C Motion plus Sensor optional Indicates that the channel is set to detect either triggering events caused by motion or from the sensor This is an optional feature only for DVR unit that supports Sensor When this is set to a non supported DVR ex ENXDVR 4C only the Motion will work NOTE When Motion Mode is set for the r...

Страница 28: ...to set the same mode for a specified time every day The following example shows that from 23 00 to 24 00 11 00pm to 12 00mn everyday there is no recording set to None recording mode Select None recording mode press the icon and press RECORD SCHEDULE Channel Number None Time Motion Sensor Motion Sensor Day Hour Sunday Monday Tuesday Wednesday Thursday Friday Saturday RECORD SCHEDULE Channel Number ...

Страница 29: ... or to change mode on the timetable Select Time recording mode move the cursor and click the period of icons change to and press Total Power Total Power 240 240 Power Sec It shows the number of recording power that has been allocated and the total number of recording power RECORD SCHEDULE Channel Number None Time Motion Sensor Motion Sensor Day Hour Sunday Monday Tuesday Wednesday Thursday Friday ...

Страница 30: ... four channels click the total power as indicated above Video Resolution Quality and Frame Rate Setting for each channel Resolution Press the button to adjust the resolution from CIF Half D1 and D1 for individual channel Quality Press the button to adjust the resolution from Lowest Low Standard High and Highest for individual channel Frame rate Press the button to adjust the frame rate from 0 to m...

Страница 31: ...on quality frame rate and performance gains of recording ChannelNumber Select the icon to setup all channels at one time Select the icons for 16Ch to individually setup of each channel Recording Resolution Select the recording resolution for each or all channels as D1 704x480 60fps NTSC 704x576 50fps PAL Half D1 704x240 120fps NTSC 704x288 PAL Default CIF 352x240 120fps NTSC 352x288 PAL Video Qual...

Страница 32: ...ect the icon to setup for all channels at one time Select the icons to individually setup of each channel RECORD SETUP Auto Record 30Sec Active Performance Gain Enable Record Schedule Total Frame Rate 480 480 Power Sec Auto Settings Adjustment Channel Recording Setup Channel Number Record Resolution Middle Res Half D1 Video Quality Standard Record Frame Rate 15 Record Performance Gains YES DETECTO...

Страница 33: ...g settings to adjust the sensitivity of light detection SensitivityOFF No sensitivity SensitivityLow Low sensitivity level SensitivityNormal Normal sensitivity level SensitivityHigh High sensitivity level SensitivityHighest Highest sensitivity level Light DetectAlarm Mode Select the alarm mode when the Light Detect Mode is triggered Mute No beep whatever loss of light or not Buzzer Short Slow beep...

Страница 34: ...m Mode Select the alarm mode when the Blind Detect Mode is triggered Mute No beep whatever loss of light or not Buzzer Short Slow beeping sound from buzzer on main board Buzzer Long Fast beeping sound from buzzer on main board Alarm Short Short sound coming from the alarm Alarm Long Prolonged sound coming from the alarm Video Loss Mode The Video Loss Mode is for detecting the loss of the camera vi...

Страница 35: ...allowing you to detect unusual movements and enables the system to log motion triggered events even when your DVR setting is in Time Recording mode Enable Activates motion triggered detection even when DVR is in a different recording mode When enabled a blinking motion icon will be found alongside the Time Recording mode icon when motion is detected DETECTOR SETUP Channel Number Alarm Setup Motion...

Страница 36: ...ion Mode Choose any of the following settings to adjust the motion sensitivity parameter SensitivityOFF No sensitivity SensitivityLow Low sensitivity level SensitivityNormal Normal sensitivity level SensitivityHigh High sensitivity level SensitivityHighest The highest sensitivity level Record Time Set the recording time when the Motion Mode is triggered The recording time as 5sec 10sec 15sec 20sec...

Страница 37: ...hannel has been triggered Also the trigger area will turn to a red color Trigger Type There are two trigger types Initial Trigger and Continuous Trigger Initial Trigger When channel has been triggered the triggering event will be displayed on full screen for the duration of the period set in Trigger Full Screen During that period this channel will ignore any other triggering events Continuous Trig...

Страница 38: ... move around and select the area After positioning click on the right button of the mouse to save it CAUTION There will be no response in Motion Mode when the Motion Area Setup has not been completed MOTION SETUP MOTION SETUP All Select All Deselect ...

Страница 39: ... recording mode Record Detection Activate SensorSetup This feature activates the sensor setup allowing you to detect unusual movements picked up by the sensor and enables the system to log sensor triggered events even when your DVR setting is in Time Recording mode Enable Activates sensor triggered detection even when DVR is in a different recording mode When enabled a blinking sensor icon will ap...

Страница 40: ...using Record Detection Activate in the Sensor Setup Sensor Mode This parameter enables or disables sensor mode detection Enable Activates sensor mode for Sensor Recording Mode Disable Deactivates sensor mode for Sensor Recording Mode Sensor Device Setup This feature is to easily map a sensor port to a particular channel without having to remove any wires 1 2010 06 06 15 37 47 Time Recording Mode I...

Страница 41: ...is in a normally open state Normally Close The sensor type is in a normally closed state Record Time Set the recording time when the Sensor Mode is triggered The recording time as 5sec 10sec 15sec 20sec 25sec 30sec 45sec 60sec 90sec 120sec 150sec or 180sec DETECTOR SETUP Channel Number Alarm Setup Motion Setup Sensor Setup Record Detection Activate Enable Sensor Mode Disable Sensor Device Setup Re...

Страница 42: ... is the duration of the of full screen display when a channel is triggered This may be set to a period between 1 to 30 seconds OFF It will not display on full screen when the channel has been triggered Also the trigger area will turn to a red color Trigger Type There are two trigger types Initial Trigger and Continuous Trigger Initial Trigger When the sensor has been triggered the triggering event...

Страница 43: ...he factory default When the system is reset to the factory default all previous settings will be change back to the default values therefore you will lose all settings you have changed previously Click on the Authentication Setup icon or Authentication Setup on the Main Menu The factory default setup is shown Click the following icons for authority management AUTHENTICATION SETUP Account ID Passwd...

Страница 44: ...on for channel monitoring setup Click the icons for setting Enables the account to monitor all channels The icon turns orange when enabled Enables the account to monitor the specific channels The icon turns green when enabled Disabled accounts are indicated by white icons Click Option for audio monitoring setup AUTHENTICATION SETUP Account ID Passwd Video Monitoring admin power police guest Option...

Страница 45: ...l users can access only specific functions System Setup System Setup sets the Language Viewing Date Time Sequence Button Beep Input Device and other relevant parameters Click on the System Setup icon or System Setup on the Main Menu SYSTEM SETUP Language Selection English View Setup Date Time Setup Sequence Setup Button Beep Setup Beep of Mouse Buttons Sound A Beep of Keypad Sound B Beep of IR Rem...

Страница 46: ...ics Mode MAIN MENU Text Mode MAIN MENU Channel Setup Record Setup Detector Setup Authentication Setup System Setup Hardware Setup Utility Tools Exit Main Menu Exit Save Changes Exit Discard Changes LANGUAGE SELECTION English 中 文 日本語 ไ ท ย Pусский Magyar Italiano ية ب ر ع ال Ελ λ η νι κά Français Deutsch Español Română Portuguese VIEW SETUP System Display Setup Main Menu Graphics Mode ON Channel Dy...

Страница 47: ...uld have a more abrupt appearance on the screen Icon Help Enables or disables the help icon text description to appear when the mouse hovers over the icons Error Message Enables or disables system to show the log when an error occurs Status Bar Information Determines how system status information is set and shown VIEW SETUP System Display Setup State Bar Information All State Bar Information ON Re...

Страница 48: ...n icons is set and shown on the home screen VIEW SETUP System Display Setup State Bar Information Channel Information All Channels Information ON Channel Number ON Channel Name ON Record Light ON Video Loss ON Record Mode ON Detector Mode ON Alarm Display ON 1 2010 06 06 15 37 47 Status Bar ...

Страница 49: ...me Date Display Mode Date Display Mode is used to choose a date format for the state information The allowable formats are YYYY MM DD DD MM YYYY and MM DD YYYY DAY TIME SETUP Date Display Mode YYYY MM DD Time Set 2011 06 14 11 18 19 Time Zone GMT 08 00 Taipei Daylight Saving Time Activate Daylight Saving Disable Time Starts No definition Time Ends No definition NTP Server Activate Service Enable S...

Страница 50: ... Saving enables or disables the daylight saving mode Time Starts Time Starts indicates the start date of daylight saving time The user can set the month week number day and hour Time Ends Time Ends indicates the end date of daylight saving time The user can set the month week number day and hour Time Ends Month October Week First Week Day Sunday Hour 0 NTP Server NTP Server allows for the synchron...

Страница 51: ...ETUP Date Display Mode YYYY MM DD Time Set 2010 06 14 11 18 19 Time Zone GMT 08 00 Taipei Daylight Saving Time Active Daylight Saving Disable Time Starts Not definition Time Ends Not definition NTP Server Activate Service Enable Server IP time stdtime gov tw Interval Days 3Day Synchronize Now SYSTEM SETUP Language Selection English View Setup Date Time Setup Sequence Setup Button Beep Setup Beep o...

Страница 52: ...ence settings i e full screen 4 split etc are OFF the screen displays will remain static The Auto Rotation icon will not appear on the Control Bar If Auto Sequence and Full Screen Sequence are both ON the display will enter the single channel view within the time set on Auto Sequence If Auto Sequence is OFF and Full Screen Sequence is ON the display will enter the single channel view only when the...

Страница 53: ...d Beep is available for models equipped with keypad Input Device Setup Input Device Setup is used to set the speed of the following input devices mouse keypad and IR Remote The speeds can be assigned the following settings Mouse Moving Speed Slow Normal Fast Mouse Repeat Speed OFF Slow Normal Fast Keypad Repeat Speed OFF Slow Normal Fast IR Repeat Speed OFF Slow Normal Fast NOTE Keypad repeat spee...

Страница 54: ... The Query Error Message window shows all error messages View Time Sort error messages by time of occurrence Clear Message Clear all error logs HARDWARE SETUP Query Error Messages Hard Drive Setup Network Setup Keyboard PTZ Setup Screen Setup NTSC PAL Auto Detection ON Video Output Format NTSC Screen Border ON Main Display Screen VGA VGA Resolution 1024x768 Video Adjustment Audio Setup Audio Recor...

Страница 55: ... to limit CAUTION If you decide to move or re assign your DVR to a different system with a different ruling on how long you can keep your videos you have to reformat your hard drive to change the Max Recording Days First Hard Disk Model Automatically displays the hard drive model number HDD Size Automatically displays the hard drive size Max Recording Days Displays the current setting for the maxi...

Страница 56: ... Network Setup NOTE You must have a running network in the premises if you plan to have your surveillance systems accessible to remote users Consult your MIS or Network Administrator for your router s setup of the IP address segment and port forwarding rule for the DVR network setup Network Setup is for adjusting network configurations Network Enable Enable Network may be used Disable Network may ...

Страница 57: ... Please input the PPPoE Account ID and Password provided by the ISP Note Account ID maximum in 24 characters Password maximum in 16 characters GATEWAY Define gateway IP address Contact the network administrator for this information SUBNET MASK A sub network or subnet is a logically visible distinctly addressed part of a single Internet Protocol network Contact the network administrator for this in...

Страница 58: ... viewing from IE or PCViewer Port The default port number is 8000 for DVR video and audio transmission The range of port numbers is from 2048 to 32767 This can also be used as the web port Video Transmission Quality Selects the remote video transmission quality from Lowest Low Standard High and Highest Audio Transmission Enables ON or disables OFF audio transmission UPNP UPnP allows devices to aut...

Страница 59: ...e server to be updated in real time Please refer to the chapter DynDNS Service Overview Activate Service Enable the Dynamic DNS service Provider The web site IP Address of Dynamic DNS provider Server Name Define a name of Dynamic DNS Maximum in 35 characters Account The account name of Dynamic DNS Maximum in 27 characters Password Password for Dynamic DNS Please refer to DynDNS Service Maximum in ...

Страница 60: ... Specify the email address of the sender Receiver E mail Specify the email address of the recipient Email Authentication Activate or deactivate the email account authentication This is for identifying and verifying if the sender has been authorized This is typically set to YES since most email server providers require this Authen User Name Specify the user name for email authentication Authen User...

Страница 61: ...the DVR and the PTZ capable cameras and the keyboard connected to it Pan Tilt Zoom Setup The Pan Tilt Zoom Setup allows you to modify the PTZ settings for each channel of the DVR These settings need to be matched to the camera you intend to connect to your DVR KEYBOARD PTZ SETUP Pan Tilt Zoom Setup RS 485 Baudrate 9600 Databit 8 Bit Parity No Parity Stopbit 1 Stopbit Keyboard Keyboard Model OFF Ke...

Страница 62: ...to the panning tilting and cruising speeds of your camera Pan Speed can be set between 0 to 8 Tilt Speed can be set between 0 to 8 Cruise Speed can be set between 0 to 3 Auto Pan Speed can be set between 0 to 5 Zoom Focus Iris These pertain to the zoom focus and iris adjustment settings of your camera Zoom Speed can be set between 0 to 3 Focus Speed can be set between 0 to 3 Iris Speed can be set ...

Страница 63: ...ts the identification number based on the local settings of your keyboard This value may be any number from 1 to 16 Keyboard Protocol Provides options for the keyboard communication protocol Pelco P Pelco D Teleview Pelco P Teleview Pelco D Merit LILIN 3B Merit LILIN 7B HiSharp Nicecam and Elitar This setting depends on the keyboard model being used Screen Setup Use to adjust the video format and ...

Страница 64: ... default setting for VGA resolution on the DVR is 800x600 Some monitors that may be connected to the VGA port may not support this resolution and this may result to unclear images on the display You can adjust the setting to a higher value to ensure clarity of the video Video Adjustment Adjusts the position of main display on the monitor when connect the main display screen to BNC port Labeled as ...

Страница 65: ...location Audio Setup Audio Setup relates to the settings for the audio device that may be connected to your DVR Audio Record ON Enables audio recording OFF Disables audio recording Audio Mute ON Mutes the sound OFF Allows for sound to be heard Input Volume Adjusts the input volume from 1 to 16 Output Volume Adjusts the output volume from 1 to 16 1 2010 06 06 15 37 47 VIDEO ADJUSTMENT Default ...

Страница 66: ...ngs to USB Load Settings from USB Restore Default Setting Format USB Flash Drive The system supports USB pen drives and USB card readers with the FAT32 device file format Please format the drive using the file format function if it is not in FAT32 an error will occur during backup The file format function helps you format USB device to improve its compatibility with the DVR for storing video data ...

Страница 67: ...isk Once the USB device is connected to the port the DVR will take a few seconds to search for the firmware If there is a mistake or missing file on the drive it will show File not found or Disk Error on the bottom line Please check USB disk or file Re attach disk to the port Once the firmware has been found its file name revision number revision date and time file language and checksum are displa...

Страница 68: ...File Env2010 07 14_0503 env Written successfully OK FIRMWARE UPDATE Current Revision V15 0 0 Current Date Time Jun 14 2011 05 22 38 Current Language International File Name FWVX4TWNFWI File Size 7196672 Bytes File Revision V15 5 3 File Date Time Jan 15 2011 16 45 52 File Language English File Checksum 0x02E165B5 FIRMWARE UPDATE Current Revision V15 0 0 Current Date Time Jun 14 2011 05 22 38 Curren...

Страница 69: ...Generic Click Load File to load the selected file from USB device It will show the following message LOAD SETTINGS FROM USB File Env2010 07 14_0503 env Loaded System will restart Restore Default Setting This command resets the system to its default settings LOAD SETTINGS FROM USB USB Disk General Flash Disk Free Capacity 905MB Total Capacity 1005MB Read File Env2010 07 14_0503 Load File File Selec...

Страница 70: ... on the icon if you access this from the Main Menu in Graphics Mode If you have made changes you will be asked whether or not you would like to save those changes Exit Main Menu Some configuration has been changed Please confirm Save Discard Cancel Otherwise in the regular Main Menu mode you are presented with the following window MAIN MENU Channel Setup Record Setup Detector Setup Authentication ...

Страница 71: ...exiting from the menu Data Saving Please Wait Exit Discard Changes All changes are ignored The changes will not be saved and will take no effect before exiting from the menu Confirm with Yes or go back to the menu by choosing No Exit Main Menu Discard changes and exit now YES NO ...

Страница 72: ...72 Chapter 3 Playback and Data Backup ...

Страница 73: ...eo to play back The Month Selector will start blinking when your mouse is hovering over it Click on the month or the arrows beside the month or to choose Choosing the day of the video to play back The dates with recorded videos will be in a vivid white color for weekdays red for Sundays and cyan for Saturdays on the Day Selector A specific day will start blinking when your mouse is hovering over i...

Страница 74: ...ay are available from 09 00 to 18 00 Play Starts to play the event that has been selected Backup Creates a backup file for the event that has been selected NOTE Play back and backup for the Calendar Menu is similar to the operation available in the Play Menu Please refer to the section on the Video Playback Control Bar Play Menu Press the Play Menu icon to enter Play Menu in the active view window...

Страница 75: ...ed it will show Backup To back up the recorded data Please refer to the Backup section Commands and Recorded Data status PLAY MENU Channel Number Play Begin Time 2010 7 04 10 40 02 Play End Time 2010 7 14 05 59 13 2121 2010 07 14 06 18 31 2120 2010 07 14 06 17 12 2119 2010 07 14 05 57 38 2118 2010 07 14 04 20 11 2117 2010 07 14 02 18 42 Option Play Backup S N of Recorded Data Series Number of reco...

Страница 76: ... and playback video simultaneously in PIP picture in picture view 4 Split View Displays playback video in 4 split view Previous Segment Plays back the recorded video by one hour Rewind Plays backward faster Stop Stops the video playback Pause Single Frame Pauses the video playback Play Starts the video playback Fast Forward Plays forward faster Next Segment Plays forward the recorded video by one ...

Страница 77: ...h time period according to all effective events as recorded SEARCH MENU Channel Number Filter Type All Events Filter Time Setup Disable 2121 2010 07 14 06 18 31 2120 2010 07 14 06 17 12 2119 2010 07 14 05 57 38 2118 2010 07 14 04 20 11 2117 2010 07 14 02 18 42 Option Play Backup Play Starts to play the event that has been selected Backup Creates a backup file for the event that has been selected O...

Страница 78: ...rd End Time Shows the recording end time Data Backup The DVR supports a USB 2 0 device stick drive and card reader for data storage NOTE Please refer to your Hardware Installation and Operation Manual to locate this USB port typically on the front panel as it may vary for each DVR Press Backup Start to enter the Backup Menu PLAY MENU Channel Number Play Begin Time 2010 7 04 10 40 02 Play End Time ...

Страница 79: ...nnels you would like to backup You can change the period of recorded data for backup by setting the Start Time and End Time BACKUP MENU Backup Device Generic Flash Disk Free Capacity 1029352 1029380 KB Backup Channel Estimate Time 30Sec Start Time 2010 08 11 06 17 25 End Time 2010 08 11 06 17 31 Backup Period 00Min 06Sec Backup Size 1152KB Backup Start BACKUP MENU Backup Device Generic Flash Disk ...

Страница 80: ...VF video file An example for the backup made above would look like and a PVF player will be stored into the USB device You can review this video file using the PC Player or on the PCViewer software Please refer to the chapter on the PCViewer for information about the said application PC Player A PC Player is stored along with the PVF file when a backup is created and stored into a USB pen drive In...

Страница 81: ...Frame Plays forward the recorded video by one frame image Play Plays the video in the normal rate of motion Fast Forward Plays forward 8 times or 16 times faster Still Capture Captures a still picture of the current frame and saves it Split 1 Displays a single channel being played back Use left mouse button to go through each channel Split 4 Displays 4 channels being played back simultaneously Spl...

Страница 82: ... the length of the video by simply dragging it across The Volume Control Bar allows you to control the volume of the sound coming from the player NOTE 9 Split View is available only for DVRs with more than 8 channels and 16 Split View is available only for DVRs with 16 channels ...

Страница 83: ...83 Chapter 4 System Information ...

Страница 84: ...ution Recording Mode Remaining Recording Time Buzzer Alarm Latest Recording Frame Rate External Alarm Possible corresponding values for the parameters Channel Number Video Loss CIF Recording Resolution Half D1 Recording Resolution D1 Recording Resolution Not Recording Motion Record Mode Time Record Mode Sensor Record Mode Optional Sensor Motion Record Mode 10 Record Time Count Down 30 Frame Rate i...

Страница 85: ...tandard Record Size 2438 715351 MB Standard number of Event 396 357376 Model Displays the hard drive model number HDD Size Displays the hard drive size Record Start Time Displays the day and time when the hard drive starts storing recorded data Record End Time Displays the day and time of the last recording on the hard drive Standard Record Size Displays the total hard drive capacity in megabyte M...

Страница 86: ...s from remote site Management Service shows enable or disable the management service for allowing remote control from IE or PCViewer Monitoring Service shows enable or disable the management service for allowing remote viewing from IE or PCViewer Dynamic DNS shows that the Dynamic DNS service has been enabled or disabled UPNP displays the status of the UPNP on the DVR NETWORK INFORMATION IP Type D...

Страница 87: ...87 Chapter 5 Network Connectivity ...

Страница 88: ... network devices is from 192 168 11 160 to 192 168 11 199 Step 3 Find out the available IP address Enter ping and the IP address you would like to test on the DOS prompt window When Reply from IP address bytes 32 time 10ms TTL 128 appears as in the following illustration that means this IP address is occupied by another network device If Request timed out appears it means this IP address is not be...

Страница 89: ...ESS Enter the DVR s address GATEWAY Enter Router IP Address Subnet MASK Typically 255 255 255 0 NETWORK SETUP Network Enable Enable IP Address Setup IP Type Static IP Address 0 0 0 0 Gateway 0 0 0 0 Subnet Mask 255 255 255 0 MAC Address 00 B2 95 DF 96 B7 PPPoE Account ID No Definition PPPoE Password No Definition Management Monitoring Setup Server Setup ...

Страница 90: ...assigned by your ISP company server randomly NOTE A router is needed as the interface between PC and DVR when DVR is under internal network environment or LAN Register with Dynamic DNS There are three suggested providers for Dynamic DNS account www no ip com www changeip com and www dyndns com In the following example we will use http www dyndns com as the dynamic DNS provider ...

Страница 91: ...get a free hostname to map to your dynamic IP address Below steps are currently posted in the dyndns com web site Step 1 Please make sure you have read the notice above because web links for DynDNS mentioned here may change If the links and instructions given below differ from what you are seeing in this manual please contact DynDNS on how to get a free hostname Or you may want to subscribe to a y...

Страница 92: ...inue checkout check mark the Accept button then click Create Account Step 4 Email verification Follow instructions on the screen You should activate your account within 48 hours otherwise you have to start over the process again If you choose to click the link on your email you will be connected to the Step 5 screen ...

Страница 93: ...iod your account will be automatically activated to a full PRO service and the annual service usage fee will be charge to your account When you cancel before the 14 day period you will receive a one free hostname with limited DynDNS service Please check with DynDNS on rules how to maintain the retained free Hostname otherwise it will expire if not visited in a certain time These statement and rule...

Страница 94: ... screen is shown below follow these steps SERVER SETUP Default DNS Address 168 95 192 1 Custom DNS Address 168 95 1 1 Dynamic DNS Activate Service Disable Provider www dyndns com Server Name myhome_dvr from ca com Account timon Password lionking Default DNS Address leave it as it is or check your ISP Custom DNS Address leave it as it is or check your ISP Dynamic DNS o Activate Service Change to EN...

Страница 95: ...il account This message will contain details about the event NOTE Remember to enable the email service function in the E Mail Setup menu to receive notifications NOTE Your sender email server must be using SMTP server to be able to forward email Check with your email service provider for their SMTP server address and SMTP port number before setting up the email notification ...

Страница 96: ...ENXDVR 4C User s Manual V 2 96 Chapter 6 PCViewer ...

Страница 97: ...rom a remote PC computer using LAN or WAN internet network connections depending on how the PC computer can access your DVR and how the DVR is connected to the network PCViewer works only on Windows based computer and Internet Explorer web browser If you would like to remote view your DVR using a different platform please check the specific section from this manual NOTE The PCViewer works best wit...

Страница 98: ...Overview The PCViewer supports remote viewing and control for a maximum of 4 remote DVR site connections Once the PCviewer installation is completed click on the PC desktop icon PCViewer The main application screen will appear as follows No Function 1 Opens the DVR connection window 2 Indicates the name of the DVR connections 3 Selects the language for the PCViewer 4 Closes the PCViewer applicatio...

Страница 99: ...VR connection Step 2 Press the Add button to create a DVR connection Step 3 Type in the DVR name DVR IP address port number Default port number is 8000 account name and password Step 4 Once you close the Add menu the DVR list will show the new DVR connections Step 5 Tick on the box beside the DVR name The check mark indicates that the DVR will be displayed on the PCViewer Click on the Close button...

Страница 100: ...ed into quadrants four areas Each quadrant is associated to one DVR This section briefly illustrates how to switch display on the quadrant from multiple channels 4 8 or 16 to a single channel switch display on the quadrant from a single channel to multiple channels 4 8 or 16 switch display on the screen from multiple DVRs to one DVR switch display on the screen from one DVR to a single channel on ...

Страница 101: ...lay a single DVR connection display in full view Click on the DVR connection button on the right hand side of the screen to display your selected DVR in full screen view The screen will appear as follows Display single channel from one DVR in full view Double click the specific channel you would like to display in full view or click the icon to switch the display The screen will appear as follows ...

Страница 102: ... and 16 channel views respectively Pause Live Viewing Click on the icon to pause the current viewing Capture Still Image Click on the icon to capture still image of the view that is currently displayed on the screen A prompt will require you to specify the desired location for the file ...

Страница 103: ... the icon for live backup This allows you to record the video stream instantly to your PC where you are running the PCViewer Software Select which channel you want to record When you stop the recording a pop up screen will direct you to select the drive where you want to store your file The PVF will be stored in a folder Viewer in the chosen drive ...

Страница 104: ...k on the icon to display the remote playback interface on your PCViewer A selection window will allow you to select between Time Search or Event Search Preview of the ControlBar Control bar Exit application DVR configuration Playback 1 2 3 4 5 6 7 8 10 9 ...

Страница 105: ...Time Search control window No Name Function 1 Fast Backward 2x Plays backward faster by twice the normal speed 2 Fast Backward 1x Plays backward faster by 1x the normal speed 3 Playback Starts the video playback 4 Fast Forward 1x Plays forward faster by 1x the normal speed 5 Fast Forward 2x Plays forward faster by twice the normal speed 6 Pause Pauses the video playback 7 Stop Stops the video play...

Страница 106: ...the video you would like to create a copy of End Select the end date and time for the video you would like to create a copy of Channel Select the channel or channels from which the backup video or videos will be taken from Audio Enables the inclusion of audio into the backup Size The file size automatically adjusts according to the duration start and end time set by the user Step 4 Press Start to ...

Страница 107: ...e video you would like to play back Event End Date Select the end date for the video you would like to play back Event End Time Select the start time for the video you would like to play back Event Select the type of event you are searching for The drop down lists Hardware Normal Warning Record All Step 2 Press the button Search to start video playback Step 3 You will see the search result table s...

Страница 108: ...utton to specify the location where you would like to store the file Begin Select the start date and time for the video you would like to create a copy of End Select the end date and time for the video you would like to create a copy of Channel Select the channel or channels from which the backup video or videos will be taken from Audio Enables the inclusion of audio into the backup Size The file ...

Страница 109: ...ettings on your DVR please use the default settings below Default User admin Default Password 123456 You can change the DVR configuration after successfully logging in The operation method of the remote configuration interface is consistent with the DVR interface Please refer to the DVR operation sections on this manual PCViewer Player The PCViewer can play stored PVF files with its built in playe...

Страница 110: ...ENXDVR 4C User s Manual V 2 110 Click on PlayFile to locate the file you would like to view Once the file is found the PCViewer Player will automatically display the stored video ...

Страница 111: ...ENXDVR 4C User s Manual V 2 111 Chapter 7 Remote Viewers ...

Страница 112: ...w the frames videos are captured by frame taken by the DVR WebViewer for Internet Explorer This section introduces the remote viewing and control through ENXDVR 4C DVR Viewer This function is supported only in the IE browser You may encounter abnormal operations if you use other browsers Some Microsoft Smart Phones loaded with Windows operating systems are already loaded with Internet Explorer web...

Страница 113: ...ENXDVR 4C User s Manual V 2 113 Enable ActiveX installation You may also click on the ActiveX link on the right hand side of the viewer indicated below ...

Страница 114: ...R 4C User s Manual V 2 114 Save the ActiveX cabinet file into your preferred folder Extract all the contents of the cabinet file into a similar location i e folder Double click on Setup to begin installation ...

Страница 115: ...rompted to refresh your browser Click OK Enter the designated user name and password Enter the default username is admin and the default password is 123456 if you did not change the DVR Authentication settings then press the icon to connect to the DVR from the remote site ...

Страница 116: ...into four eight or sixteen channels display This depends on the number of channels supported by your DVR NOTE Multiple channel viewing depends on the number of channels available on the DVR Viewer Operation The top area of the DVR Viewer Allows the user to enter the user name and password to access the DVR A allows the user to Save and to automatically reconnect to the current connection B provide...

Страница 117: ...pplication or Apps available for the DVR user to connect to the DVR for remote monitoring through an Apple mobile digital devices such as iPhone iPod Touch iPad2 or iPad Install SecuViewer for Apple Follow these steps to install SecuViewer into your Apple mobile digital device NOTE It is advisable for you to update your device firmware before installing SecuViewer This mitigates the possibility of...

Страница 118: ...one main screen SecuViewer for Apple Interface Overview Connect to th VR St p the DV connection Switch channel button display CH1 CH4 CH5 CH8 CH9 CH12 CH13 CH16 Setup the DVR connection SecuViewer operation guide Switch to split view to Display channel one CH1 to sixteen CH16 ...

Страница 119: ...ing channel display There can only be four 4 channel buttons displayed at each time You can use the button to switch between displays Quick Operation Guide The button opens into an operation information screen similar to the one shown here ...

Страница 120: ...ENXDVR 4C User s Manual V 2 120 Connecting to the ENXDVR 4C Select the SecuViewer icon on iPhone main screen to start the remote monitoring Tap on the icon to setup the DVR connection ...

Страница 121: ...the DVR Network IP Address Enter the DVR IP address Network Port Enter the network port default is 8000 User Name Enter the user name default is admin Password Enter the password default is 123456 When you are done with the setup tap on Ok The DVR name will then appear on the DVR list screen Tap on the DVR name to begin access NOTE Please wait for the images to load and appear as speed of connecti...

Страница 122: ...devices such as Android smart phones tablet PC s etc Install SecuViewer for Android Follow these steps to install SecuViewer into your Android mobile digital device NOTE It is advisable for you to update your device firmware before installing SecuViewer This mitigates the possibility of incompatibility errors Search for the SecuViewer app on Android Market and download to your device You can see t...

Страница 123: ...witch channel button display CH1 CH4 CH5 CH8 CH9 CH12 CH13 CH16 Setup the DVR connection SecuViewer operation guide Switch to split view to Display channel one CH1 to sixteen CH16 Switching channel display There can only be four 4 channel buttons displayed at each time You can use the button to switch between displays ...

Страница 124: ... 2 124 Quick Operation Guide The button opens into an operation information screen similar to the one shown here Connecting to the DVR Select the SecuViewer icon on your Android device main screen to start the remote monitoring ...

Страница 125: ...DVR 4C User s Manual V 2 125 Tap on the icon to setup the DVR connection In the Setup and DVR list screen DELETE Remove a DVR from the list ADD Add a new DVR to the list EDIT Change the settings of the DVR ...

Страница 126: ...use this feature the SecuViewer needs to be installed to your Blackberry phone Follow these simple step by step installation instructions Install SecuViewer for Blackberry OS Step 1 Determine the OS version installed in your BlackBerry mobile phone device SecuViewer for BlackBerry currently supports OS versions 4 6 5 0 and 6 0 Step 2 Insert the Encore setup disc of the ENXDVR 4C to the CDROM drive...

Страница 127: ...iewer cod file will not show on your browser screen Click on SecuViewer alx to select it then click Open Step 5 After selecting the file you will be brought back to the Blackberry Desktop Software Applications screen For OS Version 6 0 the files are already imported to your phone For OS Version 5 0 click to select the SecuViewer from the Application Summary pane then click on the Apply button loca...

Страница 128: ...s 4 6 Look for the blue SecuViewer icon and run it SecuViewer for BlackBerry OS Interface Overview Connect to the DVR Stop the DVR connection Switch channel button display Configure the DVR connection SecuViewer version info to Display channel one CH1 up to sixteen CH16 channels Switching channel display There can only be four 4 channel buttons displayed at each time Use the button to switch betwe...

Страница 129: ...SecuViewer icon on the BlackBerry Click on the icon to configure the DVR connection The configured accounts are listed on top of the screen e g Demo DVR ok Connect to a DVR through selected account add Add a new account A maximum of three accounts can be configured delete Delete the selected account edit Edit the configuration of the selected account cancel Return to main page ...

Страница 130: ...er Google Chrome and Firefox Images may be viewed based on a designated refresh rate You may use this program on your computer or a mobile device that has a web browser installed Step 7 Follow the instructions for installing the DVR Assign an IP address for the DVR Open the web browser Type in the IP address or hostname of the DVR followed by an m and a It would look like the following examples Ex...

Страница 131: ...l to be viewed the desired resolution and the refresh time from the drop down menus Channel Number CH1 CH4 4Ch DVR CH1 CH8 8Ch DVR CH1 CH16 16Ch DVR Resolution QCIF Quarter CIF CIF or H D1 Half D1 Refresh Time Time for images to refresh on display 1sec 2sec 5sec 10sec or 30sec RUN Allows the user to refresh the display on the screen END ...

Отзывы: