Users’ Manual
EAN-26CCJ Inclinometer calibration check jig
Page
|
3
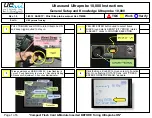
Reading must be noted for all five positions, first with top wheel (A+ direction) of the probe towards right hand
side, then with top wheel (A+ direction) of the probe towards left hand. Then repeat the procedure for B
axis (at 90º to original axis given in point # 4 above).
Note:
It is strongly recommended to take the first data on calibration check jig before using the
Inclinometer system in field. Carefully store this data as reference for future readings to
calculate and workout any drift with time. It is also requested to send this first data (reference
data) to us also for site assistance in future.
Note:
The jig must be mounted at any stable location that is not subject to any movement caused
by construction activities.
Note:
It should be noted that the 0
°
,
±
14
°
or
±
28
°
positions are approximate and should not be
taken as calibration points.
3 PERIODIC CHECKS
Periodic checks with a spirit level can be made to check the verticality of the calibration check jig. Also the
mounting bolts can be checked to ensure that they are tight.
Index pin for setting positions at
Figure 2


