background image

Installing the Capture Card 

9


You are likely to need a flat blade and /or a cross head screwdriver for the installation of the


XtremeDV-SDI4 card; it would be useful to have these to hand before you begin.


Power down the PC (including peripherals), switch off at the mains and disconnect all the cables


connected to the computer, noting the positions for accurate re-connection


Remove the PC cover


Locate a vacant PCI Express slot (x4 or higher) on the motherboard and remove the blanking plate 
(retain all screws) 

If you are in doubt consult your motherboard documentation to correctly identify a 

PCI Express slot. If the card is forced into a 32 or 64 bit PCI or PCI-X slot it will be irreparably damaged 
when the system is powered up and the warranty will be void.


Reconnect all cables to the PC


Power up the PC and commence the software installation


How to Connect Input Sources


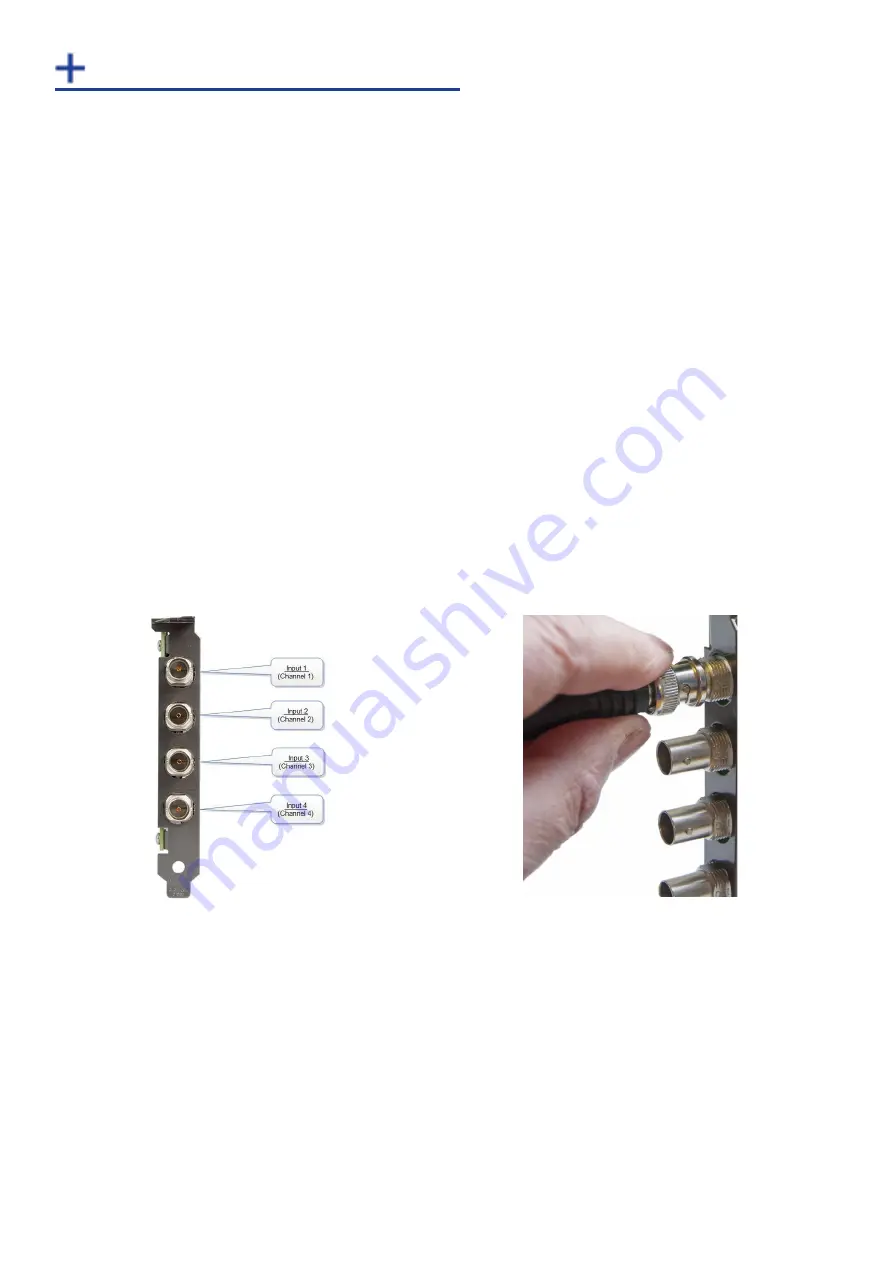
The XtremeDV-SDI4 card has four BNC type connectors for four separate, simultaneous inputs. The 
connectors have green LED’s. Connect the cables distributing the video source signal to BNC input 
connectors on the XtremeDV-SDI4 capture card.


Fig. 3 

Fig. 4


When connecting BNC cables, ensure connectors are fully twisted and locked in place. Failure to lock the 
connector can result in the BNC cable becoming separated from the card and the connection being lost.


Cable Lengths


The XtremeDV-SDI4 supports cable lengths of up to 150m for 3G-SDI.  This 

figure

 is based on using low 

loss coax cables (Belden 1694A).  Avoid tight loops or kinks in the cables.


Содержание XtremeDV-SDI4

Страница 1: ...XtremeDV SDI4 UserGuide Version 1 0 4 ...

Страница 2: ...s 1 FCC Statement 2 Introduction 3 Hardware Overview 4 SoftwareOverview 5 Specification 7 Unpacking 8 Installing the Capture Card 9 Installing Multiple Cards 10 Firmware Upgrades 11 SoftwareInstallation 12 EMS Limited 13 Index 14 ...

Страница 3: ...ones de seguridad antes de poner en funcionami ento el equipo a fin de evitar daños en su producto de EMSo lesiones al personal encargado de su manejo Poner estas instrucciones a disposición de todos aquellos que vayan a utilizar y o manejar los productos de EMS Alimentación eléctrica Todos los productos de EMSrequieren una fuente de alimentación eléctrica Esta fuente de alimentación eléctrica deb...

Страница 4: ...ent generates uses and can radiate radio frequency energy and if not installed and used in accordance with the instruction guide may cause harmful interference to radio communications Operation of this equipment in a residential area is likely to cause harmful interference in which case the user will be required to correct the interference at their own expense Changes or modifications not expressl...

Страница 5: ...r surfaces to be captured and stitched together Developed as part of the XtremeSC family of capture cards theXtremeDV SDI4 offers unmatched capture performance and reliability Key Features LiveStream Technology Low latency video and audio capture minimizes the delay prior to post processing MultiStream Open and independently control multiple instances of the same capture from a single inputsource ...

Страница 6: ...e Gen 3interface Frame buffer memory 768 MB Single PCIe endpoint allowing for more cards captures to be placed within a singlesystem EMS Xtreme Performance Driver Multiple cards per system 16 streams per card Frame sync and time stamping Automatic signal detection Direct Show interface EMSRGBEasy API Models XtremeDV SDI4 3G SDI Video Capture Card Fig 1 Fig 2 ...

Страница 7: ...y can use Xtreme capture cards due to their built in WDM support Xtreme Software Capabilities Timestamp support for streaming synchronisation Synchronisation of multiple inputs across multiple cards Synchronise systems using network clock synchronisation For edge blending and other applications Flexible and configurable EDID Management Allows programming of custom EDID parameters for capture cards...

Страница 8: ...nterface and also simplifies development tasks for application developers who do not need to implement video stream reformatting separately Xtreme Application Overview The application displays the connected source in a window it has the following features Scales the data to fit in the window Ability to set up sources accurately settings automatically saved Save a single frame to a file in one of t...

Страница 9: ... data rate 2 9GB S per channel is not exceeded Multi buffered to eliminate tearing artefacts Video Modes 480i 576i 720p 1080I 1080P 1080PSF 2048X1080P 2048X1080PSF Supported Frame Rates 23 98Hz 24HZ 25Hz 29 97HZ 30Hz 50Hz 59 94Hz 60Hz Audio Capture Embedded audio capture Operating System Support Windows OS up to Win 8 8 1 Power Requirements Max current at 3 3 0 45A Max current at 12V 0 85A Max pow...

Страница 10: ...It is recommended that you do not discard the packing box until you are completely satisfied with the XtremeDV SDI4 capture card and it is fully installed and working correctly We also recommend that you make a note of the serial number of the card in a prominent place before the card is plugged into the computer This should hasten any query should you need to contact our Technical Support Departm...

Страница 11: ...PCI X slot it will be irreparably damaged when the system is powered up and the warranty will be void Reconnect all cables to the PC Power up the PC and commence the software installation How to Connect Input Sources The XtremeDV SDI4 card has four BNC type connectors for four separate simultaneous inputs The connectors have green LED s Connect the cables distributing the video source signal to BN...

Страница 12: ...meDV SDI4 are configured The example below shows the jumper link settings for up to 32 cards in a single system When two cards share the same link settings their order is determined by the PCIe bus DirectShow Fig 5 If you change the link ordering after installation you must run dplinks exe This program will update the existing input names used by the windows DirectShow interface To run the dplinks...

Страница 13: ...N therefore no action should be necessary In the unlikely event that something goes wrong during the upgrade process e g System power outage it is possible to revert to the factory settings by powering down the system temporarily setting SW2 to the OFF position then powering up the system Once the system has rebooted set the SW2 back to the ON position while the system is still powered up and rest...

Страница 14: ...en a EMS graphics card is used XtremeDV SDI4 transfers the data directly to the graphics card thereby increasing performance The XtremeDV SDI4 sends the relevant portions of each captured image to each display channel and instructs each channel to use its graphics engine to render the data This fully utilises the hardware and dramatically increases performance When a Direct3D compatible graphics c...

Страница 15: ...il to support ems imaging com with as much information about your system as possible Toenable a swift response we need to know the following details Specification of the PC including processorspeed Operating System Application Software EMS Hardware Software The exact nature of the problem and please be as specific as possible Please quote version and re Xtreme numbers of hardware and software in u...

Страница 16: ...e upgrade 11 H Help File 12 O Operating System Support 7 P Packing box 8 Power Requirements 7 R RGBEasy API 4 S Software Capabilities 5 Software updates 12 Supported Frame Rates 7 SW2 11 T Technical Support 13 Troubleshooting 12 U Update Rate 7 V Video Modes 7 Video Streaming 5 How to Connect Input Sources 9 Xtreme Performance Driver 4 M Maximum Capture Resolution 7 Models 4 Multiple cards 10 Mult...

Отзывы: