EMPERO EMP.7KG021 Скачать руководство пользователя страница 4


4


                                                     GAS RANGES WITH OVEN 


Kasap Ti

p Dik Buzdolapları 


A4 

UNPACKING 

*Please unpack  the package according to the security codes and ordinances of current 
country and get rid from the pack.Parts which contacts with food are produced by stainless 
steel.All plastic parts are marked by material’s symbol. 
 
*Please check that all the parts of appliance had come completely and if they are damaged or 
not during the shipping. 
 

INSTALLATION 

*Please place the product to straight and sturdy ground,please take necessary steps against 
possibility of overturn. 
 
*Technician who will serve for installation and service for the appliance must be professional 
on this subject and must have installation and service licenses by the company. 
 
*Connection to Gas Fitment  must be done by authorized person. 
 
*The area where the appliance is  must have enough ventilation and vent-hole. 


*The appliance must be connected correctly according to local and national gas standards of 
your country. 
 
*The appliance gas entrances are indicated with ‘’G’’ label on the body. 


*Connection to gas fitment  must be done with suitable diameter metal flex pipe and spheric 
valve.The spheric valve must be immobilized to a place that is far away from heat and 
accessible during the danger.After gas entrance connection done,gas leakages must be 
checked. 
 
*According to the datas on appliance information plate,gas and pressure must be adjusted.If 
the gas type that is adjusted is not the suitable with gas type that is at installation place,apply 
the instructions that is about adjustment of different gas type. (

Event :G

 
*If the location  where gas ranges with oven placed is covered with nonflammable heat 
insulation material,the distance between them must be 5 cm.Otherwise it should be at least 20 
cm.The appliance shouldn’t be operated under chimney hood. 


Содержание EMP.7KG021

Страница 1: ... A2 TECHNICAL INFORMATION Page 3 A3 TRANSPORTATION Page 3 A4 UNPACKING Page 4 B INSTALLATION Page 4 C SAFETY INSTRUCTIONS Page 5 D OPERATION Page 6 E CLEANING MAINTENANCE Page 7 F TROUBLESHOOTING Page 8 G INJECTOR CHANGE AND GAS SETTING Page 9 H GAS CONNECTION IMAGES Page 10 I SPARE PART LIST EXPLODING DRAWING Page 13 ...

Страница 2: ... disobeying instructions and regulations wrong connections Unauthorized intervention to appliance invalidates the warranty 1 This instruction manual should be kept in a safe place for future reference 2 Installation should be made in accordance with ordinances and security rules of that country by a qualified service personnel 3 This appliance has to be used by trained person 4 Please turn off the...

Страница 3: ...P 7KG041 1600x730x850 248 1700x800x1020 A2 TECHNICAL INFORMATION Product Code Model Power KW Gas Consumption NG Gas Consumption LPG Capacity EMP 7KG021 4 Burner Gas Ranges With Oven 27 9 3 05 m h 2 28 kg h 2xGN 2 1 EMP 7KG031 6 Burner Gas Ranges With Oven 41 4 24 m h 3 18 kg h 2xGN 2 1 EMP 7KG041 8 Burner Gas Ranges With Oven 68 6 11 m h 4 58 kg h 2xGN 2 1 EMP 7KG031 1 Oven Half module cupboard EM...

Страница 4: ...appliance is must have enough ventilation and vent hole The appliance must be connected correctly according to local and national gas standards of your country The appliance gas entrances are indicated with G label on the body Connection to gas fitment must be done with suitable diameter metal flex pipe and spheric valve The spheric valve must be immobilized to a place that is far away from heat a...

Страница 5: ...o less or more than appliance s capacity Do not attempt to use the appliance without suitable protective equipments Because of any reason if there is a fire or flame flare where the appliance is used turn off all gas valves and electric contactor switch quickly and use fire extinguisher Never use water to extinguish the fire If there is gas leakage where the appliance is do not fire absolutely and...

Страница 6: ...position Press the button at Pilot position before firing to remove the air from gas fitment during first operation The burner has features of primary and secondary burning and high burning efficiency It is also environmentalist and has world standards with low CO2 and CO waste gas emission Oven Operating Take off front side of the oven s sheet metal Provide the oven to be at pilot flame position ...

Страница 7: ...essure water Do not clena the appliance with a materials that may damage chrome material Wash the oven trays and grills with hot water and then dry after every use PERIODIC CLEANING AND MAINTENANCE Maintenance should be done by qualified person These parts Gas storage pilot thermocouples taps burner lighter and spark plug cable are not maintained so they need to be changed when they have error Che...

Страница 8: ...rload the oven trays 3 Check the oven heat settings THE APPLIANCE STOPPED 1 Gas flow is stopped automatically when the flame is off due to having gas tap that has safety valve In this situation the appliance is not operated 2 When there is gas leakage if there is solenoid gas stopper alarm gas flow is stopped and the appliance is not operated Ventilate the area through the agency of vent hole If c...

Страница 9: ...t with suitable injector Image 2 3 Adjust burner air inlet by loosening B bolt Image 2 4 Change C injector by paying attention to the datas at chart with suitable injector For this it is enough to take off D fitting and pull the gas pipe to down Image 3 Change of Oven Injectors 1 Take off F bolts from oven door lower sheet metal E Image 5 2 Change oven injector I with suitable injector Image 6 3 C...

Страница 10: ...10 GAS RANGES WITH OVEN Kasap Tip Dik Buzdolapları H GAS CONNECTION IMAGES Image 1 Image 2 ...

Страница 11: ...11 GAS RANGES WITH OVEN Kasap Tip Dik Buzdolapları H GAS CONNECTION IMAGES Image 3 Image 4 ...

Страница 12: ...12 GAS RANGES WITH OVEN Kasap Tip Dik Buzdolapları H GAS CONNECTION IMAGES Image 5 Image 6 ...

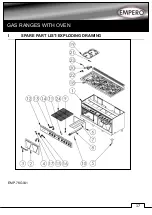
Страница 13: ...13 GAS RANGES WITH OVEN Kasap Tip Dik Buzdolapları I SPARE PART LIST EXPLODING DRAWING EMP 7KG021 ...

Страница 14: ...14 GAS RANGES WITH OVEN Kasap Tip Dik Buzdolapları I SPARE PART LIST EXPLODING DRAWING ...

Страница 15: ...15 GAS RANGES WITH OVEN Kasap Tip Dik Buzdolapları I SPARE PART LIST EXPLODING DRAWING EMP 7KG031 ...

Страница 16: ...16 GAS RANGES WITH OVEN Kasap Tip Dik Buzdolapları I SPARE PART LIST EXPLODING DRAWING ...

Страница 17: ...17 GAS RANGES WITH OVEN Kasap Tip Dik Buzdolapları I SPARE PART LIST EXPLODING DRAWING EMP 7KG041 ...

Страница 18: ...18 GAS RANGES WITH OVEN Kasap Tip Dik Buzdolapları I SPARE PART LIST EXPLODING DRAWING ...

Отзывы: