background image


28


|

 ENGLISH


Click 

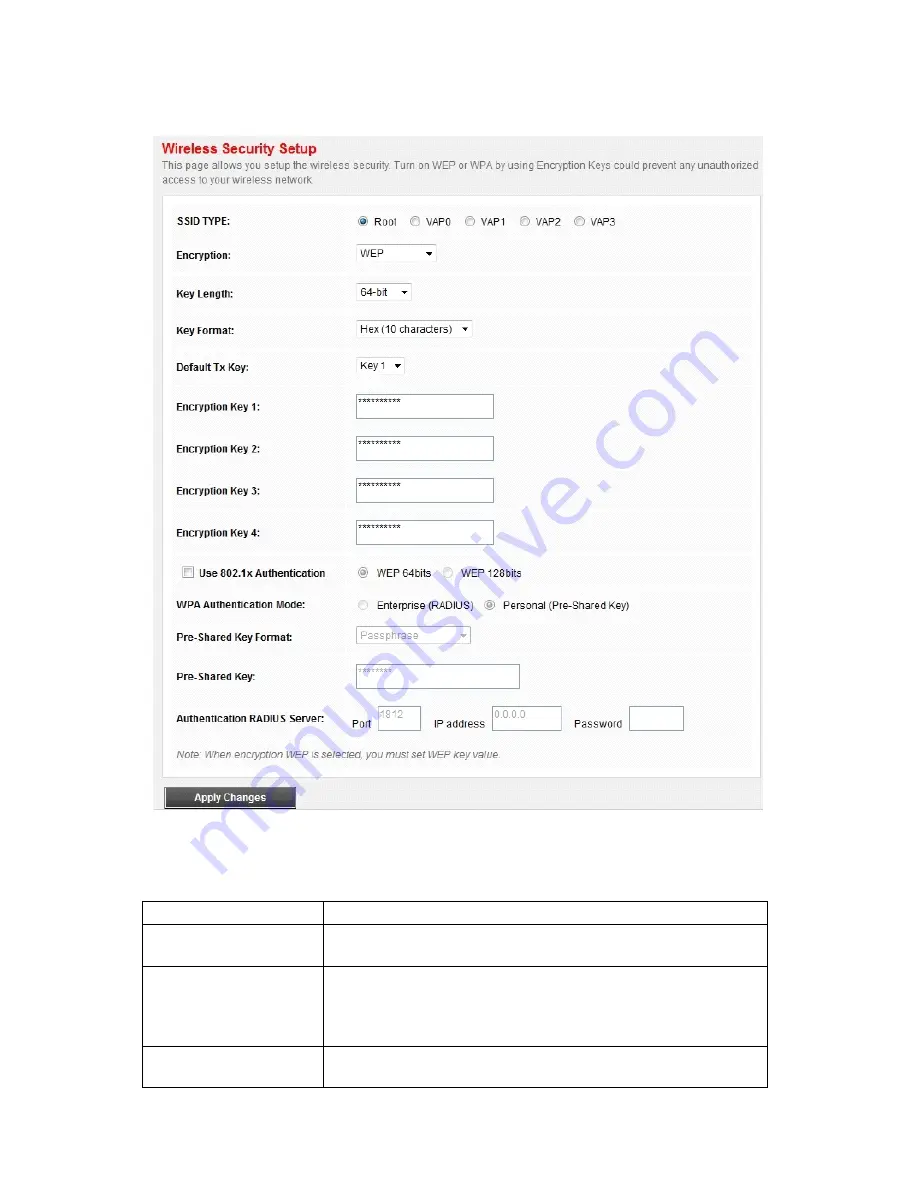
SetWEP Key

, and the following page appears. 


The following describes the parameters of this page. 
 

Field 

Description 

Key Length 

Choose the WEP key length. You can Choose 

64-bit 

or 

128-bit

Key Format 


If you choose 

64-bit

, you can choose ASCII (5 

characters) or Hex (10 characters). 


If you choose 

128-bit

, you can choose ASCII 

(13 characters) or Hex (26 characters). 

Default Tx Key 

Choose the index of WEP Key. You can choose 

Key 

1

Key 2

Key 3 

or 

Key 4

Содержание EM4561 / EM4567

Страница 1: ...EM4561 EM4567 Router Wireless N ADSL2 2 ...

Страница 2: ...ing 19 4 2 4 LAN 19 4 2 5 DHCP 21 4 2 6 DHCP Static 24 4 2 7 WLAN 25 4 2 8 Security 27 4 2 9 Multi BSSID 29 4 2 10 Access Control 30 4 3 Advanced 31 4 3 1 Route 31 4 3 1 1 Static Route 31 4 3 1 2 RIP 33 4 3 2 NAT 34 4 3 2 1 DMZ 34 4 3 2 2 Virtual Server 34 4 3 2 3 ALG 35 4 3 2 4 NAT Exclude IP 36 4 3 2 5 Port Trigger 37 4 3 2 6 FTP ALG PORT 37 4 3 2 7 Nat IP Mapping 38 4 3 3 QOS 39 4 3 4 CWMP 41 4...

Страница 3: ...quently Asked Questions and other related information 65 6 0 Service and support 65 7 0 Warning and points of attention 65 8 0 Warranty conditions 66 1 0 Introduction Congratulations with the purchase of this high quality Eminent product This product has undergone extensive testing by Eminent s technical experts Should you experience any problems with this product you are covered by a five year Em...

Страница 4: ...f The WLAN connection is not activated LAN 1 4 On The LAN connection is normal and activated Off The LAN interface is disconnected WPS Blinking WPS is triggered and is waiting for client to negotiate Off WPS is idle Rear panel The following table describes the interfaces and buttons of the device Interface Description Reset Reset to the factory default configuration Keep the device powered on and ...

Страница 5: ...m Windows 98 SE Windows 2000 Windows ME Windows XP Windows Vista Window 7 Windows 8 Windows 8 1 Internet Explorer V5 0 or higher Netscape V4 0 or higher or FireFox 1 5 or Higher 2 2 Features The device supports the following features Various line modes line auto negotiation External PPPoE dial up access Internal PPPoE PPPoA dial up access 1483B 1483R MER access Multiple PVCs eight at most A single...

Страница 6: ...terface of the splitter through a telephone cable Connect the phone to the Phone interface of the splitter through a cable Connect the incoming line to the Line interface of the splitter The splitter has three interfaces Line Connect to a wall phone jack RJ 11 jack Modem Connect to the ADSL jack of the device Phone Connect to a telephone set 2 Connect the LAN interface of the modem with the networ...

Страница 7: ... X 2 254 Subnet Mask as 255 255 255 0 Open the Internet Explorer IE browser and enter http 192 168 1 1 In the Login page that is displayed enter the username and password The username and password of the super user are admin and admin The username and password of the common user are user and user If you log in as a super user you will see the Device Info page as shown below ...

Страница 8: ...ed LAN MAC address LAN IP address DHCP server status You can also view the basic status of WAN and DNS server 4 1 Status The tab Status contains Device Info and Statistics Click Status Device Info ADSL the following page appears You can see the router settings such as the Adsl Line Status Vendor ID and Firmware Version ...

Страница 9: ...9 ENGLISH Click Status Statistics the following page appears In this page you can view the statistics of each network port ...

Страница 10: ...10 ENGLISH 4 2 Wizard In the navigation bar click Wizard The tab Wizard only contains Wizard ...

Страница 11: ...orrect values assigned by your ISP 2 Please select the Connection Type given by your ISP 3 Here we use PPPoE as an example Enter the Username Password and Confirm Password given by your ISP and then click Next 4 On the Wireless screen we use the default SSID select a Mode Set a Password or select Disable Security Disable Security is not recommended and then click Next to continue ...

Страница 12: ...12 ENGLISH 5 On this page please confirm all parameters Click Prev to modify or click the Apply Changes button to save your configuration 6 You will see the Complete screen below ...

Страница 13: ...the navigation bar click Setup The tab Setup contains WAN LAN and WLAN 4 2 1 WAN Configuration Choose Setup WAN WAN and the page shown in the following figure appears In this page you can configure WAN interface of your router ...

Страница 14: ...from 32 to 65535 1 to 31 are reserved for known protocols Encapsulation You can choose LLC and VC Mux Channel Mode You can choose 1483 Bridged 1483 MER PPPoE PPPoA 1483 Routed or IPoA Enable NAPT Select it to enable Network Address Port Translation NAPT function If you do not select it and you want to access the Internet normally you must add a route on the uplink equipment Otherwise the access to...

Страница 15: ...Local IP Address Enter the IP address of WAN interface provided by your ISP Netmask Enter the subnet mask of the local IP address Unnumbered Select this checkbox to enable IP unnumbered function IPv6 WAN Setting Set ipv6 wan setting if this interface support ipv6 Address Mode Select this interface support Slaac or Static to generate wan ipv6 addresses Enable DHCPv6 Client Enable or disable dhcpv6 ...

Страница 16: ... of this table is eight After proper settings click Add and the following page appears Click in the PPPoE mode the page shown in the following figure appears In this page you can configure parameters of this PPPoE PVC ...

Страница 17: ...ion Protocol It displays the protocol type used for this WAN connection ATM VCC The ATM virtual circuit connection assigned for this PPP interface VPI VCI Login Name The user name provided by your ISP Password The password provided by your ISP Authentication Method You can choose AUTO PAP or CHAP ...

Страница 18: ...om 1 to 4095 Apply Changes Click it to save the settings of this page temporarily Return Click it to return to the Channel Configuration page Reset Click it to refresh this page Source Mac address The MAC address you want to clone MAC Clone Click it to enable the MAC Clone function with the MAC address that is configured 4 2 2 ATM Setting Click ATM in the left pane the page shown in the following ...

Страница 19: ...anges from 0 to 65535 MBS Maximum burst size MBS is the maximum number of cells that can be transmitted at the PCR Its value ranges from 0 to 65535 4 2 3 ADSL Setting Click ADSL in the left pane the page shown in the following figure appears In this page you can select the DSL modulation Generally you need to remain this factory default settings The router negotiates the modulation modes with the ...

Страница 20: ...bnet Mask Enter the subnet mask of LAN interface The range of subnet mask is from 255 255 0 0 255 255 255 254 Secondary IP Select it to enable the secondary LAN IP address The two LAN IP addresses must be in the different network LAN Port You can choose the LAN interface you want to configure Link Speed Duplex Mode You can select the following modes from the Drop downlist 100Mbps FullDuplex 100Mbp...

Страница 21: ...rent Ethernet status list MAC Address Control Select the LAN interface on which you want to run MAC Address Control New MAC Address A MAC address to be added Current Allowed MAC Address Table It shows the current allowed MAC address list 4 2 5 DHCP Click DHCP in the left pane the page shown in the following figure appears ...

Страница 22: ...ter the domain name if you know If you leave this blank the domain name obtained by DHCP from the ISP is used You must enter host name system name on each individual PC The domain name can be assigned from the router through the DHCP server DNS Servers You can configure the DNS server ip addresses for DNS Relay Set VendorClass IP Range Click it the Device IP Range Table page appears You can config...

Страница 23: ...s page Close Click it to close this page Click Set Vendor Class IP Range in the DHCP Mode page the page as shown in the following figure appears In this page you can configure the IP address range based on the device type Choose None in the DHCP Mode field and the page shown in the following figure appears In the DHCP Mode field choose DHCP Relay The page shown in the following figure appears ...

Страница 24: ...eponses between the remote server and the client Relay Server Enter the DHCP server address provided by your ISP Apply Changes Click it to save the settings of this page Undo Click it to refresh this page 4 2 6 DHCP Static Click DHCP Static in the left pane the page shown in the following figure appears You can assign the IP addresses on the LAN to the specific individual PCs based on their MAC ad...

Страница 25: ...l be added in the DHCP Static IP Table Delete Selected Select a row in the DHCP Static IP Table then click it this row is deleted Undo Click it to refresh this page DHCP Static IP Table It shows the assigned IP address based on the MAC address 4 2 7 WLAN Choose Setup WLAN The WLAN page that is displayed contains Basic Security MBSSID Access Control Advanced and WPS Choose WLAN Basic and the follow...

Страница 26: ...0MHZ 40MHZ or 20 40MHZ Control Sideband You can choose Upper or Lower Country Area Select the country from the drop down list Channel Number A channel is the radio frequency used by 802 11b g n wireless devices You should use a different channel from an adjacent AP to reduce the interference Interference and degrading performance occurs when radio signal from different APs overlap Choose a channel...

Страница 27: ... collection of WPA and WPA2 encryption modes The wireless client establishes the connection between the modem through WPA or WPA2 Key differences between WPA and WEP are user authentication and improved data encryption Set WEP Key It is available when you set the encryption mode to WEP Click it the Wireless WEP Key Setup page appears WPA Authentication Mode Select Personal Pre Shared Key enter the...

Страница 28: ...ption Key Length Choose the WEP key length You can Choose 64 bit or 128 bit Key Format If you choose 64 bit you can choose ASCII 5 characters or Hex 10 characters If you choose 128 bit you can choose ASCII 13 characters or Hex 26 characters Default Tx Key Choose the index of WEP Key You can choose Key 1 Key 2 Key 3 or Key 4 ...

Страница 29: ...ters enter any 10 hexadecimal characters If you choose 128 bit and ASCII 13 characters enter any 13 ASCII characters If you choose 128 bit and Hex 26 characters enter any 26 hexadecimal characters Apply Changes Click it to apply the settings temporarily If you want to save the settings of this page permanently click Save in the lower left corner 4 2 9 Multi BSSID Choose WLAN MBSSID and the followi...

Страница 30: ...N Wireless stations associating to the modem must have the same name Enter a descriptive name that is used when the wireless client connecting to the modem 4 2 10 Access Control Choose WLAN Access Control List and the following page appears In this page you can configure the access control of the wireless clients ...

Страница 31: ...oose Wireless Advanced and the following page appears In this page you can configure the wireless advanced parameters It is recommended to use the default parameters In the navigation bar click Advanced The tab Advanced contains Route NAT QoS CWMP Port Mapping and Others 4 3 1 Route Choose Advanced Route the page shown in the following figure appears The page that is displayed contains Static Rout...

Страница 32: ...fied route Add Route Click it to add the new static route to the Static Route Table Update Select a row in the Static Route Table and modify the parameters Then click it to save the settings temporarily Delete Selected Select a row in the Static Route Table and click it to delete the row Show Routes Click it the IP Route Table appears You can view a list of destination routes commonly accessed by ...

Страница 33: ...e settings of this page Interface Choose the router interface that uses RIP Recv Version Choose the interface version that receives RIP messages You can choose RIP1 RIP2 or Both Choose RIP1 indicates the router receives RIP v1 messages Choose RIP2 indicates the router receives RIP v2 messages Choose Both indicates the router receives RIP v1 and RIP v2 messages Send Version The working mode for sen...

Страница 34: ...b HTTP servers FTP servers SMTP e mail servers and DNS servers Click NAT DMZ in the left pane the page shown in the following figure appears The following describes how to configure manual DMZ Step 1 Select WAN Interface Step 4 Enter an IP address of the DMZ host Step 5 Click Apply Changes to save the settings of this page temporarily 4 3 2 2 Virtual Server Click Virtual Server in the left pane th...

Страница 35: ...d to enter the corresponding parameters Protocol Choose the transport layer protocol that the service type uses You can choose TCP or UDP WAN Setting You can choose Interface or IP Address WAN Interface Choose the WAN interface that will apply virtual server WAN Port Choose the access port on the WAN LAN Open Port Enter the port number of the specified service type LAN IP Address 4 3 2 3 ALG Click...

Страница 36: ...e IP Click NAT Exclude IP in the left pane the page shown in the following figure appears In the page you can configure some source IP addresses which use the purge route mode when accessing internet through the specified interface ...

Страница 37: ...nt to setup isn t listed click the User defined Application Name radio button and type in a name for the trigger in the Custom application field Configure the Start Match Port End Match Port Trigger Protocol Start Relate Port End Relate Port Open Protocol and Nat type settings for the port trigger you want to configure When you have finished click the Apply changes button 4 3 2 6 FTP ALG PORT Clic...

Страница 38: ...eft pane the page shown in the following figure appears Entries in this table allow you to config one IP pool for specified source ip address from Lan so one packet which s source ip is in range of the specified address will select one IP address from pool for NAT ...

Страница 39: ... used to assign the precedence for each incoming packet based on physical LAN port TCP UDP port number source IP address destination IP address and other information Step 1 Enable IP QoS and click Apply to enable IP QoS function Step 6 Click add rule to add a new IP QoS rule The page shown in the following figure appears ...

Страница 40: ... page Field Description IP QoS Select to enable or disable IP QoS function You need to enable IP QoS if you want to configure the parameters of this page QoS Policy You can choose stream based 802 1p based or DSCP based Schedule Mode You can choose strict prior or WFQ 4 3 2 1 ...

Страница 41: ...ol The protocol responds to the IP QoS rules You can choose TCP UDP ICMP or TCP UDP Physical Port The LAN interface responds to the IP QoS rules Set priority The priority of the IP QoS rules P0 is the highest priority and P3 is the lowest 802 1p You can choose from 0 to 7 delete Select a row in the QoS Rule list and click it to delete the row delete all Select all the rows in the QoS Rule list and...

Страница 42: ...42 ENGLISH ...

Страница 43: ...ction Request User Name The connection username provided by TR 069 service Password The connection password provided by TR 069 service Debug Show Message Select Enable to display ACS SOAP messages on the serial console CPE sends GetRPC Select Enable the router contacts the ACS to obtain configuration updates Skip MReboot Specify whether to send an MReboot event code in the inform message Delay Spe...

Страница 44: ...ep 1 Select Enable to enable port mapping Step 7 Select Group1 Then the interfaces are added in the WAN and LAN table Step 8 Select the interfaces that are respectively added to WAN and LAN Press Ctrl while selecting multiple interfaces Step 9 Click Add to add the interface to the rule ...

Страница 45: ...45 ENGLISH Step 10 Click Apply to apply the settings and the following page appears ...

Страница 46: ...aces of pppoe1 and LAN1 can communicate with each other That is only LAN1 can access the Internet through pppoe1 interface 4 3 6 Others Choose Advanced Others The page that is displayed contains Bridge Setting Client Limit Tunnel and Others ...

Страница 47: ...e host is idle for 300 seconds default value its entry is deleted from the bridge table Show MACs Click it to show a list of the learned MAC addresses for the bridge Click Show MACs the page shown in the following figure appears This table shows a list of learned MAC addresses for this bridge 4 3 6 2 Client Limit Choose Client Limit in the left pane the page shown in the following figure appears T...

Страница 48: ... the page shown in the following figure appears 4 4 Service In the navigation bar click Service The tab Service contains IGMP UPnP SNMP DNS and DDNS 4 4 1 IGMP Choose Service IGMP and the following page appears The page that is displayed contains IGMP Proxy ...

Страница 49: ... proxy If you disable IGMP proxy the modem will discard all the received multicast data packets 4 4 2 UPnP Click UPnP in the left pane the page shown in the following figure appears The system acts as a daemon after you enable UPnP 4 4 3 SNMP Click SNMP in the left pane the page shown in the following figure appears You can configure the SNMP parameters ...

Страница 50: ...main Name System DNS is an Internet service that translates the domain name into IP address Because the domain name is alphabetic it is easier to remember The Internet however is based on IP addresses Every time you use a domain name DNS translates the name into the corresponding IP address For example the domain name www example com might be translated to 198 105 232 4 The DNS has its own network...

Страница 51: ... connection establishment Set DNS Manually Select it enter the IP addresses of the primary and secondary DNS server Apply Changes Click it to save the settings of this page Reset Selected Click it to start configuring the parameters in this page 4 4 5 DDNS Choose Service DDNS the page shown in the following figure appears This page is used to configure the dynamic DNS address from DynDNS org or TZ...

Страница 52: ...ifier Interface The WAN interface of the router Enable Enable or disable DDNS function Username The name provided by DDNS provider Password The password provided by DDNS provider Email The email provided by DDNS provider Key The key provided by DDNS provider 4 4 6 FTP Server Choose Service FTP Server the page shown in the following figure appears This page is used to start the FTP Server ...

Страница 53: ...e table are used to restrict certain types of data packets from your local network to Internet through the gateway These filters are helpful in securing or restricting your local network 4 5 2 IP Port Filter Choose Firewall IP Port Filter the page shown in the following figure appears The page that is displayed contains IP Port Filter ...

Страница 54: ...e table are used to restrict certain types of data packets through the gateway These filters are helpful in securing or restricting your local network 4 5 3 URL Filter Choose Firewall URL Filter the page shown in the following figure appears This page is used to configure the filtered keyword Here you can add delete filtered keyword ...

Страница 55: ...ge shown in the following figure appears In this page you can permit the data packets from LAN or WAN to access the router You can configure the IP address for Access Control List ACL If ACL is enabled only the effective IP address in the ACL can access the router If you select Enable in ACL capability ensure that your host IP address is in ACL list before it takes effect ...

Страница 56: ...elect LAN or WAN In this example LAN is selected LAN ACL Switch Select it to enable or disable ACL function IP Address Enter the IP address of the specified interface Only the IP address that is in the same network segment with the IP address of the specified interface can access the router Services Allowed You can choose the following services from LAN ...

Страница 57: ...es Add After setting the parameters click it to add an entry to the Current ACL Table Reset Click it to refresh this page Set direction of the data packets to WAN the page shown in the following figure appears The following table describes the parameters and buttons of this page ...

Страница 58: ...th the IP address on the WAN can access the router Services Allowed You can choose the following services from WAN Web Telnet FTP TFTP SNMP or PING You can also choose all the services Add After setting the parameters click it to add an entry to the Current ACL Table Reset Click it to refresh this page 4 5 5 DoS Denial of Service Attack DoS attack is a type of attack on a network that is designed ...

Страница 59: ...59 ENGLISH ...

Страница 60: ...n the left pane the page shown in the following figure appears In this page you can upgrade the firmware of the router The following table describes the parameters and button of this page Field Description Select File Click Browse to select the firmware file Upload After selecting the firmware file click Upload to starting upgrading the firmware file Reset Click it to starting selecting the firmwa...

Страница 61: ...mmon user name and password are user and user respectively The following table describes the parameters of this page Field Description User Name Choose the user name for accessing the router You can choose admin or user Privilege Choose the privilege for the account Old Password Enter the old password New Password Enter the password to which you want to change the old password ...

Страница 62: ...n of this page Field Description Reboot from You can choose Save Current Configuration or Factory Default Configuration Click Reboot to reboot the router Save Current Configuration Save the current settings and then reboot the router Factory Default Configuration Reset to the factory default settings and then reboot the the router 4 6 4 Time Choose Maintenance Time the page shown in the following ...

Страница 63: ... need to enable NTP if you want to configure the parameters of NTP Server Set the primary NTP server manually Server2 Set the secondary NTP server manually Time Zone Choose the time zone in which area you are from the drop down list 4 6 5 Log Choose Maintenance Log the page shown in the following figure appears In this page you can enable or disable system log function and view the system log ...

Страница 64: ...ostic Choose Maintenance Diagnostics the page shown in the following page appears The page that is displayed contains Ping Tracert OAM Loopback ADSL Diagnostic and Diag test Select the option that you want to run diagnostics ...

Страница 65: ...ions concerning its use in certain European member states In certain European member states the use of such devices could be prohibited Contact your local government for more information about this limitations Always follow up the instructions in the manual especially where it concerns devices which need to be assembled Warning In most cases this concerns an electronic device Wrong improper use ma...

Страница 66: ...vered by the Eminent warranty when exposed to incorrect improper use external influences or when opening the service parts of the product by parties other than Eminent Eminent may use refurbished materials for repair or replacement of your defective product Eminent cannot be held responsible for changes in network settings by internet providers We cannot guarantee that the Eminent networking produ...

Отзывы: