background image

8

SP

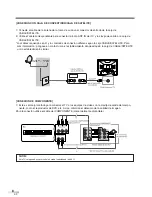
[CONEXIÓN CON CAJA DE CONVERTIDOR/CAJA DE SATÉLITE]

1) Conecte el cable de la antena de la toma de su casa al conector de entrada de la caja de

CABLE/SATÉLITE.

2) Utilice el cable correspondiente para conectar la toma ANT. IN del TV y la clavija de salida a la caja de

CABLE/SATÉLITE.

*Los cables requeridos en 2) y los métodos de conexión difieren según la caja CABLE/SATELLITE. Para

más información, póngase en contacto con el establecimiento donde adquirió la caja de CABLE/SATÉLITE
u otro establecimiento similar.

[CONEXIÓN DE COMPONENTE]

1) Este es el mejor método para conectar el TV a los equipos de vídeo con la clavija de salida del compo-

nente, como el reproductor de DVD, etc. Así se minimiza el deterioro de la calidad de imagen.

Para la conexión utilice el cable del COMPONENTE (comercialmente disponible).

NOTA:

Este TV solo puede aceptar señal de vídeo (entrelazada) de 480i.

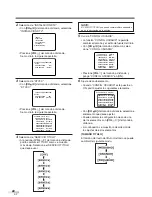
Señal del

TV cable

Antena de
satélite

Содержание EWFG2705

Страница 1: ...order replacement accessories please call TOLL FREE 1 800 605 8453 or visit our WEB SITE at http www EmersonAudioVideo com TO RECEIVE DIGITAL SIGNAL YOU MUST CONNECT ANTENNA EMERSON AND THE G CLEF LOGO ARE REGISTERED TRADEMARKS OF EMERSON RADIO CORP PARSIPPANY NEW JERSEY U S A EWFG2705 ...

Страница 2: ... should use a mounting accessory recommended by the manufacturer An appliance and cart combination should be moved with care Quick stops excessive force and uneven surfaces may cause the appliance and cart combination to overturn AMEUBLES Cet appareil ne doit être placé que sur un meuble avec ou sans roulettes recommandé par le fabricant Si vous l installez sur un meuble à roulettes déplacez les d...

Страница 3: ...g covers may expose you to dangerous voltage or other hazards Refer all servicing to qualified service personnel 19 Damage Requiring Service Unplug this TV from the wall outlet and refer servicing to qualified service personnel under the following conditions a When the power supply cord or plug is damaged or frayed b If liquid has been spilled or objects have fallen into the TV c If the TV has bee...

Страница 4: ...ver be thrown away or incinerated but disposed of in accordance with your local regulations concerning chemical wastes CAUTION TO PREVENT ELECTRIC SHOCK MATCH WIDE BLADE OF PLUG TO WIDE SLOT FULLY INSERT ATTENTION POUR ÉVITER LES CHOC ÉLECTRIQUES INTRODUIRE LA LAME LA PLUS LARGE DE LA FICHE DANS LA BORNE CORRESPONDANTE DE LA PRISE ET POUSSER JUSQU AU FOND FCC WARNING This equipment may generate or...

Страница 5: ...at displays text across the screen It allows you to read the dialogue of a TV program or other information in the Closed Caption supported programs MTS SAP Tuner This feature allows you select with the remote control your desired audio language Auto Shut Off Function The power of the main unit is automatically turned off when there has been no signal or key input for more than 15 minutes Resume Fu...

Страница 6: ...WITCHING ANALOG MODE DIGITAL MODE 16 CHANNEL SELECTION 16 VOLUME ADJUSTMENT 17 SWITCHING AUDIO 17 SCREEN INFORMAITON 18 CHANGING THE SCREEN DISPLAY MODE 19 OPTIONAL SETTINGS 20 PICTURE ADJUSTMENT 20 CLOSED CAPTION 21 V CHIP 24 SLEEP TIMER 26 OTHER SETTINGS 27 SWICHING EXTERNAL INPUT 27 AUTO PRESET CH 28 CHANNEL ADD DELETE 30 D S T 32 TIME ZONE 33 MISCELLANEOUS 34 TROUBLESHOOTING GUIDE 34 GLOSSARY ...

Страница 7: ...O PRESET on page 13 NOTES For your safety and to avoid damages to the unit unplug the antenna cable from the ANT IN jack before moving the unit If you use an antenna in order to receive analog TV the same antenna generally will work for DTV reception Outdoor or attic antennas will be more effective than set top versions Some cable channels cannot be viewed when the TV is connected to an aerial ant...

Страница 8: ...e CABLE SATELLITE box For more information please contact the store where you purchased the CABLE SATELLITE box or nearby electric appliance stores COMPONENT CONNECTION 1 This is the best method to connect this TV to video devices with the component output jack such as DVD player etc It can minimize the deterioration of image quality Use the COMPONENT cable commercially available for connection NO...

Страница 9: ...he S video cable 1 This is how to connect this TV to the video devices with the S video output jack You can expect better pic ture quality than the normal video cable connection Use the S video cable commercially available for connection NOTE If you connect to the S VIDEO jack and the VIDEO jack at the same time S video connection will have priority AUDIO OUT VIDEO OUT S VIDEO OUT CABLES NOT INCLU...

Страница 10: ...l connect this TV to the AUDIO L jack DIGITAL AUDIO CONNECTION 1 If you connect this TV to the digital supported audio devices you can enjoy much more of the digital broadcasting programs with the feeling of being at a live program Use the DIGITAL AUDIO COAXIAL cable commercially available for connection Manufactured under license from Dolby Laboratories Dolby and the double D symbol are trade mar...

Страница 11: ...gh Definition Television HDTV that can display sharper and finer images than Standard Definition Television SDTV with double scanning lines and can adopt the 16 9 wide screen format that fits more to range of human vision For audio quality digital broadcasting offers the 5 1ch surround broadcast to give you the feeling of being at a stadium or a theater In addition digital broadcasting enables to ...

Страница 12: ...0 button p16 CATV To enter the channel number for 100 or higher channels Digital mode DTV To select the minor channel CHANNEL RETURN button p16 To return to previously viewed channel INPUT SELECT button p27 To select TV or external input mode to access camcorders games etc MUTE button p17 VOL UME X X Y Y buttons p13 To adjust volume and to change settings to move to next screen for menu items MENU...

Страница 13: ... channels broadcasted in CATV are automati cally scanned and memorized CH CH VOL VOL CHANNEL RETURN ENT INPUT SELECT 3 2 1 6 5 4 9 8 100 0 7 MUTE SLEEP MENU CH K L VOL X Y NOTE Be sure that antenna or cable is connected properly before plugging the power cord 1 Set the D S T Daylight Saving Time When you first turn on the power the following screen is displayed Using VOL X Y on the remote control ...

Страница 14: ...TV TV AUTO PRESET CH CATV NOTES If D S T Daylight Saving and TIME ZONE is not set you cannot select AUTO PRESET CH Make sure if the TV is connected to antenna or cable When antenna is connected select AUTO PRESET CH TV DTV at the procedure below When connected to CATV select AUTO PRESET CH CATV MENU SCREEN This section describes the overview of the MENU screen displayed when you press MENU For mor...

Страница 15: ...SP FRA Using CH K L on the remote control select ENG ESP FRA Every time you press VOL X Y on the remote control the language will be switched as below Select the language 3 To return to the screen before setting press MENU on the remote control PICTURE CHANNEL SET ENG ESP FRA V CHIP SET UP CAPTION OFF DTV SET UP PICTURE CHANNEL SET ENG ESP FRA V CHIP SET UP CAPTION OFF DTV SET UP CH CH VOL VOL CHA...

Страница 16: ...he main unit 2 Using Channel number buttons When you select a channel from 1 to 99 press the channel number you want to view with Channel number buttons The selected chan nel will be displayed When you select a channel larger than 100 press 100 first Then use channel number buttons to press the lower 2 digits To search the minor channel of the major chan nel currently viewed in DTV press 100 If yo...

Страница 17: ...TE VOL X Y SWITCHING AUDIO This section describes how to switch the audio in the analog mode and how to switch the audio lan guage in the digital mode 1 Switch the audio Every time you press AUDIO the audio will be switched as below MAIN Outputs main audio SAP Outputs second audio channel MONO Outputs mono audio 1 Switch the audio language When you press AUDIO on the remote con trol the currently ...

Страница 18: ... such as the program guide is displayed 1 Display the detailed information for the channel Every time you press INFO the display mode will be switched as below The following information is displayed in the INFO1 mode 1 Channel number 2 Channel title 3 Program title max 2 lines displayed 4 Audio language OTHER is displayed when the audio language cannot be acquired or the acquired languages are oth...

Страница 19: ...IP SET UP CAPTION OFF DTV SET UP PICTURE CHANNEL SET ENG ESP FRA V CHIP SET UP CAPTION OFF DTV SET UP CH CH VOL VOL CHANNEL RETURN ENT INPUT SELECT 3 2 1 6 5 4 9 8 100 0 7 MUTE SLEEP MENU MENU CH K L VOL X Y DTV 3 Select the display mode Every time you press VOL X Y on the remote control LETTERBOX and ZOOM will be switched alternately LETTERBOX Display the digital supported program in full screen ...

Страница 20: ...OL CHANNEL RETURN ENT INPUT SELECT 3 2 1 6 5 4 9 8 100 0 7 MUTE SLEEP MENU MENU CH K L VOL X Y 3 Adjust the picture quality Using CH K L on the remote control select the picture quality item you want to adjust BRIGHT K To increase brightness L To decrease brightness CONTRAST K To increase contrast L To decrease contrast COLOR K To brilliant L To pale TINT K To green L To purple SHARPNESS K To clea...

Страница 21: ...ccording to programs Paint on mode Displays input characters on the screen immediately Pop on mode Once characters are stored in memory they are displayed all at once Roll up mode Displays the characters continu ously by scrolling max 4 lines TEXT MODE T1 T2 TEXT1 T1 and TEXT2 T2 display half screen text by scrolling such as a channel guide schedule or announcement 4 Exit the menu Press MENU on th...

Страница 22: ... UP 5 Use USER SETTING The USER SETTING function lets you change the caption size and font style Using CH K L on the remote control select USER SETTING Press VOL X on the remote control and set USER SETTING to ON 6 Set each item When USER SETTING is set to ON you can set the following items Using CH K L on the remote control select the item you want to set You can switch the setting for each item ...

Страница 23: ...itched as below FORE OPACITY Text opacity of the displayed caption can be switched as below FORE COLOR Text color of the displayed caption can be switched as below BACK OPACITY Background opacity of the displayed caption can be switched as below BACK COLOR Background color of the displayed caption can be switched as below OPTIONAL SETTINGS ...

Страница 24: ...2 1 6 5 4 9 8 100 0 7 MUTE SLEEP MENU Channel number buttons MENU CH K L VOL X 3 Enter the access code Use Channel number buttons and enter the 4 digit number When you have not set up your access code enter 0000 When the access code is correct the following V CHIP SET UP screen is displayed See the following description for setting each item 4 Display the TV RATING screen Using CH K L on the remot...

Страница 25: ...Y7 VIEW TV G BLOCK TV PG DLSV BLOCK TV 14 DLSV BLOCK TV MA LSV BLOCK 5 Set MPAA RATING Using the CH K L on the remote control select the rating 6 Set BLOCK or VIEW Press VOL X and set to BLOCK or VIEW 7 To exit the menu press MENU on the remote control NOTES for TV RATING and MPAA RATING You cannot access the setup menu when the PROTECTED PROGRAM by message appears You need to move to an unblocked...

Страница 26: ...o 0000 NEW CODE _ _ _ _ CONFIRM CODE _ _ _ _ TV RATING MPAA RATING CHANGE CODE C CHANGE CODE SLEEP TIMER The SLEEP TIMER function will automatically turn off the power of the unit at a preset time 1 Use SLEEP TIMER Press SLEEP on the remote control The setting display for SLEEP TIMER is shown in the screen 2 Set the timer Every time you press SLEEP on the remote control the time increases by 10 mi...

Страница 27: ... VIDEO1 If you use the S VIDEO jack S VIDEO is dis played To use the jacks on the front of the TV select VIDEO2 To use the COMPONENT VIDEO INPUT jacks on the rear of the TV select COMPONENT CH CH VOL VOL CHANNEL RETURN ENT INPUT SELECT 3 2 1 6 5 4 9 8 100 0 7 MUTE SLEEP MENU INPUT SELECT When you press INFO the current external input mode will be displayed at the top right of the screen 1 When usi...

Страница 28: ...O PRESET CH If you switch wires e g between antenna and CATV or if you move the TV to a different area after the initial setting you need to perform AUTO PRESET CH again This function lets you easily select the receivable channels with CH K L and the TV memorizes them even if you switch wires When scanning TV or CATV only 1 Select analog mode by pressing DTV TV 2 Display the MENU screen Press MENU...

Страница 29: ...ALS will appear on the display after the completion of channel scanning AUTO PRESET CH DTV TV ADD DELETE DTV AUTO PRESET CH DTV AUTO PRESET CH DTV TV PICTURE CHANNEL SET ENG ESP FRA V CHIP SET UP CAPTION OFF DTV SET UP DTV TV When scanning DTV only 1 Select digital mode by pressing DTV TV 2 Display the MENU screen Press MENU on the remote control The following MENU screen is displayed 3 Select CHA...

Страница 30: ...E CHANNEL SET ENG ESP FRA V CHIP SET UP CAPTION OFF PICTURE CHANNEL SET ENG ESP FRA V CHIP SET UP CAPTION OFF TV CH CH VOL VOL CHANNEL RETURN ENT INPUT SELECT 3 2 1 6 5 4 9 8 100 0 7 MUTE SLEEP MENU MENU CH K L VOL X Y 4 Select ADD DELETE Using CH K L on the remote control select ADD DELETE Press VOL X on the remote control 5 Select the channel you want to add or delete Using CH K L or Channel num...

Страница 31: ... control select the channel Select ADD or DELETE with VOL X Y on the remote control Color of channel numbers displayed at the right top of the screen Blue Green The selected channel will be added Pink Red The selected channel will be deleted D12 ADD DELETE DTV ADD DELETE DTV AUTO PRESET CH DTV AUTO PRESET CH DTV TV PICTURE CHANNEL SET ENG ESP FRA V CHIP SET UP CAPTION OFF DTV SET UP PICTURE CHANNE...

Страница 32: ...emote control the following MENU screen is displayed DTV DISPLAY LETTERBOX DTVCC D S T Daylight Saving TIME ZONE ALASKA PICTURE CHANNEL SET ENG ESP FRA V CHIP SET UP CAPTION OFF DTV SET UP PICTURE CHANNEL SET ENG ESP FRA V CHIP SET UP CAPTION OFF DTV SET UP CH CH VOL VOL CHANNEL RETURN ENT INPUT SELECT 3 2 1 6 5 4 9 8 100 0 7 MUTE SLEEP MENU MENU CH K L VOL X Y 3 Select D S T Daylight Saving Using...

Страница 33: ...IC 4 hours TIME ZONE If you move the TV to a different area after the ini tial setting you set when you first turned on the power you can set the area again 1 Display the MENU screen Press MENU on the remote control The following MENU screen is displayed 2 Select DTV SET UP Using CH K L on the remote control select DTV SET UP When you press VOL X on the remote con trol the following MENU screen is...

Страница 34: ...e condi tion and connection Electric waves may be interfered due to the electric appli ances etc nearby Adjust CONTRAST and BRIGHT in the MENU screen Try to view other channels It may be the problem on the broadcasting station When the outside antenna is used check the wire condi tion and connection Try to view other channels It may be the problem on the broadcasting station Check the antenna or c...

Страница 35: ...When the outside antenna is used check the wire condi tion and connection Electric waves may be interfered due to the electric appli ances etc nearby Try to view other channels It may be the problem on the broadcasting station Electric waves may be interfered due to the electric appli ances etc nearby Try to view other channels It may be the problem on the broadcasting station Check the antenna or...

Страница 36: ...Second audio channel delivered separately from main audio chan nel This audio channel is used as an alternate in bilingual broad casting S Video output It delivers independently each sig nal of color C and luminance Y to TV as video signals so that higher quality picture will be gained CABINET CLEANING Wipe the front panel and other exterior surfaces of the TV with a soft cloth immersed in lukewar...

Страница 37: ... Front 2 L R x Rear Coaxial digital audio output One pin jack 500mmVpp 75 ohm Component Video Input One pin jack Y 1Vpp 75 ohm Two pin jacks Pb Pr 700mVpp 75 ohm Stereo Sound System 2 speakers ELECTRICAL SPECIFICATIONS Sound output 2W 8 ohm x 2 OTHER SPECIFICATIONS Remote control Digital encoded infrared light system Operating temperature 5 C to 40 C 41 F to 104 F Power requirements AC120V 60Hz Po...

Страница 38: ...r office use of this product or damage which results from fire flood lightning or other acts of God THIS WARRANTY DOES NOT COVER PACKING MATERIALS ANYACCESSORIES EXCEPT REMOTE CONTROL ANY COSMETIC PARTS COMPLETE ASSEMBLY PARTS DEMO OR FLOOR MODELS FUNAI CORP AND ITS REPRESENTATIVES OR AGENTS SHALL IN NO EVENT BE LIABLE FOR ANY GENERAL INDIRECT OR CONSEQUENTIAL DAMAGES ARISING OUT OF OR OCCASIONED ...

Страница 39: ...JERSEY EE UU EWFG2705 Si necesita ayuda adicional para operar el equipo después de leer este manual del usuario o para ordenar accesorios de reemplazo llame SIN CARGO al 1 800 605 8453 o visite nuestro SITIO WEB http www EmersonAudioVideo com PARA RECIBIR SEÑAL DIGITAL DEBE CONECTAR LA ANTENA ...

Страница 40: ...rretillas trípodes plataformas o mesas recomendadas por el fabricante o que se vendan con la unidad Cualquier montaje del aparato deberá seguir las instrucciones del fabricante y deberán usarse accesorios de montaje recomendados por el fabricante La combinación de este equipo y carretilla debe moverse con cuidado Las paradas repentinas la fuerza excesiva y las superficies irregulares pueden causar...

Страница 41: ...ner lo a voltajes peligrosos u otros riesgos Remita todas las reparaciones al personal de servicio calificado 19 Daños que requieren reparación Desconecte esta unidad del tomacorriente y refiera la reparación a personal califi cado bajo las siguientes condiciones a Cuando el cable de alimentación o enchufe esté daña do o raído b Si se ha derramado líquido o han caído objetos dentro de la unidad c ...

Страница 42: ... del cable como sea práctico NOTA SOBRE RECICLADO Las pilas no deben tirarse o incinerarse sino descartarse de acuerdo con las normativas locales concernientes a desechos químicos PRECAUCIÓN PARA EVITAR CHOQUES ELÉCTRICOS CONECTE LA LÁMINA ANCHA DEL ENCHUFE EN LA RANURA ANCHA DE LA TOMA DE CORRIENTE INSERTE POR COMPLETO ADVERTENCIA DE LA FCC Este equipo puede generar o utilizar energía de radiofre...

Страница 43: ...ue muestra el texto en la pantalla Le permite leer los diálogos de un programa de TV o cualquier otra información en los programas que disponen de esta función de subtítulos Sintonizador MTS SAP Mediante esta función puede seleccionar el idioma deseado con el mando a distancia Función de apagado automático El equipo se apaga automáticamente cuando no hay señal de la antena o se toca ningún botón d...

Страница 44: ...L MODO ANALÓGICO DIGITAL 16 SELECCIÓN DE CANAL 16 AJUSTE DEL VOLUMEN 17 CAMBIO DEL MODO DE AUDIO 17 INFORMACIÓN DE PANTALLA 18 CAMBIO DEL MODO DE VISUALIZACIÓN DE PANTALLA 19 AJUSTES OPCIONALES 20 AJUSTE DE LA IMAGEN 20 SUBTÍTULOS 21 V CHIP 24 TEMPORIZADOR DE APAGADO AUTOMÁTICO 26 OTROS AJUSTES 27 SELECCIÓN DE LA ENTRADA EXTERNA 27 PREA AUTO CA 28 AGREGAR BORRAR CANALES 30 HORA DE VERANO 32 HUSO H...

Страница 45: ...INICIAL en la página 13 NOTA Para su seguridad y con objeto de evitar posibles daños en la unidad desenchufe el cable de antena de la toma ANT IN antes de moverla Si utiliza una antena para recibir TV analógica la misma antena permitirá recibir la DTV Las antenas exteriores o en el techo serán más efectivas que la versiones encima del aparato de TV Algunos canales de cable no pueden verse cuando l...

Страница 46: ...caja CABLE SATELLITE Para más información póngase en contacto con el establecimiento donde adquirió la caja de CABLE SATÉLITE u otro establecimiento similar CONEXIÓN DE COMPONENTE 1 Este es el mejor método para conectar el TV a los equipos de vídeo con la clavija de salida del compo nente como el reproductor de DVD etc Así se minimiza el deterioro de la calidad de imagen Para la conexión utilice e...

Страница 47: ...clavija AUDIO L Cuando se use el cable S Video 1 Cómo conectar el TV a los aparatos de vídeo con la toma de salida S VIDEO Obtendrá una calidad de imagen mejor que con la conexión normal de cable de vídeo Para realizar la conexión utilice el cable S video comercialmente disponible NOTA Si se conecta al mismo tiempo al conector S VIDEO y al conector VIDEO será la conexión del S video la que tenga p...

Страница 48: ...s sea monoaural conecte el TV a la clavija AUDIO L CONEXIÓN DE AUDIO DIGITAL 1 Si conecta el TV a aparatos de audio digitales podrá disfrutar mucho más de los programas de emisión digital pues tendrá la sensación de estar viendo el programa en directo Para realizar la conexión utilice el cable COAXIAL AUDIO DIGITAL comercialmente disponible Fabricado bajo licencia de Dolby Laboratories Dolby y el ...

Страница 49: ...on Television que ofrece unas imágenes mucho más finas y detalladas que la televisión estándar o SDTV Standard Definition Television con el doble de líneas de exploración pudiendo adoptar el formato de pantalla 16 9 que mejor se ajusta al alcance de la visión humana En lo que respecta a la calidad audio la radiodifusión digital ofrece un sonido envolvente con 5 1 canales que da la sensación al esp...

Страница 50: ...16 CATV Para introducir el número de canal 100 u otros más altos Modo digital DTV Para seleccionar el canal menor Botón CHANNEL RETURN pág 16 Para volver al canal que se estaba viendo antes Botón INPUT SELECT pág 27 Para seleccionar el modo de TV o de entrada externa acceso a videocámaras videoconsolas etc Botón MUTE pág 17 Botón VOL UME X X Y Y pág 13 Para ajustar el volumen y cambiar los ajustes...

Страница 51: ...ELECT 3 2 1 6 5 4 9 8 100 0 7 MUTE SLEEP MENU CH K L VOL X Y NOTA Asegúrese de que la antena o el cable están correctamente conectados antes de enchufar el cable de la corriente 1 Ajuste de la HORA DE VERANO Cuando encienda por primera vez el equipo se mostrará la siguiente pantalla Con VOL X Y del mando a distancia ponga la HORA DE VERANO en ON u OFF 2 Con CH K L del mando a distancia selec cione...

Страница 52: ...stá ajustado HORA DE VERANO y el HUSO HORARIO no podrá seleccionar el PREA AUTO CA Asegúrese que el TV está conectado al cable de antena Cuando la antena está conectada seleccione PREA AUTO CA TV DTV con el siguiente procedimiento Cuando está conectado al CATV seleccione PREA AUTO CA CATV PANTALLA MENU Esta sección describe el resumen de la pantalla MENU que se muestra al presionar MENU Para más d...

Страница 53: ... Con CH K L del mando a distancia seleccione ENG ESP FRA Cada vez que presione VOL X Y del mando a distancia se cambiará de idioma como se muestra más abajo Seleccione el idioma deseado 3 Para volver a la pantalla de antes del ajuste presione MENU del mando a distancia PICTURE CHANNEL SET ENG ESP FRA V CHIP SET UP CAPTION OFF DTV SET UP PICTURE CHANNEL SET ENG ESP FRA V CHIP SET UP CAPTION OFF DTV...

Страница 54: ...isma operación con CH K L 2 Usando los botones de Número de canal Si desea seleccionar un canal del 1 al 99 pre sione su número con los botones de Número de canal Se mostrará el canal seleccionado Si desea ver un canal superior al 100 presione primero 100 Después use los botones de Número de canal para introducir los dos últi mos dígitos Para buscar el canal menor del canal mayor que esté viendo a...

Страница 55: ...0 0 7 MUTE SLEEP MENU MUTE VOL X Y CAMBIO DEL MODO DE AUDIO En esta sección se describe el modo de cambiar el sistema de audio en el modo analógico y como seleccionar el idioma de audio en el modo digital 1 Cambio de audio Cada vez que presione AUDIO éste cam biará como se indica a continuación MAIN Saca el audio principal SAP Saca el segundo canal de audio MONO Saca el audio en mono 1 Cambio del ...

Страница 56: ...ado como la guía de programación 1 Visualización de la información detallada para el canal Cada vez que presione INFO el modo de visualización cambiará como se describe a continuación En el modo INFO1 aparecerá la siguiente infor mación 1 Número de canal 2 Título del canal 3 Título del programa se muestra un máximo de 2 líneas 4 Idioma audio se muestra OTRO cuando no se puede obtener el idioma o l...

Страница 57: ...ITULO OFF INSTALACIÓN DTV IMAGEN CANAL PREP ESP FRA ENG AJUSTE DE V CHIP TITULO OFF INSTALACIÓN DTV CH CH VOL VOL CHANNEL RETURN ENT INPUT SELECT 3 2 1 6 5 4 9 8 100 0 7 MUTE SLEEP MENU MENU CH K L VOL X Y DTV 3 Selección del modo de visualización Cada vez que presione VOL X Y del mando a distancia se cambiará alternativamente entre ANCHO BUZÓN y ZOOM ANCHO BUZÓN Muestra el programa digital en pan...

Страница 58: ...TURN ENT INPUT SELECT 3 2 1 6 5 4 9 8 100 0 7 MUTE SLEEP MENU MENU CH K L VOL X Y 3 Ajuste de la calidad de imagen Con CH K L del mando a distancia seleccione el elemento de calidad de imagen que desee ajustar CLARIDAD K Para aumentar la claridad L Para disminuir la claridad CONTRASTE K Para aumentar el contraste L Para disminuir el contraste COLOR K Más brillante L Más pálido MATIZ K Más verde L ...

Страница 59: ... los caracteres de entrada en la pantalla Modo Pop on Una vez que se han guardado los caracteres en la memoria se muestran todos a la vez Modo Roll up Muestra los caracteres avanzando de forma continua máx 4 líneas MODO DE TEXTO T1 T2 TEXTO1 T1 y TEXTO2 T2 muestran el texto en media pantalla desplazándolo como una guía programación o información de canal 4 Salir del menú Presione MENU del mando a ...

Страница 60: ...IG USUARID le permite cambiar el tamaño y el estilo de fuente del título Con CH K L del mando a distancia selec cione CONFIG USUARID Presione VOL X del mando a distancia y ponga CONFIG USUARID en ON 6 Ajuste de cada elemento Cuando CONFIG USUARID esté puesto en ON podrá ajustar los siguientes elementos Con CH K L del mando a distancia seleccione el elemento que desee ajustar Puede cambiar la confi...

Страница 61: ...forma OPACO ADELANTE Se puede cambiar la opacidad del texto del título mostrado de la siguiente forma COLOR ADELANTE Se puede cambiar el color del texto del título mostrado de la siguiente forma OPACO ATRÁS Se puede cambiar la opacidad del fondo del títu lo mostrado de la siguiente forma COLOR FONDO Se puede cambiar el color de fondo del título mostrado de la siguiente forma AJUSTES OPCIONALES ...

Страница 62: ...U Botones de Número de canal MENU CH K L VOL X 3 Introducción del código de acceso Con los botones de Número de canal intro duzca el número de 4 dígitos Si todavía no ha configurado su código de acceso introduzca 0000 Cuando el código de acceso sea el correcto se mostrará la siguiente pantalla de AJUSTE DE V CHIP Para realizar el ajuste de cada uno de los ele mentos vea la siguiente descripción 4 ...

Страница 63: ...BLOQ TV MA LSV BLOQ 5 Ajuste de CLASE DE MPAA Con CH K L del mando a distancia seleccione la clase 6 Ajuste de BLOQ o MIRAR Presione VOL X del mando a distancia y ajuste BLOQ o MIRAR 7 Para salir del menú presione MENU del mando a distancia NOTAS para la CLASE DE TV y CLASE DE MPAA No se puede acceder al menú de ajustes cuando aparece el mensaje PROGRAMA PROHIBIDO por Para poder acceder deberá pas...

Страница 64: ... _ _ CODIGO CONFIRMADO _ _ _ _ CLASE DE TV CLASE DE MPAA CAMBIAR CODIGO C CAMBIAR CÓDIGO TEMPORIZADOR DE APAGADO AUTOMÁTICO La función TEMPORIZADOR DE APAGADO AUTOMÁTICO apagará automáticamente la corri ente de la unidad a una hora determinada 1 Uso del TEMPORIZADOR DE APAGADO AUTOMÁTICO Presione SLEEP del mando a distancia Se mostrará la pantalla para el ajuste del TEM PORIZADOR DE APAGADO AUTOMÁ...

Страница 65: ...eleccione AUX1 Si utiliza el conector S VIDEO se visualiza VIDEO S Para usar los conectores de la parte frontal del TV seleccione AUX2 Para usar los conectores COMPONENT VIDEO INPUT de la parte trasera del TV seleccione COMPONENTES CH CH VOL VOL CHANNEL RETURN ENT INPUT SELECT 3 2 1 6 5 4 9 8 100 0 7 MUTE SLEEP MENU INPUT SELECT Si presiona INFO se mostrará el modo de entrada externa actual en la ...

Страница 66: ...ntre la ante na y CATV o si mueve el TV a una región distinta después del ajuste inicial será necesario volver a hacer PREA AUTO CA Esta función permite seleccionar fácilmente los canales sintonizables con CH K L y el TV los memoriza incluso si con muta cables Cuando explore sólo TV o CATV 1 Seleccione el modo analógico presionando DTV TV 2 Visualización de la pantalla MENU Presione MENU del mando...

Страница 67: ...a de canales en la pantalla se mostrará el mensaje NO HAY SEÑAL DE TV PREA AUTO CA DTV TV AGREGAR BORRAR DTV PREA AUTO CA DTV PREA AUTO CA DTV TV IMAGEN CANAL PREP ESP FRA ENG AJUSTE DE V CHIP TITULO OFF INSTALACIÓN DTV DTV TV Cuando explore sólo DTV 1 Seleccione el modo digital presionando DTV TV 2 Visualización de la pantalla MENU Presione MENU del mando a distancia Se visualizará la siguiente p...

Страница 68: ...TV TV IMAGEN CANAL PREP ESP FRA ENG AJUSTE DE V CHIP TITULO OFF IMAGEN CANAL PREP ESP FRA ENG AJUSTE DE V CHIP TITULO OFF TV CH CH VOL VOL CHANNEL RETURN ENT INPUT SELECT 3 2 1 6 5 4 9 8 100 0 7 MUTE SLEEP MENU MENU CH K L VOL X Y 4 Selección de AGREGAR BORRAR Con CH K L del mando a distancia seleccione AGREGAR BORRAR Presione VOL X del mando a distancia 5 Selección del canal que se desea agregar ...

Страница 69: ...mando a distancia 5 Selección del canal que se desea agregar o borrar Con CH K L o los botones de Número de canal del mando a distancia seleccione el canal Seleccione AGREGAR o BORRAR con VOL X Y del mando a distancia Color de los números de canal mostrados en la parte superior derecha de la pantalla Azul Verde Se agregará el canal seleccionado Rosa Rojo Se borrará el canal seleccionado D12 AGREGA...

Страница 70: ...OL X del mando a distan cia la pantalla MENU se mostrará como se indica a continuación PANTALLA DTV ANCHO BUZÓN DTVCC HORA DE VERANO HUSO HORARIO ALASKA IMAGEN CANAL PREP ESP FRA ENG AJUSTE DE V CHIP TITULO OFF INSTALACIÓN DTV IMAGEN CANAL PREP ESP FRA ENG AJUSTE DE V CHIP TITULO OFF INSTALACIÓN DTV CH CH VOL VOL CHANNEL RETURN ENT INPUT SELECT 3 2 1 6 5 4 9 8 100 0 7 MUTE SLEEP MENU MENU CH K L V...

Страница 71: ...IO Si mueve el TV a un lugar diferente después de haber llevado a cabo los ajustes iniciales al encen der por primera vez el aparato tendrá que volver a configurar el huso horario 1 Visualización de la pantalla MENU Presione MENU del mando a distancia Se visualizará la siguiente pantalla de MENU 2 Selección de INSTALACIÓN DTV Con CH K L del mando a distancia seleccione INSTALACIÓN DTV Cuando presi...

Страница 72: ... así como el de la conexión Las ondas eléctricas pueden verse interferidas debido a la excesiva proximidad de algún electrodoméstico Ajuste el CONTRASTE y la CLARIDAD en la pantalla MENU Trate de ver otros canales Puede que sea un problema de la emisora que está sintonizando Si está usando una antena exterior compruebe el estado del cable así como el de la conexión Trate de ver otros canales Puede...

Страница 73: ...o del cable así como el de la conexión Las ondas eléctricas pueden verse interferidas debido a la excesiva proximidad de algún electrodoméstico Trate de ver otros canales Puede que sea un problema de la emisora que está sintonizando Las ondas eléctricas pueden verse interferidas debido a la excesiva proximidad de algún electrodoméstico Trate de ver otros canales Puede que sea un problema de la emi...

Страница 74: ...dio secundario que se ofrece aparte del canal de audio principal Este canal se usa como alternativa en las emisiones bil ingües Salida S Video Proporciona independientemente la señal de color C y la de lumi nancia Y al TV como señales de vídeo con lo que se obtiene una mayor calidad de imagen LIMPIEZA DE LA CAJA Limpie el panel frontal y el resto de superficies exteriores del TV con un paño suave ...

Страница 75: ...ida digital coaxial de audio Toma de una patilla 500 mm Vpp 75 ohmios Entrada de video componente Una toma de patilla Y 1Vpp 75 ohmios Dos tomas de patilla Pb Pr 700mVpp 75 ohmios Sistema de sonido estéreo 2 altavoces ELECTRICAL SPECIFICATIONS ESPECIFICACIONES ELÉCTRICAS Salida de sonido 2W 8 ohmios x 2 OTRAS ESPECIFICACIONES Mando a distancia Sistema de infrarrojos con codificación digital Temper...

Страница 76: ...as o daños como consecuencia de incendio inundación rayos u otros casos de fuerza mayor ESTA GARANTIA NO CUBRE LOS MATERIALES DE EMPAQUE NINGUN ACCESORIO EXCEPTO EL CONTROL REMOTO NINGUNA PARTE COSMETICA PARTES COMPLETAS DE MONTAJE DEMOSTRACION O MODELOS DE EXHIBICION FUNAI CORP Y SUS REPRESENTANTES O AGENTES NO SERAN SOMETIDOS BAJO NINGUN CONCEPTO A NINGUNA RESPONSABILIDAD POR DAÑOS GENERALES IND...

Отзывы: