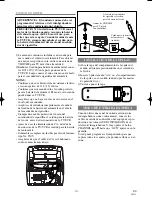
background image

- 28 -

ES

0M21

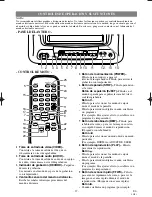
para ajustar el reloj o para establecer un programa
de temporizador), púlselo para determinar su elec-
ción y vaya al paso siguiente que quiera introducir.

• Púlselo para determinar los modos de ajuste desde

el menú de la pantalla.

• Púlselo para seleccionar un modo desde un menú-

particular.
(Por ejemplo: IDIOMA o ADJUST DE USER)

10

Botón de grabación (REC)– 

Púlselo para ini-

ciar la grabación manual.

Botón de grabación de un toque (OTR)–

Activa la grabación de un toque. (Sólo en el televi-
sor/videograbadora)

11

Botones de volumen (VOLUME  

X

X

Y

Y

)–

Ajustan el nivel del volumen.

12

Botones de canales (CHANNEL  

K

L

)–

Púlselos para seleccionar los canales deseados para
ver o grabar.
Se puede mostrar el menú principal en la pantalla del
televisor pulsando repetidamente este botón del tele-
visor/videograbadora.

Función de seguimiento– 

Pulse los botones

para minimizar el ruido de vídeo (líneas o puntos
en la pantalla) durante la reproducción. 

13

Toma de auriculares (EARPHONE)–

Para

conectar los auriculares (no suministrados) y
escuchar en privado. La toma es mono y tiene un
tamaño de 1/8”(3.5 mm).

14

Compartimiento del videocasete

15

Botones numerados– 

Púlselos para seleccionar

los canales deseados para ver o grabar. Para selec-
cionar canales del 1 al 9, pulse primero el botón 0 y
luego el botón 1 a 9.

Botón +100–

Cuando seleccione canales de tele-

visión por cable cuyo número sea superior al 99,
pulse primero este botón, y luego pulse los dos últi-
mos dígitos. (Para seleccionar el canal 125, pulse
primero el botón “+100” y luego el “2” y el “5”.)

16

Botón de menú (MENU)–

Púlselo para visu-

alizar el menú principal en la pantalla del televisor.

17

Botón del visualizador (DISPLAY)–

Visualiza

el contador o el número del canal actual y la hora
actual \en la pantalla del televisor. 

18

Botón de velocidad de cinta (SPEED)–

Púlselo para elegir la velocidad de grabación desea-
da: SP/SLP.

19

Botón T-PROG. CLEAR–

Púlselo para cancelar

un programa de temporizador.

Botón de reposición del contador
(COUNTER RESET)–

Púlselo para reponer el

contador a 0:00:00.

20

Botón de juego (GAME)–

Establece el modo

del juego y el modo de entrada externa al mismo
tiempo.

21

Botón de búsqueda con tiempo (TIME
SEARCH)–

Púlselo para activar el modo de

búsqueda con tiempo.

22

Botón de pausa/imagen fija
(PAUSE/STILL)–

Púlselo para detener temporal-

mente la cinta durante la grabación o para ver una
imagen fija durante la reproducción.

23

Botón de silenciamiento (MUTE)–

Silencia el

sonido. Púlselo de nuevo para recuperar el sonido.

24

Botón de retorno de canal (CHANNEL
RETURN)–

Púlselo para volver al canal anterior.

Por ejemplo, pulsando una vez este botón, la visu-
alización del canal cambiará de 3 (canal actual) a
10 (canal anterior), y al pulsarlo por segunda vez,
el canal cambiará del 10 al 3.

25

Botón del temporizador despertador/para
dormir (WAKE UP/SLEEP)– 

Ajusta el tempo-

rizador para despertarse/dormir. 

26

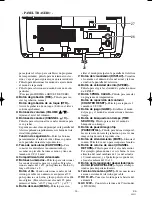
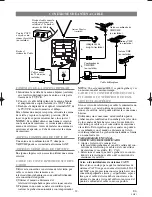
Terminal de antena (ANT.)–

Para conectar una

antena o sistema de televisión por cable.

27

DC 13.2V–

Conecta el cordón para la batería del

automóvil.

28

AC 120V–

Conéctelo a la toma de CA estándar

(120V/60Hz).

26

27

28

- PANEL TRASERO -

T4403UD(SP).QX33  02.12.24  4:28 PM  Page 28

Содержание EWC0903

Страница 1: ...mark If you need additional assistance for set up or operating after reading owner s manual please call TOLL FREE 1 800 256 2487 Or visit our WEB SITE at http www funai corp com Please read before using this equipment INSTRUCCIONES EN ESPAÑOL INCLUIDAS This Owner s Manual is made of recycled paper EMERSON AND THE G CLEF LOGO ARE REGISTERED TRADEMARKS OF EMERSON RADIO CORP PARSIPPANY NEW JERSEY U S...

Страница 2: ...om overheat ing and these openings must not be blocked or covered The openings should never be blocked by placing the TV VCR on a bed sofa rug or other similar surface This TV VCR should never be placed near or over a radiator or heat register This TV VCR should not be placed in a built in installation such as a bookcase or rack unless proper ventilation is provided or the manufacturer s instructi...

Страница 3: ...age Requiring Service Unplug this TV VCR from the wall outlet and refer servicing to qualified service per sonnel under the following conditions a When the power supply cord or plug is damaged or frayed b If liquid has been spilled or objects have fallen into the TV VCR c If the TV VCR has been exposed to rain or water d If the TV VCR does not operate normally by following the operating instructio...

Страница 4: ...fields Avoid moving TV VCR to locations where temper ature differences are extreme Do not handle the power cord with wet hands Do not pull on the power cord when disconnecting it from an AC wall outlet Grasp it by the plug If by accident water is spilled on your unit unplug the power cord immediately and take the unit to our Authorized Service Center for servicing Do not put your fingers or object...

Страница 5: ... 11 CHANNEL SET UP FOR THE FIRST TIME 11 CLOCK SET UP AUTO MANUAL 12 CHANNEL SET UP AGAIN 13 DELETING OR ADDING CHANNEL 13 SELECTING THE LANGUAGE 14 DAYLIGHT SAVING TIME 14 C TV OPERATION 15 WATCHING A TV PROGRAM 15 GAME MODE 15 DEGAUSSING 15 PICTURE CONTROL 15 C PLAYBACK 16 NORMAL PLAYBACK 16 AUTO REPEAT PLAYBACK 16 SEARCH 17 STILL PICTURE 17 NOISE CANCEL in the Still mode 18 VERTICAL HOLD CONTRO...

Страница 6: ... Allows you to repeat the playing of a tape indefinitely without pressing the PLAY button Time search Let you set the TV VCR to advance the tape by entering the desired playback time you want to skip OTR One Touch Recording Instant timed recording from 30 to 480 minutes is possible at the push of the REC OTR button 1 Year 8 events including Daily and Weekly Timer Recording The built in timer allow...

Страница 7: ...y in forward during playback mode Forward Search B button When setting program for example setting clock or timer program press to determine your selec tion and proceed to the next step you want to input Press to determine setting modes from on screen menu Press to select a mode from a particular menu for example LANGUAGE or USER S SET UP REMOTE CONTROL VIDEO AUDIO REC POWER STOP EJECT rREW PLAY F...

Страница 8: ...display the main menu on the TV screen 17 DISPLAY button Display the counter or the cur rent channel number and current time on the TV screen See page 24 18 SPEED button Press to choose the desired recording speed SP SLP 19 T PROG CLEAR button Press to cancel a setting of timer program See page 22 COUNTER RESET button Press to reset counter to 0 00 00 20 GAME button Sets the game mode and external...

Страница 9: ...ote to CATV system installer This reminder is provided to call the CATV system installer s attention to Article 820 40 of the NEC that provides guidelines for proper grounding and in particular specifies that the cable ground shall be connect ed to the grounding system of the building as close to the point of cable entry as practical IN OUT ANT Dipole Antenna Supplied VHF UHF Antenna Not supplied ...

Страница 10: ...before you unplug it from the TV VCR You must disconnect the car battery cord from the TV VCR before you can use the AC power Be sure to replace the fuse with only the same type 5A 250V Be sure the AC cord is wound as shown below WARNING The driver should never watch the TV VCR while operating a motor vehicle CAUTION When used in moving vehicle be sure that the unit is secure at all the times to p...

Страница 11: ...you want to recall the selected channels you can select the desired channel directly with the remote control number buttons or CHANNEL K or L button SET UP B LANGUAGE ENGLISH ESPAÑOL AUTO PRESET SET UP LANGUAGE ENGLISH ESPAÑOL B AUTO PRESET TO SELECT A DESIRED CHANNEL You can select the desires channel by using the CHANNEL K or L button on or directly pressing the number buttons on the remote cont...

Страница 12: ...m select AUTO CLOCK and press the F FWD B or REW s button to turn OFF this function Then you can manually adjust the clock MANUAL CLOCK SET MONTH DAY YEAR 0 5 HOUR MINUTE AUTOMATIC CLOCK SETTING Make sure The TV VCR is turned on Confirm the TV VCR is receiving a RF Radio Frequency signal from either an antenna or cable system connection using the ANT IN jack on the rear of the TV VCR NOTE If a cab...

Страница 13: ... also use the number buttons or the CHANNEL K L button to enter it Example CH8 M E N U TIMER PROGRAMMING PICTURE CONTROL SETTING CLOCK B CHANNEL SET UP USER S SET UP LANGUAGE ENGLISH ZERO RETURN TIME SEARCH CHANNEL SET UP B ADD DELETE CH TV AUTO PRESET 08 ADD DELETE the number s that appear on the screen These are the auto clock station s in your area See item 4 below If no number s appear on the ...

Страница 14: ... confirm that channel s has been deleted or added press the CHANNEL K or L button Added channel Light blue Deleted channel Light red DAYLIGHT SAVING TIME Select this feature and the TV VCR s clock automati cally will advance one hour in April then reverse one hour in October When Daylight Saving Time is ON the clock will change automatically as follows First Sunday of April At 2 AM the clock imme ...

Страница 15: ...OL The TV VCR s picture controls BRIGHT CON TRAST COLOR TINT and SHARPNESS are preset to factory specifications Although they are usually the best you may need to make some further adjustments for a natural looking image NOTES Procedures must be followed within 5 seconds or the Picture Control mode will be cancelled When setting the Picture Control the Game mode will be cancelled Make sure TV VCR ...

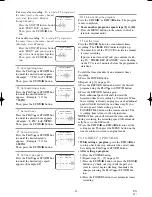
Страница 16: ...you to repeat a tape indefinitely without touching the PLAY button ALL REPEAT Repeat playback from the beginning to the end of the tape BLANK REPEAT Repeat playback from the begin ning to a blank part which is blank for more than 10 seconds 1 Select USER S SET UP Press the MENU button on the remote control Press the PLAY K or STOP L but ton to point to USER S SET UP Then press the F FWD B button 2...

Страница 17: ...nning point at which you want to review 2 Reset the counter to 0 00 00 Press the COUNTER RESET button repeatedly 3 Begin recording or playback Press the RECORD or PLAY button Press the STOP button when recording or playback is completed 4 To activate ZERO RETURN mode Press the MENU button on the remote control Press the PLAY K or STOP L but ton to point to ZERO RETURN Then press the F FWD B button...

Страница 18: ...ape recorded in the SLP mode If the tape was originally recorded in the SP or LP mode the still picture may revert to black and white in addition to the noise bars This is normal In the Pause Still mode only when the picture begins to vibrate vertically stabilize the picture by pressing the CHANNEL K or L button NOTE If there are video noise lines on the screen reposition or reduce them Refer to N...

Страница 19: ...R Make sure TV VCR power must be turned on Insert a cassette tape with its erase prevention tab in place If necessary rewind or fast forward the tape to the point at which you want to begin recording NOTES This function CANNOT be done from the remote control Recording starts immediately when the REC OTR button is pressed When the REC OTR button is pressed 18 times the TV VCR returns to the Normal ...

Страница 20: ...e recording Press the PLAY K up button until the desired date appears Example 7 04 for July 4th Then press the F FWD B but ton TIMER RECORDING 9 00AM 10 00AM 12 00PM Program 1 10 00AM 11 00AM Program 2 9 00AM 10 00AM Program 3 9 30AM 12 00PM 11 00AM Recording Sequence Recording period is SHADED You may set the TV VCR to start and end a record ing while you are away You can set 8 programs to record...

Страница 21: ...r REW s button The program is now completed To set another program repeat steps 2 to 10 Press the MENU button on the remote control to return to original mode 11 Set the timer Press the POWER button to set automatic timer recording The TIMER REC indicator lights up You must turn off the TV VCR to activate automat ic timer recording If power is not turned off and you continue watch ing TV TIMER REC...

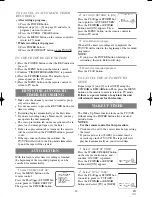
Страница 22: ...on to point to USER S SET UP Then press the F FWD B button WAKE UP TIMER The Wake Up Timer function turns on the TV VCR without using the POWER button after a desired period of time NOTES Use the remote control for this procedure Clock must be set to the correct time before setting the timer If you want to select TAPE you must insert a cassette tape in the TV VCR The tape will start playback autom...

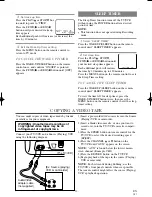
Страница 23: ...rs To view the time left for sleep timer press the WAKE UP SLEEP button twice then press the MENU button on the remote control to exit the sleep timer setting SLEEP TIMER 2 00 WAKE UP ON OFF ON TIMER TV TAPE TV BTIME 12 00AM You can make copies of video tapes made by friends or relatives for your enjoyment Connect your TV VCR and a Source Playing VCR using the following diagram WARNING Unauthorize...

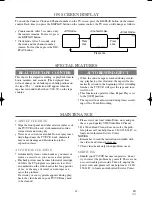
Страница 24: ...to correct the problem by yourself There are no user serviceable parts inside Turn off unplug the power cord and please call our help line at 1 800 256 2487 to locate an Authorized Service Center ON SCREEN DISPLAY To check the Counter Clock and Channel number on the TV screen press the DISPLAY button on the remote control Each time you press the DISPLAY button on the remote control the TV screen w...

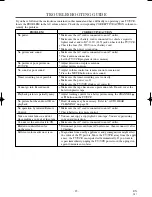
Страница 25: ... off Make sure the TV VCR clock is set correctly Cannot go into Record mode Make sure the tape has an erase prevention tab If need cover the hole with plastic tape Playback picture is partially noisy Adjust tracking control for a better picture using the CHANNEL K or L button on the TV VCR No picture but the audio is OK in Head cleaning may be necessary Refer to AUTO HEAD playback CLEANING on page...

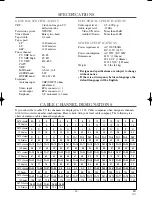
Страница 26: ...annels with letters or letter number combinations Please check with your local cable company The following is a chart of common cable channel designations TV Display TV Display TV Display TV Display TV Display TV Display TV Display TV Display CATV channel TV Display W 80 W 81 W 82 W 83 W 84 W 65 W 66 W 67 W 68 W 69 W 70 W 71 W 72 W 73 W 74 W 75 W 76 W 77 W 78 W 79 W 55 W 56 W 57 W 58 A 4 A 3 A 2 A...

Страница 27: ... establecer un programa de temporizador 9 Botón de avance rápido F FWD Púlselo para avanzar rápidamente la cinta o para ver la imagen en avance rápido durante el modo de reproducción Búsqueda con avance rápido Botón B Cuando establezca un programa por ejemplo POWER WAKE UP SLEEP 1 2 3 4 5 6 7 8 9 100 0 EJECT CHANNEL RETURN REW PLAY STOP F FWD GAME RECORD PAUSE STILL SPEED TIME SEARCH CHANNEL T PRO...

Страница 28: ...s últi mos dígitos Para seleccionar el canal 125 pulse primero el botón 100 y luego el 2 y el 5 16 Botón de menú MENU Púlselo para visu alizar el menú principal en la pantalla del televisor 17 Botón del visualizador DISPLAY Visualiza el contador o el número del canal actual y la hora actual en la pantalla del televisor 18 Botón de velocidad de cinta SPEED Púlselo para elegir la velocidad de grabac...

Страница 29: ...sión por cable le suministra un convertidor o si usted utiliza un sistema de emi siones vía satélite usted podrá utilizar las conexiones básicas Utilizando estas conexiones usted también podrá grabar canales codificados Sin embargo la selección de los canales deberá hacerse con el convertidor de televisión por cable con el convertidor de emisiones vía satélite Esto significa que los canales no pod...

Страница 30: ... eléctrico a tierra negativo de 13 2 12 voltios Confirme que está usando sólo el cordón provisto para la batería del automóvil El uso de otro cordón puede dañar su TV VCR Asegúrese que no haya cenizas ni otro restos en el zócalo del encendedor Asegúrese de introducir completamente el enchufe del cordón de la batería del automóvil en el zócalo del encendedor de cigarrillos Siempre desenchufe primer...

Страница 31: ... El sintonizador se para en el canal memorizado más bajo Si desea recuperar canales seleccionados usted podrá seleccionar directamente el canal deseado con los botones numerados del mando a distancia o con los botones CHANNEL K o L PREPARACIÓN DE CANALES POR PRIMERA VEZ Cerciórese La alimentación del televisor videograbadora deberá estar conectada En el ejemplo de abajo el reloj va a ajustarse así...

Страница 32: ... use such as hotel rental or office use of this prod uct or damage which results from fire flood lightning or other acts of God THIS WARRANTY DOES NOT COVER PACKING MATERIALS ANY ACCESSORIES EXCEPT REMOTE CONTROL ANY COSMETIC PARTS COMPLETE ASSEMBLY PARTS DEMO OR FLOOR MODELS FUNAI CORP AND ITS REPRESENTATIVES OR AGENTS SHALL IN NO EVENT BE LIABLE FOR ANY GENERAL INDIRECT OR CONSEQUENTIAL DAMAGES ...

Отзывы: