background image

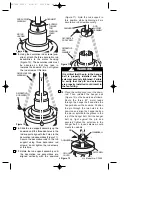
12. Tighten the setscrews (Figure 8)

securely while pulling up on the
downrod.

NOTE: The setscrews must be properly
installed as described above, or fan
wobble could result.

13. Make sure the grommet Is properly

installed in the coupling cover, then
slide the coupling cover over the
downrod until it rests on the motor
housing. (Figure 9).

NOTE: If you installed the 6” downrod,
the three decorative rod assemblies
and the rod support assembly will not
be installed. Disregard steps 14
through 17; proceed to step 18.

14. Make sure the grommets are properly

installed in the rod support assembly.
Then position the three screws in the
rod support toward the top, and slide
the rod support over the downrod
(Figure 9).

9. Carefully remove the fan assembly

from the lower foam pad. Turn the fan
assembly over and position it on the
lower foam pad with the fan blades
resting on the pad so that the top of
the motor faces up.

10. Remove the hanger ball by loosening

the setscrew in the hanger ball until
the ball falls freely down the downrod
(Figure 7). Remove th pin from the
downrod, then remove the hanger ball.
Retain the pin and hanger ball for rein-
stallation in step 18.

NOTE: If you have an eight-foot ceiling,
you will have to use the 6” downrod
(supplied) in order to maintain the nec-
essary blade-to-floor clearance of
seven feet.

11. Unscrew the two upper setscrews

(Figure 8) until they clear the inside of
the motor coupling. Then separate,
untwist and unkink the three 80” motor
leads. Route the motor lead wires
through the downrod. Align the clevis
pin holes in the downrod with the holes
in the motor coupling. Install the clevis
pin and secure with the hairpin clip
(Figure 8). The clevis pin must go
through the holes in the motor cou-
pling and the holes in the downrod. Be
sure to push the straight leg of the
hairpin clip through the hole near the
end of the clevis pin until the curved
portion of the hairpin clip snaps around
the clevis pin. The hairpin clip must be
properly installed to prevent the clevis
pin from working loose. Pull up on the
downrod to make sure the clevis pin is
properly installed.

7

PIN

HANGER
BALL

SETSCREW

DOWNROD

Figure 7

DOWNROD

MOTOR 
COUPLING

SETSCREW (2)

HAIRPIN
CLIP

CLEVIS PIN

It is critical that the clevis pin in the
motor coupling is properly installed
and the setscrews securely tight-
ened. Failure to verify that the pin
and setscrews are properly installed
(as shown in Figure 8) could result in
the fan falling.

!

WARNING

Figure 8

U.L. Model No.: CF200

BP7354 CF200  9/19/07  11:30 AM  Page 7

Содержание CITYSCAPE CF200GES00

Страница 1: ...CF200 READ AND SAVE THESE INSTRUCTIONS Net Weight 22 1 Lbs CITYSCAPE Ceiling Fan Owner s Manual Model Numbers CF200NI00 Brushed Nickel with Black Brushed Nickel Blades CF200GES00 Golden Espresso with Black Teak Blades BP7354 CF200 9 19 07 11 30 AM Page 1 ...

Страница 2: ...rance for a 9 foot ceiling The 6 downrod supplied must be used for an 8 foot ceiling 5 The fan must be mounted with the fan blades at least 7 feet from the floor to pre vent accidental contact with the fan blades 6 Follow the recommended instructions for the proper method of wiring your ceiling fan If you do not know enough about electrical wiring have your fan installed by a licensed electrician ...

Страница 3: ...an motor and housing assembly b One ceiling cover c One coupling cover d Three fan blades e Three blade flanges f One hanger bracket g One hanger ball downrod assembly h One switch housing assembly i One rod support assembly j Three decorative rod assemblies k Six decorative screws bagged l One light fitter m One lower glass n One 75 watt halogen bulb o One 6 downrod p One remote control transmitt...

Страница 4: ...o two sections The first section REMOTE CONTROL PROCEDURES describes how to install the 9 volt alka line battery not supplied in the remote control transmitter and how to set the operating frequency of the transmitter and receiver These instructions must be performed prior to the installation of the ceiling fan as described in the second section CEILING FAN PROCE DURES REMOTE CONTROL PROCEDURES Ge...

Страница 5: ...urned off at the main fuse box before wiring All wiring must be in accordance with National and Local codes and the ceil ing fan must be properly grounded as a precaution against possible electri cal shock WARNING How to Assemble Your Ceiling Fan 1 Mount the fan blades to the blade flanges using three 10 24 x 9mm truss head screws and three fiber washers supplied Figure 2 2 Remove and discard the ...

Страница 6: ...rocedure for the remaining two blade assemblies 5 Insert the motor connector through the center hole in the switch housing assembly Figure 4 Position the switch housing so that the slotted holes align with the smaller threaded holes in the coupling Then install three 8 32 x 12mm pan head screws with lockwashers supplied Install three 1 4 20 x 11mm pan head screws with lockwashers supplied in the l...

Страница 7: ... NOTE If you have an eight foot ceiling you will have to use the 6 downrod supplied in order to maintain the nec essary blade to floor clearance of seven feet 11 Unscrew the two upper setscrews Figure 8 until they clear the inside of the motor coupling Then separate untwist and unkink the three 80 motor leads Route the motor lead wires through the downrod Align the clevis pin holes in the downrod ...

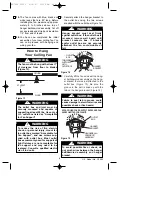
Страница 8: ...using Figure 10 The decorative rods must be oriented so that they lean in towards the downrod Do not tighten the rod screws at this time 16 Slide the rod support assembly up the downrod until the threaded holes in the rod support align with the holes in the decorative rod assemblies Figure 11 Secure the decorative rods to the rod support using three decorative rod screws do not tighten the rod scr...

Страница 9: ...using the two screws supplied with the outlet box Figure 14 Hanger bracket must seat firmly against outlet box If the outlet box is recessed remove wall board until bracket contacts box If bracket and or outlet box are not securely attached the fan could wobble or fall WARNING Failure to seat tab in groove could cause damage to electrical wires and possible shock or fire hazard WARNING To avoid po...

Страница 10: ...connectors except for the ground wire 2 Refer to Figure 16 and 17 and connect the receiver wires to the supply wires and the fan motor wires as follows a Securely connect the green grounding wires from the hanger ball and the hanger bracket to the supply grounding conductor this may be a bare wire or a wire with green insulation b Securely connect the supply white neutral wire to the receiver whit...

Страница 11: ...HITE RED BLACK WHITE HANGER BALL GREEN WIRE GROUND FROM HANGER BALL AND HANGER BRACKET TWO CONDUCTOR CABLE WITH GROUND BLACK HOT WHITE GROUND TO 120 VOLT SUPPLY WHITE BLUE WHITE BLUE Figure 17 3 Push the wires and connectors up into the outlet box while inserting the receiv er fully into the hanger bracket Position the antenna wire on top of the receiver 4 Screw the two 1 1 4 threaded studs suppli...

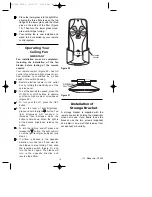
Страница 12: ...se the button The light will turn on at the light level previously set see step 4 6 If airflow is desired in the opposite direction turn the fan off and wait for the blades to stop turning Then slide the reversing switch Figure 21 and turn the fan on again The blades will turn in the opposite direction and reverse the airflow STORAGE BRACKET HI OFF LOW MED Figure 20 Figure 21 Installation of Stora...

Страница 13: ...e in a residential installation This equipment generates uses and can radiate radio frequency energy and if not installed and used in accor dance with the instructions may cause harmful interference to radio communications However there is no guarantee that interference will not occur in a particular installation If this equipment does cause harmful interference to radio or television reception wh...

Страница 14: ...gainst the interior wall of the switch housing WARNING Make sure main power is turned off 4 Screws holding blades to 4 Tighten screws securely flanges are loose 5 Loose screws in motor housing 5 Check to make sure all screws in motor housing are snug not over tight 3 Fan wobbles 1 Setscrew in motor coupling is 1 Raise coupling cover and tighten excessively not tightened securely setscrew securely ...

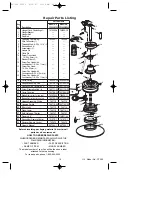
Страница 15: ...708 NI 762708 GES 21 Blade Set full set for one fan 762635 10 762635 11 22 Flange Set full set for one fan 762725 NI 762725 GES 23 Harness Assembly Wiring 762719 762719 24 Housing Switch 762715 NI 762715 GES 25 Fitter Light 762716 762716 26 Glass Lower 762718 762718 1 27 Bulb Halogen 75 watt 762737 762737 28 Downrod 6 761631 43 761631 44 29 Transmitter Remote Control 761970 1 761970 1 30 Receiver ...

Страница 16: ...ory or authorized service center Your Emerson Air Comfort Ceiling Fan should be properly packed to avoid damage in transit since we will not be responsible for any such damage What Is Not Covered The glass globes and light bulbs of your ceiling fan are not covered by this warranty This warranty also does not cover any defects malfunctions or failures caused by Repairs by persons not authorized by ...

Отзывы: