Supported IPMI Commands
ATCA-7368 Installation and Use (6806800M12C)
103
and use the boot parameters stored in the default area and thus use the factory settings, you
need to configure the blade accordingly. This is typically done by an on-board switch (for
example, “Clear CMOS RAM”). It depends on the blade and firmware which settings are stored
in the default area. Details are given in the following sections.
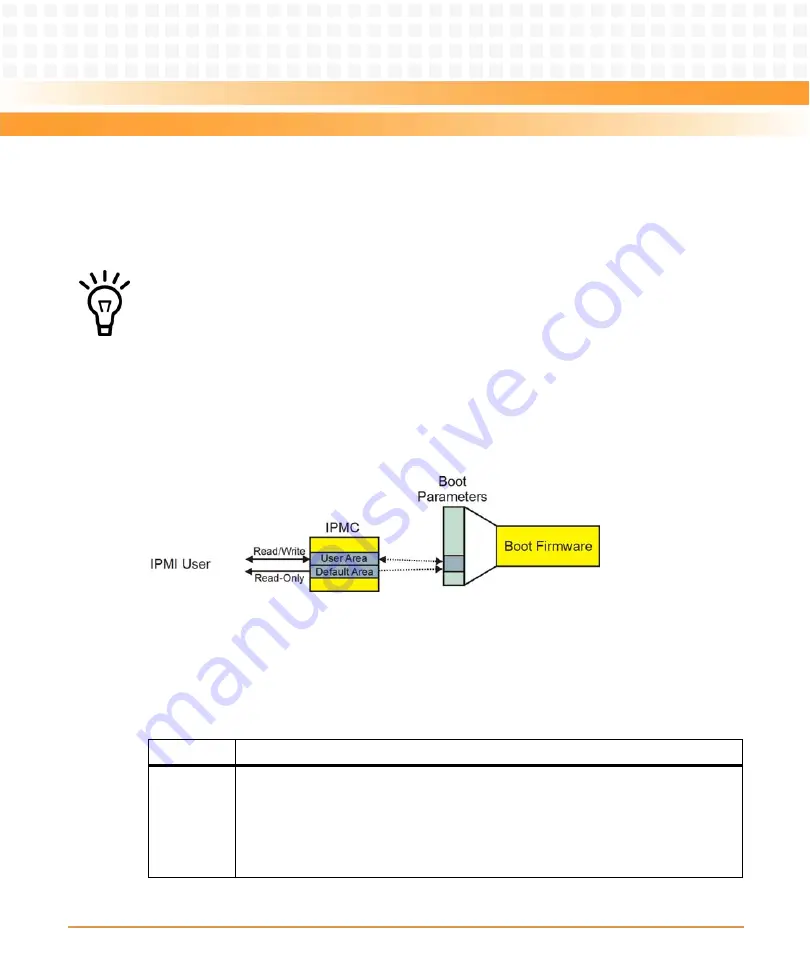
The following figure summarizes the previously explained basic information flow related to the
system boot options parameter #100.
The boot options need to be stored as a sequence of zero terminated strings. The following
table describes in detail the format of the boot options to be used when setting or reading the
System Boot Options parameter #100.
On some blades with particular firmware types, changing a boot parameter in the firmware
setup menu changes the boot parameter in the user area as well, if the same parameter is
defined both in the user area and the set-up menu. Details are given below.
Figure 7-1
System Boot Options Parameter #100 - Information Flow Overview
Table 7-12 System Boot Options - Parameter #100 - Data Format
Byte
Description
0..1
Number of bytes used for boot parameters (LSB first)
The number of bytes must be calculated and written into these two bytes by the
software which writes into the storage area. The values 0x0000 and 0xFFFF indicate
that no data has been written to the storage area. When reading from the storage area
and you find any of these two values, your software should assume that no user-specific
boot options have previously been written to the storage area.
Содержание ATCA-7368
Страница 8: ...ATCA 7368 Installation and Use 6806800M12C Contents 8 Contents Contents ...
Страница 14: ...ATCA 7368 Installation and Use 6806800M12C 14 List of Figures ...
Страница 26: ...Introduction ATCA 7368 Installation and Use 6806800M12C 26 Figure 1 1 Declaration of Conformity ...
Страница 29: ...Introduction ATCA 7368 Installation and Use 6806800M12C 29 Figure 1 3 Mechanical Layout without AMC and HDD ...
Страница 30: ...Introduction ATCA 7368 Installation and Use 6806800M12C 30 Figure 1 4 Mechanical Layout without AMC with HDD ...
Страница 50: ...Hardware Preparation and Installation ATCA 7368 Installation and Use 6806800M12C 50 ...
Страница 88: ...Functional Description ATCA 7368 Installation and Use 6806800M12C 88 ...
Страница 210: ...Replacing the Battery ATCA 7368 Installation and Use 6806800M12C 210 ...
Страница 221: ......

