background image


- 51 - 

Funkcja automatycznego włączania 


Jeżeli  użytkownik  chce  ustawić  czas  automatycznego  włączania  gotowania  wody,  najpierw  należy 
wykonać  kroki  „1)  -  3)”  w  części  „

Gotowanie  wody

”.  Jeżeli  użytkownik  chce  ustawić  czas 

automatycznego włączania parzenia herbaty, najpierw należy wykonać kroki „1) - 4)” w części „

Parzenie 

herbaty

”. 


Następnie należy wykonać kroki podane poniżej: 
-


Nacisnąć  i  przytrzymać  przez  około  2  sekundy  przycisk  „Automatyczne  włączanie”  („AUTO  START”). 
Kontrolka świetlna przycisku „Automatyczne włączanie” („AUTO START”) zapali się na niebiesko, a na 
wyświetlaczu  cyfrowym  migać  będzie  „CURRENT  TIME”  (AKTUALNA  GODZINA)  oraz  „START  TIME” 
(CZAS ROZPOCZĘCIA). 

-


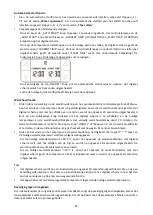
Przyciskami  nastawiania  temperatury  ustawić  aktualny  czas,  na  wyświetlaczu  cyfrowym  pojawi  się 
wartość  „CURRENT  TIME”.  Przyciskami  nastawiania  godziny  ustawić  czas  rozpoczęcia,  wyświetlaczu 
cyfrowym  pojawi  się  wartość  zapisana  jako  „START  TIME”.  (Patrz  rysunek  poniżej.)  Cykl  zegarowy 
wynosi 24 godzimy. Długie wciśnięcie przyspiesza nastawianie. 


-


Następnie należy wcisnąć „Włącznik” („ON/OFF”), aby przejść w tryb automatycznego rozpoczynania 
pracy. Wyświetlacz cyfrowy zgaśnie po 20 sekundach. 

-


Gdy aktualny czas osiągnie nastawioną godzinę rozpoczęcia, urządzenie rozpocznie parzenie. 


Funkcja utrzymywania temperatury 


W  czasie  parzenia  należy  nacisnąć  przycisk  utrzymywania  temperatury,  jego  kontrolka  zapali  się  na 
niebiesko.  Po  zakończeniu  parzenia  rozlegną  się  3  sygnały  dźwiękowe  i  urządzenie  przejdzie  w  tryb 
utrzymywania  temperatury.  Na  wyświetlaczu  cyfrowym  rozpocznie  się  odliczanie  czasu  i  po  ok.  20 
sekundach  wyświetlacz  zgaśnie.  Wciśnięcie  dowolnego  przycisku  pozwala  ponownie  włączyć 
wyświetlacz  w  celu  sprawdzenia  aktualnej  temperatury  i  czasu  utrzymywania  temperatury.  Cała 
procedura utrzymywania temperatury będzie trwała 30 minut. Utrzymywana temperatura jest ≥60°C. 
Wcisnąć „Włącznik” („ON/OFF”) lub przycisk „Utrzymywanie temperatury” („Keep warm”), aby wyjść z 
funkcji utrzymywania temperatury. W trybie utrzymywania temperatury nie należy przesuwać koszyka 
do zaparzania herbaty. Powinien on pozostać u góry. 


Po  zakończeniu  parzenia  należy  nacisnąć  przycisk  utrzymywania  temperatury,  na  wyświetlaczu 
cyfrowym pojawi się „

- -

”, a potem wyświetlona zostanie aktualna temperatura wody. 

-


Jeżeli aktualna temperatura wody jest ≥60°C, urządzenie przejdzie w tryb utrzymywania temperatury. 
Na wyświetlaczu cyfrowym rozpocznie się odliczanie czasu i po ok. 20 sekundach wyświetlacz zgaśnie. 
Funkcja utrzymywania temperatury będzie działać tak jak zostało to opisane powyżej. 

-


Jeżeli  aktualna  temperatura  wody  jest 

60°C,  urządzenie  nie  przełączy  się  w  tryb  utrzymywania 

temperatury.  Na  wyświetlaczu  cyfrowym  wartość  temperatury  mignie  3  razy,  po  czym  po  ok.  20 
sekundach wyświetlacz zgaśnie. 


Wskazówki: 


Po ok. 20 sekundach braku aktywności wyświetlacz cyfrowy wyłącza się. Jeśli użytkownik chce wykonać 
dalsze operacje, należy najpierw nacisnąć dowolny przycisk, aby włączyć wyświetlacz cyfrowy, a potem 
nacisnąć odpowiednie przyciski w celu wybrania żądanych funkcji. 


Urządzenie  nie  będzie  pracować,  jeżeli  nastawiona  temperatura  będzie  niższa  niż  aktualna 
temperatura wody. 


Содержание WK-122248

Страница 1: ...WK 122248 Tea Water kettle EN Tee Wasserkocher DE Th Bouilloire FR Te Vattenkokare SE Thee Waterkoker NL Herbata Czajnik na wod PL RU...

Страница 2: ...Inhalt Teneur Inneh ll Inhoud Tre Instruction manual English 2 Bedienungsanleitung German 10 Mode d emploi French 19 Bruksanvisning Swedish 28 Gebruiksaanwijzing Dutch 36 Instrukcja obs ugi Polish 45...

Страница 3: ...f they have been given supervision or instruction concerning use of the appliance in a safe way and if they understand the hazards involved 2 Cleaning and user maintenance shall not be made by childre...

Страница 4: ...that the voltage and frequency comply with the specifications on the rating label 15 Disconnect the mains plug from the socket when the appliance is not in use and before cleaning 16 Ensure that the m...

Страница 5: ...le is for household use only not for outdoor 29 Our warranty does not cover water kettles that malfunction resulting from failure to descale 30 If you wish to stop the kettle before the water has boil...

Страница 6: ...ons 6 Tea button g Indicator light of the type of tea Green h Indicator light of the type of tea Black i Indicator light of the type of tea White j Indicator light of the type of tea Herbal k Indicato...

Страница 7: ...k the kettle lid in place 2 Put the kettle body on the power base and plug the appliance into an appropriate electrical outlet A beep sound will be heard 3 Firstly press the button TEA to select your...

Страница 8: ...r approx 20 seconds You can press any button to turn on the digital display to check the current temperature and the keep warm time The whole keep warm process will last 30 minutes The keep warm tempe...

Страница 9: ...p water may form scale on the bottom of the kettle so as to cause the operation less efficiency You can use the commercially available descaler and follow the instructions on the package of the descal...

Страница 10: ...can we hold responsible for material damage or personal injury caused by improper use if the instruction manual are not properly executed Damage to accessories does not mean free replacement of the wh...

Страница 11: ...sanleitung fahrl ssigen Gebrauch oder Benutzung die nicht in bereinstimmung mit den Anforderungen dieser Bedienungsanleitung erfolgt verursacht wurden 1 Dieses Ger t kann von Kindern ab 8 Jahren und d...

Страница 12: ...anderen Unterkunftsarten Fr hst ckspensionen 8 Wenn der Wasserkocher zu voll ist kann kochendes Wasser herausspritzen 9 Das Ger t darf zum Reinigen nicht in Wasser getaucht werden 10 Um Informationen...

Страница 13: ...d aus der Steckdose ziehen oder mit der Steckdose verbinden 21 Versuchen Sie unter keinen Umst nden das Geh use des Ger tes zu ffnen oder das Ger t selbst zu reparieren Dies k nnte einen Stromschlag v...

Страница 14: ...Wasserkocher von seinem Sockel nehmen 31 Der Wasserkocher darf nur mit dem mitgelieferten Sockel benutzt werden 32 Um ein Umst rzen und Sch den bzw Verletzungen zu verhindern muss das Ger t auf einem...

Страница 15: ...n 6 Teetaste g Anzeigeleuchte f r Teesorte Gr n h Anzeigeleuchte f r Teesorte Schwarz i Anzeigeleuchte f r Teesorte Hell j Anzeigeleuchte f r Teesorte Kr uter k Anzeigeleuchte f r Teesorte Oolong l An...

Страница 16: ...wieder fest verriegelt 2 Den Beh lter auf das Unterteil stellen und den Ger testecker an eine geeignete Steckdose anschlie en Ein Piepton ert nt 3 Zuerst auf die Taste TEA dr cken um die gew nschte Te...

Страница 17: ...rd die Zeit mitgez hlt und nach ca 20 Sekunden erlischt die Anzeige Um das Display zu aktivieren und die aktuelle Temperatur und die Warmhaltezeit zu kontrollieren eine beliebige Taste dr cken Die War...

Страница 18: ...m Leitungswasser zu Kalkbildung am Beh lterboden f hren und dadurch die Ger tefunktion beeintr chtigen k nnen Zum Entkalken kann ein handels bliches Entkalkungsmittel verwendet werden Dazu die Gebrauc...

Страница 19: ...r Anwendung oder Nichtbefolgen der Sicherheitshinweise sind wir nicht haftbar Sch den an den Zubeh rteilen bedeutet nicht dass das gesamte Ger t kostenlos ausgetauscht wird In diesem Fall kontaktieren...

Страница 20: ...ce d utilisation un usage n gligent ou l usage non conforme aux exigences de cette notice d utilisation 1 Cet appareil peut tre utilis par des enfants g s d au moins 8 ans condition qu ils b n ficient...

Страница 21: ...es h tels motels et autres environnements de type r sidentiel Environnements de type chambres d h tes 8 Lorsque la bouilloire est trop pleine il est possible que de l eau bouillante d borde 9 Lors du...

Страница 22: ...centre de r paration agr pour le faire r parer 20 Ne branchez pas et ne d branchez pas l appareil de la prise lectrique avec les mains mouill es 21 N essayez pas d ouvrir le bo tier de l appareil ni d...

Страница 23: ...a bouilloire est con ue exclusivement pour tre utilis e avec la base fournie 32 Assurez vous que l appareil est utilis sur une surface ferme et plane hors de port e des enfants Cela emp chera la bouil...

Страница 24: ...6 Bouton th g Voyant lumineux indiquant le type de th Green Vert h Voyant lumineux indiquant le type de th Black Noir i Voyant lumineux indiquant le type de th White Blanc j Voyant lumineux indiquant...

Страница 25: ...ns le sens des aiguilles d une montre pour faire tourner le rep re CLOSE situ sur le bord du couvercle afin de l aligner avec le rep re pour verrouiller le couvercle de la bouilloire 2 Placez la bouil...

Страница 26: ...appuyer sur n importe quel bouton pour allumer l cran afin de v rifier la temp rature actuelle et le temps de maintien au chaud L ensemble du processus de maintien au chaud dure 30 minutes La temp ra...

Страница 27: ...p ts min raux de l eau du robinet peuvent former du tartre sur le fond de la bouilloire ce qui r duit l efficacit du fonctionnement Vous pouvez utiliser le d tartrant disponible dans le commerce et s...

Страница 28: ...on inappropri e ou si les instructions de s curit n ont pas t convenablement observ es Si les accessoires sont endommag s cela ne signifie pas que toute la machine sera remplac e gratuitement Dans de...

Страница 29: ...anv ndning som inte r i enlighet med kraven i denna bruksanvisning 1 Denna apparat kan anv ndas av barn fr n 8 r och upp t under f ruts ttning att de vervakas eller mottagit instruktioner f r s ker an...

Страница 30: ...taget kontrollera att sp nningen och frekvensen verensst mmer med specifikationerna p m rkpl ten 15 Dra ut str mkontakten fr n eluttaget n r apparaten inte anv nds och f re reng ring 16 S kerst ll att...

Страница 31: ...r endast avsedd f r anv ndning i hemmet inte f r utomhusbruk 29 V r garanti t cker inte vattenkokare som uppvisar felfunktioner som beror p d lig avkalkning 30 Om du vill stoppa vattenkokaren innan v...

Страница 32: ...sknappar 6 Teknapp g Indikatorlampa f r typ av te Gr nt h Indikatorlampa f r typ av te Svart i Indikatorlampa f r typ av te Vitt j Indikatorlampa f r typ av te rter k Indikatorlampa f r typ av te Oolo...

Страница 33: ...ck p plats 2 Placera bryggaren p str mplattan och koppla in apparaten i ett l mpligt v gguttag Ett pipljud kommer att h ras 3 Tryck f rst p knappen TEA f r att v lja nskad typ med te Gr nt Svart Vitt...

Страница 34: ...ef r 20 sekunder Du kan trycka p n gon knapp f r att sl p den digitala displayen f r att kontrollera nuvarande temperatur och varmh llningstid Hela varmh llningsprocessen kommer att vara i 30 minuter...

Страница 35: ...alavlagringar fr n kranvattnet kan kalka igen botten i bryggaren s att den blir mindre effektiv Du kan anv nda kommersiellt tillg ngliga avkalkningsmedel och f lja instruktionerna p avkalkningsmedlets...

Страница 36: ...ador som orsakas av felaktig anv ndning eller om inte s kerhetsf reskrifterna f ljs Skador p tillbeh ren inneb r inte per automatik ers ttning av hela apparaten I s dana fall ska du kontakta v r kunds...

Страница 37: ...g is met de bepalingen van deze gebruiksaanwijzing 1 Dit apparaat kan worden gebruikt door kinderen vanaf 8 jaar en ouder indien ze onder supervisie staan of gepaste instructies hebben gekregen zodat...

Страница 38: ...nnen komen met voedsel dient u de instructies in de paragraaf REINIGING EN ONDERHOUD van de gebruiksaanwijzing in acht te nemen 11 Waarschuwing Voorkom morsen op de aansluiting 12 Er bestaat een poten...

Страница 39: ...ebruik het apparaat niet zonder water om schade aan de verwarmingselementen te voorkomen 24 Mocht u de waterkoker per ongeluk zonder water inschakelen zal de droogloop bescherming de waterkoker automa...

Страница 40: ...n het niet kunnen aanraken om het kantelen van het apparaat en eventueel letsel of schade te voorkomen 33 Kom tijdens het koken van het water of net erna niet in aanraking met de stoom die uit de tuit...

Страница 41: ...ontrolelampje voor de theesoort Groen h Controlelampje voor de theesoort Zwart i Controlelampje voor de theesoort Wit j Controlelampje voor de theesoort Kruiden k Controlelampje voor de theesoort Oolo...

Страница 42: ...OSE op de rand van het deksel zich op n lijn met het teken bevindt om het deksel stevig vast te zetten 2 Plaats de waterkoker op het voetstuk en steek de stekker van het apparaat in een gepast stopcon...

Страница 43: ...hakeld U kunt op een willekeurige knop drukken om het digitaal scherm in te schakelen en de huidige temperatuur en de warmhoudtijd bekijken Het volledig warmhoudproces duurt 30 minuten De warmhoudtemp...

Страница 44: ...ale resten in het leidingwater kunnen kalkaanslag op de bodem van de waterkoker veroorzaken waardoor de werking van het apparaat minder effici nt wordt U kunt een commercieel ontkalkingsmiddel gebruik...

Страница 45: ...ik of het niet opvolgen van de veiligheidsvoorschriften zijn wij niet aansprakelijk In dergelijke gevallen vervalt iedere aanspraak op garantie Schade aan accessoires of onderdelen betekend niet dat h...

Страница 46: ...ane nieprzestrzeganiem podanych w instrukcji zalece zaniedbaniami oraz u ytkowaniem w spos b niezgodny z wymaganiami opisanymi w instrukcji 1 Pod warunkiem zapewnienia odpowiedniego nadzoru pouczenia...

Страница 47: ...ie wolno zanurza w wodzie 10 Zalecenia dotycz ce czyszczenia powierzchni maj cych kontakt z ywno ci podano w instrukcji w cz ci Czyszczenie i konserwacja 11 Ostrze enie Nale y unika rozlewanie p yn w...

Страница 48: ...za urz dzenia bez wody 24 Je eli czajnik zostanie przypadkowo u yty bez wody zabezpieczenie przed wygotowaniem wody automatycznie go wy czy W takiej sytuacji przed nalaniem wody i ponownym jej zagotow...

Страница 49: ...zajnika i uszkodzeniu go lub obra eniom 33 Podczas gotowania wody oraz tu po jej zagotowaniu nale y unika kontaktu z par wydobywaj c si z dziobka czajnika 34 Podczas nalewania wody do gor cego urz dze...

Страница 50: ...ki nastawiania temperatury 6 Przycisk herbaty g Kontrolka rodzaju herbaty zielona h Kontrolka rodzaju herbaty czarna i Kontrolka rodzaju herbaty bia a j Kontrolka rodzaju herbaty zio owa k Kontrolka r...

Страница 51: ...y znak ZAMKNI TE na obrze u przykrywki znalaz si naprzeciw znaku 2 Postawi korpus czajnika na podstawce zasilaj cej i w o y wtyczk przewodu zasilaj cego urz dzenie do odpowiedniego kontaktu elektryczn...

Страница 52: ...trzymywania temperatury Na wy wietlaczu cyfrowym rozpocznie si odliczanie czasu i po ok 20 sekundach wy wietlacz zga nie Wci ni cie dowolnego przycisku pozwala ponownie w czy wy wietlacz w celu sprawd...

Страница 53: ...zykrywki czajnika nie wolno zanurza w wodzie nale y j tylko wyciera wilgotn ciereczk 5 Gdy czajnik nie jest u ywany przew d zasilaj cy mo na schowa pod podstawk zasilaj c Usuwanie osad w mineralnych C...

Страница 54: ...nosi odpowiedzialno ci za szkody materia owe ani obra enia cia a spowodowane niew a ciw obs ug urz dzenia i nieprzestrzeganiem instrukcji obs ugi Uszkodzenie akcesori w nie oznacza bezp atnej wymiany...

Страница 55: ...54 Russian 1 8 2 8 3 8 4...

Страница 56: ...55 5 6 7 8 9 10 11 12 13 14 15 16...

Страница 57: ...56 17 18 19 20 21 22 23 24 25 26 27 28...

Страница 58: ...57 29 30 31 32 33 34 35 36...

Страница 59: ...58 WK 122248 RU 1 2 3 4 5 6 7 8 1 ON OFF 2 a Strong b Medium c Mild d Custom 3 4 e f 5 6 g Green h Black i White j Herbal k Oolong l Custom 7 8...

Страница 60: ...59 1 7 0 5 1 0 0 5 1 1 2 3 70 100 0 00 4 ON OFF 5 20 2 1 2 3 TEA Green Black White Herbal Oolong TEA Custom 70 100 4 Strength Strong Medium Mild Strength Custom 0 10 5 ON OFF 6 0 00 20...

Страница 61: ...80 100 3 85 4 100 5 90 4 Medium 80 3 100 2 85 3 100 4 90 3 Mild 80 2 100 1 85 2 100 3 90 2 1 3 1 4 AUTO START 2 AUTO START CURRENT TIME START TIME Current Time Start Time 24 ON OFF 20 Keep warm 20 30...

Страница 62: ...61 20 1 2 3 4 5 1 3 2 A 1 2 3 5 1 2...

Страница 63: ...62 3 4 5 220 240V 50 60Hz 1850 2200W 2 2012 19 EU Emerio Holland B V Zomervaart 1A 2033 DA Haarlem The Netherlands T 31 0 23 3034369 E info nl emerio eu...

Отзывы: