background image

CHAPTER

TWO

INSTALLATION

2.1 ATTENTION

• Do not power on the PCS Ground Station without connecting the antenna.
• Do not start a mission without having a charged battery.
• Make sure the distance between ground end and air end is over 5m.
• Guarantee that no obstacles will interrupt Radiolink LOS.
• Port RS232 has possible connections in both external harnesses (68 pin) and Expansion Bay (16 pin). CAUTION:

only one of both can be used. They drive to the same input channel, but this configuration is thought to ease the

connection of any device from the Expansion Bay if needed.

• Port RS-485 is used by default by the Veronte BCS for Ethernet connection. Please contact us before using it for

other purposes.

• Only one dhcp device connection can be done simultaneously. If more than one is meant to be connected, then

it is needed to configure a Static IP, as established in Operation section.

• Veronte PCS is IP54 protected while closed. However, it loses its water resistance meanwhile the outer cover is

open.

• Do not break warranty seals. Please contact us before doing it.
• Keep the PCS in a position where the GPS antenna is facing to the free sky for better satellite view.
• Do not cover the pressure purge in order to ensure the correct flow of the system
• Avoid shocks during transportation or operation, some of the components could suffer damage.

Warning:

For safer operations, it is recomended to operate the Veronte PCS connected to an external power

source, using the internal battery as back-up.

Warning:

Do not forget to connect RF antenna before powering up!!!!

11

Содержание Veronte PCS

Страница 1: ...Veronte PCS Embention Apr 21 2022 ...

Страница 2: ......

Страница 3: ...agram 12 2 3 Pinout 12 2 4 Mechanical installation 15 3 Operation 21 3 1 ON OFF 21 3 2 Battery Charge 21 3 3 How to operate 22 3 3 1 Computer Connection 22 3 3 2 Joystick Connection 23 3 3 3 Tracking Antenna Connection 24 3 3 4 Ethernet Internal Device Connection 24 3 3 5 Troubleshooting 24 3 4 Advanced Wi Fi Configuration 26 4 Maintenance 27 4 1 Preventive Maintenance 27 4 2 Corrective Maintenanc...

Страница 4: ...ii ...

Страница 5: ... for customer electronics installations Easy maintenance 2 hours of battery life Battery over discharge protection 1 2 Mechanical Specifications PCS Weight 5 9Kg max depending on version PCS Pole Weight 20 4Kg max depending on version Operating temperature 20 to 60 C Environmental proteciton IP54 Transport case Rugged plastic case quad track wheels pressure purge valve side handles and carry handl...

Страница 6: ...2 Frequencies 400MHz 900MHz or 2 4GHz depending on version RF1 and RF2 Impedance 50 Ohm GNSS 1 Integrated GNSS antenna 40dB Gain covering GPS QZSS L1 GLONASS G1 Galileo E1 BeiDou B1 as well as SBAS GNSS 2 SMA female connector for secondary GNSS antenna Expansion bay I O RS232 CAN and Ethernet External I O 1x USB 2x CAN ports Ethernet 16x PWM PPM 4x ADCs and 1x I2C Expansion bay power outputs 3 3V ...

Страница 7: ...omponents Interface dimensions Veronte PCS is supplied together with a telescopic foldable mast that can be extended up to 3m Next you can find the maximum and the minimum dimensions of the system when installed 1 4 Dimensions 3 ...

Страница 8: ...Veronte PCS Fig 2 System Dimensions 4 Chapter 1 Technical ...

Страница 9: ...o No antenna Veronte PCS Control Station Datalink DT 2 4GHz 5W Video TM TC V2 0 2 4GHz Yes 5W Yes Yes 15dBi Veronte PCS Control Station Datalink MH 2 4GHz 10W TM TC V2 0 2 4GHz Yes 10W Yes No 15dBi Veronte PCS Control Station Datalink MH 2 4GHz 10W Video TM TC V2 0 2 4GHz Yes 10W Yes Yes 15dBi Veronte PCS Control Station Datalink MH 2 4GHz MIC 0 1W TM TC V2 0 2 4GHz No 100mW Yes No 15dBi Veronte P...

Страница 10: ...Veronte PCS 1 6 Interfaces Fig 4 PCS Interfaces Parts identification 6 Chapter 1 Technical ...

Страница 11: ...Veronte PCS Fig 5 PCS Interfaces Parts identification 1 6 Interfaces 7 ...

Страница 12: ...nector B Integrated GNSS antenna C RF 1 antenna SMA female D RF 2 antenna SMA female E GNSS 2 antenna SMA female F Connector for Expansion Bay G Ethernet connector H Wifi antenna connector SMA female RP I Hand carrier J Expansion Bay K Automatic pressure purge 8 Chapter 1 Technical ...

Страница 13: ...Connection harness 1 Veronte Control station Power source euro plug 1 5m ethernet extension cable 1 5m USB A extension cable 1 5m joystick extension cable 1 Expansion Bay Male Connector FGG 2B 316 CLAD72Z 1 Rugged transport case 1 High Gain Antenna 1 RF Cable N Male to SMA LMR 195 410mm 1 Datalink not always depending on variant 1 Amplifier not always depending on variant 1 7 Part list 9 ...

Страница 14: ...Veronte PCS 10 Chapter 1 Technical ...

Страница 15: ...it for other purposes Only one dhcp device connection can be done simultaneously If more than one is meant to be connected then it is needed to configure a Static IP as established in Operation section Veronte PCS is IP54 protected while closed However it loses its water resistance meanwhile the outer cover is open Do not break warranty seals Please contact us before doing it Keep the PCS in a pos...

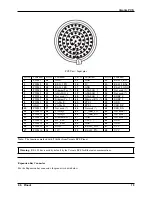
Страница 16: ...e PCS 2 2 Basic Connection Diagram Fig 1 Basic Connection Diagram 2 3 Pinout PCS Harness connector The 68 pin main connector has the distribution of input output channels as follows 12 Chapter 2 Installation ...

Страница 17: ...42 FTS_1 59 GND 9 GND 26 CANA_N 43 FTS_2 60 USB_DP 10 PWM 9 27 Not used 44 Not used 61 USB_DN 11 PWM 10 28 CANB_P 45 V_ARB_TX 62 Not used 12 PWM 11 29 CANB_N 46 V_ARB_RX 63 Not used 13 PWM 12 30 Ethernet Rx 47 GND 64 Not used 14 PWM 13 31 I2C_SCL 48 VCC 65 GND 15 PWM 14 32 I2C_SDA 49 GND 66 GND 16 PWM 15 33 GND 50 RS 485_TX 67 VCC 17 PWM 16 34 3 3V 51 RS 485_TX 68 VCC Note The functions marked wit...

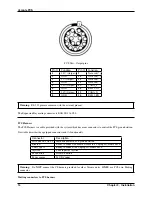
Страница 18: ...ith the system which has many connectors to control the PCS ground station Next table describes the equipped connectors and its functionality Connector Description FGW LM 368 XLCT Main connector to PCS ground station Ethernet Ready to connect an Ethernet cable to a Laptop or Veronte MCS USB Type A Ready to connect to a Laptop or Veronte MCS Joystick PPM input for Joystick Push button ON OFF button...

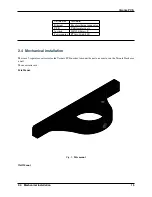
Страница 19: ...stick HI J35S Screw F Power source PT06A 10 6S 005 2 4 Mechanical installation There are 2 separate accessories for the Veronte PCS in order to mount the unit on a mast or on the Veronte Tracker or a wall The accessories are Pole Mount Fig 2 Pole mount Wall Mount 2 4 Mechanical installation 15 ...

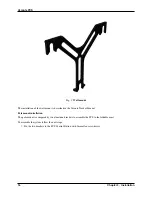
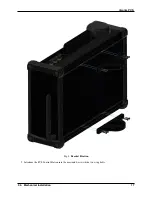
Страница 20: ...eronte Tracker Manual Pole mount installation The pole mount is composed by two aluminun brackets to assemble the PCS to the foldable mast To assemble the system follow the next steps 1 Fix the two brackets to the PCS Control Station with 2mm allen screw driver 16 Chapter 2 Installation ...

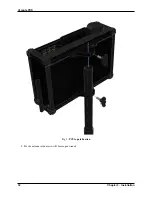
Страница 21: ...Veronte PCS Fig 4 Bracket Fixation 2 Introduce the PCS Control Station into the mast and fix it with the two wing bolts 2 4 Mechanical installation 17 ...

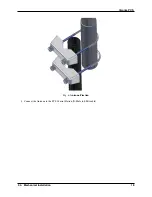
Страница 22: ...Veronte PCS Fig 5 PCS to pole fixation 3 Fix the antenna to the mast with 13mm open wrench 18 Chapter 2 Installation ...

Страница 23: ...Veronte PCS Fig 6 Antenna Fixation 4 Connect the Antenna to the PCS Control Station N Male to SMA cable 2 4 Mechanical installation 19 ...

Страница 24: ...Veronte PCS 20 Chapter 2 Installation ...

Страница 25: ...power supply during the operation without turning off the system In case of external power supply desconnection the smart battery managment system will switch automatically from external power supply to the internal battery In order to have a redundant power supply during operation and ensure the robustness of the system it is recommended to use always the external power supply so the internal bat...

Страница 26: ...S communication disabling 2 4GHz if interferences are noticed First of all a connection between the Control Station Veronte MCS Computer etc and the Veronte PCS is needed For that the two available options are Wi Fi or Ethernet If connecting through Ethernet step 2 does not apply If connecting through Wi Fi search for the PCS according to the indicated network name from the identification badge na...

Страница 27: ...n Joystick connection is preconfigured on the main external connector Pin 55 EQEP_A CAP 1 Wireless joystick connection is also possible with the installation of a joystick receiver on the Expansion Bay Expansion Bay joystick input pin 8 for PPM or pin 9 for SBUS can be activated from Veronte PIPE Setup Devices Others Digital Input Manager 3 3 How to operate 23 ...

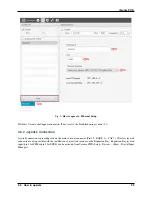
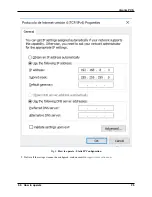
Страница 28: ...ext ipconfig Check that IPv4 Address is 192 168 8 3 Now there exists 2 options if the IP is ok ensure to make a total charge of the battery If the IP is not the same The IP can be reserved for another device which has been connected recently Wait for 2 minutes to free the IP disconnect any other device from the PCS that could be interfering If there has not been any other device connected recently...

Страница 29: ...Veronte PCS Fig 4 How to operate Static IP Configuration 2 If after all these steps it cannot be configured send an email to support embention com 3 3 How to operate 25 ...

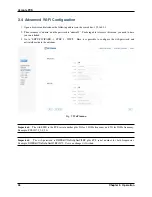
Страница 30: ...d 3 Go to SETUP WIZARD STEP 3 WIFI Here it is possible to configure the wifi password and activate deactivate the antennas Fig 5 Wi Fi menu Important The wifi SSID is the PCS serial number plus 2G for 2 4GHz frequency and 5G for 5GHz frequency Example PCS10172_2 0_2G Important The wifi password is DHPKhO7X6Ne0qNm0f2RS plus PCS serial number for both frequencies Example DHPKhO7X6Ne0qNm0f2RS10172 Us...

Страница 31: ... turns off 2 Check all connectors in case of abnormality or damage please contact us for replacement 3 Attach all protection cups to all connectors in order to keep them free of dust 4 Store the system in the supplied rugged case 5 It is a good praxis to clean all connectors with a good contact cleaner after working in adverse conditions 4 2 Corrective Maintenance Battery If battery needs to be re...

Страница 32: ...Veronte PCS Fig 1 Remove screws and cups 2 Unscrew the 4 screws with a 2mm allen crew driver and remove the protective plate 28 Chapter 4 Maintenance ...

Страница 33: ...Veronte PCS Fig 2 Remove screws and protective plate 3 Unscrew the 2 screws with a 2mm allen screw driver and remove the battery holder bar 4 2 Corrective Maintenance 29 ...

Страница 34: ...Polígono Industrial Las Atalayas C Chelín Nº 16 CP 03114 Alicante España Veronte PCS is a rugged control station hardware designed for outdoors use The aluminium enclosure with IP54 protection permits the operation of the system in all weather conditions by protecting the datalink and other electronics from rain and harsh environments The whole system is delivered in a wheeled rugged case for easy...

Страница 35: ... setup permits the installation of the Veronte PCS init installing the datalink and sensors in the open field maximizing the performance of the GNSS receivers and the datalinks at the time that the operator can operate from a protected location from the Veronte MCS 4 3 Contact data 31 ...

Страница 36: ...Veronte PCS Fig 4 Basic Features Veronte PCS 32 Chapter 4 Maintenance ...

Страница 37: ...sensors and devices integrated and the required wires to connect it to any other Veronte device tracker MCS The main applications that can be develop with this system are Mapping and photogrammetry Surveillance Environmental control and research Firefighting 4 3 Contact data 33 ...

Отзывы: