background image

23

EGES14020T man v.190417

Operating Instructions

6. 

INSTALL APPROPRIATE ASME-CODE 

SAFETY VALVES  

and make sure piping system 

is equipped with adequate condensate drains.

Piping / Tank Installation

Never install a shut-off valve 

such as a globe or gate valve, 

between the pump discharge 

and the air tank unless a safety 

valve is installed in the line 

between valve and pump.

7. 

MAKE SURE  

any tube, pipe or hose connected 

to the unit can withstand operating temperatures 

and retain pressure.

Never use plastic (PVC) pipe 

for compressed air.  

Serious injury or death could 

result.

8. 

NEVER USE REDUCERS IN DISCHARGE 

PIPING.  

Keep all piping and fittings the same 

size in the piping system.

9. 

FOR PERMANENT INSTALLATIONS OF 

COMPRESSED AIR SYSTEMS, DETERMINE 

TOTAL LENGTH OF SYSTEM AND SELECT 

CORRECT PIPE SIZE.  

Make sure underground 

lines are buried below frost line and avoid areas 

where condensation could build up and freeze.

10. 

TEST THE ENTIRE PIPING SYSTEM  

before 

any underground lines are buried. Be sure to find 

and repair all leaks before using compressor.

Never exceed recommended 

pressure or speed while 

operating compressor.

Re-install the beltguard on 

unit after pump installation is 

complete.

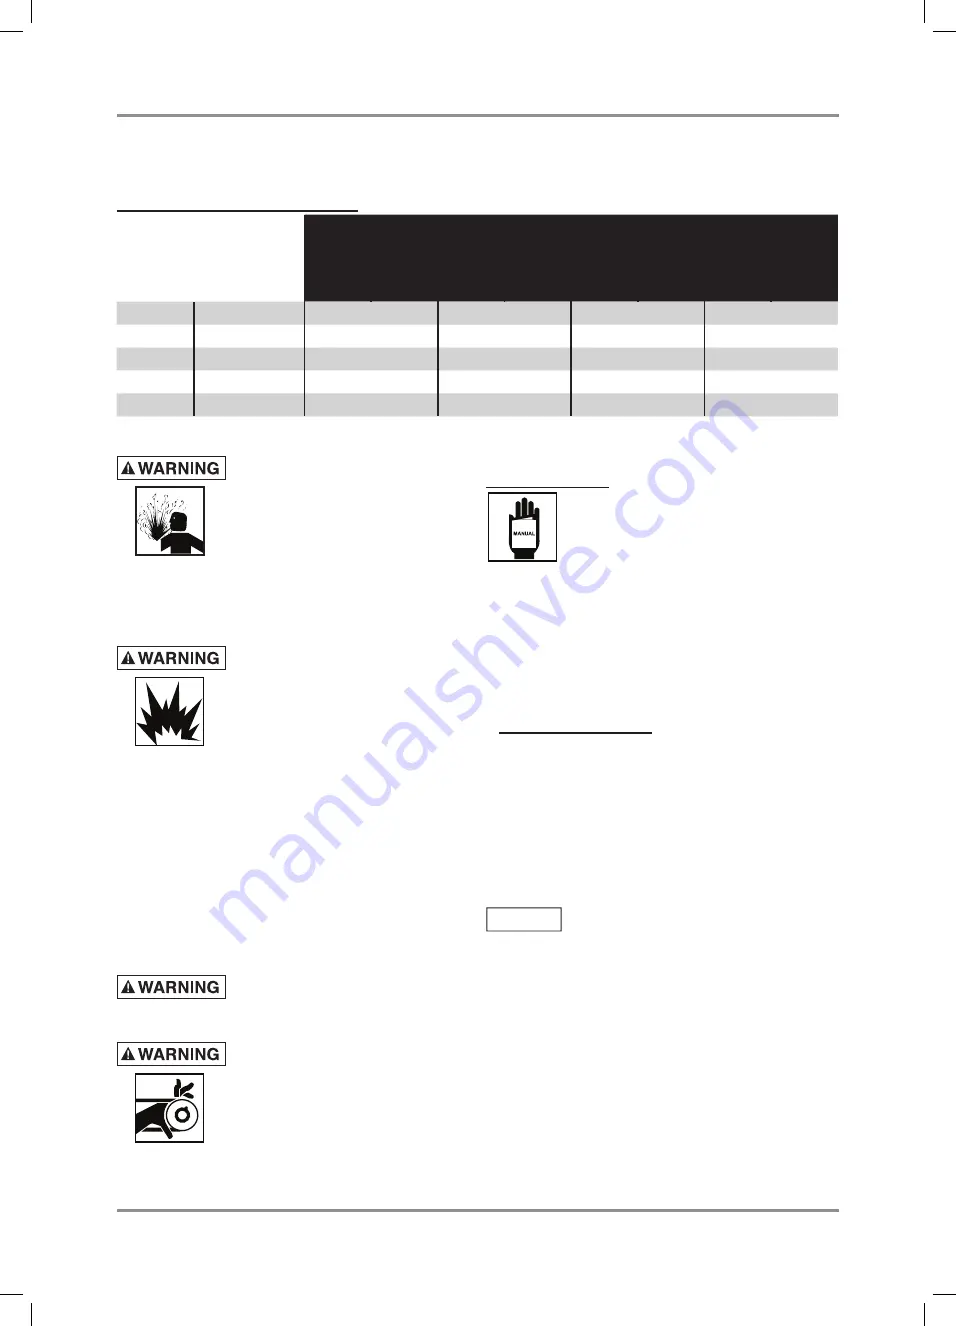
Minimum Pipe Size 

for Compressed Air 

Lines 

Length of Piping System

Standard air volume

25 ft.

7.6 m

50 ft.

15.2 m

100 ft.

30.5 m

2

50 ft.

76.2 m

20 CFM

566.34 L/min

3/4 in.

3/4 in.

3/4 in.

1 in.

40 CFM 1132.67 L/min

3/4 in.

1 in.

1 in.

1 in.

60 CFM 1699.01 L/min

3/4 in.

1 in.

1 in.

1 in.

100 CFM 2831.68 L/min

1 in.

1 in.

1 in.

1-1/4 in.

125 CFM 3539.61 L/min

1-1/4 in.

1-1/4 in.

1-1/4 in.

1-1/2 in.


Lubrication

Be sure the engine is supplied with the 

correct lubricating oils in the correct 

places as mentioned in the engine 

manual:

1.  Engine crankcase lubricant: 10W-30 high quality 

detergent oil is a good most-cases choice. Check 

the maintenance section of the Kohler engine 

service manual for details. Be sure the crankcase 

is filled to the appropriate mark on the oil dipstick, 

not overfilled. It should be changed out after the 

engine break-in period, i.e. after the first five 

hours.

Low-oil shutdown

The low-oil shut-down feature on this piece of 

machinery applies only to the gas engine. It is 

intended to prevent accidental running of the engine 

when the oil is insufficient to lubricate it properly 

and cause it to over-heat. However, this does not 

mean the operator should not always keep watch 

on the engine oil level. Do not rely on Oil Sentry™ 

to shut the engine down. In addition, there is also a 

continuing need to monitor and maintain oil levels in 

the reduction gearing and in the compressor pump. 

The low-oIl switch is designed to 

prevent engine from starting in a 

low oil or no oil condition. Oil Sentry™ may 

not shut down a running engine before 

damage occurs.

2.  Oil-bath air cleaner: Check oil level in oil reservoir 

cup; add oil if below oil level mark; do not overfill. 

Use the same oil as for the engine crankcase.

Be sure the compressor pump is lubricated correctly. 

This unit is shipped with compressor pump break-in 

oil and should be ready to operate. 

3.  Check the oil level. It should show in center of the 

compressor pump oil sight glass

. Refer to JF, fig.6 

and fig.8, below.

NOTICE

Содержание EGES14020T

Страница 1: ...anufactures products for safe operation However operators and maintenance persons are responsible for maintaining safety All safety precautions are included to provide a guideline for minimizing the possibility of accidents and property damage while equipment is in operation Keep these instructions for reference ...

Страница 2: ...ng 17 Wiring 17 Specific Areas of Danger 17 Electrical Shock 17 Fumes and Gases 18 Flash Hazards UV and IR Arc Rays 19 Fire Hazards 19 Hot Materials 20 Electromagnetic Fields 21 Sources of Welding Safety Standards Info 21 Unpacking 22 Lifting this equipment 22 Placement 22 Piping Tank Installation 23 Lubrication 23 Minimum Pipe Size for Compressed Air Lines 23 Battery Set up and connections 24 Gro...

Страница 3: ... maintenance Dual roller bearings Dual belt drive 100 rebuildable 4 piston ring design for low 1 to 5 micron oil carry over Air production 175 psi 16 8 scfm 475 72 l min Max pressure 175 psi 1206 58 kPa Air Reservoir Tanks 2 x 10 gal 2 x 37 85 liters Total 20 gal 70 71 liters Generator 120 volts AC 60 Hz 20 amps 240 volts AC 60 Hz 20 amps 12 volts DC 8 3 amps Peak 5500 watts Continuous 5000 watts ...

Страница 4: ...n provide an air volume of 16 8 scfm at 175 psi and with a 20 gallon reservoir The generator produces 5000 continuous watts 5500 peak watts of AC electrical power Its electrical output will enable 190 amp DC stick welding with an 80 duty cycle Please use the photos below opposite and on the following pages to familiarize yourself with the various functions and locations of the salient parts of thi...

Страница 5: ...elder interface panel I Compressor pump air filter J Compressor pump details K Bumper lift handle L Generator M Wheel 2 Key Letter Description N Welding ground lead clamp O Welding electrode holder P Air tanks Q Compressor pump flywheel drive pulley R Belt guard S Muffler assembly T Drive belts U Generator drive pulley V Engine valve cover W Electric starter X Gear reduction system Y Lifting point...

Страница 6: ...ails Functional Description FA FB FC FD FF FE fig 3 Detail of Air Delivery Cluster Key Letter Description FA Safety valve FB Left air supply pressure gauge FC Supply pressure regulator Key Letter Description FD Left air supply quick connect FE Right air supply quick connect FF Right regulated pressure gauge ...

Страница 7: ...N Drain plug GO Gear box dipstick GQ Oil level Drain plug 2 x GR Oil fill plug 2 x GS Muffler assembly HC HD HB HE HF L HG HH HI HA fig 5 Generator Welder Panel details Key Letter Description HA Dual circuit breakers HB 20 amp 115 230 volt power supply for twist lock plug HC 115 volt power supply duplex socket HD Fuse HE 12 V DC negative black terminal HF 12 V DC positive red terminal L Alternator...

Страница 8: ...Functional Description Key Letter Description JA Pilot valve pressure relief JB Oil regulator JC Oil pump JD Oil pressure gauge JE Safety valve Key Letter Description JF Compressor sump oil fill JG Compressed air output tube JH Compressor pump oil sight glass JI Compressor pump reusable screen oil filter JJ Oil drain ...

Страница 9: ...to the State of California to cause cancer and birth defects or other reproductive harm For more information go to www P65Warnings ca gov This product when used for welding or cutting produces fumes or gases which contain chemicals known to the State of California to cause DANGER WARNING CAUTION NOTICE WARNING DANGER birth defects and in some cases cancer California Health and Safety Code Section ...

Страница 10: ... brings a particular set of safety considerations into play primarily dictating outdoor use only 1 FOLLOW all the gasoline engine manufacturer s instructions guidelines and recomendations which come in a manual separate from this one 2 CHOOSE A SUITABLE SITE FOR YOUR COMPRESSOR WELDER GENERATOR to prevent possible death from carbon monoxide poisoning injury from fire or explosion hot surfaces and ...

Страница 11: ...ID LOCATION WITH DUSTY DIRTY CONDITIONS Do not allow debris to accumulate or block airflow 2 THE LOCATION SHOULD ALLOW FOR ADEQUATE UNOBSTRUCTED AIRFLOW for cooling and combustion air 3 DO NOT INSTALL IN SMALL ENCLOSED AREAS without an ample circulation of supply air 4 DO NOT OPERATE WITH A TARP BLANKET OR COVER surrounding the machine 5 DO NOT PLACE ANY OBJECTS AGAINST OR ON TOP OF THE UNIT Exhau...

Страница 12: ...NTENANCE ACCESS Mount unit with pulley towards wall and leave a minimum of 15 inches 38 1 cm of clearance 2 USE SHIMS TO LEVEL THE UNIT IF INSTALLATION AREA IS NOT FLAT This will avoid excessive vibration and premature pump wear CAUTION DO NOT install compressor in boiler room paint spray room or area where sandblasting occurs Make sure inlet air is away from exhaust fumes or other toxic noxious o...

Страница 13: ...ck or other enclosed area be sure to vent exhaust fumes away from operating area Gasoline powered motors will develop hydro carbons which can be fatal if inhaled Prevent electric shock Always ground the generator directly from its frame or its grounding lug gg fig 9 to a proper physical electrical ground or to the vehicle frame Bed liners pallets as well as some of the vehicle s running gear may f...

Страница 14: ...FOR USE section 12 GENERATOR SHOULD ONLY BE PLUGGED INTO ELECTRICAL DEVICES either directly or with an extension cord NEVER connect to a building electrical system without a qualified electrician Such connections must comply with local electrical laws and codes Failure to comply can create a backfeed which may result in serious injury or death to utility workers 13 USE A GROUND FAULT CIRCUIT INTER...

Страница 15: ... removing starter keys 9 STORE THE WELDER OUT OF THE REACH of children and infirm people when not in use 10 ALWAYS DISCONNECT the equipment from the power supply when leaving it unattended Never leave the equipment running unattended Switch it off and do not walk away until it comes to a complete stop Always be sure the welding area is secured and free of potential hazards sparks flames glowing me...

Страница 16: ... in force in your area Equipment Use and Safety 1 THE TOOL MUST BE FULLY ASSEMBLED before connecting it to a power supply 2 KNOW YOUR EQUIPMENT Read and understand the owner s manual and the labels attached to the tool Learn its application and limitations as well as the specific potential hazards peculiar to this tool 3 HAVE A QUALIFIED PERSON who can install and earth the welder according to all...

Страница 17: ...T WELD FROM AN AWKWARD POSITION Maintain a secure stance while welding to prevent accidents If you are working above ground wear a safety harness to prevent injury from possible falls 4 DO NOT DRAPE OR COIL WELDING CABLES over or around your body 5 WEAR A NON FLAMMABLE FULL COVERAGE HELMET WITH LENS OF AN APPROPRIATE SHADE see ANSI Z87 1 safety standard that will cover the face and neck as far as ...

Страница 18: ...DS FOR ANY EXPOSED WIRE and If found replace any cracked abraded or damaged parts such as welding cables power cord or electrode holder that are insulated or act as insulators IMMEDIATELY using only recommended replacement cables and cords 19 NEVER ATTEMPT ANY REPAIRS OR MAINTENANCE on the welder while it is connected to power 20 ALWAYS ATTACH GROUND CLAMP TO THE WORKPIECE OR WORK TABLE AS CLOSE T...

Страница 19: ...nd do not strike a welding arc until all bystanders and you the operator have welding shields and or helmets in place Use a lens that meets ANSI standards and safety glasses with side shields For welders such as this one above 160 Amps use a shade 12 Under 160 Amps output use a shade 10 lens Refer to the ANSI standard Z87 1 for more information 3 DO NOT USE A CRACKED OR BROKEN HELMET Replace it an...

Страница 20: ...RT CUFFLESS TROUSERS HIGH TOPPED SHOES HELMET AND CAP If necessary additional protective clothing such as leather jacket or sleeves fire resistant leggings or apron can be brought into play Hot sparks or metal can lodge in rolled up sleeves trouser cuffs or pockets Sleeves and collars should be kept buttoned closed and no pockets should be on the shirt front 10 DO NOT WEAR GLOVES OR OTHER CLOTHING...

Страница 21: ...w York NY 10036 Tel 212 642 4900 Fax 212 398 0023 www ansi org NFPA STANDARD 51B CUTTING AND WELDING PROCESS available from National Fire Protection Association 1 Batterymarch Park P O Box 9101 Quincy MA 02269 9101 Tel 617 770 3000 Fax 617 770 0700 www nfpa org OSHA STANDARD 29 CFR PART 1910 SUBPART Q WELDING CUTTING AND BRAZING available from your state OSHA office or from U S Dept of Labor OSHA ...

Страница 22: ...lacement Locate the unit as close to where air electrical power or welding is needed as is practical while keeping in mind the dangers and cautions presented in the preceding safety sections Install this unit in a clean dry and well lit area Be sure installation area can maintain a temperature range between 35º and 110º F 2º and 43º C The maximum allowable angle of operation for the engine is 25 I...

Страница 23: ... min 1 in 1 in 1 in 1 1 4 in 125 CFM 3539 61 L min 1 1 4 in 1 1 4 in 1 1 4 in 1 1 2 in Lubrication Be sure the engine is supplied with the correct lubricating oils in the correct places as mentioned in the engine manual 1 Engine crankcase lubricant 10W 30 high quality detergent oil is a good most cases choice Check the maintenance section of the Kohler engine service manual for details Be sure the...

Страница 24: ...s not running Connecting Battery 1 The battery must be fully charged before use 2 Use the supplied cables to connect to the battery 3 You ll find the red positive cable connected to the starter solenoid on engine 4 The black negative cable is connected to one of the engine bolts 5 Connect other end of red positive cable to positive battery terminal 6 Connect other end of black negative cable to ne...

Страница 25: ...ssed air discharge If the machine is installed in an enclosed area be sure to vent the relief valve outside of the structure or to an unoccupied area 11 DO NOT use air tools that are rated below the maximum rating of the compressor Select air tools air hoses pipes valves filters and other fittings accordingly DO NOT exceed manufacturer s rated safe operating pressures for these items 12 Make sure ...

Страница 26: ...For engines that are already warm place lever in half choke or run position 12 Turn the key or pull recoil start handle to start engine 13 After unit is warm put the compressor pressure relief valve back into run position fig 13 Engine Throttle Make sure when starting the engine to set the engine throttle to the 1 4 postion Unit is equipped with a centrifugal clutch that engages and disengages bas...

Страница 27: ... system before attempting to install service relocate or perform ANY maintenance 1 Before working on the engine or the connected equipment disable engine as follows 1 Disconnect spark plug lead 2 Disconnect negative battery cable from battery 3 Turn the engine key switch off and remove key from compressor 4 Close the shut off valve block valve between receiver and compressor or receiver and air sy...

Страница 28: ...or pump oil level F F Check for unusual operation and correct before damage occurs F F Check safety valve operation F F Drain air receiver and traps of condensate After first 5 hours F F Change engine oil Weekly F F Clean compressor pump air filter F F Check for unusual operation and correct before damage occurs F F Generally clean external parts of compressor and engine After first 50 hours or 30...

Страница 29: ... lost and air system components could fail with catastrophic results 2 Inspect the entire air system both on this unit and downstream for leaks using soapy water do this to ensure the compressor does not run beyond its duty cycle due to air leaking somewhere in the system 3 Check tension on all the belts done primarily to ensure the belts do not fail pre maturely due to slippage but also to ensure...

Страница 30: ...ter 6 Replace air filter 7 Application exceeds rated air output of compressor 7 Check CFM requirements change tool or use compressor with higher air output Excessive vibration 1 Improper compressor mounting 1 Ensure tank is located on properly sized rubber padding 2 Loose drive pulleys 2 Ensure drive pulleys fit snugly shaft keys are functioning correctly and there is no slippage or wobble 3 Loose...

Страница 31: ...l and to maintain clean filters Exceeding 70 duty cycle resulting in overheating and excess wear and tear Exposing electrical components to rain or water Installing in hostile environments such as acid vapors or any caustic or abrasive matter that could be ingested into the pump Repairs due to Installing unit in an enclosed area where lack of cooling ventilation is present where ambient air exceed...

Отзывы: