background image

USB


HDMI

VGA 

PC

Audio 

Video 

Headphone 

RF

DC


IN

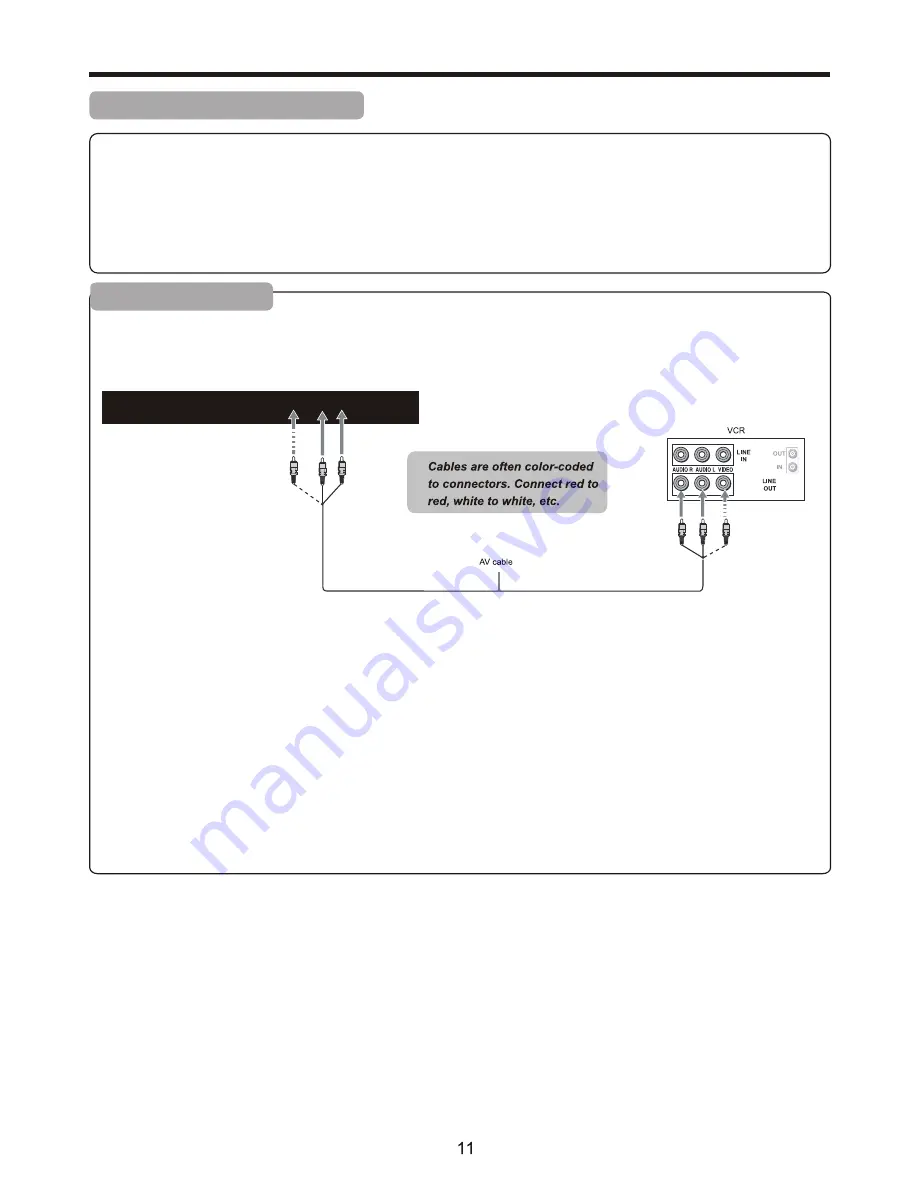
How to connect:

Connect the Audio/Video cables between the Audio (L/R)/Video jacks on the unit and VCR.

To play VCR

1. Turn on your TV, then press 

SOURCE 

button. The 

INPUT SOURCE 

menu opens.

2. Press 

 or 

▼ 

to select 

AV

, then press 

ENTER 

to confirm.

3. Turn on your VCR , insert a videotape and press the 

Play 

button.

Connections

Cautions Before Connecting

●  Carefully check the terminals for position and type before making any connections.

●  The illustration of the external equipment may be different depending on your model.

●  Loose connectors can result in image or colour problems. Make sure that all connectors are securely inserted into

     their erminals.

●  Refer to the operating manual of the external device as well.

●  When connecting an external device, turn the power off to avoid any issues.

Connecting a VCR

TV REAR

Содержание ETD199

Страница 1: ...19 HD LED TV with DVD User Manual Before connecting operating or adjusting this product please read the manual completely Please keep this manual for future reference MODEL ETD199...

Страница 2: ...ts Important Safety Instructions 1 Important Notice 4 Preparations 5 Identification of Controls 7 Connections 11 Basic Operations 14 Getting Started 15 Troubleshooting 24 Specifications 26 27 Wall mou...

Страница 3: ...e liquid cleaners or aerosol cleaners Use a damp cloth for cleaning 7 Ventilation Do not block any ventilation openings Install in accordance with the manufacturer instructions The vents and other ope...

Страница 4: ...r or those with the same characteristics and performance as the original parts Use of unauthorized parts can result in fire electric shock and or other danger 17 Overloading Do not overload wall outle...

Страница 5: ...nt and easily accessible Use only the power cord designated by our dealer to ensure safety and EMC When connecting other products such as VCRs and personal computers you should turn off the power of t...

Страница 6: ...evel B Do not display the fixed image for extended periods of time C Turn the power off when not in actual use Important Information Regarding Use of Video Games Computers Captions or Other Fixed Imag...

Страница 7: ...to shock In addition do not expose the remote control to liquids and do not place in an area with high humidity Do not install or place the remote control under direct sunlight The heat may cause defo...

Страница 8: ...upon your particular area Power Connection Note Insert the AC plug into a conveniently located AC outlet This product should be operated only from the type of power source indicated on the marking lab...

Страница 9: ...s serve as up down buttons 5 VOL Press the VOL or VOL button to directly increase or decrease the sound volume level In menu operations these buttons serve as right left buttons 6 OPEN COLSE in DVD mo...

Страница 10: ...es such as VCR or DVD player or Wii Connect the yellow for video and the red white for audio Audio output is shared with Component 7 HDMI HDMI connects to devices that use HDMI cable such as Blu ray o...

Страница 11: ...eturns to the previous channel 9 GUIDE Opens the current digital channel information guide antenna only 10 INFO Shows the display information 11 THUMBSTICK p q t u ENTER Allows you to navigate the on...

Страница 12: ...s this button to go to the DVD source 2 27 Play pause button in DVD mode 28 Stop button in DVD mode 29 REPEAT Press this button for repeat the program 0 A B Press this button for repeat play point A a...

Страница 13: ...pe and press the Play button Connections Cautions Before Connecting Carefully check the terminals for position and type before making any connections The illustration of the external equipment may be...

Страница 14: ...input jacks on the unit and AUDIO output jacks on the device To play component video from an external device 1 Turn on your TV then press SOURCE button The INPUT SOURCE menu opens 2 Press or to select...

Страница 15: ...cable analog RGB How to connect a device using HDMI Connection Connect the HDMI cable between the HDMI interface on the unit and HDMI output on the device To play from the device using HDMI 1 Turn on...

Страница 16: ...button on the remote control to turn off the unit and put the unit in standby mode To cut off the power completely please disconnect the AC power cord Note If there is no signal input for a certain t...

Страница 17: ...ess or to select your connection either AIR or CABLE 4 Use the or buttons to select AUTO CHANNEL SEARCH and pressENTER to scan for channels 5 Once the scanning finishes you can begin to watch TV CHANN...

Страница 18: ...nization sleep timer and power on timer power off timer Picture SOUND CHANNEL PARENTAL SETUP OTHERS PICTURE This option allows users to adjust the TV s picture sharpness color tint and other various f...

Страница 19: ...being neutral color V ADVANCE PICTURE SETTINGS i DYNAMIC CONTRAST This feature allows the HDTV to automatically adjust the contrast of the HDTV depending on the picture you are viewing ii FILM MODE Th...

Страница 20: ...sound from left to right II SURROUND MODE This feature enables the TV two speakers to provide a wider sound effect III AVL This feature adjusts the auto volume leveler enabling volume protection from...

Страница 21: ...elect the one you want to adjust and or or OK to adjust them I CHANNEL LIST This feature gives you the list of channels currently found by the TV II FAVORITE LIST This feature gives the favorite list...

Страница 22: ...Found 0 Now Searching Please Wait 2 Retirm PARENTAL This option allows users to filter TV programs and movies while using the TV tuner To use this option you will need to enter in the password first 1...

Страница 23: ...D OPACITY This changes the transparency of background of the text D CC BACKGROUND COLOR This changes the color of the background II MENU LANGUAGE This function adjusts the language of the menu English...

Страница 24: ...fault background when there is no signal II NO SIGNAL POWER OFF This feature turns the TV off if there is no signal given to the TV after a certain time III NO OPERATIONS POWER OFF This feature turns...

Страница 25: ...Slideshow Interval 1S Slideshow Effect Off Slideshow Repeat Off Music Play Mode Once Music Play Repeat Off Music Auto Play On...

Страница 26: ...he antenna cable connections Dark poor or no picture Screen lit good sound Check the antenna cable connections Try another channel it could be station trouble No color dark picture color is not correc...

Страница 27: ...in current input mode Some items can t be accessed When the TV is in use there is a natural rise in temperature causing the cabinet to expand or contract and may be accompanied by a slight creaking n...

Страница 28: ...DVD Function General Setup...

Страница 29: ...The super password is 136900 DVD Function General Setup...

Страница 30: ...The default password is 0000 AUTO DVD Function General Setup...

Страница 31: ...ight and dimensions shown are approximate 3 Specifications and external appearance may be changed for the sake of improvement 19 inches 1366 H x 768 V 16 9 TV AV YPbPr HDMI PC Media VOL VOL CH CH MENU...

Страница 32: ...xceed 8mm Please Note The 8mm length of screw refers to how deep the screw can go inside the mounting holes When you re buying screws you should add the original 8mm to the thickness of your mounting...

Отзывы: