background image

52

E

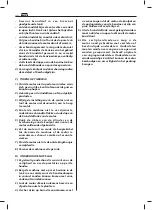
6.3 

CAMBIO DE ACEITE

Para el tipo de aceite, consulte el capítulo 8.1.


ATENCIÓN: 

 Descargue el aceite con el motor 

caliente y con cuidado de no tocar el aceite ni las 
partes del motor que están a alta temperatura.

a)  Ponga la máquina en posición horizontal.

b)  Limpie alrededor de la boca de carga y 

desenrosque el tapón con varilla (A, fig. 2).

c)  Disponga un recipiente adecuado para 

recoger el aceite y desenrosque el tapón de 
vaciado (C).

d)  Coloque el tapón de vaciado (C) con la junta 

en la posición correcta, y enrósquelo a fondo.

e)  Llene con aceite nuevo.

f )  Controle en la varilla (B, fig. 3) que el nivel del 

aceite llegue a la indicación “MAX”.

g)  Enrosque el tapón (A, fig. 2) y limpie el aceite si 

se ha derramado.

N OTA :

 La carga completa de aceite es de 

aproximadamente 2 l.

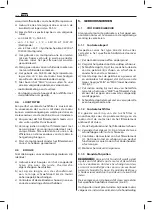
6.4 

LIMPIEZA DEL SILENCIADOR Y DEL 
MOTOR

La limpieza del silenciador se debe hacer con el 
motor frío.

a)  Limpie el silenciador y la protección con aire 

comprimido, eliminando toda la suciedad para 
evitar incendios.

b)  Compruebe que las entradas de aire de 

refrigeración no estén obstruidas.

c)  Limpie las partes de plástico con una esponja 

mojada en agua y detergente.

6.5 

MANTENIMIENTO DEL FILTRO DE AIRE

a)  Limpie alrededor de la tapa del filtro.

b)  Desenrosque los pomos (B, fig. 4) y quite la 

tapa (A).

c)  Extraiga el elemento filtrante (C, figs. 4 y 5).

d1) Limpie el prefiltro de espuma (D, fig. 5) 

estrujándolo en agua jabonosa templada, 
aclárelo y déjelo secar. Como alternativa se 
puede utilizar un disolvente no inflamable y 
dejarlo secar.  

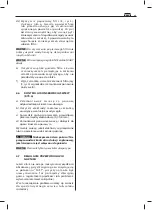
d2) Golpee el filtro de papel (E, fig. 5) sobre 

una super ficie firme o sóplelo con aire 
comprimido (a menos de 30 psi) desde 
dentro hacia fuera para eliminar el polvo y 
la suciedad. No utilice nunca un cepillo. El 
cepillado empuja la suciedad hacia dentro de 

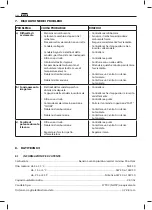
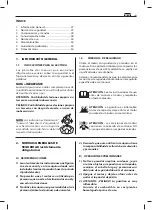
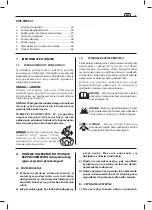
6. MANTENIMIENTO

6.1 

RECOMENDACIONES DE SEGURIDAD


ATENCIÓN: 

  Antes de comenzar cualquier 

operación de limpieza, mantenimiento o 
reparación, desconecte el capuchón de la bujía 
y lea las instrucciones. Utilice ropa adecuada 
y guantes de trabajo cuando haya riesgo 
para las manos. No realice operaciones de 
mantenimiento o reparación si no dispone de 
las herramientas y los conocimientos adecuados.

IMPORTANTE:

 Deseche el aceite usado, el 

combustible y todo otro producto contaminante 
como lo establezcan las normas.

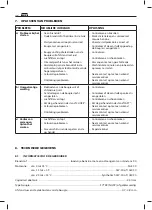
6.2 

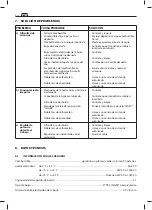
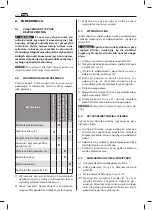
PROGRAMA DE MANTENIMIENTO

Siga el programa de mantenimiento indicado en 
la tabla, realizando las operaciones en el orden 
cronológico indicado.

Operación

A las 5 primer

as 

hor

as

C

ada 5 hor

as o tr

as 

cada uso

C

ada 50 hor

as o final 

de t

empor

ada

C

ada 100 hor

as

Control del nivel de aceite

X

Cambio de aceite (1)

X

X

Limpieza de silenciador y 
motor

X

Control y limpieza del filtro 
de aire (2)

X

Cambio del filtro de aire (2)

X

Control de la bujía

X

Cambio de la bujía

X

Control del filtro de 
combustible (3)

X

1)  C a m b i e   e l   a c e i t e   c a d a   2 5   h o r a s   s i   e l 

motor funciona a plena carga o con altas 
temperaturas.

2)  Limpie el filtro de aire con mayor frecuencia 

si la máquina se utiliza en sitios polvorientos.

3)  Se debe realizar en un centro especializado.

Содержание K 2400 ADV V-TWIN

Страница 1: ...ATOR S INSTRUCTION BOOK D BETRIBS UND WARTUNGSANLEITUNG F MANUEL D UTILISATION ET D ENTRETIEN I MANUALE USO E MANUTENZIONE NL GEBRUIKS EN ONDERHOUDSHANDLEIDING E MANUAL DE USO Y MANTENIMIENTO PL INSTRUKCJA OBSŁUGI I KONSERWACJI ...

Страница 2: ......

Страница 3: ...GB User s manual 7 D Bedienungsanleitung 15 F Manuel Utilisateur 23 I Manuale di istruzioni 31 NL Gebruikershandleiding 39 E Manual de usuario 47 PL Instrukcja obsługi 55 ...

Страница 4: ...4 ...

Страница 5: ...5 ...

Страница 6: ......

Страница 7: ... on which this engine is installed Learn how to stop the engine quickly 2 Never allow people unfamiliar with these instructions to use the engine 3 Never use the engine while people especially children or pets are nearby 4 Remember that the operator or user is responsible for accidents or hazards occurring to other people or their property B PREPARATION 1 Do not wear loose fitting clothing danglin...

Страница 8: ... fins and or the silencer guard until the engine has cooleddown 6 Stop the engine and disconnect the sparkplug cable before checking cleaning or servicing the machine or the engine 7 Do not crank the engine with spark plug removed 8 Transport the machine with empty tank D MAINTENANCE AND STORAGE 1 A routine maintenance is essential for safety and for keeping a high performance level 2 Do not store...

Страница 9: ...e is affected by a Temperature Working in low temperatures could lead to a difficult cold starting Working in very high temperatures could lead to a difficult hot starting due to the evaporation of the fuel either in the carburettor float chamber or in the pump In any case the right kind of oil must be used according to the operating temperatures b Altitude The higher the altitude above sea level ...

Страница 10: ...ing the instructions contained in the machine s Instructions Manual 5 1 4 Spark plug cap Firmly connect the cable cap to the spark plug making sure that there are no traces of dirt inside the cap and on the spark plug terminal from 5 to 35 C SAE 30 from 15 to 5 C 5W 30 or 10W 30 Multi viscosity from 25 to 35 C Synthetic oils 5W 30or 10W 30 Multi viscosity c The use of multi viscosity oils in hot t...

Страница 11: ...nual 5 6 STOPPINGTHE ENGINE AFTER MOWING a Move the throttle to SLOW b Allow the engine to run at minimum speed for at least 15 20 seconds c Stop the engine following the instructions contained in the machine s Instructions Manual d When the engine is cold disconnect thee spark plug and remove the starter key if present e Close the fuel stopcock f Remove any debris from the engine and especially a...

Страница 12: ...0 psi through the filter from the inside Never try to brush off the dirt Brushing will force dirt into the filter fibers IMPORTANT Do not use water petrol detergents or any other products to clean the cartridge IMPORTANT The sponge pre filter must NEVER be oiled e Clean the inside of the filter housing from dust and debris making sure to bloc inlet 6 MAINTENANCE 6 1 SAFETY RECOMMENDATIONS WARNING ...

Страница 13: ...odes d Install the spark plug and tighten with a socket wrench Replace the spark plug if the electrodes are burnt or if the porcelain is broken or damaged WARNING Fire hazard Do not check the ignition system with spark plug removed IMPORTANT Use only spark plugs of the recommended type 6 7 TUNING THE THROTTLE CABLE ANDTHE CARBURETTOR Should the engine not reach maximum revs with the throttle trigg...

Страница 14: ...e Centre Contact a Licensed Service Centre b Inconsistent working Dirty electrodes or incorrect gap The spark plug cap is inserted incorrectly Air filter clogged Throttle trigger in CHOKE position Fault in carburation Fault in ignition Check Check that the cap is fitted correctly Check and clean Move the lever to the FAST position Contact a Licensed Service Centre Contact a Licensed Service Centre...

Страница 15: ...UNG 1 Lesen Sie die Anweisungen in dieser Anleitung sowie die Anweisungen des Geräts in dem dieser Motor installiert ist Lernen Sie wie Sie den Motor schnell abstellen können 2 Erlauben Sie niemals Personen die nicht mit dieser Anleitung vertraut sind den Motor zu benutzen 3 Ver wenden Sie den Motor nicht in unmittelbarer Nähe von Personen besonders von Kindern oder Haustieren 4 Denken Sie daran d...

Страница 16: ...die Grundeinstellung des Motors und lassen Sie ihn nicht überdrehen 4 Kippen Sie das Gerät nicht auf die Seite um Kraftstoffaustritte aus dem Tankverschluss des Motors zu vermeiden 5 Berühren Sie die Zylinderrippen und den Hitzeschutz des Auspufftopfs erst nachdem der Motor abgekühlt ist 6 Bevor Sie das Gerät bzw den Motor überprüfen reinigen oder warten sollten Sie unbedingt den Motor abstellen u...

Страница 17: ...ein besseres Verständnis und eine sachgerechte Verwendung Ihres Motors gedacht 4 1 UMGEBUNGSBEDINGUNGEN Der Betrieb eines 4 Takt Ottomotors wird beeinflusst durch a Temperatur Das Arbeiten bei niedrigen Temperaturen kann zu Kaltstartproblemen führen Das Arbeiten bei sehr hohen Temperatur kann zu Warmstartproblemen infolge der Kraftstoffverdampfung in der Vergaserkammer oder Pumpe führen I n j e d ...

Страница 18: ...e Eigenschaften des Kraftstoffs wird auf das betreffende Kapitel verwiesen siehe 8 1 Tanken Sie bei kaltem Motor nach den Anweisungen in der Betriebsanleitung des Geräts Verwenden Sie nur hochwertiges Öl und wählen Sie die Viskositätsklasse in Abhängigkeit von der Einsatztemperatur a Verwenden Sie nur detergierendes Öl lt Klassifizierung SF SG b Wählen Sie die SAE Viskositätsklasse nach folgender ...

Страница 19: ...kunden im Leerlauf drehen c Stellen Sie den Motor lt Hinweisen in der Betriebsanleitung des Geräts ab 5 6 MOTORSTOPP NACH DEM MÄHEN a Stellen Sie den Gashebel auf LANGSAM b Lassen Sie den Motor mindestens 15 20 Sekunden im Leerlauf drehen c Stellen Sie den Motor lt Hinweisen in der Betriebsanleitung des Geräts ab d Ziehen Sie bei k altem M otor den Zündkerzenstecker und den Zündschlüssel sofern vo...

Страница 20: ... Sie den Filtereinsatz C Abb 4 5 ab d1 Reinigen Sie den Vorfilter aus Schaumstoff D Abb 5 in lauwarmem Seifenlauge spülen Sie ihn aus und lassen Sie ihn trocknen Sie können den Vorfilter stattdessen auch mit einem nicht entzündlichen Lösemittel reinigen und anschließend trocknen lassen d2 Reinigen Sie den Papierfilter E Abb 5 indem 6 WARTUNG 6 1 SICHERHEITSEMPFEHLUNGEN ACHTUNG Vor jedem Reinigungs...

Страница 21: ...NG DER ZÜNDKERZE ABB 6 a Schrauben Sie die Zündkerze mit einem Stückschlüssel ab b Reinigen Sie die Elektroden mit einer Metallbürste von etwaigen kohlenstoffhaltigen Ablagerungen c Ü b e r p r ü f e n S i e d e n k o r r e k t e n Elektrodenabstand 0 7 0 8 mm mit einer Fühlerlehre d Schrauben Sie die Zündkerze dann mit einem Steckschlüssel wieder bündig in ihren Sitz ein Ersetzen Sie die Zündkerz...

Страница 22: ...hen Ein autorisiertes Servicezentrum aufsuchen b Unregelmäßiger Betrieb Verschmutzte Elektroden oder falscher Elektrodenabstand Zündkerzenstecker nicht richtig aufgesetzt Luftfilter verstopft Gashebel auf Stellung STARTER Vergaserprobleme Zündprobleme Überprüfen Richtigen Sitz des Zündkerzensteckers überprüfen Überprüfen und reinigen Gashebel auf SCHNELL stellen Ein autorisiertes Servicezentrum au...

Страница 23: ...pas pris connaissance et compris ces instructions ne doivent en aucun cas être autorisées à utiliser le moteur 3 Ne jamais utiliser la machine avec des personnes notamment des enfants et ou des animaux domestiques aux alentours de celle ci 4 Noter qu il relève de la responsabilité de l opérateur ou de l utilisateur d éviter tout accident ou risque pour les personnes et les choses B OPÉRATIONS PRÉL...

Страница 24: ... au point de provoquer la sortie de carburant du bouchon du réservoir du moteur 5 Ne pas toucher les ailettes du cylindre et la protection du silencieux jusqu à ce que le moteur n est pas suffisamment refroidi 6 Couper le moteur et débrancher le fil de la bougie avant de contrôler nettoyer ou travailler sur la machine ou le moteur 7 Ne pas démarrer le moteur avec la bougie d allumage démontée 8 Tr...

Страница 25: ... 4 1 CONDITIONS AMBIANTES Les facteurs qui influent sur le fonctionnement d un moteur endothermique sont les suivants a Température Par basses températures des difficultés de démarrage à froid peuvent survenir Par très hautes températures des difficultés de démarrage à chaud peuvent survenir à cause de l évaporation du carburant dans le réservoir de carburant ou dans la pompe En tout cas le type d...

Страница 26: ...burant sont décrites dans le chapitre spécifique voir 8 1 Le ravitaillement en carburant doit être effectué moteur froid en suivant les instructions 4 3 HUILE Toujours utiliser de l huile de bonne qualité en choisissant le degré de viscosité en fonction de la température d utilisation a Utiliser seulement de l huile détergente d une qualité non inférieure à SF SG b Choisir le degré de viscosité SA...

Страница 27: ...UCHAGE a Positionner l accélérateur sur SLOW b Laisser tourner le moteur au ralenti pendant au moins 15 20 secondes c Arrêter le moteur en suivant les instructions contenues dans la notice d instructions de la machine 5 6 ARRÊT DU MOTEUR À LA FIN DU FAUCHAGE a Positionner l accélérateur sur SLOW b Laisser tourner le moteur au ralenti pendant au moins 15 20 secondes c Arrêter le moteur en suivant l...

Страница 28: ...tergent 6 5 ENTRETIEN DU FILTRE À AIR a Nettoyer la zone autour du couvercle du filtre b Enlever le couvercle A Fig 4 en dévissant les deux boutons croisillons B c Déposer l élément filtrant C Fig 4 5 d1 Nettoyer le préfiltre avec une éponge D Fig 5 6 ENTRETIEN 6 1 CONSIGNES DE SÉCURITÉ ATTENTION Retirer le capuchon de bougie et lire les instructions avant d effectuer une quelconque intervention o...

Страница 29: ...tirer le chiffon remettre en place l élément filtrant C Fig 4 dans son boîtier et remonter le couvercle A 6 6 CONTRÔLE ET ENTRETIEN DE LA BOUGIE FIG 6 a Démonter la bougie à l aide d une clé à tube b Nettoyer les électrodes avec une brosse métallique pour les débarrasser d éventuels résidus charbonneux c Contrôler à l aide d un jeu de cales l écartement correct des électrodes 0 7 0 8 mm d Remonter...

Страница 30: ...ire appel à un centre d assistance agréé b Fonctionnement irrégulier Bougies encrassées ou écartement incorrect des électrodes Capuchon de bougie monté incorrectement Filtre à air colmaté Commande de l accélérateur positionnée sur CHOKE Problèmes de carburation Problèmes d allumage Contrôler Contrôler que le capuchon est bien en place sur la bougie Contrôler et nettoyer Mettre la commande de l acc...

Страница 31: ...l arresto rapido del motore 2 Non permettere mai che il motore venga utilizzato da persone che non hanno la necessaria dimestichezza con queste istruzioni 3 Non utilizzare mai la macchina con persone in particolare bambini o animali domestici nelle vicinanze 4 Ricordare che l operatore o l utilizzatore ha la responsabilità di evitare incidenti e pericoli per le persone e le cose B OPERAZIONI PRELI...

Страница 32: ...o del serbatoio del motore 5 Non toccare le alette del cilindro e la protezione del silenziatore fino a quando il motore non si sia sufficientemente raffreddato 6 Fermare il motore e staccare il cavo della candela prima di controllare pulire o lavorare sulla macchina o sul motore 7 Non avviare il motore con la candela di accensione rimossa 8 Trasportare la macchina a serbatoio vuoto D MANUTENZIONE...

Страница 33: ...o motore 4 1 CONDIZIONI AMBIENTALI Il funzionamento di un motore endotermico a quattro tempi è influenzato da a Temperatura Operando a basse temperature si possono verificare difficoltà di avviamento a freddo Operando a temperature molto elevate è possibile riscontrare difficoltà di avviamento a caldo dovute all evaporazione del carburante nella vaschetta del carburatore o nella pompa In ogni caso...

Страница 34: ...ca causati dal carburante Le caratteristiche del carburante sono riportate nel capitolo specifico vedi 8 1 Il rifornimento deve essere effettuato a motore freddo secondo le indicazioni fornite nel Manuale di Istruzioni della macchina a Usare solo olio detergente di qualità non inferiore a SF SG b Scegliere il grado di viscosità SAE in base alla seguente tabella da 5 a 35 C SAE 30 da 15 a 5 C 5W 30...

Страница 35: ...LOW b Lasciare girare il motore al minimo per almeno 15 20 secondi c Arrestare il motore secondo le modalità indicate nel Manuale di Istruzioni della macchina 5 6 ARRESTO DEL MOTORE AL TERMINE DELLA FALCIATURA a Portare l acceleratore in posizione SLOW b Lasciare girare il motore al minimo per almeno 15 20 secondi c Arrestare il motore secondo le modalità indicate nel Manuale di Istruzioni della m...

Страница 36: ...lire il prefiltro in spugna D Fig 5 strizzandolo in acqua saponata tiepida risciacquarlo e farlo asciugare In alternativa si può usare un solvente non infiammabile e poi lasciarlo asciugare d2 Pulire il filtro in carta E Fig 5 battendolo su una superficie solida oppure soffiare con aria compressa a meno di 30 psi dal lato interno per rimuovere polvere e detriti Non tentare mai di rimuovere la spor...

Страница 37: ...metallica rimuovendo eventuali depositi carboniosi c Controllare con uno spessimetro la corretta distanza fra gli elettrodi 0 7 0 8 mm d Rimontare la candela e serrare a fondo con una chiave a tubo Sostituire la candela se gli elettrodi sono bruciati o se la porcellana si presenta rotta o incrinata ATTENZIONE Pericolo di incendio Non effettuare verifiche dell impianto di accensione con la candela ...

Страница 38: ...tattare un Centro Assistenza Autorizzato b Funzionamento irregolare Elettrodi della candela sporchi o distanza inadeguata Cappuccio della candela inserito male Filtro aria ostruito Comando acceleratore in posizione CHOKE Problemi di carburazione Problemi di accensione Controllare Controllare che il cappuccio sia inserito correttamente Controllare e pulire Portare il comando in posizione FAST Conta...

Страница 39: ...r snel kan worden uitgeschakeld 2 De motor mag nooit gebruikt worden door personen die niet vertrouwd zijn met deze instructies 3 Gebruik de machine nooit als er personen met name kinderen of huisdieren in de buurt zijn 4 D e op erator of de gebruiker zijn verantwoordelijk voor het voorkomen van ongevallen en risico s voor personen en voorwerpen B VOORBEREIDINGEN 1 Draag geen ruim zittende kleding...

Страница 40: ...r 5 Raak de ribben van de cilinder en de bescherming van de knalpot niet aan tot de motor voldoende afgekoeld is 6 Zet de motor uit en maak de bougiekabel los alvorens de machine of de motor te controleren schoon te maken of eraan te werken 7 Start de motor niet als de ontstekingsbougie verwijderd is 8 Vervoer de machine met lege tank D ONDERHOUD EN OPSLAG 1 Regelmatig onderhoud is cruciaal voor d...

Страница 41: ...ie vermeld waarmee u uw motor op een meer doordachte wijze kan gebruiken 4 1 OMGEVINGSOMSTANDIGHEDEN De werking van de viertakt verbrandingsmotor wordt beïnvloed door a Temperatuur Bij lage temperaturen is koud starten soms moeilijk Bij zeer hoge temperaturen kan het moeilijk zijn de motor warm te starten omwille van de verdamping van de brandstof in de carburateur of in de pomp In ieder geval moe...

Страница 42: ...meld in het specifieke hoofdstuk daarover zie 8 1 Het bijvullen moet plaatsvinden bij koude motor volgens de instructies vermeld in de handleiding viscositeit afhankelijk van de bedrijfstemperatuur a Gebruik enkel detergentolie waarvan de kwaliteit niet lager is dan SF SG b Kies de SAE viscositeit op basis van volgende tabel van 5 tot 35 C SAE 30 van 15 tot 5 C 5W 30 of 10W 30 Multigrade van 25 to...

Страница 43: ...erental draaien c Schakel de motor uit volgens de instructies vermeld in de handleiding van de machine 5 6 STOPZETTEN VAN DE MOTOR AAN HET EIND VAN HET MAAIEN a Zet de gashendel in de stand SLOW b Laat de motor gedurende minstens 15 20 seconden op het laagste toerental draaien c Schakel de motor uit volgens de instructies vermeld in de handleiding van de machine d Als de motor koud is maakt u de a...

Страница 44: ...e voorfilter in spons D Fig 5 schoon door hem uit te knijpen in lauw water met zeep uit te spoelen en te laten drogen Men kan eventueel ook een niet ontvlambaar oplosmiddel gebruiken en de voorfilter vervolgens laten drogen d2 Maak de papierfilter E Fig 5 schoon door hem op een hard oppervlak uit te kloppen of de binnenkant schoon te blazen met 6 ONDERHOUD 6 1 VEILIGHEIDSADVIEZEN LET OP Maak de aa...

Страница 45: ...te dopsleutel b Maak de elektroden schoon met een metalen borstel om eventuele koolstofafzettingen te verwijderen c Controleer met een diktemeter de juiste afstand tussen de elektroden 0 7 0 8 mm d Monteer de bougie opnieuw en span stevig aan met een dopsleutel Vervang de bougie als de elektroden verbrand zijn of het porselein gebroken of gebarsten is LET OP GEVAAR OP BRANDWONDEN Voer geen control...

Страница 46: ...t een erkend servicecentrum b Onregelmatige werking Elektroden van de bougie vuil of afstand niet juist Aansluitkap van de bougie slecht aangesloten Luchtfilter verstopt Zet de gashendel in de stand CHOKE Carburatieproblemen Ontstekingsproblemen Controleren Controleer of de aansluitkap correct is aangesloten Controleren en schoonmaken Zet de gashendel in de stand FAST Neem contact op met een erken...

Страница 47: ...tor 2 No permita que el motor sea utilizado por personas que no estén familiarizadas con él y con estas instrucciones 3 No utilice la máquina en proximidad de otras personas sobre todo niños o de animales 4 Recuerde que quien utiliza la máquina tiene la responsabilidad de evitar daños materiales y personales B OPERACIONES PRELIMINARES 1 No lleve prendas amplias cordones joyas ni otros objetos que ...

Страница 48: ...or se haya enfriado lo suficiente 6 Pare el motor y desconecte el cable de la bujía antes de hacer controles limpieza u otras operaciones en la máquina o en el motor 7 No intente poner el motor en marcha si la bujía de encendido no está instalada 8 Trasporte la máquina con el depósito vacío D MANTENIMIENTO Y GUARDADO 1 El mantenimiento regular es esencial para la seguridad y para garantizar el niv...

Страница 49: ...or endotérmico de cuatro tiempos está condicionado por a Temperatura A bajas temperaturas se puede presentar dificultad para el arranque en frío Las temperaturas muy altas pueden complicar el arranque en caliente a causa de la evaporación del combustible en la cubeta del carburador o en la bomba En todos los casos utilice el tipo de aceite adecuado para la temperatura ambiente b Altitud La potenci...

Страница 50: ...l combustible se detallan en el capítulo 8 1 Reposte con el motor frío como se indica en el manual de instrucciones de la máquina 5 1 4 Capuchón de la bujía Conecte firmemente el capuchón del cable a la bujía previa comprobación de que no hay con la tabla siguiente de 5 C a 35 C SAE 30 de 15 C a 5 C 5W 30 o 10W 30 multigrado de 25 C a 35 C aceites sintéticos 5W 30 o 10W 30 multigrado c El uso de a...

Страница 51: ...l manual de instrucciones de la máquina 5 6 PARADA DEL MOTOR AL FINAL DEL CORTE DE CÉSPED a Ponga el acelerador en la posición SLOW b Deje el motor al mínimo durante al menos 15 20 segundos c Pare el motor como se indica en el manual de instrucciones de la máquina d Con el motor frío desconecte el capuchón de la bujía y quite la llave de arranque si el modelo la incluye e Cierre el grifo de combus...

Страница 52: ... y déjelo secar Como alternativa se puede utilizar un disolvente no inflamable y dejarlo secar d2 Golpee el filtro de papel E fig 5 sobre una superficie firme o sóplelo con aire comprimido a menos de 30 psi desde dentro hacia fuera para eliminar el polvo y la suciedad No utilice nunca un cepillo El cepillado empuja la suciedad hacia dentro de 6 MANTENIMIENTO 6 1 RECOMENDACIONES DE SEGURIDAD ATENCI...

Страница 53: ...ósitos de carbón c Compruebe con una galga la distancia correcta entre los electrodos 0 7 0 8 mm d Monte la bujía y apriete a fondo con la llave de tubo Cambie la bujía si los electrodos están quemados o si la porcelana está rota o agrietada ATENCIÓN Peligro de incendio No controle el sistema de encendido si la bujía no está enroscada en su alojamiento IMPORTANTE Utilice solo bujías del tipo indic...

Страница 54: ... asistencia autorizado b Funcionamiento irregular Electrodos de la bujía sucios o distancia inadecuada Capuchón de la bujía mal ubicado Filtro de aire obstruido Mando del acelerador en posición CHOKE Problemas de carburación Problemas de encendido Controle Controle que el capuchón esté bien insertado Controle y limpie Ponga el mando en la posición FAST Llame a un centro de asistencia autorizado Ll...

Страница 55: ...gorystycznie przestrzegać A PRZESZKOLENIE 1 Przeczytać uważnie zalecenia zawarte w niniejszym podręczniku oraz instrukcję obsługi maszyny w której zainstalowany jest ten silnik Nauczyć się jak szybko zatrzymać silnik 2 Nie pozwalać nigdy by silnik był obsługiwany przez osoby które nie zapoznały się dokładnie z niniejszą instrukcją 3 Nigdy nie używać maszyny gdy w pobliżu znajdują się inne osoby zw...

Страница 56: ...dmiernych prędkości obrotowych silnika 4 Nie przechylać maszyny na bok w taki sposób by przez korek zbiornika silnika wylewało się paliwo 5 Nie dotykać żeberek cylindra ani osłony tłumika dopóki silnik wystarczająco nie ostygnie 6 Przed przystąpieniem do kontroli czyszczenia lub jakichkolwiek prac w obrębie maszyny lub silnika należy zatrzymać silnik i odłączyć przewód świecy 7 Nie uruchamiać siln...

Страница 57: ...działanie czterosuwowego silnik a endotermicznego wpływ ma a Temperatura W przypadku niskich temperatur mogą wystąpić trudności z rozruchem na zimno W przypadku bardzo wysokich temperatur mogą wystąpić trudności z rozruchem na ciepło spowodowane parowaniem paliwa w zbiorniku gaźnika lub w pompie W każdym przypadku należy dostosować rodzaj oleju do temperatur roboczych b Wysokość Maksymalna moc sil...

Страница 58: ...ła przedstawiona w odpowiednim rozdziale patrz 8 1 Uzupełnianie paliwa należy wykonywać przy zimnym silniku zgodnie z zaleceniami podanymi w instrukcji obsługi maszyny a Stosować tylko olej zawierający detergent o jakości nie niższej niż SF SG b Wybierać stopień lepkości SAE zgodnie z poniższą tabelą od 5 do 35 C SAE 30 od 15 do 5 C 5W 30 lub 10W 30 wielostopniowy od 25 do 35 C Oleje syntetyczne 5...

Страница 59: ...odnie z zaleceniami podanymi w instrukcji obsługi maszyny 5 6 ZATRZYMANIE SILNIKA PO ZAKOŃCZENIU KOSZENIA a Ustawić dźwignię gazu w położeniu SLOW b Pozwolić by silnik pracował przez co najmniej 15 20 sekund c Zatrzymać silnik zgodnie z zaleceniami podanymi w instrukcji obsługi maszyny d Przy zimnym silniku odłączyć nasadkę świecy i wyjąć kluczyk zapłonu jeżeli jest przewidziany e Zakręcić kurek p...

Страница 60: ...ąć pokrywę A rys 4 odkręcając obie gałki B c Wyjąć element filtrujący C rys 4 5 d1 Wyprać filtr wstępny z gąbki D rys 5 w ciepłej wodzie z mydłem opłukać go i osuszyć Alternatywnie można użyć do tego celu niepalnego rozpuszczalnika po czym pozostawić go do wyschnięcia 6 KONSERWACJA 6 1 ZALECENIA DOTYCZĄCE BEZPIECZEŃSTWA UWAGA Przed przystąpieniem do jakiejkolwiek czynności konserwacyjnej lub napra...

Страница 61: ...NSERWACJA ŚWIECY RYS 6 a Z d e m o n t o w a ć ś w i e c ę z a p o m o c ą odpowiedniego klucza nasadowego b Oczyścić elektrody metalową szczotką usuwając ewentualne osady węgla c Sprawdzić grubościomierzem prawidłową przerwę międzyelektrodową 0 7 0 8 mm d Zamontować ponownie świecę i dokręcić do oporu kluczem oporowym Wymienić świecę jeżeli elektrody są przepalone lub na porcelanie widać oznaki p...

Страница 62: ...em b Nieprawidłowe działanie Zabrudzone elektrody świecy lub nieprawidłowa przerwa międzyelektrodowa Nieprawidłowo nałożona nasadka świecy Zatkany filtr powietrza Dźwignia gazu w pozycji CHOKE Problemy z wytwarzaniem mieszanki palnej Problemy z zapłonem Sprawdzić Sprawdzić czy nasadka jest prawidłowo nałożona na świecę Sprawdzić i wyczyścić Ustawić dźwignię w pozycji FAST Skontaktować się z autory...

Страница 63: ......

Страница 64: ...ät während seiner gesamten Lebensdauer begleiten F ATTENTION Le manuel doit accompagner la machine pour toute sa vie I ATTENZIONE Questo manuale deve accompagnare la macchina durante tutta la sua vita NL LET OP Dit handboek moet voor de gehele levensduur bij de machine blijven E ATENCIÓN Este manual debe acompañar a la máquina durante toda su vida útil PL UWAGA Niniejsza instrukcja powinna towarzy...

Отзывы: