


10
11
Output Settings
Output Settings
Output Settings
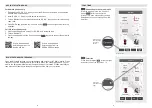
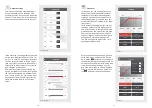
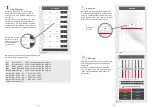
This menu provides the substantial Input/
Output management. On the page main
you determine the function of the respective
channel. Touch the button of the channel to
open the selection and chose the function.
In the next step you assign that output chan-
nel the according input channel. Touch “In-
put C>>” to open the input menu. By default
the CH1 output is related to the CH1 input
(and so on). But you can also feed the CH1
output with an input channel of your choice
by moving the related slider.
Some factory systems do not provide full
signals per channel, but divide the high and
low frequencies signals into different chan-
nels. In such a case, you can use the input
management to merge both signal compo-
nents and forward them to one common
output.
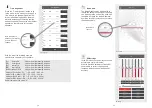
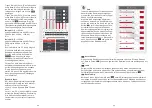
Crossover
Crossover
In this menu you can assign a frequency
band to the connected speakers that cor-
responds to their recommended operat-
ing range. You can chose to adjust each
channel separately, or combine each pair
of channels (Button “Combine” in the upper
right corner).
In the left half of the diagram you can set
the break frequency of the high pass filter
as well as its slope. In the right half are the
break frequency and slope of the low pass
filter. The red line shows the set slope of
the filter. "Bypass" means that the signal is
unfiltered and contains all frequencies.
The filter settings also apply to the corre-
sponding preamp outputs.
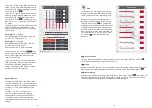
When you have done all settings, go back
to the main menu, and touch the "Save to
Amp" button
to transfer the settings to
the amplifier. During the saving process do
not switch off the amplifier as this may lead
to malfunction and/or damage. You can
also save the settings on your smartphone.
To do this, press the "Save on Phone" but-
ton
, and enter the desired filename.
Crossover