background image

Oilfill and removal of air pockets

Packings and sealings are of highest quality but a small oil loss can occur after some use and a small replacement 

quantity of oil will have to be added. (The total oil volume is about 0.10 litre).

Before oil fill, the tool must be carefully cleaned on the outside. It is very important that even very small dirt particles 

must never enter into the hydraulic system.

NOTE!   

The key grip, 32 mm, MUST NEVER be used when loosening the fixed handle. 


The refilled oil must be unused and clean.

While the tool is still in vertical position (i.e. with the handles upwards) the oil level should reach the upper edge of 

the filling hole. Then pump, with press dies assembled, until full pressure is reached and let the piston return to rest 

position. Repeat this until the tool is completely free from air pockets.

Thereafter, pump out the press piston carefully 2-3 mm from resting position and fill oil until oil surface reaches 

the edge of the oil hole. Replace and fasten the screw. Check the rubber sealing under the screw head to 

ensure tightness. Wipe off excess oil on the outside and reassemble the handle. The tool is now ready for use 

(=functional check).

With empty press dies, the piston fast feed shall be effected in about 5 full handle strokes and thereafter about 6 

handle strokes more are needed to achieve full pressure.

18

Service

If the tool is not operating satisfactory in spite of proper handling, proper oil fill and removal of air pockets, it must be 

returned to factory or authorized service shop for further actions.


IMPORTANT!


No other servicing than the above mentioned can be made without authorization on the 


pump system. The design of the pump unit is complicated and special tooling is needed 


for disassembly and assembly of the unit.

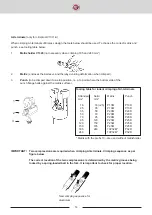
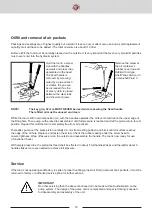
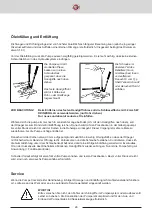
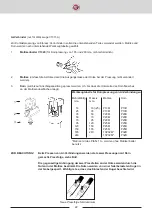
Hold the tool in a screw 

vice with the handles 

upwards and press dies 

assembled in the head.

The fixed handle is 

removed by screwing, 

aided by a pipe wrench 

or similar, the grip can 

be increased if a strip 

of emery cloth is placed 

between the steel tube 

and the wrench jaws.

Remove the screw at 

the oil container’s 

(rubber hose) top end. 

Refill with oil type 

Shell Tellus Arctica 32 

or Aeroshell Fluid 4.

Содержание V1311-A

Страница 1: ...NG SE V1311 A V1311C A DIRECTIONS FOR USE GB BEDIENUNGSANLEITUNG DE V1311 A Elpress AB P O Box 186 SE 872 24 KRAMFORS Sweden Tel 46 612 71 71 00 Fax 46 612 71 71 51 E mail sales elpress se www elpress...

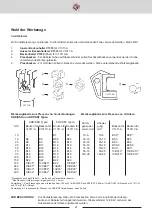
Страница 2: ...A 11 Steps to be taken before use 11 Choosing tools dies 13 Cu terminals 13 Al terminals 14 Preforming 15 Marking of Elpress terminals 15 Checking the crimp result 16 Maintenance instructions 17 Oilfi...

Страница 3: ...med verktyg monterade enligt bilder nedan Elpress handpumpar V1311 A V1311C A r precisionsverktyg som enbart r konstruerade f r att kontaktpressa Elpress f rbindningar inom f ljande areaomr den Cu f...

Страница 4: ...tt hydraulsystemet inte normalt kan utl sas innan utl sningsventilen tr tt i funktion VIKTIGT T nk p att det r h g presskraft 130 kN och h gt oljetryck 730 bar under pressningen St aldrig i pressriktn...

Страница 5: ...Antal V1311 A V1311C A pressningar 10 B8 KR10 KS10 B8 KR10 KS10 1 10 13B8 KR10 KS10 13B8 KR10 KS10 1 16 B9 B9 1 16 13B9 13B9 1 25 B11 B11 1 25 13B11 13B11 1 35 B13 B13 1 35 13B13 13B13 1 50 B14 5 B14...

Страница 6: ...ka l ses av en fj derbelastad kula i gaffeln Det r viktigt att kontrollera att s sker Verktygstabell f r dornpressning av Al f rbindningar F tr dig Solid Matris Dorn mm2 mm2 16 16 25 P13M P13D 25 35 P...

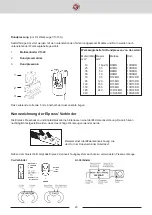
Страница 7: ...val av matris och dorn se verktygstabell nedan 1 Matrish llare V1320 2 Rundpressningsmatris 3 Rundpressningdorn Placera kabel ndan ca 5 mm innanf r ytterkanten M rkning av Elpress f rbindningar Elpre...

Страница 8: ...p den pressade ovalens maxh jd l mpligen med skjutm tt M tten j mf rs med tabell p n sta sida Om h m ttet verskrids efter korrekt utf rd kontaktpressning kontakta n rmaste auktoriserade Elpress Servi...

Страница 9: ...tet verskrids efter korrekt utf rd kontaktpressning kontakta n rmaste auktoriserade Elpress Service verkstad F tr dig Al ledare mm2 Verktyg Solid Dorn T mm Matris 16 25 35 50 70 95 120 150 150 185 240...

Страница 10: ...igare lite olja fylls p s niv n med s kerhet g r upp till h lets kant S tt tillbaka och dra fast skruven Kontrollera att gummipackningen finns p plats under skruvskallen s att t tningen blir fullgod T...

Страница 11: ...g areas Cu terminals 10 400 mm V1311C A not 400mm C sleeves 10 120 mm Al terminals 16 240 mm V1311C A does not crimp Al For further details please see our technical literature on connections WARNING T...

Страница 12: ...ginning of the pumping crimping process there is a quick feed to the work position by means of the low pressure system When the tool movement meets a certain resistance the high pressure system is aut...

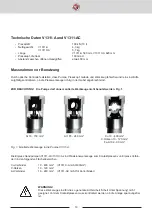
Страница 13: ...ypes Main mm Dies for Dies for Dies for Dies for conductor Branch Dies for Dies for V1311 A V1311C A V1311 A V1311C A mm mm V1311 A V1311C A 10 B8 B8 B7 B7 10 6 10 6 BC4 BC4 16 B8 B8 B8 5 B8 5 16 10 1...

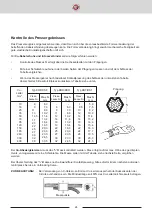
Страница 14: ...x surface IMPORTANT Two compressions are required when crimping Al terminals Crimping sequence as per figure below The correct location of the two compressions is determined by the matrix grooves bein...

Страница 15: ...a check after crimping that the right tool has been used The Elpress marking system shows the conductor area the tools to be used and the connecting bolt size Copper terminals Aluminium terminals 15...

Страница 16: ...aximum height of the crimped oval The measurement should be compared with those in the table on the next page Should the h size be exceeded following a properly performed crimping operation contact ne...

Страница 17: ...3 9 and C13 11 C15 C15 8 C15 9 C15 11 and C15 13 Max h mm 9 6 12 2 15 2 21 2 22 2 25 8 29 2 Dies with the prefix 13 are used without dieholder Press dies for V1311C A BC4 BC5 BC6 BC8 9 BC11 13CBC13 13...

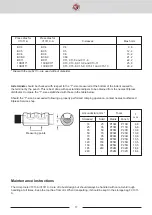
Страница 18: ...en the screw Check the rubber sealing under the screw head to ensure tightness Wipe off excess oil on the outside and reassemble the handle The tool is now ready for use functional check With empty pr...

Страница 19: ...n Cu Verbinder 10 400 mm V1311C A nicht 400mm C H lsen 10 120 mm Al Verbinder 16 240 mm V1311 AC nicht f r Al Verbinder WARNUNG Diese Werkzeuge sind f r die so genannte AUS Arbeit Arbeit Unter Spannun...

Страница 20: ...den Die Hydraulik der Pumpe enth lt ein Nieder und ein Hochdrucksystem Mit Hilfe des Niederdrucksystems wird zu Beginn des Pumpens Pressverlaufs f r schnellen Vorschub gesorgt Treffen die Werkzeuge au...

Страница 21: ...Typen Durch Abzwei mm Backen f r Backen f r Backen f r Backen f r gehender gung Backen f r Backen f r V1311 A V1311C A V1311 A V1311C A Leiter mm mm V1311 A V1311C A 10 B7 B7 10 6 10 6 BC4 BC4 16 B8 B...

Страница 22: ...ZUR BEACHTUNG Beim Pressen von Al Verbindungen werden stets zwei Pressungen mit Dorn gemacht Pressfolge siehe Bild Die gegenseitige Anbringung der zwei Presstellen an der H lse werden durch die Nuten...

Страница 23: ...rkennzeichnung Dadurch kann nachtr glich festgestellt werden dass das richtige Werkzeug verwendet wurde Neben dem Querschnitt zeigt das Elpress Kennzeichnungssystem auch die zu verwendeten Presswerkze...

Страница 24: ...erfolgt auf der max H he des gecrimpten Ovals vorzugsweise mit eine Schieblehre Die Masse sollen mit der Tabelle siehe n chste Seite verglichen werden Bei berschreitung des h Masses nach einwandfreier...

Страница 25: ...1 8 und C11 9 C13 C13 8 C13 9 und C13 11 C15 C15 8 C15 9 C15 11 und C15 13 Max h mm 9 6 12 2 15 2 21 2 22 2 25 8 29 2 Pressbacken mit das Pr fix 13 werden ohne Backenhalter benutzt Pressbacke f r V131...

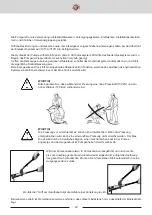
Страница 26: ...d der ffnung recht Zur cksetzen und die Schraube festziehen Kontrollieren dass sich die Gummidichtung unter dem Schraubenkopf befindet damit eine richtige Abdichtung erzielt wird Eventuelles l an der...

Страница 27: ......
Страница 28: ...Elpress AB P O Box 186 SE 872 24 KRAMFORS Sweden Tel 46 612 71 71 00 Fax 46 612 71 71 51 E mail sales elpress se www elpress se 8052 003700...

Отзывы: