background image


32 

The image is striped. 

This may be interference fringes between dots of printed matter 

and TV scanning lines or CMOS pixels. Changing the shooting 

range may help the problem. 

If you shoot a monitor screen that is displaying a live video, the 

image may be distorted. 

Vertical stripes may appear on an LCD projector image. 

Manually adjusting the dot clock at the projector side may help the 

problem. 

Vertical stripes may appear when the shooting environment is 

dark. Brightening the environment may reduce vertical stripes. 

The UVC video stream is 

upside down. 

Check that the graphics driver and other device drivers on your 

computer are updated. The latest device drivers are available from 

the computer manufacturer. 

The displayed UVC image 

contains images other than 

the camera image 

The software and OS you are using or the connection status may 

be causing images other than the camera image to breakthrough 

while displaying the camera image. This problem can be solved by 

reconnecting the product or restarting the software. 

A software error message 

appears and the UVC image 

is not displayed 

If it is taking too much time for the preparation of the image 

output, the software may determine this to be an error. Restart the 

product, reconnect it to the computer, and then start the software. 

The UVC image fails to be 

output. 

Disconnect the USB cable, restart the software, and then 

connect the USB cable again. 

The UVC video stream 

sometimes freezes. 

The displayed image may pause for a brief second when the 

object moves quickly. In that case, adjusting the brightness 

manually may improve the problem.   

There is a distortion of the 

UVC image. 

Use a high-spec computer. Also, reducing the resolution or frame 

rate may improve the distortion of the image. 

4K image cannot be 

displayed with UVC. 

The system requirements to display 4K image are as follows: 

CPU

Intel® Co

re™ i

  3GHz or higher 

Memory

16GB or higher 

Graphic board

GeForce GTX750 or higher 


About the light (LED lighting) 


The  brightness  of  the  LED  lighting  will  diminish  with  long-term  use.  If  its  brightness  has 

significantly diminished, consult the dealer from whom you purchased this product or our nearest 

branch/office for replacement (subject to charge). 


About long-term usage of this product 


Due  to  the  lifetime  of  its  parts,  if  this  product  is  used  for  longer  than  the  warranty  period,  its 

performance  and  quality  may  deteriorate.  In  this  case,  we  will  replace  the  parts  for  a  charge. 

Consult the dealer from whom you purchased this product or our nearest branch/office. 

Содержание MX-P3

Страница 1: ...MX P3 VISUAL PRESENTER I IN NS ST TR RU UC CT TI IO ON N M MA AN NU UA AL L ...

Страница 2: ...e manufacturer s instructions and should use a mounting accessory recommended by the manufacturer Ventilation Slots and openings in the cabinet are provided for ventilation and to ensure reliable operation of the product and to protect it from overheating and these openings must not be blocked or covered The openings should never be blocked by placing the product on a bed sofa rug or other similar...

Страница 3: ...he product and cart combination to overturn Object and Liquid Entry Never push objects of any kind into this product through openings as they may touch dangerous voltage points or short out parts that could result in a fire or electric shock Never spill liquid of any kind on the product Servicing Do not attempt to service this product yourself as opening or removing covers may expose you to danger...

Страница 4: ...ECTRIC SHOCK DO NOT EXPOSE THIS PRODUCT TO RAIN OR MOISTURE The connection of a non shielded equipment interface cable to this equipment will invalidate the FCC Certification or Declaration of this device and may cause interference levels which exceed the limits established by the FCC for this equipment It is the responsibility of the user to obtain and use a shielded equipment interface cable wit...

Страница 5: ...ng Use the product on a stable base desk or table Do not place the product on an unstable base or slanted location Place or wire the product so as to prevent the cables from being pulled or drawn Do not point the lens directly to the sun It could degrade the imaging capability Do not look directly into the LED light If you look directly into it at pointblank range your eyes may be injured If this ...

Страница 6: ...c cards If the product is installed to the wall or place which is not level with the magnet it may fall Be sure to confirm that the product is installed securely before use Carrying the product Carry the product by folding the arm so as not to damage the camera Do not carry by holding the arm or camera head HANDLING PRECAUTIONS The followings are special precautions against mishandling of the prod...

Страница 7: ...ole 17 PREPARATION AND CONNECTION 18 SETTING UP 18 MOVING PARTS OF THE PRODUCT 19 CONNECTING TO A PROJECTOR OR MONITOR 20 CONNECTING TO A COMPUTER 20 CONNECTING TO A PROJECTOR OR MONITOR AND COMPUTER SIMULTANEOUSLY 21 USING THE PRODUCT 22 ADJUSTING THE SIZE 22 ADJUSTING THE BRIGHTNESS 22 ADJUSTING THE FOCUS 22 PAUSING THE IMAGE 23 ROTATING THE IMAGE 23 MIRROR INVERT THE IMAGE 23 TURNING ON OFF THE...

Страница 8: ...NU 25 FW UPDATE PROCEDURE 28 ABOUT VIEWER SOFTWARE 29 INSTALLING THE SOFTWARE 30 TROUBLE SHOOTING 31 SYMPTOMS AND POSSIBLE CAUSES REMEDIES 31 SPECIFICATION 33 MAIN CAMERA 33 FUNCTIONAL SPECIFICATION 33 ILLUMINATION DEVICE 34 OTHER SPECIFICATIONS 34 TRADEMARKS AND LICENSES 35 ...

Страница 9: ...e cable could be exposed and result in an accident IMPORTANT SAFEGUARDS 3S service registration sheet For Japan only DC power cord AC adapter MX P3 About AC adapter for customers in Europe and Asia Fit the convex part of the plug in the groove of the AC adapter and push it downward Push it until you hear click Choose the correct plug according to the outlet When removing the plug from the AC adapt...

Страница 10: ...10 BASIC OPERATIONS THE NAME OF EACH PART Name Camera head LED lighting Arm Operating panel Connection ports Anti theft lock hole SD card slot Setting switches Stage Microphone Microphone status LED ...

Страница 11: ...on is disabled when the power is supplied through the USB cable only ZOOM IN To enlarge the image ZOOM OUT To shrink the image One push AF To focus automatically Brightness To brighten the image Brightness To darken the image Initialization of the brightness To initialize the brightness level by pressing and together Lighting MENU To turn on or off the LED lighting Long press this button to displa...

Страница 12: ...ractive Whiteboard R1 mode If you press and hold and at the same time it will be the best mode for displaying on our Interactive Whiteboard model number EL55R1 EL65R1 EL75R1 EL86R1 via USB Initialization The Status LED flashes blue when the power is supplied to the product with the USB cable or DC power cord while pressing and at the same time The product will be reset to factory default settings ...

Страница 13: ...Flash Yellow Off On USB Disabled Red On Off AC adapter OFF Blue Flash Yellow On Off AC adapter ON Green Flash Yellow On Off AC adapter ON Red Flash Yellow On On AC adapter OFF Blue Flash Yellow On On AC adapter ON Green Flash Yellow On On AC adapter ON The Status LED stays off until the product starts up after the power is on AUDIO STATUS LED SD card Status LED During recording process Flash Red F...

Страница 14: ...e HDMI cable The HDMI cable is not included Max resolution 3840x2160 To output RGB images by connecting to a monitor via the RGB cable The RGB cable is not included Max resolution 1920x1080 SETTING SWITCH The change made by the Setting switch will be reflected after the product is turned off and on again Mark Description 60 50 To correct flickers Select the same value as used for the power supply ...

Страница 15: ...te when connecting with the USB cable If a low spec computer is used the actual frame rate may be slower than what is specified in the table Resolution USB MJPEG fps YUY2 fps 4160x3120 10 3840x2160 30 2048x1536 30 1920x1080 60 30 15 1280x960 30 1280x720 60 30 15 1024x768 30 640x480 30 20 Interactive Whiteboard R1 mode only ...

Страница 16: ... RGB output is not possible when the resolution is 4K The viewing angle of the output image is as follows HDMI out Normal 16 9 Full 4 3 RGB out only 1080p XGA Depending on the condition of the arm the maximum angle of view that can be captured will change The aspect ratio of the output image is 16 9 when the Viewing angle is set to NORMAL 16 9 Depending on the monitor used you will see black bars ...

Страница 17: ...17 Anti theft lock hole The product can be secured with a security wire using this hole Size of the hole 7 3mm Anti theft lock hole ...

Страница 18: ...ul not to pinch your fingers when moving the arm Do not hold the arm or camera head when carrying the product Be careful not to give an impact to the camera head CAUTION This product uses static electricity sensitive components In order to avoid malfunction from static electricity hold the edge of the camera head to rotate the camera head Do not touch the rotating part 4 CAUTION If the product is ...

Страница 19: ...19 MOVING PARTS OF THE PRODUCT The product can be moved as shown below Camera head 90 270 350 CAUTION Be careful not to let the top of the camera head hit the camera arm Rotating part 90 90 120 180 ...

Страница 20: ...using the USB cable bus power 1 Connect the Type C plug of the USB cable to in the side of the product 2 Connect the Type A plug of the USB cable to the USB port of your running computer 3 Set the resolution as described in P 15 using the UVC app Flicker correction Select the same value as the power supply frequency of the location where the product is used 50Hz 60Hz TYPE C plug TYPE A plug 2 USB ...

Страница 21: ...the USB port of your running computer 5 The product enters the standby status Status LED Red The image appears in the UVC app on your computer 6 Set the resolution to either one of 4K 30fps or 1080p 30fps or 720p 30fps using the UVC app 7 Press the Power button to turn on the product Image output to HDMI RGB output will begin Status LED Blue USB CAUTION RGB output is not possible when the resoluti...

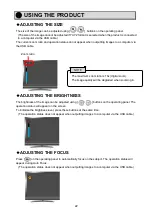
Страница 22: ...utting images to a computer via the USB cable ADJUSTING THE BRIGHTNESS The brightness of the image can be adjusted using buttons on the operating panel The operation status will appear on the screen To initialize the brightness level press these buttons at the same time The operation status does not appear when outputting images to a computer via the USB cable ADJUSTING THE FOCUS Press on the oper...

Страница 23: ... blue when the audio output is on There is no audio output to the HDMI output SETTING THE CAMERA TO STANDBY STATUS ONLY AVAILABLE WHEN USING DC POWER CORD Press the button on the operating panel to enter the standby status In the standby status no image will be output from the HDMI OUT or RGB OUT The image will be output regardless of the Power button status ON OFF when the product is connected to...

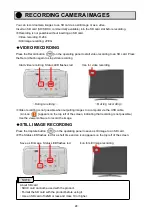
Страница 24: ...rating panel to start video recording to an SD card Press the Record button again to stop video recording Start video recording Status LED flashes red Icon for video recording During recording During recording Video recording is not possible when outputting images to a computer via the USB cable An icon appears on the top left of the screen indicating that recording is not possible Use the viewer ...

Страница 25: ...ne push AF button Then press the ZOOM OUT button to confirm SETTINGS MENU The following Settings menu appears on the screen The items in the blue frame are items currently selected with the cursor 1 Resolution HDMI The one with the check mark is the currently selected item The resolution setting can also be changed by pressing the Brightness button and the ZOOM OUT button on the operating panel at...

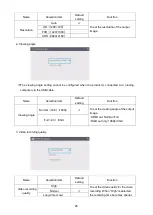
Страница 26: ...ion of the output image HD 1280 720 FHD 1920 1080 UHD 3840 2160 Name Selection item Default setting Function Viewing angle Normal 16 9 1080p To set the viewing angle of the output image HDMI out Normal Full RGB out only 1080p XGA Full 4 3 XGA Name Selection item Default setting Function Video recording quality High To set the video quality for the video recording When High is selected the recordin...

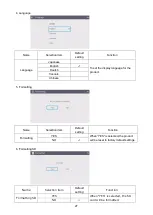
Страница 27: ...display language for the product English Deutch francais Chinese Name Selection item Default setting Function Formatting YES When YES is selected the product will be reset to factory default settings NO Name Selection item Default setting Function Formatting SD YES When YES is selected the SD card will be formatted NO ...

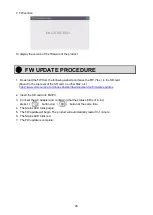
Страница 28: ...card no other files etc https www elmoeurope com index php en download service firmware updates 2 Insert the SD card into MX P3 3 Connect the AC adapter and confirming that the status LED is lit in red press t button and button at the same time 4 The Status LED turns purple 5 The FW update will begin The product will automatically restart in 1 minute 6 The Status LED turns red 7 The FW update is c...

Страница 29: ...a the USB cable Saving videos and still images to a computer Operating the product from a computer etc If Image Mate 4 is already installed in your computer update the version of Image Mate 4 You can view the camera image with a commercially available software With Image Mate 4 you can also use other functions such as zoom and freeze For details of the control software Image Mate4 and its instruct...

Страница 30: ...e supplied USB cable It may take some time to display the image after the resolution is changed via UVC with the USB cable Do not turn off the power of the product or disconnect the USB cable before the image is displayed The displayed image may pause for a brief second when the object moves quickly This is not a malfunction The displayed image may be distorted depending on the object being displa...

Страница 31: ...rned on The input source of the monitor is not set correctly The viewer software is not started correctly Restart the software and try to connect again The product is not selected in the setting of the viewer software The output image resolution changes automatically When the HDMI monitor is connected to the product the output image resolution is automatically changed based on information from the...

Страница 32: ...output the software may determine this to be an error Restart the product reconnect it to the computer and then start the software The UVC image fails to be output Disconnect the USB cable restart the software and then connect the USB cable again The UVC video stream sometimes freezes The displayed image may pause for a brief second when the object moves quickly In that case adjusting the brightne...

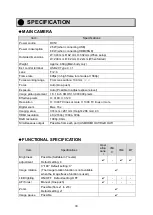
Страница 33: ...h CMOS 13 000 000 pixels Effective pixels H 4160 V 3120 Resolution H 1300 TV lines or more V 1300 TV lines or more Digital zoom Max 16x Imaging area 374 mm 281 mm Height 286 mm 4 3 HDMI resolution 4K 2160p 1080p 720p RGB resolution 1080p XGA Simultaneous output Possible from each port USB HDMI OUT RGB OUT FUNCTIONAL SPECIFICATION Item Specifications Oper ating pane l IM C IM4 EIT Brightness adjust...

Страница 34: ...n menu or by connecting the product to your computer via the USB cable while pressing the Lighting MENU button and the Freeze button at the same time The items that can be reset are Brightness Image rotation Contrast Hue Saturation Sharpness White balance AF ILLUMINATION DEVICE OTHER SPECIFICATIONS Item Specifications LED lighting White LED Item Specifications Recording SD card 32GB or less Class ...

Страница 35: ...nd a non commercial activity and or ii play AVC Video that was obtained from a video provider licensed from MPEG LA LLC Additional information including that relating to promotional and commercial uses may be obtained from MPEG LA LLC Unless used for personal use it is prohibited by copyright law to record slides books and photos without the prior consent of copyright holder This product is design...

Страница 36: ...131 熊本オフィス 862 0976 熊本県熊本市中央区九品寺 1 丁目 11 番 4 号 熊本県教育会館 4 階 TEL 096 282 8338 OVERSEAS SUBSIDIARY COMPANIES ELMO USA CORP Headquarters 6851 Jericho Turnpike Suite 145 Syosset NY 11791 Tel 516 501 1400 Fax 516 501 0429 E mail elmo elmousa com Web https www elmousa com ELMO Europe SAS Headquarters 60 av Charles de Gaulle 92200 Neuilly sur Seine FRANCE Tel 33 0 1 73 02 67 06 Fax 33 0 1 73 02 67 10 E ma...

Отзывы: