


132
TR
OUBLE
SHOO
TING
English
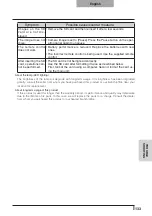
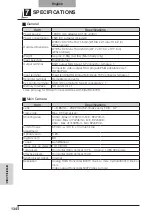
Symptoms and Confirmation
Check the following items. If any abnormality is found, consult the dealer from whom you
purchased this product or our nearest branch/office.
Symptom
Possible cause/counter measure
No image is
displayed.
• The cable is not correctly connected.
• The AC adapter is disconnected from the wall outlet.
• The AC adapter is disconnected from the power supply socket of the
presenter.
• The power is not on. (Blue lamp)
• Zoom is set at the TELE side, displaying only the white/black part of
the document.
• If you turn the power on immediately after turning it off, the unit may
not start. Wait for several seconds after turning the power off, and
then turn it back on.
• The slide switch is not set to the correct image output (RGB/VIDEO).
In such case, set the dip switch correctly by referring to "RGB/VID-
EO Switch".
No image is
displayed from the
USB.
• No image is output from USB during USB Mode (Mass Storage)
or SD Mode. Check whether or not it is set to Mass Storage or SD
mode. Switch the USB mode from Mass Storage to Application refer-
ring to "Function Setting Menu". When using SD mode, change the
output image to Camera image.
The image is out of
focus
• The document (object) is too close to the lens.
• Zoom is set at the TELE side after focusing at a wide angle (WIDE
side). Focus to its maximum limit at the TELE side.
• Some auto focus may be difficult to adjust. Focus on an image man-
ually referring to “Manual focus”.
The video output
image is disarrayed.
• Video output is set to [PAL]. If this product is set to the PAL system
and connected to a monitor specially designed for the NTSC system,
the video image may not be normally output but be disarrayed or in
black and white. Check if the video output system is PAL.
The image is
too dark.
• The intensity of the lighting is insufficient. Press the [BRIGHTNESS
] button on the operating panel or on the remote control to adjust
the brightness.
The image is striped. • This may be interference fringes between dots of printed matter and
TV scanning lines or CMOS pixels. Changing the projection range
may mitigate the trouble.
• Vertical stripes may appear on an LCD projector image. Manually
adjusting dot clock at projector side may mitigate the trouble.
TROUBLE SHOOTING
6
Содержание L-1EX
Страница 2: ......
Страница 3: ......
Страница 4: ......
Страница 5: ...AC AC...
Страница 6: ...AC AC AC AC AC AC...
Страница 7: ...AC AC AC AC AC...
Страница 8: ...AC AC AC AC AC AC...
Страница 9: ...AC AC AC100V 50Hz 60Hz 0 40 30 85 CMOS CMOS AC FD MO MD...
Страница 10: ...CD DVD LED SD Ni Cd 4...
Страница 12: ...10 Manual 55 56 56 57 58 60 61 PinP 62 63 6 64 64 7 66 66 67 67 68 68...
Страница 13: ...11 P 15 P 35 P 49 P 35 AF P 50 P 35 P 16 P 12 P 45 P 35 Image Mate CD ROM P 14 1...
Страница 14: ...12...
Страница 18: ...16 4 2 4...
Страница 20: ...18 7 30 7m 30 3 0 3 0 3 0 3 0 3 0 3 0 3 0 3 0...
Страница 21: ...19 OSD On Screen Display OSD OSD OSD OSD OSD 1 MENU OSD 2 MENU...
Страница 22: ...20 1 2...
Страница 23: ...21 Image Setting Function Setting Back OSD MENU OSD P 54 Camera OSD...
Страница 30: ...28 1 2 90 180 2...
Страница 31: ...29 3 AC DC IN 12V AC P 30 POWER 4 POWER ON POWER ON...
Страница 32: ...30 AC RGB RGB OUT RGB PC RGB RGB IN RGB RGB OUT DC IN 12V VIDEO OUT TV RGB IN USB PC PC PC PC...
Страница 34: ...32 1 POWER OFF POWER 2 OFF 2 AC AC 3 90 3 OFF...
Страница 35: ...33 4 180 AC OFF...
Страница 37: ...35 PC ON P 49 AF P 50 BRIGHTNESS BRIGHTNESS P 53 ON OFF ON OFF...
Страница 39: ...37 1 2 OSD 3 ZOOM IN SD OSD Guide ON SD SD SD SD SD SD SD 1 16 4 4 2 1 OSD SD SD 2 OSD 3 AF SD AF...
Страница 45: ...43 P 45 PC ON OSD Microscope Set AF Image Mode 1 Graphics1...
Страница 46: ...44 OSD Microscope Off OSD Microscope Off Image Mode Image Mode Microscope BRIGHTNESS BRIGHTNESS...
Страница 47: ...45 1 2 3...
Страница 48: ...46 4 5 20mm 28mm...
Страница 49: ...47 PC ON AF OSD Focus Manual P 50 BRIGHTNESS BRIGHTNESS P 53 ON OFF ON OFF 50mm...
Страница 50: ...48 OSD Image Rotation On 180 110 110 50mm OFF...
Страница 51: ...49 ZOOM OUT ZOOM IN 5 2 8 SD SD 5 L 1ex...
Страница 52: ...50 AF 50mm SD SD...
Страница 53: ...51 OSD Focus OSD AF AF Mode Zoom Sync...
Страница 54: ...52 ON OFF ON OFF OFF LED LED ON OFF ON OFF...
Страница 56: ...54 RGB RGB IN SD RGB RGB IN RGB VIDEO VIDEO PC PC RGB OUT PC VIDEO CAMERA...
Страница 58: ...56 OSD Preset 1 3 USB OSD Preset ON Power On USB 4 1 3 ON AF E x i t O N 3 2 1 ZOOM IN...
Страница 59: ...57 OSD Call 1 3 OSD Call ON Power On OSD Call Default USB E x i t O N 3 2 1...
Страница 60: ...58 OSD Function Setting Highlight Darkness Size...
Страница 61: ...59 SD PC OSD...
Страница 62: ...60 OSD Function Setting Mask Darkness SD PC...
Страница 63: ...61 OSD Function Setting Scroll 2 3 4 SD PC...
Страница 64: ...62 PinP 1 4 PinP 1 4 PinP PinP SD PC PinP 1 4...
Страница 65: ...63 RGB 1 OFF 2 3 ON 1 2 MENU ENTER...
Страница 67: ...65 SD SD SD SD SD 2 1 2 LED...
Страница 82: ...80 PART NAMES AND FUNCTIONS English Functions 1 2 6 7 8 11 13 3 9 4 5 14 10 12 Operating Panel...
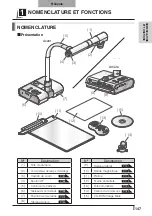
Страница 150: ...148 NOMENCLATURE ET FONCTIONS Fran ais Fonctions 1 2 6 7 8 11 13 3 9 4 5 14 10 12 Tableau de commande...
Страница 175: ...173 PROC DURES DE FONCTIONNEMENT Fran ais Pr sentation l aide d une carte SD disponible dans le commerce...
Страница 210: ......
Страница 222: ...220 NAMEN DER TEILE UND FUNKTIONEN Deutsch Funktionen 1 2 6 7 8 11 13 3 9 4 5 14 10 12 Bedienfeld...
Страница 247: ...245 INBETRIEBNAHME Deutsch Pr sentation mit einer SD Karte im Handel erh ltlich...
Страница 282: ......
Страница 283: ......