background image


31


4-2


USING IMAGE MATE 4


Run Image Mate 4 [            ], installed to your computer 

in the step “4-1 

INSTALLING IMAGE 

MATE 4”.


Select the desired camera to display by the following procedure   

The camera will not be recognized when it is not turned on. Turn on the camera. 


HOW TO SELECT THE CAMERA


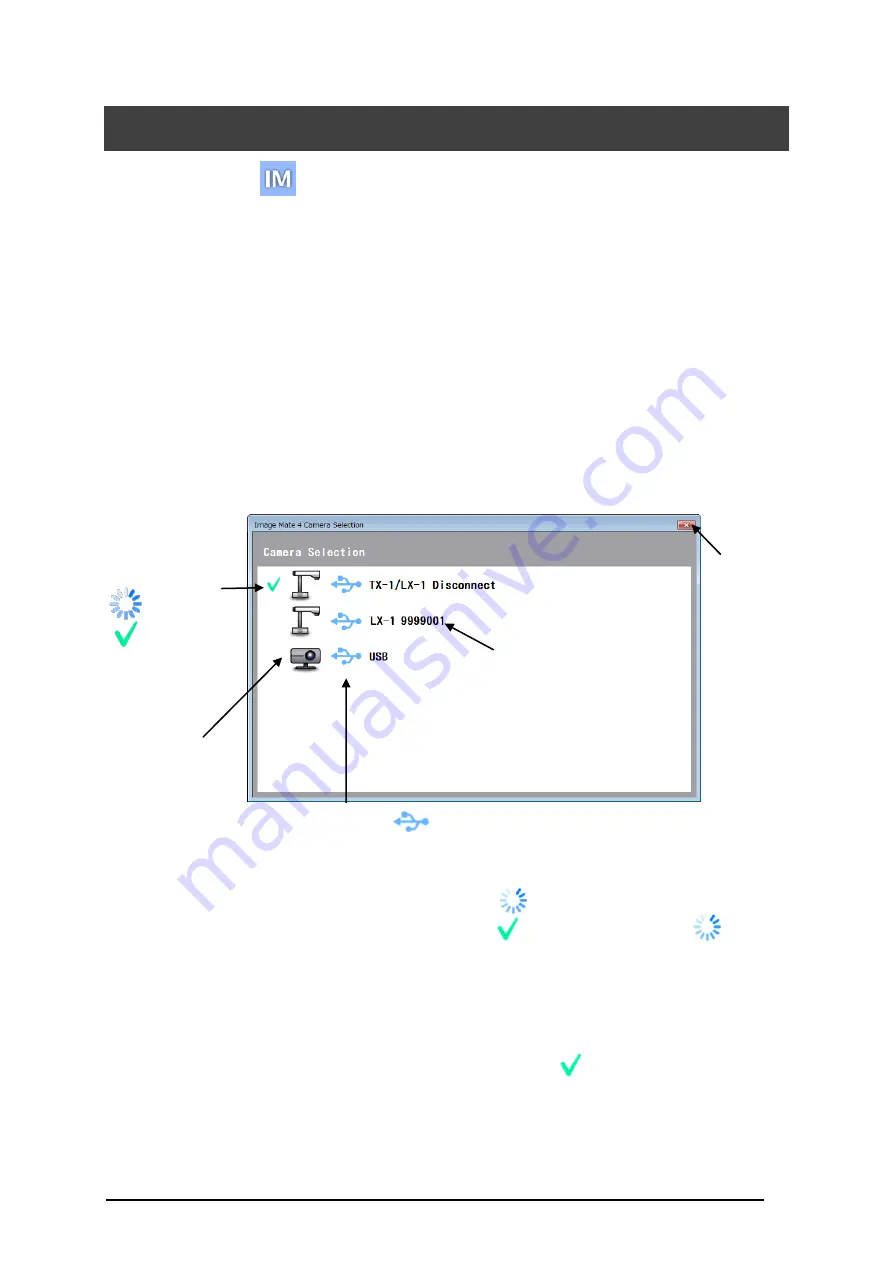
When the LX-1 is connected to a computer via the USB cable (the camera selection window 

does not appear on the screen), the live image of the camera appears after Image Mate 4 is 

started. 

When several cameras are connected to a computer, the camera selection window appears 

on the screen. 


Connection procedure


 Click the selected camera name. 


The connection status changes to “Connecting” [


]. 


The connection status changes to “Connected” [          ] from “Connecting” [            ] after 

the connection is established. 


The software will cancel the selection and start to connect to the other selected 

camera if the camera name of the other camera is selected before the connection is 

established. 


The connection will be disconnected if 

Connected

  [


] is pressed. 

 The camera selection window disappears and the live image of the camera appears. 


Exit 

Camera type


Camera name 

Factory default setting is 

serial number


Connection status 

Connecting 

Connected 

Type (USB


Содержание 1353-R

Страница 1: ...INSTRUCTION MANUAL TT L Please read this instruction manual carefully before using this product previously LX 1 and TT LX1...

Страница 2: ...ntences or illustrations marked with a Caution symbol Name Prohibited Meaning Indicates that the user must pay careful attention to any sentences or illustrations marked with a Prohibited do not do sy...

Страница 3: ...itch on the product and then unplug the power plug from the outlet Then contact your local dealer to request maintenance Continuing to use the product in this condition could result in a fire or elect...

Страница 4: ...s when you may not notice that a heavy object has been placed on the cable Do not damage process pinch twist pull or heat the power cable or the AC adapter The cable could be damaged and result in a f...

Страница 5: ...ctric shock Do not place the product in a location where it could be exposed to smoke steam or water droplets such as on a kitchen counter or near a humidifier This could result in a fire or electric...

Страница 6: ...d Black Spots There may be some pixels that do not properly operate due to the use of CMOS Area Image Sensors made up of many pixels Though luminescent or black spots may be found on the screen it is...

Страница 7: ...e or menu settings Copyright Unless used for personal use it is prohibited strictly under copyright law to use any photo files without the prior consent of the copyright holder Even if using for perso...

Страница 8: ...e the camera head could be damaged Installation Do not place the product on an unstable place or slanted surface Carrying the product Carry the product by holding the lower part of the main unit in bo...

Страница 9: ...F THE LX 1 16 2 2 SUPPLIED ACCESSORIES 17 IMAGE MATE 4 17 2 3 SHOOTING IMAGES 18 SETTING UP THE LX 1 18 TURNING THE POWER ON OFF 19 ADJUSTING THE SIZE 20 AF AUTO FOCUS 21 ADJUSTING THE BRIGHTNESS 22 T...

Страница 10: ...OOL 34 OTHERS 35 6 1 SHOOTING FORWARD OR BACKWARD 35 6 2 ABOUT THE BASE PLATE 35 HOW TO CHANGE THE POSITION BASE PLATE 35 6 3 DISPLAYING ENLARGED IMAGESUSING A MICROSCOPE 36 PROCEDURE 36 EXITING THE M...

Страница 11: ...nnect the LX 1 to a computer P 19 P 19 P 19 Press and slide the plug into the groove of the AC adapter as shown in the drawing Slide it until it clicks Choose the correct plug according to the outlet...

Страница 12: ...12 2 1 DOCUMENT CAMERA PART NAMES Operation of the main unit BASIC OPERATIONS Name AF button Zoom dial LED lighting Operating panel Rear panel P 16 P 21 P 20 P 23 P 13 P 14...

Страница 13: ...OFF LED turns red MENU To show hide the menu on the screen AF Enter When MENU is not displayed to focus automatically When MENU is displayed to execute the selected menu item Image rotation To rotate...

Страница 14: ...er Connect the supplied AC adapter and the supplied power cable Connect video cables such as HDMI cable and RGB cable to the LX 1 Then connect the AC adapter to the DC IN 5V in the rear panel and plug...

Страница 15: ...onditions is not guaranteed To connect to a computer via the USB cable Connect the supplied USB cable to the USB terminal on the rear panel To connect to a device with an HDMI input terminal Connect a...

Страница 16: ...e of the LX 1 stable operation may not be possible In that case change the position of the base plate In order to prevent the damage to the camera head pay attention to the position of the camera head...

Страница 17: ...an be performed by using Image Mate 4 Capture a still image from a live video stream from the LX 1 and save it to your computer Record a live video stream from the LX 1 and save it to your computer Co...

Страница 18: ...lace the LX 1 on a stable even surface 2 Raise the camera head as shown below CONNECTING THE VIDEO CABLE Connect the video cable corresponding to an image display device to the LX 1 with RGB cable com...

Страница 19: ...turns red when the power cable black is connected to the outlet The button turns purple for a few seconds when this button is pressed The image appears on the screen when the color changes to blue Pre...

Страница 20: ...oom Within the digital zoom range the image quality is degraded Digital zoom can be set ON OFF from the Settings menu ADJUSTING THE SIZE The display range of the document can be adjusted by rotating t...

Страница 21: ...FOCUS The auto focus works once when the AF button on the operating panel is pressed in One Push Auto Focus mode The auto focus can also be performed by pressing the AF button in the camera head P 26...

Страница 22: ...SS Press the button on the operating panel to adjust the image brightness When the OSD menu is not displayed Brightness The brightness of the image is increased Brightness The brightness of the image...

Страница 23: ...he light from the LED lighting does not shine directly into your eyes This product is equipped with a high brightness LED You can safely use it to light up the object The brightness will gradually dec...

Страница 24: ...to MENU Settings Output settings Auto The LX 1 automatically selects the output destination HDMI MENU Settings Output settings HDMI Set the output destination to HDMI RGB MENU Settings Output settings...

Страница 25: ...panel to display the OSD menu and then use the buttons to move the cursor to the icon you want to operate or set Press the button to set the setting value LIST OF MENU ICONS To go back the previous l...

Страница 26: ...em Factory Setting Function Microscope mode ON To ON OFF the microscope mode OFF Return Image mode Document camera To set to the mode suitable for displaying documents Black White To change color to B...

Страница 27: ...GB HDMI To set the output destination to HDMI RGB To set the output destination to RGB Return Language English To display the menu in English Japanese To display the menu in Japanese Return Reset Came...

Страница 28: ...mages to a computer Operate the LX 1 from a computer This instruction manual briefly explains the feature of Image Mate 4 Refer to the instruction manual of Image Mate 4 for details such as the system...

Страница 29: ...images can be output through the USB port Depending on the software you use you may not be able to display the images The displayed image may pause for a brief second when the object moves quickly Th...

Страница 30: ...Select Image Mate 4 3 Click Download and read the Precautions on the handling of the downloaded data Click Agree 4 Downloading will start after a short while If you cannot find the downloaded file che...

Страница 31: ...ed to a computer the camera selection window appears on the screen Connection procedure Click the selected camera name The connection status changes to Connecting The connection status changes to Conn...

Страница 32: ...isplayed image as a still image Start recording Stop recording To start and stop recording Open To open the destination folder of still image files or video files recorded with Image Mate 4 Freeze To...

Страница 33: ...TATUS Recording a video This icon appears during video recording The color of this icon changes between red and white during video recording Capturing a still image This icon appears during still imag...

Страница 34: ...on for the Image Mate Setting tool is created when Image Mate 4 is installed Click the icon to start the Image Mate 4 Setting tool 5 2 USING THE SETTING TOOL The following items which cannot be config...

Страница 35: ...operating panel 6 2 ABOUT THE BASE PLATE The base plate of the LX 1 is removable and can be attached in both directions Attaching the base plate facing the legs to the camera head direction will prev...

Страница 36: ...focus and brightness Attach the microscope attachment lens Attach the guide ring to the microscope attachment lens and cover the eyepiece with it Match the centers of the microscope attachment lens an...

Страница 37: ...al diameter of the eyepiece is 20 to 28mm Use the thinner guide ring for Microscope Lens Attachment There are two types of rings included in the package the thicker one is not used here Adjust the ang...

Страница 38: ...ing Elmo official website and copy update bin file to your computer in advance http www elmousa com LX 1 http elmoeurope com en html download 02 php Update Procedure 1 Connect the LX 1 to your compute...

Страница 39: ...nformation Version 6 5 CAPTURING A3 SIZED DOCUMENTS The LX 1 can capture images in 3 different angles of view A3 sized documents 4 3 aspect ratio can be captured The shooting conditions are as follows...

Страница 40: ...MI outputs Is the USB cable connected When the image is output via the USB cable it is not possible to output the image from the RGB and HDM outputs Remove the USB cable and retry The output image res...

Страница 41: ...appears The software may recognize it as error when it takes time to prepare the image output Restart the LX 1 and reconnect it to the computer Then restart the software Fails to output the UVC video...

Страница 42: ...evice 2 0 compliant Mini B receptacle x 1 8 2 MAIN CAMERA Item Specifications Lens f 4 0mm 48 0mm F3 2 F3 6 Frame rate 30fps Shooting area Focus working range TELE 200mm WIDE 50mm Optical zoom 12x Dig...

Страница 43: ...Image output 1080i 720p White balance Auto Natural light Fluorescent light Incandescent light 1 Brightness control Auto with level adjustment Manual Image mode Document B W Photo Flicker correction 60...

Страница 44: ...ils about specifications and instruction manual of the product refer to the following official website http www elmousa com LX 1 http elmoeurope com en html download 02 php 6X1VLAB04 R0 Xxx ATTENTION...

Отзывы: