Ellison eclips EC-C1200 Скачать руководство пользователя страница 32

32

TROUBLESHOOTING


TROUBLESHOOTING

* Results based on factory life test data. Your results may vary.

For latest updates to user's manual, please visit sizzix.com.

• 

problem: machine is not cutting with its usual pristine quality.

  Try this: Your Cutting Blade may be worn and need replacing (see pg. 25).
  Or this: Choose only the material type that corresponds with the material you are using from the list of recommended materials 

accessed from the eclips Handheld Remote Control.

  Or this: If you are using a material not listed on the Options Menu, you can manually change the Speed, Pressure and Blade 

Depth to customize the Machine to cut through your desired material. Please note that not all materials will be compatible with 
the Machine.

• 

problem: Cutting Blade does not cut all the way through material.

  Try this: Make sure Cutting Blade is installed properly (see pg. 7). 
  Or this: Make sure material to be cut is from list of recommended materials accessed from Handheld Remote Control. 
  Or this: Increase cutting pressure or decrease cutting speed (see pg. 20). If Blade does not cut through the recommended  

material, the Blade is in need of adjustment (see pg. 6) or replacement (see pg. 25).

• 

problem: the corners of the cutouts are wrinkled.


  Try this: If your corners are wrinkling when using any of the recommended materials accessed, then your blade may need to be 

replaced for a sharper cut. Other possibilities for a wrinkled cut include:


• Cutting Mat has lost its adhesion


• Pressure setting is too high (change to a lower number for lesser pressure)


• Speed setting is too fast (change speed to a slower, lower number)


• the Blade Depth setting is too high (change Blade Depth to a lower number)

• 

problem: machine is cutting outside of paper.

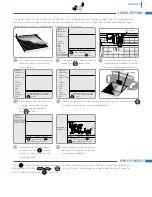
  Try this: Use the Cut Preview button to preview the image to be cut and to see how it will fit on the size of paper you are  

working with.

  Or this: Use Blade Positioner Control to move Blade to starting cutting position at upper left corner of material.

• 

problem: material keeps shifting from its original position during cutting.


  Try this: If your material is no longer adhering to the Cutting Mat, it is time to replace the Cutting Mat. 
  Or this: If you are using a material that has an adhesive side covered by a protective, slippery backing, turn it with the adhesive 

side facing up so that the material can better adhere to Cutting Mat. Be sure to use Mirror feature to reverse artwork to proper 
orientation.

• 

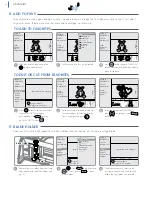
problem: eclips system will not turn on.

  Try this: Unplug system from wall outlet before troubleshooting. Make sure all components and connectors are plugged in  

properly (see pg. 6). When everything is connected, plug system into wall outlet and press power ON.

• 

problem: nothing shows on handheld remote Control screen.

  Try this: Make sure power is off and the USB cable is plugged into the Handheld Remote Control and Machine. Now press power ON.

• 

problem: eclips machine freezes up. 

  Try this: Turn off Machine and restart.

• 

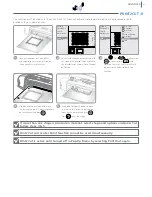
problem: material does not stick to Cutting mat.

  Try this: Remove clear protective sheet from Cutting Mat. Using the Spatula included in the optional Tool Kit, make sure all  

debris has been removed from the Cutting Mat. Align material to top left corner of Cutting Mat and press into place across  
entire Cutting Mat. If material will not stick to Cutting Mat, it is time to replace it. (Cutting Mat can become worn and lose  
sticking ability if in regular use for 4−6 months or sooner if used extensively.*)

• 

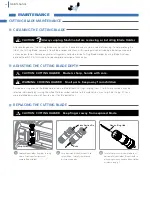
problem: Cutting mat will not load into machine.

  Try this: The built-in Cutting Mat sensor may not recognize the Cutting Mat being inserted. Make sure all edges of Cutting Mat 

are flat and uncurled before inserting against rollers and pushing the Load button on front right side of Machine.  
(Load/Unload can also be accessed on Handheld Remote Control Keypad.)

• 

problem: Cutout from Cutting mat cannot be removed.

  Try this: Make sure to use the Spatula when removing your cutouts from Cutting Mat.

Содержание eclips EC-C1200

Страница 1: ...cutting blade internal use only V 2 02 Read Guide Before Operating Product Save for Reference Version 2 0 Software For software updates please visit Sizzix com eclips Now you re in control USER S GUID...

Страница 2: ...your possibilities Best of all everything you need to get started is right here no computer required But there s more much more With Version 2 0 we ve incorporated many new changes to enhance your us...

Страница 3: ...d ALT keys 13 Beyond the Basics 14 Options Menu 14 Solid 14 Outline 14 Shadow 14 Pieces 14 Embellishments 14 Border 15 Add to Queue 15 Edit Queue 15 Function Keys 16 Setup 16 Fill 16 Fit 16 PIP 17 Mir...

Страница 4: ...laser product is safe under reasonably foreseeable conditions of operation Use of controls or adjustments or performance of procedures other than those specified herein may result in hazardous radiati...

Страница 5: ...mes styles and occasions 15 eclips Replacement Blades Keeps cutting crisp 16 12 x 24 30 5cm x 61 0cm Cutting Mat For longer cuts such as borders 17 Tool Kit Set of useful tools to enhance shapes and e...

Страница 6: ...chipboard and heavy cardstock require a higher number Blade Depth Setting For optimal results try a test cut and make necessary adjustments to the Blade Depth Setting before performing the final cut D...

Страница 7: ...Holder by turning the Clamp Screw clockwise until Blade Holder is secure 4 Clamp Screw White Ring Clamp set up CAUTION CUTTING HAZARD Blade is sharp handle with care WARNING MOVING PARTS Keep fingers...

Страница 8: ...th the Machine cover closed Align top edge of Cutting Mat against rollers and push Load button The Machine will automatically move the Cutting Mat to Start position 1 2 Rollers Load Button Tray PlacEM...

Страница 9: ...Selection Display ALT keys add options to keypad When highlighted red or blue keypad characters are active Cut HANDHELD REMOTE Control Page 16 Page 16 Page 16 Page 17 Page 17 Page 18 Page 18 Page 18...

Страница 10: ...1 Slide eclips cartridge into right side of Handheld Remote Control 2 English Spanish German French Select default language and press Inches Millimeters Select default dimension and press Please enter...

Страница 11: ...dstock L H 1 50 W 1 50 QTY 1 to select material size to Esc for more options Setup Space P R Setup Space P R 2 Press to highlight material size Press to apply changes Setup Space P R Setup Space P R S...

Страница 12: ...Space P R WARNING MOVING PARTS Keep fingers hair and clothing away Setup Space P R Setup Space P R SELECTING A SHAPE CUTTING Starter and Rockin Janie H 2 25 W 2 42 QTY 1 to edit qty to Esc to apply t...

Страница 13: ...cut See pg 15 for more information about the Queue Setup Space P R Using Keypad to edit size allows more exact sizes Setup Space P R Additional Font Features add shortcuts and tricks to simplify usin...

Страница 14: ...Starter and Rockin Janie SPEED 4 PRESSURE 2 12 x12 Cardstock L Solid Outline Shadow Pieces H 2 25 W 2 72 QTY 2 Starter and Rockin Janie All SPEED 4 PRESSURE 2 12 x12 Cardstock L Solid Outline Shadow P...

Страница 15: ...Display Press to highlight desired Border length Press to cut 2 Setup Space P R Setup Space P R Setup Space P R Note Border size height cannot be edited To change quantity press and use to change quan...

Страница 16: ...ow Pieces Embellishment H 5 49 W 5 90 QTY 4 Starter and Rockin Janie Press to view Setup Menu Use to scroll through options Press to open a menu Make changes and press to apply Press at any time to re...

Страница 17: ...rdstock L H 4 00 W 4 00 QTY 1 Starter and Rockin Janie SPEED 4 PRESSURE 2 12 x12 Cardstock L Outline Shadow Pieces H 4 00 W 4 00 QTY 1 Starter and Rockin Janie PIP Setup Space P R Setup Space P R Setu...

Страница 18: ...e to accompanying shapes Actual Off Actual On USING ACTUAL WITH Fonts 1 2 Pressing Actual key once ON Pressing again OFF Press Select a shape and then select a size Press Selected piece will be cut at...

Страница 19: ...add them to Queue Press again and last cut shape will appear in Queue again 2 3 Starter and Rockin Janie SPEED 4 PRESSURE 2 12 x12 Cardstock L Solid Shadow H 4 19 W 5 50 QTY 1 Starter and Rockin Janie...

Страница 20: ...s are automatically adjusted for you However since there are so many options of material thicknesses the Machine gives you the ability to manually adjust settings for the perfect cut see pg 19 for det...

Страница 21: ...sed as a stencil The Paper Saver option aligns the tops of the designs for more economical paper use Paper Saver Off Paper Saver On USING PAPER SAVER WITH Fonts Press on Keypad Press to highlight Pape...

Страница 22: ...SPEED 4 PRESSURE 3 D6 35 x0 Cardstock M H 3 00 W 3 00 QTY 1 Use keypad to enter material width to continue 12 x12 8 1 2 x 11 8 x8 6 x6 A4 12 x24 Dimensions Laser SPEED 4 PRESSURE 3 D6 35x7 62 Cardstoc...

Страница 23: ...as material size Press and select a design The Machine will cut within specified dimensions 6 SPEED 4 PRESSURE 3 L7 92 x5 63 Cardstock M H 3 00 W 3 93 QTY 1 to select material size to Esc for more op...

Страница 24: ...bellishment H 3 00 W 2 59 QTY 1 Starter and Rockin Janie SPEED 4 PRESSURE 2 12 x12 Cardstock L Solid Shadow Pieces H 3 00 W 3 54 QTY 1 Starter and Rockin Janie Setup Space P R Setup Space P R Setup Sp...

Страница 25: ...Blade Holder Laser Point This function makes it easy to center a shape inside or around another shape or within a particular area of a shape Have fun with this function and discover its countless opt...

Страница 26: ...o draw 4 SPEED 2 PRESSURE 1 12 x12 Pen Marker Solid Outline Shadow Pieces H 5 00 W 6 05 QTY 1 Starter and Rockin Janie Setup Space P R Have Machine lid open during Laser Cut Preview If Pen Holder func...

Страница 27: ...erior intact choose Solid Shadow or Outline 1 2 SPEED 4 PRESSURE 2 12 x12 Cardstock L Solid Shadow H 7 25 W 9 51 QTY 1 Starter and Rockin Janie Setup Space 5 3 SPEED 4 PRESSURE 2 12 x12 Cardstock L So...

Страница 28: ...Rockin Janie SPEED 4 PRESSURE 2 12 x12 Cardstock L Outline Shadow Pieces H 4 00 W 2 68 QTY 1 Add to Favs Blade Holder Center Point Double Cut Laser Cut Preview Pen Holder Print 2 Cut Rotate Starter a...

Страница 29: ...tools in the Tool Kit sold separately helps enhance shapes and ensures easy removal from Cutting Mat Why can t I change the quantity when I ve selected FILL When using FILL you cannot change the quant...

Страница 30: ...g Blade Holder by using Blade Pick from optional Tool Kit Visit Sizzix com to see complete selection of accessories Printed on a ring around the Blade Holder top are Blade Depth Settings ranging from...

Страница 31: ...mal use the Handheld Remote Control may become dirty or dusty To clean use only Isopropyl alcohol rubbing alcohol poured onto a clean paper towel Do not pour liquid directly onto the Machine Rub over...

Страница 32: ...Use Blade Positioner Control to move Blade to starting cutting position at upper left corner of material Problem Material keeps shifting from its original position during cutting Try this If your mate...

Страница 33: ...Agreement will terminate upon such assignment 2 Restrictions Except to the extent expressly permitted under applicable law you may not reverse engineer decompile or otherwise attempt to make a copy of...

Страница 34: ...Further this Limited Warranty does not cover damages or defects caused by misuse or abuse of the Product modification of or to any part of the Product use of any third party software firmware and or...

Страница 35: ...l rather than personal applications Opening the Product housing or tampering with the Product label will automatically void the warranty Disclaimers SIZZIX SHALL NOT BE LIABLE FOR CONSEQUENTIAL AND IN...

Страница 36: ...2010 Ellison Educational Equipment Inc All rights reserved...

Отзывы: