background image

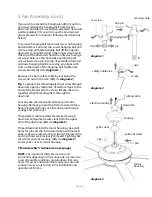
Remove 6 screws and washers from yoke plate 
(located on top plate on top of motor housing) 
and set aside. Lift yoke plate and top plate to 
remove from motor housing and set aside.

Time Saver

: Washers for blade screws can be 

set on each blade screw prior to installing 
blades.

Locate 15 blade attachment screws and 
washers in hardware pack. Slide blade through 
one of the narrow, rectangular openings on 
center band,  aligning holes in blade with holes 
in blade arm (located 

inside

 motor housing). 

Insert 3 blade attachment screws (along with 
washers) with fingers first and then tighten 
screws securely with a Phillips screwdriver. 
Repeat procedure for each remaining blade.

Re-attach top plate and yoke plate to yoke 
using washers and screws that were previously 
removed. 

Be sure that semicircular cutout on top 

plate and yoke plate aligns over electrical wires for 
a proper fit. (Also make sure that reverse switch 
aligns properly with hole for reverse switch in top 
plate--

see drawing.

) Tighten screws to secure 

top plate and yoke plate.

["Fan Assembly" continued on next page.]

page 4

5. Fan Assembly.

blade

top plate

yoke

center band
on motor housing

yoke plate

blade attachment

screws and washers

blade

arms

hole for reverse switch

reverse switch

Содержание E-TIT52ABZ5LKRCI

Страница 1: ...ntrol Operation pg 10 Testing Your Fan pg 10 Troubleshooting pg 11 Warranty pg 11 Parts Replacement pg 11 net weight of fan 21 54 lb 9 77 kg PRINTED IN CHINA READ THESE INSTRUCTIONS AND AND SAVE THEM...

Страница 2: ...r there is more than one house wire to connect to the corresponding fan lead wires consult an electrician for the proper size wire connectors to use 5 Electrical diagrams are for reference only Light...

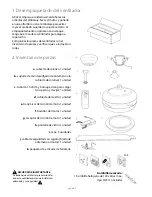
Страница 3: ...a canopy 1 piece b hanging bracket pre attached to canopy 1 piece c 6in downrod and hanging ball with pin and clip 1 piece d yoke cover 1 piece e remote control transmitter 1 piece f motor housing 1 p...

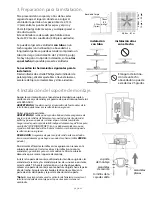
Страница 4: ...aker panel and be sure operating light switch is turned to the OFF position WARNING Failure to disconnect power supply prior to installation may result in serious injury Remove existing fixture WARNIN...

Страница 5: ...crews along with washers with fingers first and then tighten screws securely with a Phillips screwdriver Repeat procedure for each remaining blade Re attach top plate and yoke plate to yoke using wash...

Страница 6: ...the electrical wires this will keep the wires together when threading them through the downrod Loosen yoke set screws and nut at top of motor housing Remove pin and clip from downrod if you have not...

Страница 7: ...to hold the stepladder in place and to help lift the fan up to you once you are set on the ladder Find a secure attachment point wood ceiling joist highly recommended and secure safety cable It will...

Страница 8: ...ire the receiver with wire connectors provided as shown in diagram at right Tip While you are wiring keep in mind that wires must not obstruct receiver from sliding into hanging bracket Wrap each wire...

Страница 9: ...ockwise until it slides completely into place IMPORTANT The glass shade must be removed in order to replace the bulb When you need to replace the bulb please allow bulb and glass shade to cool down be...

Страница 10: ...ON OFF and DIM has been pre set to the ON position DIM If you do not wish to have dimming capability please move the switch to the OFF position ON OFF Restore electrical power Within 30 seconds of re...

Страница 11: ...Test dimmer function by holding down the button for more than 2 seconds For more detailed information on using remote control see Section 10 above If the remote control operates all of the functions o...

Страница 12: ...est one 2 Check to be sure set screw s on motor housing yoke is are tightened securely 3 Check to be sure set screw on hanging ball is tightened securely Parts Replacement page 11 WARNING Failure to d...

Страница 13: ...cionamiento del control remoto P g 10 Verificaci n del funcionamiento del ventilador P g 10 Localizaci n de fallas P g 11 Garant a P g 11 Piezas de repuesto P g 11 peso neto del ventilador 9 77 kg 21...

Страница 14: ...alibre del cable de la casa es superior al 12 o hay m s de un cable de la casa para conectar a los cables principales del ventilador al cual corresponda cada uno consultar con un electricista para inf...

Страница 15: ...e montaje fijado de antemano a la cubierta decorativa 1 unidad c tubo de 15 24cm y bola que sirve para colgar con perno y clavija 1 unidad d cubierta del cuello 1 unidad e transmisor del control remot...

Страница 16: ...y asegurarse de que el interruptor de luz est APAGADO ADVERTENCIA El no desconectar el suministro de fuerza antes de la instalaci n puede tener por resultado lesiones graves Quitar el aparato existent...

Страница 17: ...pa junto con las arandelas con los dedos primero y luego apretarlos bien con un destornillador de estrella Phillips Repetir el procedimiento con las dem s aspas Volver a fijar la placa superior y la p...

Страница 18: ...edacito de cinta aisladora en la punta de los cables esto mantendr los cables juntos al pasarlos por el tubo Aflojar los tornillos de fijaci n del cuello y la tuerca en la parte superior del bastidor...

Страница 19: ...para que le suba el ventilador cuando usted ya est preparado en la escalera para colgarlo Encontrar un punto de acoplamiento seguro se recomienda la viga de madera en el techo y asegurar el cable de...

Страница 20: ...e provistos como se muestra en el diagrama al lado Sugerencia Mientras est haciendo la instalaci n el ctrica recordar que los cables no deben de impedir el posicionamiento del receptor en el soporte d...

Страница 21: ...a hacia la DERECHA en sentido de las agujas del reloj hasta que se quede encajada IMPORTANTE Es necesario quitar la pantalla de vidrio para reemplazar la bombilla Cuando necesite reemplazar la bombill...

Страница 22: ...er a conectada pero fuera del compartimento de la bater a hasta que se haya terminado el proceso de aprendizaje Nota El interruptor del reductor de luz etiquetado ON OFF y DIM est programado de antema...

Страница 23: ...on el bot n en el control remoto Poner a prueba la funci n del reductor de luz oprimiendo el bot n por m s de 2 segundos Para informaci n m s detallada acerca del control remoto ver la secci n 10 m s...

Страница 24: ...de aprendizaje entre el ventilador y el transmisor del control remoto y que no se activ el c digo Desconectar la electricidad quitar la tapa de la bater a en la parte de atr s del transmisor y repetir...

Отзывы: