Page 8
011822
1-888-651-3431
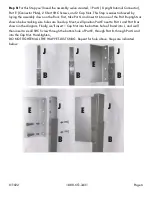
Step 12:
For this Step you’ll need our assembly so far, 1 Part A, 2 short SHC screws, 2 Cap Nut, small
Hex key, large hex key. Repeat Step 10 for other side. Finished assembly should appear like image
below:
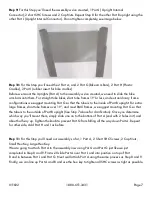
Step 13:
For this Step you’ll need our assembly so far,1 Part F, 2 Short SHC Screws, 2
Cap Nut, Small Hex Key, Large Hex Key.
It’s time to add the Top Connector Bar across Parts A. To do this, line up the holes of the Part
F and Part A, and insert 1 cap nut in the back of Part A. Insert short SHC Screw through
Part F, into Part A, and into cap nut. Hand tighten. Repeat the process for the other side. Finally, use
the hex keys to tighten down tight.
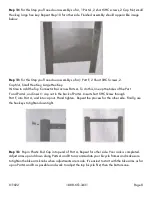
Step 14:
Pop in Plastic End Cap in top end of Part A. Repeat for other side. Your rack is completed.
Adjust arms up and down along Parts A and B to accommodate your bicycle frames and make sure
to tighten the bike arm knobs when adjustments are made. It’s easiest to start with the bike arms as far
up on Part A and B as possible and work to adjust the top bicycle first, then the bottom one.


