background image

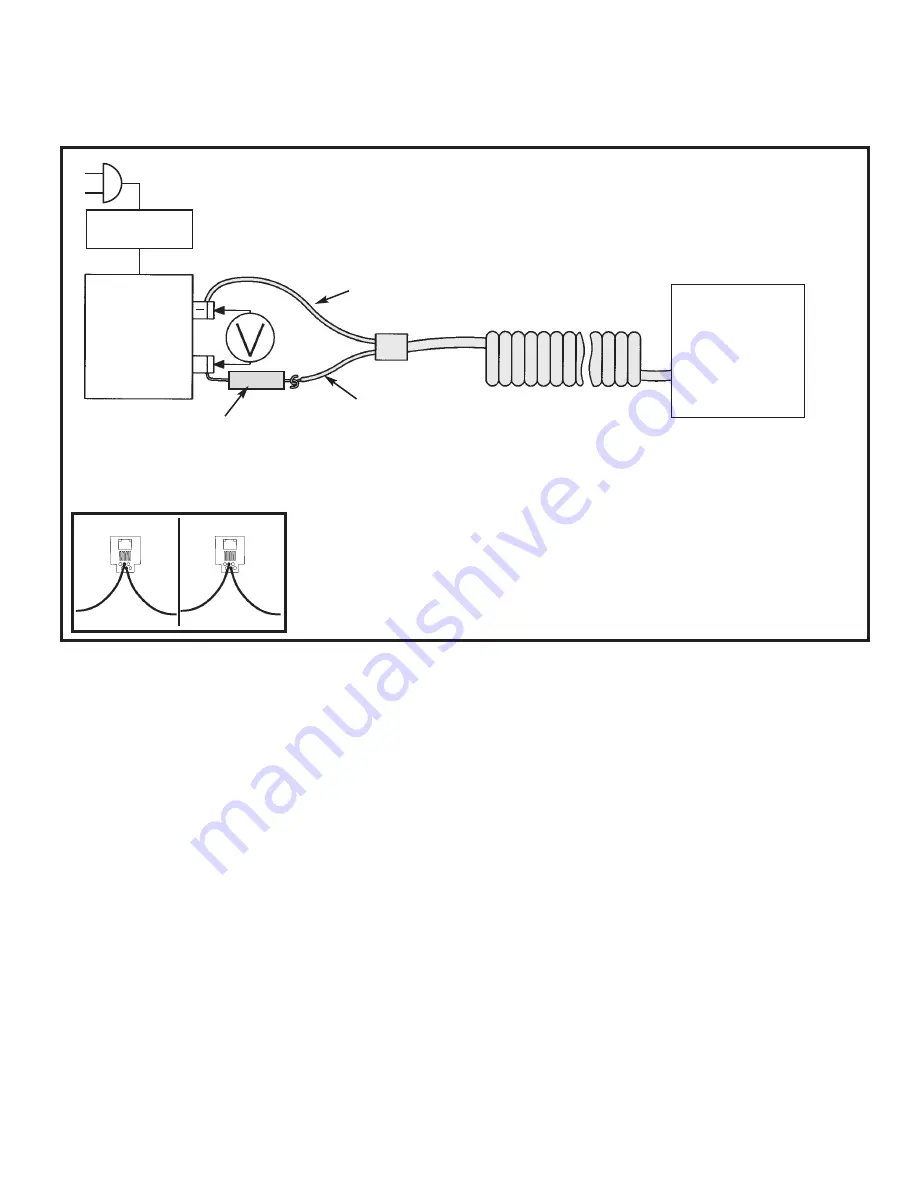
2. Set the voltmeter to read 50VAC. Put the variac ON and adjust it to obtain 50VAC on the voltmeter.

3. Put the ringer switch ON. Plug in the telephone cord and position the telephone so that it is on hook (hook

switch depressed). You should hear a steady ringing from the telephone.

4. Take the variac OFF.

5. To measure the AC voltage across the 1k

resistor, move the voltmeter lead from the red wire of the modular

jack to point “C”. Put the variac ON. The voltage should be between 2 and 5VAC. This indicates that the
AC current drawn by the telephone is between 2 and 5mA. AC resistor voltage: _______________

6. Take the variac OFF.

7. Have your instructor verify the ringer test just performed.

Instructor’s approval: _______________________

If any of the above tests should fail:

a) Check for broken wires on the keyboard, speaker, buzzer, hook switch, and telephone cord.

b) Check that the hook switch is seated properly against the switch button and that it operates freely.

c) Recheck the PC board for bad solder joints and solder bridges.

d) Recheck the PC board components. Be sure that all resistor and capacitor values are correct according to

the assembly instructions. Be sure that each transistor is the proper type and is installed properly.

Disconnect the test setup.

-29-

Type A

Type B

Green

Red Red

Green

Figure 6-21

1k

5W Resistor

Modular Jack

Green - Type A
Red - Type B

Telephone Cord

+

Red - Type A
Green - Type B

Telephone

Isolation

Transformer

Variac

Содержание AK-700

Страница 1: ...ht 2006 1994 Elenco Electronics Inc Revised 2006 REV N 753700 No part of this book shall be reproduced by any means electronic photocopying or otherwise without written permission from the publisher E...

Страница 2: ...R11 R21 100k 5 1 4W brown black yellow gold 161000 2 R10 R14 150k 5 1 4W brown green yellow gold 161500 1 R8 1M 5 1 4W brown black green gold 171000 Diodes QTY SYMBOL VALUE DESCRIPTION PART 4 D1 D4 1N...

Страница 3: ...ellow 6 814420 1 Wire 26AWG Stranded Red 2 834520 1 Wire 26AWG Stranded Red 4 834521 4 Wire 26AWG Stranded Gray 3 834530 1 Wire 26AWG Stranded Orange 2 834523 1 Ribbon Cable 1 9 wires 879009 1 Solder...

Страница 4: ...ch SPDT S1 S3 Switch SPDT Hook S2 5 8 Screw 1 4 Screw BAG 5 Microphone Microphone Pads Buzzer Buzzer Pad Modular Jack Label Cover BAG 6 Ribbon Cable Solder Wire Battery Snap BAG 7 Contact Keypad Push...

Страница 5: ...eir actual value printed on them Some capacitors may have their value printed in the following manner The maximum operating voltage may also be printed on the capacitor Second Digit First Digit Multip...

Страница 6: ...pose of the telephone is to transmit and receive voice signals allowing two people with telephones to communicate with each other To be of practical value the telephone must be connected to a switchin...

Страница 7: ...accept the number being called a dial tone is sent to the calling telephone The dial tone stops when the first digit is dialed Dialer There are two types of dialers pulse and tone Pulse Dialer Pulse d...

Страница 8: ...hanically connected to switch SR1 Similarly each of the other rows and columns are connected to their corresponding switch Thus pressing any key closes two switches and generates two frequencies Press...

Страница 9: ...e is alternately attracted to one coil and then the other The hammer attached to the armature thus strikes one bell and then the other to produce the ringing sound Induction Coil Balance Network When...

Страница 10: ...mponent Lead Solder Soldering Iron Drag Foil 1 Solder all components from the copper foil side only Push the soldering iron tip against both the lead and the circuit board foil 2 Apply a small amount...

Страница 11: ...hematic Diagram The capacitor C1 blocks the 48VDC that is present on the inputs when the phone is on the hook To signal an incoming call the Central Office places a 90VAC 20Hz signal on top of the 48V...

Страница 12: ...flat side in the same direction as marked on the PC board Figure D Use a discarded resistor lead for a jumper wire Leave about a 1 16 space between the jumper and the PC board 1 16 R3 47k Resistor yel...

Страница 13: ...the buzzer to the PC board Identify the red and orange wire and cut a 2 piece of wire off of the 3 gray wire If needed strip 1 8 of insulation off of each end Tin the buzzer with solder in the locati...

Страница 14: ...hown in Figure 6 3 Check that the telephone cord wires are soldered correctly c Check that transistor Q1 is a 9014C and is mounted with the emitter base and collector leads as shown in the assembly in...

Страница 15: ...ctor leads as shown in the assembly instructions d Check that R5 R6 and R7 are the correct values e Check for bad solder joints and solder bridges 5 Put the ringer switch to OFF toward the edge of the...

Страница 16: ...ircuit regardless of the polarity of the input This is done to protect the integrated circuit and other components that may be damaged by a reversal of polarity When the hook switch is not depressed t...

Страница 17: ...re F Q4 9013 Transistor see Figure C R16 15k Resistor brown green orange gold Q3 2N5551 Transistor see Figure C R10 150k Resistor brown green yellow gold R12 3 3k Resistor orange orange red gold Q2 2N...

Страница 18: ...the microphone Bend the wires and very carefully solder the wires to the microphone as shown in Figure 6 8 Peel the backing off of one side of the microphone pads and place them onto the microphone a...

Страница 19: ...are mounted as shown in the assembly instructions d Check that the resistors just installed are the correct values as shown in the assembly instructions e Check the hook switch and the wires to the P...

Страница 20: ...C and connect as shown in the Figure 6 12 Position the PC board so that the telephone is off the hook hook switch not depressed Turn the power supply ON and adjust it for 48VDC on the meter 6 To measu...

Страница 21: ...lead to the anode of D2 point B in Figure 6 12 Record the Output Voltage ___________ 14 To obtain the voltage across the diode bridge subtract the Output Voltage step 13 from the input voltage step 12...

Страница 22: ...illator The IC HM9102 has a built in oscillator clock which is used for tone generation and other timing functions Because the frequency of dialing tones must be precise for the Central Office to reco...

Страница 23: ...orange orange red gold D5 1N4148 see Figure E R23 10k Resistor brown black orange gold R9 100k Resistor brown black yellow gold R22 15k Resistor brown green orange gold IC1 IC Socket IC1 HM9102 IC see...

Страница 24: ...te see Figure 6 18 BE SURE THAT THE 2 BUTTON IS IN THE HOLE MARKED ABC With the contact pad laying flat on the front side insert the keyboard s PC board under the two upper restaining tabs Push the lo...

Страница 25: ...ent notch as shown in the assembly instructions c Check that diodes D5 D6 and D7 are installed with the polarity markings as shown in the assembly instructions d Check the ribbon cable for broken wire...

Страница 26: ...structions d Check the ribbon cable for broken wires check switch S3 e Check for bad solder connections and solder bridges Look closely at the IC and the ribbon cable The pads on these components are...

Страница 27: ...C board and does not extend out over the edge of the top case c Make sure that no leads from the PC board touch the 1 4 screws mounting the keypad d Be sure that the keyboard PC board does not hit the...

Страница 28: ...The voltage should be between 5 and 12 5VDC Input Voltage _______________ 6 To measure the input current to the telephone measure the voltage across the 1k resistor Connect the negative voltmeter lead...

Страница 29: ...e switch to the pulse position 3 Set the voltmeter to read 48VDC Turn the power supply ON and adjust it for a reading of 48VDC on the voltmeter 4 Set the oscilloscope as follows Coupling AC Sweep 10mS...

Страница 30: ...OFF 7 Have your instructor verify the ringer test just performed Instructor s approval _______________________ If any of the above tests should fail a Check for broken wires on the keyboard speaker b...

Страница 31: ...a modular jack if your telephone is to be installed in the same place or 2 install a modular jack in a new location and connect it to the hard wired jack with a length of 4 conductor telephone wire Mo...

Страница 32: ...hone service wire Connect the two green wires and tighten the screw Fasten the red telephone service wire to the red telephone cable wire in the same way Fasten the remaining wires in the same way If...

Страница 33: ...32 SCHEMATIC DIAGRAM...

Страница 34: ...se found in your radio and TV B an integrated circuit C an FET amplifier D an electret microphone 6 Sidetone is A the frequency band on either side of the voice signal B the tone a caller hears when t...

Страница 35: ...is flowing Pulse Dialing A dialing system in which the number of pulses on the local loop represents the number dialed Ring Wire The red negative wire of the local loop Sidetone The sound heard from t...

Страница 36: ...99 Washington Street Melrose MA 02176 Phone 781 665 1400 Toll Free 1 800 517 8431 Visit us at www TestEquipmentDepot com...

Отзывы: