3. PANEL LAYOUT AND CONNECTORS
10
3. PANEL LAYOUT AND CONNECTORS
3.1 FRONT PANEL
11
10
19
20
5
4
22
9
6
7
8
13
12
14
16
15
17
21
2
1
23
3
18
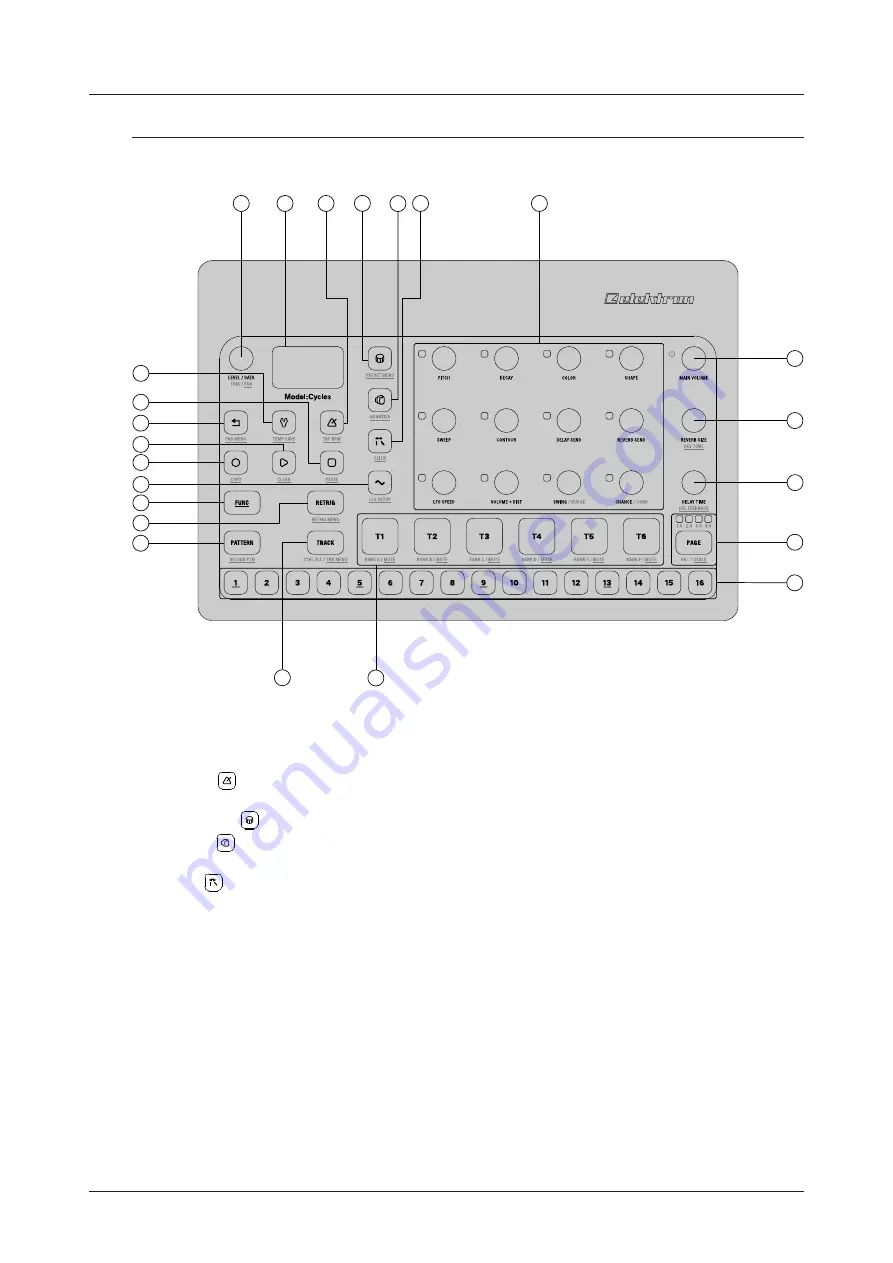
1.
LEVEL/DATA
sets the overall volume level of the active track. You also use it to set parameters and
navigating menus. The secondary function sets the track pan.
2. Screen.
3.
[TEMPO]
opens the TEMPO menu, where you can adjust the tempo. The secondary function makes
it possible to tap the tempo.
4.
[MACHINES]
opens the MACHINES menu. The secondary function opens the PRESET menu.
5.
[PUNCH]
adds fixed pseudo-compression and distortion to the active track. The secondary function
opens the QUANTIZE menu.
6.
[GATE]
activates gate mode for the trigs on the active track. The secondary function opens the
CLICK menu.
7.
TRACK PARAMETER
knobs are used for setting parameter values. Press and hold
[FUNC]
, and then
turn the knobs to change values in larger increments.
8.
MAIN VOLUME
sets the volume for the main outputs and the headphones output. Press and hold
MAIN
VOLUME
to turn the unit on. Press and hold
MAIN VOLUME
until the countdown on the screen finishes
to turn the unit off. The unit will not turn off if you let go of the
MAIN VOLUME
during the countdown.
This is to prevent that you turn the unit off accidentally.
9.
REVERB SIZE
sets the size of the global reverb effect. The secondary function sets the reverb tone.
10.
DELAY TIME
sets the delay time of the global delay effect. The secondary function sets the delay
feedback.
11.
[PAGE]
selects the active pattern page, if the pattern is made up of more than 16 steps. The <PATTERN
PAGE> LEDs indicate how many pattern pages the active pattern consists of, or which pattern page is
currently active. The LED flashes on the pattern page currently playing. The secondary function access-
es the SCALE menu. This key also activates Fill mode (when GRID RECORDING mode is not active).


