background image

11

SPECIFICATIONS

PARTS & FEATURES

Power Supply
Refrigerant Type
Max Cold Water Power
Cold Capacity / Hour
Cold Temp Range
Hot Water Power
Hot Capacity / Hour
Hot Temp Range
Product Dimensions

Net Weight

Cover Tray

Lid of the Coffee Brewer  

Coffee Brewer Control panel

Control: Hot Water

Toddlers Safety Latch

Control: Cold Water

Faucet Nozzle For Coffee

Faucet Nozzle For Cold/Hot Water

LED Night Light 

Drip Tray For Coffee 

Drip Tray

Door

Bottle Tray

Power Cord

Hot Energy  Saving Switch

Cold Energy  Saving Switch

Carry Handle

Drain Plug

Condenser

120V~/60Hz / 12 Amp
R-134A
100W
3 L/H
3°C – 10°C / 37.4

0

F- 50

0

F

1400W
9 L/H
89°C – 94°C / 192

0

F - 201

0

F

104.4 H x 32  W x 38.2 D (cm)
41.1 H × 12.6 W x 15 D (inch)
18.2kg / 40.1Ibs

2


3


10 

11 
12 

13 
14 

15 

16 
17 

18 

19 

10 

11 

12 

13 

19 

18 

17 

14 

16 

15 

Содержание Estratto 8LCH-KK-SC-SSF

Страница 1: ...D INSTRUCTION MANUAL BEFORE OPERATING PRODUCT The appearance of your product may differ from the above illustration 8LCH KK SC SSF 2013 Electrotemp Technologies Inc PN 5M009933XW02 User Manual For service call 1 855 7 MY BREW Single Serve Turbo Brewer and Self Cleaning Bottled Water Cooler Combination Unit ...

Страница 2: ...illing of the coffee water tank Combines the benefits of premium quality water with gourmet coffee to make a deli cious cup of coffee 2 High temperature preheated hot water is ready to pour through your Coffee Capsule making a very fast yet fully developed cup 3 No more thin watery cups of coffee Brews at 201 0 F a tem perature experts recommend for full bodied robust flavor extrac tion A full 9 0...

Страница 3: ...k for more and colder water X Cold technology uses ice to chill the water to the lowest average temperature in the industry 6 Continuous dispensing for 6cups of coffee no waiting time for heating water Easy to use intuitive prompt menu 8 Dispenses water for 3 cup sizes 6 oz 8 oz and 10 oz Coffee Capsule conveniently stored Properly hot water allows to make an America favorite Medium Roasted Coffee...

Страница 4: ...common in the hot tank with the internal heaters Decalcification required once per year only when used with tap or Spring mineral water e Patent Pending design of Turbo Heating makes more and hotter water in the shortest time 10 11 Superior technology Patented technology allows for the water tempera ture to be controlled within 1 degree F while on standby 20 years designed life time External heate...

Страница 5: ... and is covered by numerous patents Ozone O3 could be called a miracle substance since it is a naturally occurring disinfectant A common example is the ozone created by lightning strikes The electric charge in lightning reacts with the oxygen in the air and creates ozone The fresh smell in the air after a storm is the odor of ozone Ozone molecules are very unstable and in short time they changes i...

Страница 6: ...vices An Electronic sensor and mechanical float valve Electronic sensor activates solenoid shut off valve silently Mechanical float valve is similar to toilet bowl float valve As water level nearing to be full near closing the valve higher pitch noise might be heard from the float valve This noise will last until cold water tank is full 3 Hot tank water heater During the periods of maintaining ste...

Страница 7: ...ense hot water without placing K cup or equivalent Single Serve Coffee Cup It is recommended to use purified water made by Reverse Osmosis or Distilled without mineralization This way internal valves and hot tank will not clog up with calcium deposits and help to keep your machine trouble free without any need for descaling Please place water bottle and plug power cord into electrical outlet Wait ...

Страница 8: ...unit in a dry place away from direct sunlight Do NOT use outdoors Install and use only on a hard flat and level surface Do NOT place dispenser into an enclosed space or cabinet Do NOT operate dispenser in the presence of explosive fumes Position back of dispenser no closer than 4 inches from wall and permit free airflow between wall and dispenser There must be at least 4 inches clearance on the si...

Страница 9: ...cord connected water cooler This water cooler must be properly wired for correct polarity and grounded In the event of a mal function or breakdown grounding will reduce the risk of electrical shock by providing a path of least resistance for electric current This water cooler is equipped with a cord having an equipment grounding conductor and a grounding plug The plug must be plugged into an appro...

Страница 10: ...w Off to Dry Cups with Open Bottom Troubleshooting How to Open Control Board Enclosure for an Inspection Open Inspection Porthole Cleaning Under Control Board in Case of Severe Spill of Liquids 2 5 6 7 8 9 10 11 11 12 12 13 14 15 17 19 19 19 20 23 24 24 TABLE OF CONTENTS KEY INFORMATION FOR FUTURE USE For future support please record your serial number located on label on back of the unit and date...

Страница 11: ...atch Control Cold Water Faucet Nozzle For Coffee Faucet Nozzle For Cold Hot Water LED Night Light Drip Tray For Coffee Drip Tray Door Bottle Tray Power Cord Hot Energy Saving Switch Cold Energy Saving Switch Carry Handle Drain Plug Condenser 120V 60Hz 12 Amp R 134A 100W 3 L H 3 C 10 C 37 40 F 500 F 1400W 9 L H 89 C 94 C 1920 F 2010 F 104 4 H x 32 W x 38 2 D cm 41 1 H 12 6 W x 15 D inch 18 2kg 40 1...

Страница 12: ...at least 4 inches from wall and there are at least 4 inches of clearance on both sides 4 To minimize vibration and noise make sure dispenser is level Notice Do NOT plug in power cord yet INSTALLATION WARNING Keep plastic bags away from children 1 Remove dispenser from packaging 2 Unpack drip tray and insert into dispenser 3 Remove protective packaging from around probe 4 Properly dispose of all pa...

Страница 13: ... HEAT READY BREW PRE HEAT READY BREW PRE HEAT READY BREW PRE HEAT READY BREW PRE HEAT READY BREW PRE HEAT READY BREW PRE HEAT READY a Open lid and place a COFFEE CAPSULE when LED is blinking b Press coffee capsule down by your hand to pierce bottom of the capsule c If Brewer was switched off wait up to 10 minutes until the Ready light is ON If READY light is blinking if indicates there is not enou...

Страница 14: ...through the drain at the back Replace the drain plug Step 3 Place the probe into the container with vinegar Step 4 Plug the power cord into an outlet Hold the reset switch for the door to start the cooler and get the pump working Fill the cooler with vinegar Step 5 Check if hot tank is full of vinegar by dispensing it from hot water faucet Step 6 Remove the container filled with the vinegar and cl...

Страница 15: ...sh bottle in front of tray Clean bottle cap and neck Using soft cloth soaked in bleach solation Remove entire plastic cap from bottle Push down on probe head until it is seated Push bottle inside of compartment Close the door gently CAUTION OPERATION Stainless Steel tube for Self Clean function Expandable telescopic tube for drawing water from the bottle NOTICE When using a 5 gallon rectangular bo...

Страница 16: ...If problems persist Call 1 855 7 MY BREW for assistance Initial Rinsing of Water Lines This unit has been tested and sanitized prior to packing and shipping However during transit odors from shipping containers can accumulate in the tank and lines To remedy please follow the instruc tions below 1 Allow cooler to fill with water as per initial setup instructions 2 Plug unit in turn hot water switch...

Страница 17: ...w coffee Replace an Empty Bottle Notice When your bottle is empty the water cooler will beep intermittently You may also hear a sucking sound when the bottle empties This is normal and is another way to be alerted that your bottle is empty Replace empty bottle as soon as you notice it is empty If unavailable leave door ajar or unplug cooler to stop beeping noise and flashing lights There may be a ...

Страница 18: ...zles of water faucets with a mild chlorine solution 1 teaspoon of unscented bleach in 12 oz of water 9 After 1 minute rinse by spraying the nozzles with tap water 10 Place probe into bottle filled with tap water Install in cooler and close door 11 Dispense 1 Gallon of water from both faucets 12 Remove bottle with tap water 13 Install bottle with fresh water 14 Dispense 1 gallon of water from both ...

Страница 19: ... to SET For altitude under 10 000 Feet elevation you should touch Big cup button for 1 second until Big cup LED will flash then touch BREW button to SET Immediately after power cord is plugged into the electrical outlet you will hear an audible signal At the same time touch together buttons for Middle Cup and Brew for 1 second water will start dispensing from the Brewer When water reaches required...

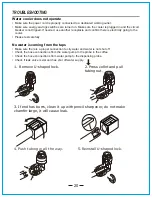
Страница 20: ...No water is coming from the taps Make sure there is a proper connection to city water and water is not shut off Check the hose connections from the water pump to the probe in the coffee Check the hose connections from water pump to the dispensing probe Check if leak valve is wet and has shut off water supply TROUBLESHOOTING 1 Remove U shaped lock 2 Press collet and pull tubing out 3 If end has bur...

Страница 21: ...ections from the water pump to the probe in the coffee Dispenser is noisy Make sure dispenser is positioned on a level surface Place mat provided under the cooler Water tastes bad Drain the water from the reservoirs and replace the bottle with a fresh one Clean the dispenser as per Proper Care Cleaning instructions The buttons on the control panel do not work or unresponsive The hot tank may be em...

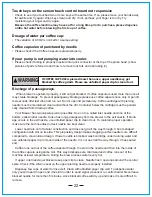
Страница 22: ...ridge must be periodi cally cleaned from dried up coffee Your Brewer has two capsule piercing needles One on top called inlet needle and one at the bottom called outlet needle It also has long passageway from the brewer to the exit nozzle If block age occurs in the exit nozzle use unfolded paper clip to clean it out To maintain proper operation make sure the both needles and exit nozzle are kept c...

Страница 23: ...n and does not go all the way through It has U shaped configuration with slot on its side It has sealed end Coffee runs out out of the coffee capsule through the slot in the needle and then into the inside of the coffee capsule using same slot A B B A HOW TO OPEN CONTROL BOARD ENCLOSURE FOR AN INSPECTION Report observations to service toll phone 1 855 7 MY BREW Unscrew two holding screws from the ...

Страница 24: ...ecting power cord Unscrew two holding screws from the back as shown Lift Coffee Capsule storage tray Beware of hot water Report observations to service toll phone 1 855 7 MY BREW 1 3 2 Using flat screwdriver Push lock tabs to release control board assembly Lift controe board assembly If water present soak it up with paper towel Close lid and press down 1 4 2 3 24 ...

Страница 25: ...ubsidiary of Green Mountain Coffee Roasters Inc Electrotemp Technologies Inc is not affiliated with Green Mountain Coffee Roasters or Keurig Electrotemp Technologies Inc 406 Watline Avenue Mississauga Ontario L4Z 1X2 Canada Toll free 1 855 7 MY BREW www electrotemp com ...

Отзывы: