background image


1.


Once the engine is running, disconnect the black (-)clamp first and return this cable to its stored 

position on the Jump Starter. 

2.


Disconnect the red (+) clamp and return this cable to its stored position on the power booster. 

3.


As soon as possible, connect your Jump Starter system to the 120V AC adapter/charger and 

recharge. 


Compressor operation 

Caution: Run compressor only for 10 minutes at a time contiunously. Then leave off for 10minutes before 
using again so that compressor can cool. 

1.


For tire inflation use the universal adapter that is attached permanently to the air hose. Place this 

adapter onto the tyre valve system, press the adapter lever down to lock onto the valve system. 

2.


For inflation of leather balls, flotation devices, etc., use one of the plastic nozzles. 

3.


Check pressure gauge determine the desired pressure (A). 

4.


Turn on power switch (B). 

5.


When the desired pressure is reached turn the compressor switch off (B). 

6.


Remove the adapter from tyre or other item being inflated. 


Battery replacement 

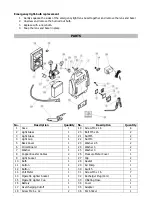
This figure shows a back view of your Jump Starter with cover and eight screws removed. To replace the 
battery follow these steps. 


1.


Unscrew and remove the eight cross-headed screws at the back of your power booster. 

2.


Life off the cover plate to expose the battery compartment. 

3.


Unscrew the two cross-headed screws at the top of the battery. 

4.


Lift the battery out of the battery compartment. 

5.


Detach cables and the red and black recharging wires from the battery terminals. 

6.


Ensure that the replacement battery is oriented with the label out. 

7.


Ensure that the red cable and red recharging wire are attached to the positive (+)battery 

terminal(also marked with red).Attach cables and the recharging wires to the battery terminals. 

8.


Taking care NOT to damage the circuit board, slide the new battery in position. 


Warning: Do NOT dispose of the battery in fire as this may result in an explosion 
Warning: Before disposing of the battery, protect exposed terminals with heavy-duty electrical 
tape to prevent shorting(shorting can result in injury or fire). 


Содержание 10000862

Страница 1: ...3 in 1 Starthilfeset mit Kompressor 10000862 ...

Страница 2: ...kl Abdeckung Eigenschaften 600A Spitzen 300A Starthilfeleistung Starthilfe von Autos LKWs anderen Straßenfahrzeugen und Booten ohne dass ein anderes Fahrzeug oder eine Stromquelle vorhanden sein muss 12V Steckdose ermöglicht den Gebrauch von Geräten die Sie sonst am 12V Zigarettenanzünder betreiben Bis zu 50 Std 12V Betrieb möglich Sie können 12V Geräte im Notfall oder unzugänglichen Orten benutze...

Страница 3: ...es Ladevorgangs wird noch mehr Wasserstoff abgegeben Wasserstoff ist 1 Explosiv 2 Giftig beim Einatmen 3 Hochentzündlich Um Explosionen und oder das Austreten von Batteriesäure zu vermeiden Es darf kein Kurzschluss zwischen dem roten und schwarzen Batterieanschluss verursacht werden Überbrücken Sie Fahrzeuge nur an gut belüfteten Orten Schließen Sie zuerst die rote Klammer an den Pol der Batterie ...

Страница 4: ...on der 12V Steckdose 2 Stecken Sie den 12V Stecker in die Seite des Geräts Diese Tabelle zeigt Ihnen die ungefähre Nutzungsdauer bei vollständiger Ladung Gerätetyp Stromverbrauch in Watt Nutzungsdauer in Stunden 1 8 2 16 3 24 4 32 5 40 6 48 Starthilfe Für eine optimale Nutzung lesen Sie bitte folgende Schritt für Schritt Anleitung 1 Schließen Sie zuerst die rote Klammer an den Pol der Batterie ihr...

Страница 5: ...Schrauben und anschließend die Abdeckung um die Batterie zu tauschen 1 Entfernen Sie die 8 Schrauben an der Rückseite 2 Entfernen Sie die Abdeckung 3 Lösen Sie die beiden Kreuzschrauben oben an der Batterie 4 Heben Sie die Batterie aus dem Fach Achtung Um Kurzschlüsse zu vermeiden achten Sie darauf dass Sie die Anschlusskabel nicht vertauschen 5 Trennen Sie die beiden Kabel von den Batterieanschlü...

Страница 6: ...Schraube M5x16 2 3 Lichtglass 1 21 Mutter M5 2 4 Lichtschale 1 22 Mutter M3 2 5 Abdeckung hinten 1 23 Scheibe 2 5 2 6 Steuerkarte 1 24 Scheibe 3 2 7 Scheibe 1 25 Scheibe 3 1 8 Kupfer Überbrückungskabel 2 26 Druckmesserabdeckung 1 9 Lampenfassung 1 27 Klammer 2 10 Leuchtmittel 1 28 Dichtung 1 11 Taste 1 29 Kompressor 1 12 Taste 1 30 Schalter 1 13 Volt Anzeige 1 31 Schraube M3x16 7 14 Zigarettenanzü...

Страница 7: ...hränkungen pro Tag Monat Jahr sowie über etwa anfallende Kosten bei Abholung entnehmen Sie bitte den Informationen der jeweiligen Gemeinde Hinweise zur Batterieentsorgung Batterien dürfen nicht in den Hausmüll gegeben werden Als Endverbraucher sind Sie zur Rückgabe gebrauchter Batterien gesetzlich verpflichtet Sie können Batterien nach Gebrauch in der Verkaufsstelle oder deren unmittelbarer Nähe z...

Страница 8: ...DC cigarette lighter socket with overload protection provides power for utilities and appliances that usually plugged into vehicle or boat 12V cigarette lighter socket Provides up to 50 hours of DC power when use in with 12V DC appliances Allows 12V DC appliances to be used in remote sites and or in emergency when commercial power is not available Solid state automatic operation and circuit protec...

Страница 9: ...arrives Warning Lead acid batteries generate hydrogen gas during normal operation More gas is generated when the battery is charging Hydrogen gas is 1 Explosive 2 Poisonous to breath 3 Highly flammable To avoid an explosion and or the possibility of being splashed with battery acid Never allow the red and black clamps to touch each other nor to both touch the same metal object Only attempt to jump...

Страница 10: ...r as a 12V DC DC power source 1 Life up the cover of 12V DC cigarette lighter receptacle 2 Insert the 12V DC cigarette lighter plug from the appliance into the 12V DC cigarette lighter receptacle on the side of your booster The following table will give you an idea of what operation time you can expect when starting from a fully charged system Appliance type Power consumption in watts Usage time i...

Страница 11: ...6 Remove the adapter from tyre or other item being inflated Battery replacement This figure shows a back view of your Jump Starter with cover and eight screws removed To replace the battery follow these steps 1 Unscrew and remove the eight cross headed screws at the back of your power booster 2 Life off the cover plate to expose the battery compartment 3 Unscrew the two cross headed screws at the ...

Страница 12: ...t M5 x 16 2 3 Light Glass 1 21 Nut M5 2 4 Light Cup 1 22 Nut M3 2 5 Back Cover 1 23 Washer 2 5 2 6 Circuit Board 1 24 Washer 3 2 7 Washer 1 25 Washer 3 1 8 Copper Booster Cables 2 26 Pressure Meter Cover 1 9 Light Socket 1 27 Clip 2 10 Bulb 1 28 Gasket 1 11 Button 1 29 Air Pump 1 12 Button 1 30 Switch 1 13 Volt Meter 1 31 Screw M3 x 16 7 14 Cigarette Lighter Socket 1 32 Recharger Plug Cord 1 15 Ci...

Отзывы: