background image

8

1

5a

6

7

* Certain models only.

Before stArtinG

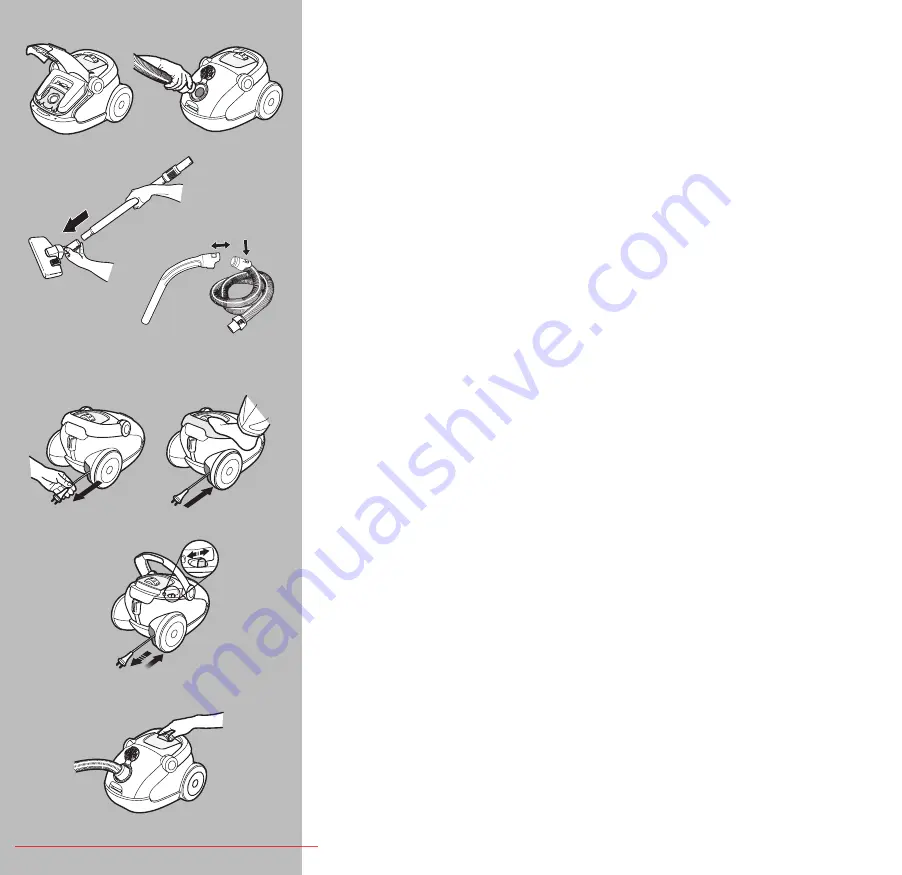
Check that the s‑bag® is in place.

   Insert the hose until the catches click to engage (press 

the catches to release the hose).


Attach the telescopic tube to the hose handle and 
the floor nozzle (when you want to remove it again, 
press the lock button and pull the pieces apart).

Insert the hose into the hose handle until the catches 

click to engage (press the catches to release the hose).

5a   Pull out the power cable and plug into the mains. 
5b  Press the carrying handle to rewind the cable (hold the 

plug to prevent it striking you).

Some vacuum cleaners, depending on the model, are 

equipped with an automatic cable winder (autoreverse). 

Pull out the cable and plug in the vacuum. Move the 

control backwards in order to wind the cable in and out 

as required. Move it forwards to lock the cable once it is 

at the required length.

7   Start the vacuum cleaner using the rolling control. 

Increase/reduce the suction power by adjusting the 

rolling control. In the auto‑position* the suction power 

is automatically adjusted depending on the surface.

check lights at start

When the machine is started, all the check lights initially light 

up. They will then all go out with the exception of Optimum 

(o). 

English

* Nur bestimmte Modelle.

VorBereitunGen

Prüfen, ob der s‑bag® richtig eingelegt ist.

   Schlauch einführen, bis Verriegelung einrastet. Zur 

Freigabe des Schlauches Verriegelung drücken.

   Teleskoprohr an Schlauchgriff und Bodendüse 

anbringen (zum Lösen Verriegelungstaste drücken 
und Teile auseinander ziehen).

Schlauch in den Schlauchgriff einführen, bis 
Verriegelung einrastet. Zur Freigabe des Schlauches 
Verriegelung drücken.

5a   Stromkabel herausziehen und in Steckdose stecken. 
5b  Zum Zurückspulen des Kabels Tragegriff drücken 

(Netzstecker festhalten, damit er unkontrolliert 

herumschlägt).

Manche Staubsauger (modellabhängig) sind mit 

einem automatischen Kabelspuler mit automatischer 

Umkehr ausgestattet. Stromkabel herausziehen und 

in Steckdose stecken. Regler nach hinten schieben, 

um Kabel nach Bedarf auf‑ und abzuspulen. Regler 

nach vorne schieben, um das Kabel nach Abspulen der 

gewünschten Länge zu fixieren.

7   Staubsauger mithilfe des Walzenreglers einschalten. 

Saugleistung durch Einstellen des Walzenregler 

steigern/reduzieren. In der Automatik‑Stellung* erfolgt 

eine automatische Anpassung der Saugleistung an den 
Untergrund.

Kontrollleuchten beim start

Beim Einschalten des Staubsaugers leuchten alle 

Kontrollleuchten kurz auf. Anschließend erlöschen alle 

Kontrollleuchten mit Ausnahme der Kontrollleuchte 

“Optimum (o)”. Ist

Deutsch

4

5b

2192727-03.indd   8

12/7/06   9:35:46 AM

Downloaded From Vacuum-Manual.com Manuals

Содержание Z 7329 Oxygen +

Страница 1: ...NEW Downloaded From Vacuum Manual com Manuals ...

Страница 2: ... Downloaded From Vacuum Manual com Manuals ...

Страница 3: ...exible et les brosses 15 Gestion des pannes et informations consommateur 17 Français Deutsch Vielen Dank dass Sie sich für den Electrolux Oxygen Staubsauger entschieden haben Diese Bedienungsanleitung gilt für alle Oxygen Modelle Das bedeutet dass Ihr Modell u U bestimmte Zubehörteile nicht enthält Zubehör und Sicherheitsvorkehrungen 6 Vorbereitungen 8 Bestmögliche Resultate erzielen 10 Austausche...

Страница 4: ...ms Oxygen modeliams Tai reiškia kad tam tikri priedai gali neįeiti į Jūsų konkretaus modelio komplektą Priedai ir saugumo priemonės 31 Prieš pradedant naudotis 33 Kaip pasiekti geriausią rezultatą 35 Kaip keisti dulkų maišelį s bag 37 Variklio filtro pakeitimas 37 Žarnos ir antgalio valymas 39 Sutrikimų šalinimas ir informacija vartotojams 41 Norsk Takk for at du har valgt en Electrolux Oxygen stø...

Страница 5: ...t jelenti hogy egy konkrét típusnál néhány tartozék hiányozhat Tartozékok és biztonsági előírások 55 Üzembe helyezés előtt 57 A legjobb eredmények elérése 59 Az s bag porzsák cseréje 61 A motorszűrő cseréje 63 A tömlő és a szívófej tisztítása 63 Hibaelhárítás és ügyféltájékoztatás 65 Română Vă mulţumim pentru alegerea unui aspirator Electrolux Oxygen Aceste instrucţiuni de folosire sunt valabile p...

Страница 6: ...uthorised Electrolux service centre Be sure to keep the vacuum cleaner in a dry place ZUBEHÖR UND SICHERHEITSVORKEHRUNGENZ Zubehör 1 Teleskoprohr 2 Schlauchgriff Schlauch 3a 3b Umschaltbare Kombi Bodendüse 4 Fugendüse 5 Kombinationsdüse mit Möbelpinsel und Polsterdüse 6 Staubbeutel s bag 7 Turbobürste 8 Parkettbürste 9 Staubwedel Sicherheitsvorkehrungen Der Oxygen sollte nur von Erwachsenen und nu...

Страница 7: ...sitivo de seguridad evita que se cierre la tapa sin que haya una bolsa s bag en el interior No intente forzar la tapa para cerrarla Nunca pase la aspiradora sobre Objetos cortantes Fluido esto podría ocasionar graves daños al aparato Cenizas candentes o frías colillas de cigarro encendidas etc El polvo fino como yeso cemento harina cenizas calien tes o frías podría dañar gravemente el motor y la g...

Страница 8: ...e exception of Optimum o English Nur bestimmte Modelle Vorbereitungen 1 Prüfen ob der s bag richtig eingelegt ist 2 Schlauch einführen bis Verriegelung einrastet Zur Freigabe des Schlauches Verriegelung drücken 3 Teleskoprohr an Schlauchgriff und Bodendüse anbringen zum Lösen Verriegelungstaste drücken und Teile auseinander ziehen 4 Schlauch in den Schlauchgriff einführen bis Verriegelung einraste...

Страница 9: ...ella presa di corrente 5b Premere la maniglia per il trasporto per riavvolgerlo tenere la spina per evitare di venire colpiti 6 Alcuni aspirapolvere a seconda del modello sono dotati di un avvolgicavo automatico riavvolgimento automatico Estrarre il cavo ed inserire la spina dell aspirapolvere Spostare il comando all indietro per avvolgere o svolgere il cavo a seconda delle necessità Spostarlo in ...

Страница 10: ...1b Parking position for storage BESTMÖGLICHE RESULTATE ERZIELEN Die Düsen wie folgt benutzen Teppiche Die Düse für Teppiche und harte Böden mit dem Hebel in Stellung 1 verwenden Die Saugleistung bei kleinen Teppichen verringern Hartböden Die Düse für Teppiche und harte Böden mit dem Hebel in Stellung 2 verwenden Drücken Sie bei einer Düse für Teppiche und harte Böden mit zwei Pedalen das Pedal rec...

Страница 11: ...ros se meubles comme illustré au point 6 ou le plumeau Easy Clean 7 suivant les modèles Fentes coins etc Utiliser le suceur pour fentes 8 Utiliser la turbobrosse suivant les modèles 9 Raccorder la turbobrosse au tube Remarque Ne pas utiliser la brosse électrique ou turbobrosse sur des tapis en peau des tapis avec de longues franges ou des tapis dont l épaisseur dépasse 15 mm Pour éviter d abîmer l...

Страница 12: ... ausgetauscht werden 2 Den Schlauch entfernen und den Deckel öffnen 3 Staubbeutelhalter mit Staubbeutel entnehmen 4 Staubbeutel s bag am Pappstreifen aus der Führungnut ziehen Auf diese Weise wird der Staubbeutel automatisch verschlossen und das Austreten von Staub verhindert 5 Neuen Staubbeutel s bag in den Staubbeutelhalter einsetzen Dazu Pappstreifen bis zum Einrasten in die Führungsnut schiebe...

Страница 13: ... solo sacchetti Electrolux originali s bag Anti odour o s bag Long Performance Sostituzione del filtro del motore codice filtro EFH12a EFH13W 1b Sostituite il filtro quando la spia si accende o ogni 2 anni 2 Rimuovere il flessibile e aprire il coperchio 3 Rimuovere il supporto del sacchetto raccoglipolvere 6 Aprire il supporto del filtro del motore e piegarlo in avanti 7 EFH12a Rimuovere con caute...

Страница 14: ...NIGUNG DES SCHLAUCHES UND DER DÜSEN Der Staubsauger stoppt automatisch wenn die Düse das Rohr der Schlauch der Filter oder der s bag Staubbeutel blockiert ist Ziehen Sie in solchen Fällen den Netzstecker und lassen Sie den Staubsauger 20 30 Minuten abkühlen Die Blockierung beseitigen und oder den Filter und den s bag Staubbeutel ersetzen und wieder beginnen Rohre und Schläuche 1 Die Rohre und Schl...

Страница 15: ... que produce la obstrucción en el tubo elástico apretándolo No obstante tenga mucha precaución si la obstrucción está producida por trozos de vidrio o agujas atascadas dentro del tubo elástico Nota La garantía no cubre los daños ocasionados al limpiar el tubo elástico Limpiar la boquilla para suelos 3 Para evitar un deterioro de la potencia de succión limpie la boquilla para alfombras superficies ...

Страница 16: ...brannt ist Der Staubsauger stoppt 1 Prüfen ob der Staubbeutel s bag voll ist In diesem Fall durch einen neuen ersetzen 2 Sind Düse Rohr oder Schlauch blockiert 3 Sind die Filter blockiert Wasser ist in den Staubsauger eingedrungen Es ist notwendig den Motor in einem autorisierten Electrolux Servicezentrum auszutauschen Schäden am Motor die durch eingedrungenes Wasser verursacht wurden sind nicht d...

Страница 17: ...azioni per l utente Ricerca dei guasti L aspirapolvere non si accende 1 Controllare che il cavo sia collegato alla rete 2 Controllare che la spina e il cavo non siano danneggiati 3 Controllare che non vi sia un fusibile bruciato L aspirapolvere si spegne 1 Controllare se il sacchetto raccoglipolvere s bag è pieno In tal caso sostituirlo 2 La bocchetta il tubo o il flessibile si bloccano 3 I filtri...

Страница 18: ...ivt kul Syntetiskt materiale som filtrerer dobbelt så godt som en normal papirpose og holder længere s bag Long Performance Den nye generationen af fuld syntetiske poser med en uovertruffen funktionalitet Sugeeffekt og luftgennemstrømning bibeholdes under hele posens levetid Høj filtreringsevne takket være det specielle synteti ske materiale som tilbageholder op til 99 af støvpartiklerne Holdbar o...

Страница 19: ...nnerhalb von 2 Werktagen ist die bestellte Ware bei Ihnen AEG Electrolux Serviceline 01805 30 60 80 aus dem Festnetz der Deutschen Telekom Euro 0 12 Min Web shop www electrolux de Fax 0911 323 49 1930 E Mail service kleingeraete aeg hausgeraete de UK For those living in United Kingdom Electrolux makes it easy to buy exactly what you want In order for you to get the most out of your vacuum cleaner ...

Страница 20: ...recolección de equipos eléctricos y electrónicos para reciclaje Al asegurarse de que este producto se deseche correctamente usted ayudará a evitar posibles consecuencias negativas para el ambiente y la salud pública lo cual podría ocurrir si este producto no se manipula de forma adecuada Para obtener información más detallada sobre el reciclaje de este producto póngase en contacto con la administr...

Страница 21: ...amas šio produkto išmetimas Dėl išsamesnės informacijos apie šio produkto išmetimą prašom kreiptis į savo miesto valdžios įstaigą buitinių šiukšlių išmetimo tarnybą arba parduotuvę kurio je pirkote šį produktą Pусский Символ на изделии или на его упаковке ука зывает что оно не подлежит утилизации в качестве бытовых отходов Вместо этого его следует сдать в соответствующий пункт приемки электронного...

Страница 22: ...ménye ket amelyeket ellenkező esetben a termék nem megfelelő hulladékkezelése okozhatna Ha részletesebb tájékoztatás ra van szüksége a termék újrahasznosítására vonatkozóan kérjük lépjen kapcsolatba a helyi önkormányzattal a háztartási hulladékok kezelését végző szolgálattal vagy azzal a bolttal ahol a terméket vásárolta Slovensky Symbol na výrobku alebo na jeho obale znamená že s výrobkom sa nesm...

Страница 23: ...77 Downloaded From Vacuum Manual com Manuals ...

Страница 24: ...78 Downloaded From Vacuum Manual com Manuals ...

Страница 25: ...79 Downloaded From Vacuum Manual com Manuals ...

Страница 26: ...2192727 03 Downloaded From Vacuum Manual com Manuals ...

Отзывы: