background image

OPERATING INSTRUCTIONS

Seite 10

62.9677.01_UL

2.7

SWITCHING OFF THE GRILL/GRIDDLE

2.7.1

MAIN BURNER

D

Turn the knob (1/Fig.9) back clockwise from highest setting 
7 to pilot burner ignition 1.


The gas supply to the main burner is stopped and the main 
flame is shut down. The flame of the pilot burner keeps on 
burning and is available for further main burner ignitions.

2.7.2

PILOT BURNER FLAME

D

Press the knob (2/Fig.9) lightly and turn clockwise from 
pilot burner ignition to Off.


The complete gas supply is cut off and the pilot light 
extinguishs.


= Off

D

Ignition can only start again when the heating element has 
cooled down.

2.7.3

LONG SHUT-DOWNS

The following should be observed when shutting down for a 
long period:

D

When operating with liquid gas, also turn off the bottle or 
tank valve. 

D

Never store the fryer where the temperature can drop 
below 32°F (0 °C).

D

Rub all chrome nickel steel surfaces with a cloth soaked in 
vaseline oil, to lay down a thin protective coating.

D

Air the installation site regularly.

3.

CLEANING

The appliance should be cooled before every cleaning 
operation.

D

Shut off all the gas taps and control valves on the range.

D

Use a brush to wash the base plate with hot water to which 
a fat-dissolving agent has been added, rinse with hot water 
and rub dry. Do not use bleaching and chloric cleaning 
agents.

D

Heavy soiling can be removed with a scraper.

D

Depending on utilization, the pressure tube and the drip 
pan should be cleaned periodically with a small brush. 

D

Wash rust-resistant chrome nickel steel panels with hot 
soapy water to which a fat-dissolving agent has been 
added and rub them dry. 

Note

D

The appliance must not be sprayed with a water jet or high-
pressure cleaner. 

D

The floor directly in front of, near and behind the appliance 
must be cleaned normally without a high-pressure cleaner. 

D

Never use 

steel wool

spatulas

 or 

ordinary steel wire 

brushes

 for cleaning the surfaces, since the deposition of 

steel particles can lead to rust formation. Stainless steel 
wool can possibly be used, but only in the grinding direc-
tion.

D

Never use chloric products (bleaching dye, hydrogen chlo-
ride etc.) for cleaning chrome nickel steel, even if they are 
diluted.

D

Never use corrosive substances for cleaning the floor 
under the appliance (e.g. hydrochloric acid). Clean the 
appliance with commercial cleaning agents. Do not use 
granular or abrasive agents.

3.1

 GAS BURNER

So far as is necessary, the pilot burner and main burner are 
cleaned by after-sales service. 

3.2

FLAME

In a visual check, the flames must be dark blue without any 
upper yellow or orange tips; they must be stable and soot-free 
and adhere firmly to the outlets.
If there is a lack of primary air, the flame has yellow streaks 
and tips; if there is too much primary air, the flame is short, 
transparent and tends to lift off the burner.

When the flame is correctly adjusted, it must not lift off or back-
fire when the burner is cold as well as warm. 
The flame will backfire into the inside of the burner when the 
speed of the gas-air mixture through the burner outlets is too 
low, particularly when the air passages are dirty.
The different ignition processes must also take place without 
any delays. This concerns: ignition, arc-through and. extending 
the flame over the whole burner area.
If the flame fails to meet all the requirements, cleaning or 
maintenance is necessary.

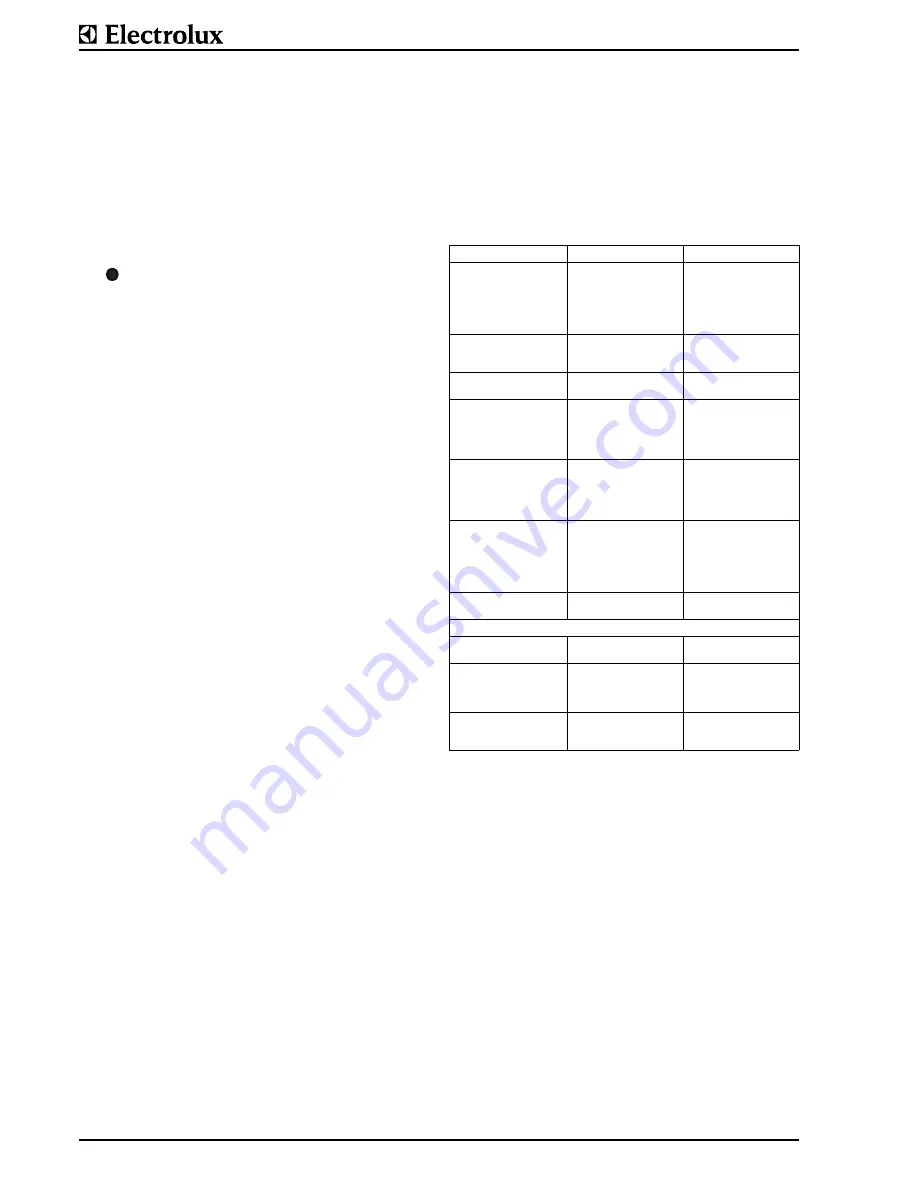
4.

MALFUNCTION

Plate does not heat up.

• The thermal limiter has 

tripped.


• Defective thermostat.
• The capillary tube sen-

sor is damaged.

- Inform After-sales ser-

vice.

Flame smokes.

• Gas mix too rich.
• Partially blocked burner 

gaps.

- Inform Customer Ser-

vice.

Long yellow flame tips.

• Mixing tube narrowed by 

dirt.

- Inform Customer Ser-

vice.

Flame lifts off.

• Exit velocity too high due 

to blocked burner gaps.

• Pressure regulator on 

gas cylinder not opera-
ting correctly.

- Inform Customer Ser-

vice.

Flame flashes back.

• Mixture too lean.
• Insufficient exit velocity 

at burner gaps.

• Soiled airways
• Blocked nozzle.

- Inform Customer Ser-

vice.

No flame or flame too 
small.

• Blocked nozzle or mixer 

tube.

• Blocked gas tap.
• No  gas.
• Insufficient gas pres-

sure.

- Inform Customer Ser-

vice.

- Check gas tap setting.

No flame at low setting.

• Blocked low setting 

nozzle.

- Inform Customer Ser-

vice.

No flame.

• Blocked burner gaps.
• Blocked nozzle.

- Clean pilot burner cap.

Flame goes out after con-
trol valve release.

• Thermo-element insuf-

ficiently heated (dirty?)

• Defective thermo-ele-

ment

- Inform Customer Ser-

vice.

Flame too small or too 
large.

• Primary air ratio adju-

sted.

• Nozzle blocked.

- Inform Customer Ser-

vice.

Malfunction

Possible cause

Remedy

Pilot burner

Содержание Thermaline 9CHG584122

Страница 1: ...intenance can cause property damage injury or death Read the installation operating and maintenance instructions thorou ghly before installing or servicing this equipment AVERTISSEMENT L installation inexacte l ajuste ment le changement le service ou l entretien peuvent causer des blessures matériels des domma ges ou la mort Lisez les instruc tions d installation d opération et d entretien complèt...

Страница 2: ...Doc 62 9677 01_UL Against wall contre une paroi Free standing isolé Connections Raccordement Gas Gaz Fig 1 INSTALLATION DRAWINGS PLANS D INSTALLATION ...

Страница 3: ...L INFORMATION 3 II INSTALLATION INSTRUCTIONS 5 III OPERATING INSTRUCTIONS 9 SOMMAIRE IV INSTRUCTIONS GÉNÉRALES 13 V INSTRUCTIONS RELATIVES À L INSTALLATION 15 VI INSTRUCTIONS DE FONCTIONNEMENT 19 APPENDIX VII Nozzle Table Tableau de gigleur ...

Страница 4: ...Page 2 62 9677 01_UL ...

Страница 5: ...oil can ignite spontaneously Never use water to extinguish burning oil but smother the flames with the lid or a damp cloth S Filling quantity and temperature must be sel ected as appropriate At high temperatures above 100 C too much liquid in the trough can lead to boiling over and spitting Dan ger of burning S The escape of burnable gases represents a fire and explosion hazard Action in the case ...

Страница 6: ...002 of Gas Food Service Equip ment 5 SPECIFICATION PLATE The specification plate E is located in each case inside and outside on the right of the operator panel C Seite 6 Fig 5 The serial number is marked on the type plate The 8 digits give following information Y last digit of the year of production WW week of production XXXXX running number PNC Appli ances Appliance type Width Depth Height Fryin...

Страница 7: ...earance of minimal 6 150 mm and maximal 8 200 mm beneath the unit due to sanitary and stability aspects The lower part of the foot must not be unscrewed too far The exposure of threads is prohibited 1 3 ASSEMBLING TWO APPLIANCES The assembly kit contains two of each of the following caged nuts 1 Fig 1 pre assembled on the right hand side of the appliance hexagonal screws M8x25 1 Fig 1 and moun tin...

Страница 8: ...r the rear also 2 Fig 3 D Push the side plinth 1 Fig 3 onto the legs from front to rear using the fastener The larger gap b Fig 3 on the fastener must be at the bottom D Affix the fasteners 3 Fig 3 to the plinth 2 Fig 3 D The larger gap b Fig 3 on the fastener must be at the bottom D Attach the plinth with the fasteners 3 Fig 3 onto the feet 1 6 ASSEMBLING ON CASTORS The assembly kit for mounting ...

Страница 9: ...c D Remove the panel 2 3 OVEN STORAGE SPACE HOT CABINET D Remove panels A B and C D Undo screws 5 D Pull out element 3 DOWNPIPE Work surfaces with a downpipe Fig 8a have the downpipe opening on the right hand side of the appliance A flexible sili con hose when installed in the standard manner ends under neath and to the right 0 8 20 mm behind the front of the appliance Fig 8b D Alternatively the h...

Страница 10: ...tested for leaks at operating pressure by painting with non corrosive foam forming media e g soapy water or leak spray 4 2 GAS PRESSURE The current gas pressure should be measured at the Mertik regulator with a liquid U tube manometer scale at least 0 1 mbar 1 mm water column D Remove the control panel The measuring nipple is located in downwards direction at the gas supply pipe before the two gas...

Страница 11: ... can be adjusted between the highest setting 7 and the lowest setting 1 2 4 INITIAL OPERATION Wash the whole plate with hot soapy water rinse with clean water and allow to dry The new appliance should then be hea ted up for 30 minutes at a temperature of 320 F 160 C 2 4 1 PREHEATING D The complete energy supply should be used for heating up 2 5 WORKING RULES The temperature must be adapted to the ...

Страница 12: ...they are diluted D Never use corrosive substances for cleaning the floor under the appliance e g hydrochloric acid Clean the appliance with commercial cleaning agents Do not use granular or abrasive agents 3 1 GAS BURNER So far as is necessary the pilot burner and main burner are cleaned by after sales service 3 2 FLAME In a visual check the flames must be dark blue without any upper yellow or ora...

Страница 13: ...TRUCTIONS 62 9677 01_UL Seite 11 5 STORAGE SPACE The storage space Fig 10 is incorporated into the base unit Recommended accessories Shelf holder 1 2 off Shelves 2 1 off 1 Shelf holder 2 Shelves Fig 10 Storage space ...

Страница 14: ...OPERATING INSTRUCTIONS Seite 12 62 9677 01_UL ...

Страница 15: ...as être chauffés sous peine de les faire exploser et de provoquer des blessures S L appareil ne doit en aucun cas être utilisé pour frire des aliments S On peut se brûler si l on entre en contact avec les plaques chaudes S Si vous remplissez une poêle préchauffée et donc très chaude avec de l huile de la graisse de l eau ou des aliments ceux ci peuvent provoquer des éclaboussures Dan ger de brûlur...

Страница 16: ...our toute opération d entretien ou de répa ration adressez vous au fabricant à un représentant agréé ou au Service Après vente local S Toute opération de réparation d entretien et de réglage doit être effectuée par un techni cien agréé en respectant les dispositions locales en vigueur dans le pays d installation Ceci concerne en particulier les dispositifs des brûleurs d allumage de sécurité et de...

Страница 17: ... unité due aux aspects sanitaires et de stabilité La partie plus inférieure du pied ne doit pas être dévissée trop loin L exposition des fils est interdite 1 3 ASSEMBLAGE DE DEUX APPAREILS Chaque kit d assemblage comprend respectivement deux écrous en cage 1 Fig 1 pré montés à l avant droit de l appareil et des éclisses 2 fig 1 D Retirez les panneaux de commande des deux appareils comme indiqué en...

Страница 18: ...lement 2 Fig 3 D Poussez les pieds du socle latéral 1 Fig 3 d avant en arrière à l aide de l attache L intervalle le plus grand avec l attache b fig 3 doit se situer en bas D Placez les attaches 3 fig 3 sur le socle 2 Fig 3 D L intervalle le plus grand avec l attache b Fig 3 doit se situer en bas D Placez le socle sur les pieds à l aide des attaches 3 Fig 3 1 6 ASSEMBLAGE SUR ROULETTES Le kit de m...

Страница 19: ...mande 2 3 FOUR À CUIRE ESPACE DE RANGEMENT ARMOIRE DE MAINTIEN AU CHAUD D Retirez les panneaux A B et C D Desserrez les vis 5 Fig 5 D Extrayez l élément 3 SORTIE 3Les plans de travail avec sortie fig 8a sont pourvus d un orifice de sortie à droite de l appareil Un flexible en silicone installé en série débouche en bas à droite 20 mm derrière le panneau avant de l appareil fig 8b Le flexible peut a...

Страница 20: ...ement effectué toutes les tuyauteries du gaz doivent être contrôlées à la pression de fonctionnement afin de s assurer de leur étanchéité en les badigeonnant d agents mousseux non corrosifs eau savonneuse ou vapori sateur de détection des fuites par ex 4 2 PRESSION DE GAZ La pression instantanée de gaz devrait être mesurée au régu lateur Mertik à l aide d un manomètre à tube en U échelle min imum ...

Страница 21: ...ourts les pièces épaisses nécessitent des températures plus basses et des temps de cuisson plus longs Il est nécessaire de badigeonner le plat d huile avant de com mencer à rôtir l aliment pour éviter que celui ci n adhère au fond du plat Dès que le processus de rôtissage est terminé il convient d éliminer tous les résidus alimentaires du plat éventuellement à l aide du grattoir fourni avec l appa...

Страница 22: ...tité d air primaire est trop importante la flamme est courte transparente et tend à se détacher du brûleur Lorsque la flamme est réglée correctement elle ne doit pas se détacher du brûleur que celui ci soit froid ou chaud et ne doit pas donner de retours Un retour de flamme se produit à l intérieur du brûleur lorsque la vitesse du mélange gaz air à travers les ouvertures du brûleur devient insuffi...

Страница 23: ...7 01_UL Page 21 5 Espace de rangement L espace de rangement Fig 10 est installé dans la partie inférieure de l appareil Accessoires conseillés Porte tablette 1 2 pces Tablette 2 1 pce 1 Porte tablette 2 Tablette Fig 10 Espace de rangement ...

Страница 24: ...INSTRUCTIONS DE FONCTIONNEMENT Page 22 62 9677 01_UL ...

Страница 25: ...in opera tion Category Main flame Small flame Ignitions burner Air adjustment Distance X inch Water Gauche mbar inch Water Gauche mbar in mm No in mm No in mm Natural gases 21 Natural gas USA 7 0 17 4 6 0 15 A 0 089 2 25 72 7801 33 fix 27 27 72 7800 02 0 59 15 22 23 24 Liquid gases 25 Propane gas USA 11 0 27 4 10 0 25 E 0 061 1 55 72 7801 04 fix 14 14 72 7800 01 0 59 15 26 27 28 23 ...

Отзывы: