background image

10

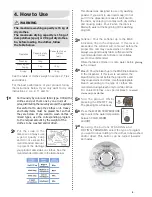
If you want, use the DELAY START 
key to delay the start of washing 
and drying. Each time the key is 
pressed

,

 it will  add a period of 

two hours to the start of the selected 
program. After 

you have selected

 the time of 

D

ELAY 

 S

TART

, press the START/PAUSE key 

to start 

the  

counting time. The panel display will show 

 and will start a countdown to the beginning of 

the selected program. At the end this count, the 
product starts the 

selected 

program.

If you 

want

, use the FAVORITE key to save any 

program of your preference. For 
this, set the washing and/or drying 
in the way you desire and press the 
FAVORITE key for 3 seconds. When 
using the product again with the 
same program, press the FAVORITE 
key and then the START/PAUSE key. When this 
option is used, the symbol 

 will be shown on 

the display.

If you only want 

to 

rinse clothes, press 

the ON/OFF key and then press the 
RINSE key for 3 seconds to activate 
this function. Select the type of rinse 
and then press the key START/
PAUSE.

Note: The ECO option merges water 
jets with spinning, providing a saving 
of water up to 40%

.


H

owever

,

 it does 

not allow the use of softener.

Note: Some options are not available for certain 
programs. See section 5 Washing and/or Drying  
Program details.

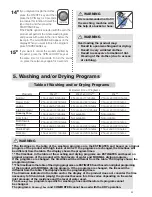
Press the START/PAUSE key to start the Washing 
and/or Drying Program. 
The START/PAUSE key can 
be used 

temporarily 

start or stop

 the program 

selected.

When you want to change a program already in 
progress, press the key, make the  desired

 changes


and press the START/PAUSE key again. When the 
key is pressed

,

 the word PAUSE will be displayed 

on the display panel.

12

0

13

0

11

0

10

0

8

0

9

0

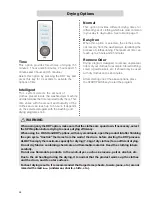
Water level

By default, t

he INTELLIGENT water 

level is 

se

t

 by factory. In this option

,

 your 

washer-dryer machine will automatically 
place the required quantity 

of 

water  

according to 

 the amount 

of 

dry clothing 

that was placed in the drum.
If you put wet clothes in the 

drum 

and 

use 

the 

Intelligent level of water, the amount of 

water can be 

more

 than the required for washing. 

M

anually 

select


the water level in this case. To 

select

 the water level manually, press the WATER 

LEVEL key and select the desired level.

Your product  already 

has 

a standard program

 set 


by factory. This program can be changed 
according to your needs. Press the keys 

as i

llustrated 

below as desired. The blue light will indicate the 
selected options.

• If  your  product  remains  with  the  key

,

START /PAUSE act

iv

ated for more than

1 hour, it will 

turn OFF automatically.

• If the lid is opened during the

program, the product will pause.
To return to program, close the lid and

press the START/PAUSE key.

• If the product is spinning and/or drying 

and the START/PAUSE key is pressed,
the product will take a few minutes to

start again.

IMPORTANT

Содержание LST15

Страница 1: ...ELECTRIC WASHER DRYER MACHINE LST15 INSTRUCTION MANUAL MADE IN BRAZIL ...

Страница 2: ...ng cycle to avoid fire hazards This product is not intended for use by persons including children with physical sensory or mental disabilities or by persons with no experience and knowledge unless they have received instructions regarding the use of the product or they under the supervision a person responsible for their safety IMPORTANT WARNING Never leave lit candles or incense on the product an...

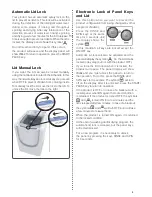
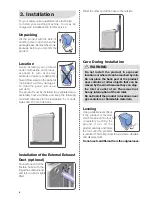
Страница 3: ...few minutes to release the lid When the product is turned ON again it is returned to the locked condition At the end of a washing and or drying program the automatic lid lock is released but the panel keys will remain blocked For a new program it is necessary to unlock the panel by pressing the keys RINSE and SPIN for 3 seconds Automatic Lid Lock Your product has an automatic safety lock on the li...

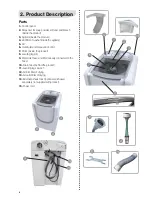
Страница 4: ... Handle lid and manual lock of lid 7 Drum inside the product 8 Leveling legs 4 9 Water inlet hose and filter already connected to the hose 10 Drain hose behind the product 11 Leveling legs wrench 12 Air inlet filter of drying 13 Air outlet filter of drying 14 External exhaust duct optional purchased separately not supplied with product 15 Power cord 2 Product Description ...

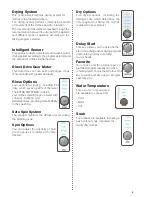
Страница 5: ... selected and the amount of clothes inside the drum Direct Drive Gear Motor This motor does not use belts and pulleys It has more strength with greater durability Rinse Options Four options for rinsing including ECO rinse which saves up 40 of the water The EXTRA SOFTENER in which your clothes remain longer in water with softener SIMPLE and DOUBLE rinses providing more flexibility in their washing ...

Страница 6: ...g Using a bubble level check if the product is leveled which means all the four feet completely touching the ground If not tilt the product carefully and rotate the foot until the problem is resolved This is important to avoid noise vibration and displacement Do not use feet different from the original ones Do not install the product in exposed locations or where it can be reached by rain Do not p...

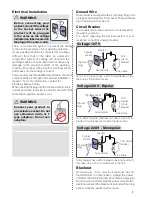
Страница 7: ...rum and or agitator can also occur Ground Wire Your product is equipped with a 3 pin plug Plug it into a properly grounded electrical socket The ground wire pin of the plug cannot be cut Circuit Breaker It is mandatory to install an exclusive circuit breaker for the washing machine If in doubt regarding the electrical system of your residence consult the energy provider For a 220 V product between...

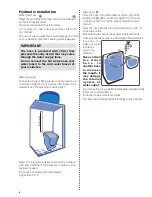
Страница 8: ...ght at the Electrolux Service Center Hydraulic Installation Water Inlet hose Attach the end of the hose that comes loose on faucet so that it is fully threaded Open the faucet and check for leaks It is required to use a faucet at water inlet with 3 4 thread The use of a low quality faucet will damage the hose of your washing machine causing water leakages The hose is provided with a filter that pr...

Страница 9: ...as designed to use only washing powder If you want to use liquid soap do not put it in the dispenser because it will flow into the drum by entering in contact with dry clothes and causing stains Pour it when the drum is filled with water at the beginning of the washing program Softener Pour the softener up to the MAX indication line in the dispenser If this level is exceeded the softener will come...

Страница 10: ...ashing and or Drying Program The START PAUSE key can be used temporarily start or stop the program selected When you want to change a program already in progress pressthekey makethe desired changes and press the START PAUSE key again When the key is pressed the word PAUSE will be displayed on the display panel 120 130 110 100 80 90 Water level By default the INTELLIGENT water level is set by facto...

Страница 11: ... the programs are changed the timelines will be different from the table The display shows the programing times The timelines in the table of the drying programs are ESTIMATES and based on original programing of the product with NORMAL drying program If the programs are changed the times will be different from the table The display shows the programing times The timelines indicated in the table an...

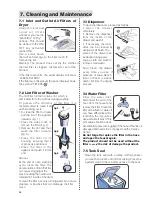
Страница 12: ...ing 55 minutes 1 hour and 45 minutes 2 hours and 15 minutes and 3 hours and 15 minutes Select this option by pressing the DRY key and press this key for 3 seconds to activate the options of time Intelligent This system detects the amount of clothes placed inside the washer dryer machine and determines the time required to dry them This time varies with the amount and humidity of the clothes and ca...

Страница 13: ... is selected the time indicator starts the countdown up to the beginning of the selected program Symbols Lights up when a favorite program is used See section 4 step 12 Lights up when the DELAY START function is selected See section 4 step 11 Lights up when the panel keys are locked See section 1 Safety Lights up when a drying program is running indicating that the drum and the clothes may be at h...

Страница 14: ...of the mesh causing the overflow of retained lint inside of the drum To clean the filter use only running water Do not use cleaners or brushes that can damage the filter mesh 7 3 Dispenser To clean the dispenser proceed as follows 1 Open the drawer completely 2 Remove the dispenser from the inside of the drawer and wash it 3 If necessary the inner sides can be cleaned by using a small brush The pi...

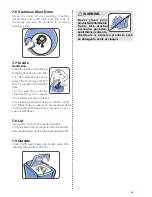
Страница 15: ...e at least once a month Put 1 liter of bleach in the drum Select the High level HEAVY DUTY program and DOUBLE rinse Let the washing machine complete the cycle to ensure the complete removal of bleach This cleaning should be done to prevent spots on clothes that are caused by accumulated waste in the washing machine due to excessive use of soap and softener 7 8 Lid Use a damp cloth on the outside a...

Страница 16: ...eys ON OFF and or START PAUSE were not pressed The product is in the soak cycle The plug is not properly plugged into the socket The electrical circuit plug wires circuit breaker is in bad condition Blackout The lid of the product is open It is being used with an adaptor or extension cord The supply voltage is low Wrong voltage The electronic lock of panel keys is trigged see section 1 The DELICAT...

Страница 17: ... the faucet C l e a n t h e w a s h i n g m a c h i n e a s recommendations Separate the clothes according the kind and colors see section 9 Check the instructions in the clothes labels See also section 10 If the clothes get stained It was mixed with clothes of different fabrics Separate the clothes according to the programs table indicated in the panel See also section 9 There is lint in the clot...

Страница 18: ...thes in the drum close the lid and press the START PAUSE key Call the Local Service Center Call the Local Service Center Call the Local Service Center Call the Local Service Center Replace the air inlet filter of drying Call the Local Service Center Clean the filters with the ON OFF key activated panel ON Call the Local Service Center Call the Local Service Center If display panel shows error E01 ...

Страница 19: ... wait for a few minutes remove excess powder and wash normally Rust Apply a mixture of salt and lemon or specific products on rust leave it for a few minutes and wash normally In old stains the fabric structure may have been attacked and tear more easily Mustiness For white clothing resistant to chlorine wash with bleach For colored clothes and not resistant to chlorine rinse the stained area with...

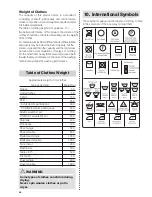
Страница 20: ...apacity of this product refers to a standard consisting of sheets pillowcases and cotton towels whosecomposition sizeandweightarespecifiedunder international standards The table of clothing weight is for guidance For the better performance of this product the volume of the clothes should be considered prevailing over the weight of the clothes Forexample articlesfilledwithfoamandsyntheticfabrics an...

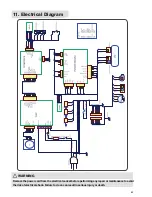
Страница 21: ...ectrical Diagram WARNING Remove the power cord from the electrical socket before performing any repair or maintenance to avoid the risk of electrical shock Failure to do so can result in serious injury or death ...

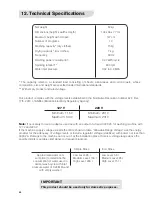
Страница 22: ... there is a voltage range above the specified limits see table cited above or frequent blackouts 127 V Minimum 116 V Maximum 133 V 220 V Minimum 201 V Maximum 231 V Our product complies with the voltage levels established in the Normative Resolution number 424 Dec 17th 2010 of ANEEL Brazilian Electricity Regulatory Agency Net weight Dimensions height x width x depth Maximum height with lid open Nu...

Страница 23: ...23 Notes ...

Страница 24: ...69500XXX Rev 00 Jul 15 ...

Отзывы: