background image

78 www.electrolux.com

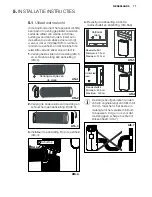
5.2 

Installatie in een dubbel 

opgehangen schuifraam

1.

 Snijdt de schuimafdichting A (gelijmd 

type) op de juiste lengte en bevestig 

hem aan het raam en kozijn (Afb.8)

Schuimafdichting A

(gelijmd type)

Afb.8

2.

 Open het schuifraam en plaats de 

raamschuifkit op het raamkozijn 

(Afb.9). Bevestig de raamschuifkit op 

het raamkozijn. Pas de lengte van de 

raamschuifkit aan in overeenstemming 

met de wijdte van het raam. Schroef 

de twee schroeven vast op de 

raamschuifkit. Zie Afb.9.

schroeven

Raamschuifkit

Raamkozijn

67.5cm~123cm

Afb.9

Snijdt de aanpasbare raamschuifkit 

indien de wijdte van het raam minder 

is dan 67,5cm (Afb.10).

Snijdt dit passend op uw raam

Afb.10

3.

 Sluit het schuifraam goed tegen de 

raamschuifkit. (Afb.11)

4.

 Schroef twee 12,7mm schroeven om 

de raamschuifkit op het schuifraam te 

bevestigen (Afb.11)

5.

 Bevestig de raamschuifkit op het 

raamkozijn. (Afb.11):

A: Voor een houten raam: Gebruik 19mm 

schroeven voor de bevestiging.

B: Voor Kunststof ramen: Gebruik 12,7 

inbus-schroeven voor de bevestiging.

12,7 mm schroeven

19 mm schroeven 

of 12,7 mm 

inbusschroeven

Raamkozijn

Raamschuifkit

Afb.11

6.

 Om de onderste schuif op zijn plaats 

te houden, bevestig het rechthoek 

schuifslot met 12,7mm schroef als 

afgebeeld (Afb.12).

Het is moeilijk om de ramen met de 

veiligheidsborging voor Kunststof 

ramen te sluiten, dus kunt u de 

sluiting van het raam zelf gebruiken.

Afb.12

7.

 Snijdt de schuimafdichting B in een 

juiste lengte en dicht het open gat 

tussen de bovenste raamschuif en de 

buitenste raamschuif, zoals afgebeeld in 

Afb.13.

Schuimafdichting B

Afb.13

Содержание EXP09CKEWI

Страница 1: ...ATORE NL AIR CONDITIONER DE KLIMAGERÄT PL KLIMATYZACJA CZ KLIMATIZAČNÍ ZAŘÍZENÍ EXP09CKEWI EXP11CKEWI USER MANUAL MODE D EMPLOI MANUALE DELL UTENTE GEBRUIKSAANWIJZING BEDIENUNGSANLEITUNG INSTRUKCJA OBSŁUGI UŽIVATELSKÁ PŘÍRUČKA 2 24 46 68 90 112 134 ...

Страница 2: ... Serial Number The information can be found on the rating plate Subject to change without notice Warning Caution Safety information General information and tips Environmental information Get usage advice brochures trouble shooter service information www electrolux com webselfservice Visit our website to Register your product for better service www registerelectrolux com Buy Accessories Consumables...

Страница 3: ...n of infirmed persons without supervision Young children should be supervised to ensure that they do not play with the air conditioner There are local council rules regarding maximum allowable noise levels emitted by air conditioners If the power cord is to be replaced replacement work shall be performed by authorised personnel only Installation work must be performed in accordance with the nation...

Страница 4: ...rt anything into any part of the unit Ensure the power supply used has an appropriate voltage rating Only use a 220V 240V 50Hz 10A mains electricity supply Use of a power supply with an improper voltage rating can result in damage to the unit an possibly fire Always use a circuit breaker or fuse with the proper amp rating Do not under any circumstances use wire pins or other objects in place of a ...

Страница 5: ...If any water remains in the tank it may spill out while being moved To ensure proper drainage the drainage hose must have no kinks and must not be elevated during dehumidificatioin mode If not the drained water may spill out into the room The temperature around the drainage hose must not be below freezing point when used Drained water may freeze inside the hose causing water inside the unit to ove...

Страница 6: ... off This protective device will prevent cooling for about 5 minutes Any previous setting will be cancelled and the unit will return to its initial setting Low temperature operation Is your unit freezing up Freezing may occur when the unit is set close to 18 C in low ambient temperature conditions especially at night In these conditions a further temperature drop may cause the unit to freeze Setti...

Страница 7: ...dy it can cause severe internal burns and can lead to death in as little as 2 hours Always completely secure the battery compartment If the battery compartment does not close securely stop using the product remove the batteries and keep it away from children If you think batteries might have been swallowed or placed inside any part of the body seek immediate medical attention To prevent injury to ...

Страница 8: ...or electric shock Always install circuit breaker and a dedicated power circuit Incorrect installation may cause Are and electric shock Unplug the unit if strange sounds smell or smoke comes from it It may cause fire and electric shock Do not use the socket if it is loose or damaged It may cause fire and electric shock Do not open the unit during operation It may cause fire and electric shock Keep ...

Страница 9: ...usehold furniture Hold the plug by the head of the power plug when taking it out It may cause electric shock and damage Turn off the main power switch when not using the unit for a long time It may cause failure of product or fire Do not place obstacles around air inlets or inside of air outlet It may cause failure of appliance or accident Always insert the filters securely Clean filter once every...

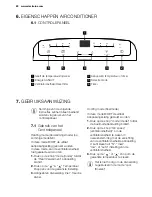
Страница 10: ...ing handle both sides Room air outlet Bottom drain outlet Air exhaust Castor Control panel Power cable Air intake Continuous drain outlet 4 ACCESSORIES INCLUDED 1 2 3 4 8 5 9 6 10 7 11 PARTS PARTS NAME QUANTITY Window kit connector A Exhaust connector B Window sliding kit Exhaust hose Foam seal A Screws Foam seal B Safety lock Remote control 1 pc 1 pc 1 set 1 pc 2 pcs 4 pcs 12 7 screws 2 pcs 19 sc...

Страница 11: ...w the hose to connector A Fig 2 3 Install the connector B into the unit Fig 4 3 Affix the connector A into the window slider kit and seal Fig 5 6 Fig 4 2 Extend the other side of the hose and screw it to connector B Fig 3 Fig 1 Lock 2 Slide onto 1 The hose can be extended from its original length of 38cm up to 150cm but it is the best to keep the length to minimum required Also make sure that the ...

Страница 12: ...it to the window sash Fig 11 5 Secure the window slider kit to the window stool Fig 11 A For wooden window Use 19mm screws for securing B For Vinyl Clad windows Use 12 7 hex head cap screws for securing 7 Cut the foam seal B to an appropriate length and seal the open gap between the top window sash and outer window sash as shown in Fig 13 6 To secure lower sash in place attach right angle sash loc...

Страница 13: ... on the window slider kit See Fig 15 Cut the adjustable window slider kit if the height of window is less than 67 5cm Fig 10 3 Close the window sash securely against the window slider kit Fig 16 4 Drive two 12 7 mm screws to secure the window slider kit to the window sash Fig 16 5 Drive two 19 mm screws to secure the window slider kit to the window stool Fig 16 6 Cut the foam seal B to an appropri...

Страница 14: ...ording to the illumination of the fan speed indicator You can choose the hi med low or auto fan speed setting 3 Press the or button to choose the temperature you want 1 Press the mode button until the Heat indicator is lit 2 Press the Temp buttons for desired setting 3 Connected drain hose See 7 3 Drainage section 6 AIR CONDITIONER FEATURES 6 1 CONTROL PANEL 1 2 3 4 5 6 cool dry fan auto timer hi ...

Страница 15: ...ator and number of hours on the screen will flash Tap or hold the UP arrow or the DOWN arrow to change delay start timer at 0 5 hour increments up to 10 You can delay shutdown when the unit is on Press the timer button then the Timer indicator and number of hours on the screen will flash Tap or hold the UP arrow or the DOWN arrow to change delay stop timer at 0 5 hour increments up to 10 hours the...

Страница 16: ...of in accordance with local legislation as they do harm to the environment Do not mix old and new batteries Do not mix alkaline standard carbon zinc or rechargeable nickel cadmium batteries Do not dispose of batteries in fire Batteries may explode or leak If the remote control is not used for a long time remove the batteries from the remote control The remote control must be handled with extreme c...

Страница 17: ...screen displays Press the and button to choose the temperature you want At the same time the low fan indicator lights Note In this mode fan speed cannot be selected Press the mode button until the upper side of LCD screen displays auto Under AUTO mode you can not select the fan speed Press the and button to choose the temperature you want When the unit is in Cool Heat or auto mode you can press th...

Страница 18: ...The louver on the top panel will swing up and down Press this button again to disable the louver swing function Louver Swing Function F C function Timer mode Press the F C button to switch between degree Fahrenheit and degrees Celsius Under Dry Fan mode you can not select F C How to delay startup Plug in the unit so the unit turns to standby Press the timer on button the screen will display and H ...

Страница 19: ... off button the screen displays and H Tap or hold the UP arrow or the DOWN arrow to change delay stop timer at 0 5 hour increments up to 10 hours then at 1 hour increments up to 24 hours After 2 seconds the setting will be memorized and the display will show the time remaining until the unit shuts down To cancel the setting press the timer off button again If the display reads AS the room temperat...

Страница 20: ...condensate a number of fills will be needed Replace the drain cap to the bottom drain outlet when no condensate flows out 8 CARE CLEANING Clean your air conditioner occasionally to keep it looking new Be sure to unplug the unit before cleaning to prevent shock or fire hazards The cabinet and front may be dusted with an oil free cloth or washed with a cloth dampened in a solution of warm water and ...

Страница 21: ...p or materials in this appliance Air conditioner will not operate Air from unit does not feel cold enough Air conditioner cooling but room is too warm NO ice forming on cooling coil behind decorative front Wall plug disconnected Push plug firmly into wall outlet House fuse blown or circuit breaker tripped Replace fuse with time delay type or reset circuit breaker Control is OFF Turn Control ON and...

Страница 22: ...USED IN YOUR APPLIANCE Specific information regarding appliances with R290 refrigerant gas area without any continuous sources of ignition for example open flames gas or electrical appliances in operation Do not puncture and do not burn Refrigerant gases can be odourless The appliance must be installed used and stored in an area that is greater than 13 m2 This appliance contains 235g or 245g see r...

Страница 23: ...plicable containers to recycle it Help protect the environment and human health and to recycle waste of electrical and electronic appliances Do not dispose appliances marked with the symbol with the household waste Return the product to your local recycling facility or contact your municipal office ...

Страница 24: ...nt faire l objet de modifications sans préavis Informations sur la sécurité Avertissement Attention Informations générales et astuces Informations sur l environnement Obtenir des conseils sur l utilisation des brochures un guide de dépannage des informations sur le service www electrolux com webselfservice Visitez notre site Web pour Enregistrez votre produit pour un meilleur service www registere...

Страница 25: ...urveillance Les jeunes enfants doivent être surveillés pour s assurer qu ils ne jouent pas avec le climatiseur Il existe des règles locales concernant les niveaux de bruit maximum autorisés émis par les climatiseurs Si le cordon d alimentation doit être remplacé des travaux de remplacement doivent être réalisés par le personnel autorisé uniquement Les travaux d installation doivent être réalisés s...

Страница 26: ... Ne tirez pas ne déformez et ne modifiez pas le cordon d alimentation électrique et ne l immergez pas dans l eau Le fait de tirer sur le cordon d alimentation électrique ou de mal l utiliser peut causer des dommages sur l appareil et un choc électrique Ne modifiez aucune pièce de ce produit N insérez rien dans l appareil Assurez vous que l énergie électrique utilisée a une tension nominale appropr...

Страница 27: ...congélation pendant l utilisation L eau vidangée peut se congeler à l intérieur du tuyau ce qui peut causer le déversement de l eau dans la pièce Si le cordon d alimentation est endommagé il doit être remplacé par le fabricant son agent de service ou une personne tout aussi qualifiée pour éviter tout danger Utilisez uniquement le cordon d alimentation spécifié par le fabricant pour le remplacement...

Страница 28: ... le rétablissement du courant redémarrez le climatiseur Si le courant a été coupé pendant plus de trois minutes assurez vous d attendre au moins trois minutes avant de redémarrer l appareil Si vous redémarrez le climatiseur pendant trois minutes un dispositif de protection dans l appareil peut causer l arrêt du compresseur Ce dispositif de protection va empêcher le refroidissement pendant environ ...

Страница 29: ...mables Ce produit contient un accumulateur au lithium Si un accumulateur au lithium neuf ou usagé est avalé il peut causer de graves brûlures internes et conduire à la mort en 2 heures seulement Sécurisez toujours complètement le compartiment des piles Si le compartiment des piles ne se ferme pas correctement arrêtez d utiliser le produit retirez les piles et éloignez les des enfants Si vous pense...

Страница 30: ...efficace Une mise à la terre inappropriée peut causer un choc électrique Empêcher l eau d entrer dans les pièces électriques Elle peut causer une panne de la machine ou un choc électrique Installez toujours un disjoncteur et un circuit d alimentation dédié Une installation incorrecte de ces éléments peut causer un incendie et un choc électrique Débranchez l appareil si des sons une odeur étranges ...

Страница 31: ...ar la tête pour la retirer Risque de choc électrique et d endommagement Coupez l alimentation principale lorsque vous n utilisez pas l appareil pendant une longue période de temps Au cas contraire une panne de la machine ou un incident peut survenir Ne placez aucun obstacle autour des entrées d air ou à l intérieur de la sortie d air Elle peut causer une panne de la machine ou un accident Insérez ...

Страница 32: ...dange continue 4 ACCESSOIRES INCLUS PIÈCES NOM DES PIÈCES QUANTITÉ 1 Connecteur du kit de fenêtre A 1 pc 2 Connecteur d évacuation B 1 pc 3 Kit de curseur de fenêtre 1 ensemble 4 Tuyau d évacuation 1 pc 5 Vis Vis de 12 7 mm à 4 pcs Vis de 19 mm à 2 pcs 6 Verrou de sécurité 1 pc 7 Boulons 2 pcs 8 Joint mousse A 2 pcs 9 Joint mousse B 1 pc 10 Télécommande 1 ensemble 11 Pile 2 pcs Vérifiez tous les a...

Страница 33: ...tre côté du tuyau et vissez le au connecteur B fig 3 Fig 3 3 Installez le connecteur B sur l appareil Fig 4 Fig 4 Verrouiller 2 Glissez sur 1 4 Fixez le connecteur B sur le kit du curseur de fenêtre et le joint Fig 5 et 6 Fenêtre verticale Kit de curseur de fenêtre Minimum 67 5 cm Maximum 123 cm Fig 5 Kit de curseur de fenêtre Minimum 67 5 cm Maximum 123 cm Fenêtre horizontale Fig 6 Le tuyau peut ...

Страница 34: ...enêtre au rebord de la fenêtre fig 11 A Pour la fenêtre en bois Utilisez des vis de 19mm pour la fixer B Pour les fenêtres plaqués en vinyle Utilisez des vis de bouchon à tête hexagonale de 12 7 mm pour les fixer vis 12 7 mm vis de 19 mm ou vis de bouchon à tête hexagonale 12 7 mm Rebord de fenêtre Kit de curseur de fenêtre Fig 11 6 Pour fixer le châssis inférieur fixez le verrou à l angle droit d...

Страница 35: ...être vis 67 5 cm 123 cm 3 Fermez le châssis de la fenêtre contre le kit du curseur de fenêtre Fig 16 4 Utilisez deux vis de 12 7 mm pour fixer le kit du curseur de fenêtre au châssis de la fenêtre Fig 16 5 Utilisez deux vis de 19 mm pour fixer le kit du curseur de fenêtre au rebord de la fenêtre fig 16 Fig 16 Rebord de fenêtre vis 12 7 mm vis 12 7 mm Kit de curseur de fenêtre 6 Coupez le joint mou...

Страница 36: ... Appuyez sur le bouton fan speed Vitesse du ventilateur pour choisir la vitesse du ventilateur selon l éclairage du voyant de vitesse du ventilateur Vous pouvez choisir parmi les paramètres de vitesse de ventilateur élevé moyen bas ou automatique 3 Appuyez sur le bouton ou pour choisir la température souhaitée Il n est pas nécessaire d utiliser le tuyau de vidange en mode cool froid Mode Dry Sec A...

Страница 37: ... minuteur le voyant du minuteur et le nombre d heures sur l écran clignotent Tapez ou maintenez la flèche HAUT ou la flèche BAS pour changer le retard du minuteur de démarrage à des incréments de 0 5 heur jusqu à 10 heures puis à des incréments d 1 heure jusqu à 24 heures Après 5 secondes le voyant du minuteur et l écran s arrêtent de clignoter La commande compte le temps restant jusqu au démarrag...

Страница 38: ...onnement Ne mélangez pas les piles anciennes et les piles neuves Ne mélangez pas les piles alcalines standard carbone zinc ou rechargeables nickel cadmium Ne jetez pas les piles dans le feu Les piles peuvent exploser ou fuir Si la télécommande n est pas utilisée pendant une période prolongée retirez les piles de la télécommande La télécommande doit être gérée avec beaucoup de soin Ne la laissez pa...

Страница 39: ... même moment le symbole du ventilateur low apparaît sur l écran Remarque Dans ce mode la vitesse du ventilateur peut être sélectionnée Mode Fan Ventilateur Appuyez sur le bouton mode mode jusqu à ce que l écran LCD de contrôle gauche affiche Dans ce mode vous pouvez sélectionner la vitesse du ventilateur Élevé Moyen Bas ou Auto en appuyant sur le bouton Vitesse du ventilateur et en vous reportant ...

Страница 40: ...u ventilateur Remarque En mode Ventilateur ou Sec le mode Veille ne peut être réglé Fonction de balancement de l évent Appuyez sur le bouton swing balancement pour activer la fonction de balancement de l évent et le côté supérieur de l écran s affiche L évent sur le panneau supérieur balance de haut en bas Appuyez sur le bouton à nouveau pour désactiver la fonction de balancement de l évent Foncti...

Страница 41: ...ature ambiante est en panne Contactez votre service client Electrolux autorisé Si l écran affiche ES le capteur de température de l évaporateur est en panne Contactez votre service client Electrolux autorisé Si l écran affiche P1 le bac inférieur est plein Déplacez soigneusement l appareil dans un emplacement de vidange retirez le bouchon de vidange inférieur et laissez l eau s évacuer Redémarrez ...

Страница 42: ...le condensé ne s écoule pas Sortie du drain inférieur Larmier Plateau d égouttage REMARQUE Pour vous assurer que tout le condensé a été retiré inclinez l appareil en le soulevant légèrement vers le haut jusqu à ce que le condensé ne s écoule plus de la sortie Tuyau d arrosage Fig 20 REMARQUE Le condensé peut s écouler après avoir retiré le bouchon de vidange si l appareil fonctionne en mode Froid ...

Страница 43: ...e pour retirer l excédent d eau Assurez vous que le filtre est soigneusement sec avant de le remplacer Ou au lieu de laver vous pouvez nettoyez le filtre avec un aspirateur 3 Remplacez le filtre après qu il soit sec Assurez vous que le filtre est soigneusement sec avant de le remplacer 8 3 Stockage d hiver Si le climatiseur ne sera pas utilisé pendant une période de temps prolongée 1 Vidangez comp...

Страница 44: ...et Nettoyage Pour dégivrer réglez le mode Ventilateur La température est réglée à une valeur trop basse pour le refroidissement de nuit Pour dégivrer le serpentin réglez le sur le mode Ventilateur Ensuite réglez la température à une valeur plus élevée Conduit d évacuation non branché ou bloqué Voir la section 5 1 Évacuation de l air chaud Le climatiseur est en mode Refroidissement mais la pièce es...

Страница 45: ...inflammation du réfrigérant causée par les chauffages électriques les poêles ou d autres sources d inflammation L appareil doit être stocké de sorte à empêcher toute panne mécanique Les personnes qui utilisent ou travaillent sur le circuit du réfrigérant doivent détenir une certification appropriée délivrée par un organisme agréé qui garantit la compétence dans la manipulation des réfrigérants sel...

Страница 46: ...ta di indentificazione Soggetto a modifiche senza preavviso Avvertimento Attenzione Norme di sicurezza Informazioni generali e consigli Informazioni ambientali Ottieni consigli sull uso brochure risoluzioni dei problemi informazioni sulla manutenzione www electrolux com webselfservice Visita il nostro sito web su Registra il tuo prodotto per un servizio migliore www registerelectrolux com Compra A...

Страница 47: ...Il condizionatore non è inteso per essere usato da bambini di persone malate senza supervisione I bambini devono essere supervisionati per assicurarsi che non giochino con il condizionatore Ci sono regole del consiglio locali riguardo i livelli massimi di rumore consentiti emessi dai condizionatori Se la prolunga deve essere sostituita la sostituzione deve essere eseguita esclusivamente da persona...

Страница 48: ...ta Non tirare deformare o modificare il cavo di alimentazione o immergerlo in acqua Tirare o non utilizzare in maniera sbagliata il cavo di alimentazione può portare danni all unità e causare scossa elettrica Se il cavo di alimentazione è danneggiato deve essere sostituito dal produttore da un suo agente di Non modificare alcuna parte del prodotto Non inserire nulla in nessuna parte dell unità Ass...

Страница 49: ... drenaggi non deve essere sotto il punto di congelamento durante l uso L acqua drenata può gelare all interno del tubo causando il traboccare dell acqua all interno nella stanza manutenzione o da persona parimente qualificata per evitare pericoli Usare soltanto il cavo di alimentazione specificato del produttore per la sostituzione Quest apparecchio deve essere messo a terra Quest apparecchio è fo...

Страница 50: ...aspettare almeno tre minuti prima di riavviarla Se riavvii il condizionatore entro tre minuti un dispositivo protettivo nell unità può causare lo spegnimento del compressore Il dispositivo protettivo preverrà il raffreddamento per circa 5 minuti Qualsiasi impostazione precedente sarà annullata e l unità tornerà alla sua impostazione iniziale Bassa temperatura di funzionamento La tua unità si sta c...

Страница 51: ...to contiene un batteria a cellula pulsante al litio Se una batteria a cellula pulsante al litio è ingoiata o entra nel corpo può causare gravi ustioni interne e può portare alla morte in poco più di 2 ore Assicurare completamente sempre il vano batteria Se il vano batteria non si chiude in sicurezza interrompi l uso del prodotto rimuovi le batterie e tienilo lontano dai bambini Se pensi che le bat...

Страница 52: ...ella stanza Questo potrebbe danneggiare la tua salute Assicurare sempre una messa a terra efficace Una messa a terra scorretta può essere causa di scosse elettriche Non consentire all acqua di scorrere nelle parti elettriche Potrebbe causare guasti dell unità o scossa elettrica Installare sempre l interruttore e un circuito elettrico dedicato Un installazione scorretta può essere causa di scosse e...

Страница 53: ...dificazione e l inzuppamento dell arredamento domestico interno Tieni la spina per la testa quando la si estrae Può causare scosse elettriche e danni Spegnere l interruttore di rete quando non si usa l unità per un lungo tempo Potrebbe causare un guasto al prodotto o incendi Non posizionare ostacoli attorno alle prese d aria o all interno della presa d aria Potrebbe causare un guasto all apparecch...

Страница 54: ...inua 4 ACCESSORI INCLUSI PARTI NOMI PARTI QUANTITA 1 Kit finestra connettore A 1 pezzo 2 Scarico connettore B 1 pezzo 3 Kit slider finestra 1 set 4 Tubo di scarico 1 pezzo 5 Viti 4 pezzi viti da 12 7 2 pezzi viti da 19 6 Blocco di sicurezza 1 pezzo 7 Bulloni 2 pezzi 8 Schiuma sigillante A 2 pezzi 9 Schiuma sigillante B 1 pezzo 10 Telecomando 1 set 11 Batteria 2 pezzi Verifica che tutti gli accesso...

Страница 55: ...itare il tubo al connettore A Fig 2 Fig 1 Prolunga il lato del tubo Fig 2 2 Prolungare l altro lato del tubo e avvitarlo al connettore B Fig 3 Fig 3 3 Installare il connettore B nell unità Fig 4 Fig 4 Blocca 2 Fai scivolare dentro 1 4 Attaccare il connettore A al kit slider della finestra e sigillare Fig 5 e 6 Fig 5 Finestra verticale Kit slider finestra Minimo 67 5 cm Massimo 123 cm Kit slider fi...

Страница 56: ...n sicurezza contro il kit slider della finestra Fig 11 4 Avvita due viti da 12 7mm per assicurare il kit slider della finestra alla fascia della finestra Fig 11 5 Assicurare il kit slider della finestra alla base della finestra Fig 11 A Per la finestra in legno Usa viti da 19mm per assicurarli B Per le finestre Vinyl Clad Usare la vite a testa esagonale da 12 7 per assicurarli Fig 11 Viti da 12 7 ...

Страница 57: ...estra è meno di 67 5cm Fig 10 Fig 15 Fermo finestra Kit slider finestra viti 67 5cm 123cm 3 Chiudere la fascia della finestra in sicurezza contro il kit slider della finestra Fig 16 4 Avvita due viti da 12 7 mm per assicurare il kit slider della finestra alla fascia della finestra Fig 16 5 Avvita due viti da 19 mm per assicurare il kit slider della finestra alla base della finestra Fig 16 Fig 16 F...

Страница 58: ...ttatore di scarico 1 Premere il pulsante mode modalità fino a che è acceso l indicatore Raffreddamento 2 Premere il pulsante fan speed velocità ventola per scegliere la velocità della ventola secondo l illuminazione dell indicatore della velocità della ventola Puoi scegliere tra l impostazione della velocità della ventola hi alto med medio low basso o auto auto 3 Premere il pulsante o per sceglier...

Страница 59: ...ritardare l avvio o la chiusura dell unità Come ritardare l avvio Collegare l unità in modo che l unità passi in standby Premere il pulsante timer timer quindi l indicatore del Timer e il numero di ore sullo schermo lampeggerà Tocca o tieni premuto la freccia SU o la freccia GIU per cambiare il ritardo del timer di avvio a incrementi di 0 5 ore fino a 10 ore quindi a incrementi di 1 ora fino a 24 ...

Страница 60: ...poiché danneggiano l ambiente Non mescolare batterie vecchie e nuove Non mescolare batterie alcaline standard zinco carbone o ricaricabili nichel cadmio Non smaltire le batterie nel fuoco Le batterie possono esplodere o avere perdite Se il telecomando non viene usato per lungo tempo rimuovere le batterie dal telecomando Il telecomando deve essere gestito con estrema cura Non lasciarlo cadere o esp...

Страница 61: ...arirà il simbolo low basso sullo schermo Nota In questa modalità non può essere selezionata la velocità della ventola Modalità Fan Ventola Premere il pulsante mode modalità fino a che il lato sinistro dello schermo LCD visualizzerà In questa modalità puoi selezionare la velocità della ventola Hi Alto Med Medio Low Basso o Auto Auto premendo il pulsante di velocità della Ventola e fare riferimento ...

Страница 62: ...ota In modalità Ventola o Asciuga la modalità Sleep non può essere selezionata Funzione Oscilla Griglia Premere il pulsante swing oscilla per abilitare la funzione dell oscillazione della griglia e sulla parte superiore dello schermo apparirà La griglia sul pannello superiore oscillerà su e giù Premere di nuovo il pulsante per disabilitare la funzione oscilla griglia Funzione F C Premere il pulsan...

Страница 63: ...o Contatta il tuo Centro di Manutenzione Electrolux autorizzato Se il display mostra ES il sensore dell evaporatore della temperatura della stanza si è guastato Contatta il tuo Centro di Manutenzione Electrolux autorizzato Se il display mostra P1 il vassoio in basso è pieno Spostare attentamente l unità in un posto asciutto rimuovere la spina di drenaggio inferiore e lascia che l acqua sia drenata...

Страница 64: ... il tuo condizionatore occasionalmente per farlo sembrare nuovo Assicurarsi di scollegare l unità prima di pulire per prevenire scosse o pericoli di incendio 8 1 Pulizia dell unità La struttura e la parte anteriore potrebbero essere pulite con un panno senza olio o lavate con un panno inumidito in una soluzione di acqua calda e un leggero detergente per lavastoviglie liquido Non usare mai detergen...

Страница 65: ...impostare l impostazione desiderata P1 compare nell area display Drenare l acqua come descritto nella 7 3 Sezione Drenaggio La temperatura ambiente è più bassa della temperatura impostata Modalità Raffreddamento Resettare la temperatura 3 Sostituire il filtro dopo che è asciutto Assicurarsi che il filtro sia accuratamente asciutto prima della sostituzione 8 3 Conservazione invernale Se il condizio...

Страница 66: ...are le griglie per una migliore distribuzione dell aria La parte anteriore dell unità è bloccata dai drappi da tendine dal mobilio ecc restringe la distribuzione dell aria Pulisci il blocco davanti all unità Porte finestre registratori ecc aperto l aria fredda scappa Chiudere porte finestre registratori ecc aperti l aria fredda scappa Unità accesa di recente in una stanza calda Consentire ulterior...

Страница 67: ...lettrici dalle stufe o da altre fonti di accensione L apparecchio deve essere conservato in modo da prevenire un guasto meccanico Non smaltire gli apparecchi contrassegnati con il simbolo insieme ai rifiuti domestici Restituire il prodotto nella struttura per il riciclaggio locale o contattare l ufficio municipale Gli individui che mettono in funzione o lavorano sul circuito devono avere la certif...

Страница 68: ...C Serienummer De informatie vindt u op de typeplaat Onder voorbehoud van wijzigingen zonder mededeling Waarschuwing Voorzichtig Veiligheidsinformatie Algemene informatie en tips Milieu informatie Gebruiksadviezen brochures probleemoplossing en service informatie te verkrijgen www electrolux com webselfservice Bezoek onze website om Registreer uw product voor betere service www registerelectrolux c...

Страница 69: ... niet bestemd om zonder toezicht gebruikt te worden door jonge kinderen of zwakbegaafden Jonge kinderen dienen onder toezicht te staan om ervoor te zorgen dat ze niet met de airconditioner spelen Er zijn lokale gemeentelijke regels betreffende de maximaal toegestane geluidsniveaus voortgebracht door airconditioners Indien het netsnoer vervangen dient te worden dienen de vervangingswerkzaamheden al...

Страница 70: ...gsnoeren Druk de stekker veilig in het stopcontact en zorg ervoor dat hij niet los zit Trek vervorm of verander het netsnoer niet en dompel het in water Uittrekken of misbruik van het netsnoer kan leiden tot beschadiging van de eenheid en elektrische schok veroorzaken Wijzig geen onderdelen van dit product Steek niets in enig onderdeel van de eenheid Zorg ervoor dat de stroomvoorziening een geschi...

Страница 71: ...afgevoerde water in de ruimte morsen Indien het netsnoer beschadigd is dient het te worden vervangen door de fabrikant zijn service agent of gelijkwaardig gekwalificeerde personen teneinde gevaren te voorkomen Gebruik alleen het netsnoer dat gespecificeerd is door de fabrikant voor vervanging Dit apparaat dient geaard te worden Dit apparaat is uitgevoerd met een snoer met een aardkabel De stekker ...

Страница 72: ...n geval van een stroomstoring tijdens gebruik wacht u 3 minuten alvorens de eenheid opnieuw te starten Nadat de stroom weer is teruggekeerd herstart u de airconditioner Indien de stroom minder dan drie minuten uitgevallen was zorg er dan voor om tenminste drie minuten te wachten voor het herstarten van de eenheid Indien u de airconditioner binnen drie minuten herstart kan een beschermingsvoorzieni...

Страница 73: ...t gebruik van ontvlambare koelmiddelen Dit product bevat een lithium knop knoopcel batterij Indien een nieuwe of gebruikte lithium knoopcel batterij is ingeslikt of het lichaam binnengaat kan het ernstige interne verbranding veroorzaken en binnen slechts 2 uur tot de dood leiden Maak het batterij compartiment altijd compleet vast Indien het batterij compartiment niet helemaal sluit stop dan met he...

Страница 74: ...gezondheid beschadigen Zorg altijd voor effectieve aarding Incorrecte aarding kan een elektrische schok veroorzaken Laat geen water in de elektrische onderdelen stromen Het kan een storing van de eenheid of een elektrische schok veroorzaken Installeer altijd een stroomonderbreker en een apart stroomcircuit Incorrecte installatie kan een elektrische schok veroorzaken Ontkoppel de eenheid als er een...

Страница 75: ...n vocht in het meubilair veroorzaken Houdt de stekker bij de kop van de stekker vast wanneer u hem verwijdert Het kan een elektrische schok en beschadiging veroorzaken Schakel de hoofdschakelaar van de voeding uit wanner u de eenheid een lange periode niet gebruikt Het kan een storing van het product of brand veroorzaken Plaats geen obstakels rondom de luchtinlaten of binnen de luchtinlaat Het kan...

Страница 76: ...VERDE ACCESSOIRES ONDERDELEN NAAM ONDERDELEN HOEVEELHEID 1 Raamkit aansluiting A 1 stuk 2 Uitlaat aansluiting B 1 stuk 3 Raam schuifkit 1 set 4 Uitlaatslang 1 stuk 5 Schroeven 4 stuks 12 7 schroeven 2 stuks 19 schroeven 6 Veiligheidsborging 1 stuk 7 Bouten 2 stuks 8 Schuimafdichting A 2 stuks 9 Schuimafdichting B 1 stuk 10 Afstandsbediening 1 set 11 Batterij 2 stuks Controleer of alle accessoires ...

Страница 77: ...luiting A Afb 2 Afb 1 Verleng de zijde van de slang Afb 2 2 Verleng de andere zijde van de slang en schroef hem aan aansluiting B Afb 3 Afb 3 3 Installeer de aansluiting B op de eenheid Afb 4 Afb 4 Borging 2 Schuif op 1 4 Bevestig de aansluiting A aan de raamschuifkit en afdichting Afb 5 6 Afb 5 Verticaal raam Raamschuifkit Minimum 67 5 cm Maximum 123 cm Raamschuifkit Minimum 67 5 cm Maximum 123 c...

Страница 78: ...t het schuifraam goed tegen de raamschuifkit Afb 11 4 Schroef twee 12 7mm schroeven om de raamschuifkit op het schuifraam te bevestigen Afb 11 5 Bevestig de raamschuifkit op het raamkozijn Afb 11 A Voor een houten raam Gebruik 19mm schroeven voor de bevestiging B Voor Kunststof ramen Gebruik 12 7 inbus schroeven voor de bevestiging 12 7 mm schroeven 19 mm schroeven of 12 7 mm inbusschroeven Raamko...

Страница 79: ...e hoogte van het raam minder is dan 67 5cm Afb 10 Raamkozijn Raamschuifkit screws 67 5 cm 123 cm Afb 15 3 Sluit het schuifraam goed tegen de raamschuifkit Afb 16 4 Schroef twee 12 7 mm schroeven om de raamschuifkit op het schuifraam te bevestigen Afb 16 5 Schroef twee 19 mm schroeven om de raamschuifkit op het raamkozijn te bevestigen Afb 16 Raamkozijn 12 7 mm schroeven 12 7 mm schroeven Raamschui...

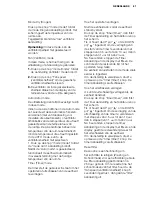
Страница 80: ...uitlaat aanpassingsslang gebruikt worden 1 Druk op de knop mode mode totdat de Koelmode aanduiding brandt 2 Druk op de knop fan speed ventilatorsnelheid om de ventilatorsnelheid te kiezen in overeenstemming met de verlichting van de ventilatorsnelheids aanduiding U kunt kiezen uit hi med low of auto instelling van de ventilatorsnelheid 3 Druk op de of knop om de gewenste temperatuur te kiezen Het ...

Страница 81: ... te vertragen Hoe het opstarten vertragen Sluit de eenheid aan zodat de eenheid stand by staat Druk op de knop timer timer dan flitst de Timer aanduiding en het aantal uren op het scherm Tik of houdt de UP pijl of de DOWN pijl ingedrukt om de vertraging van de start van de timer te veranderen met stappen van 0 5 uur tot aan 10 uur dan in stappen van 1 uur tot aan 24 uur Na 5 seconden stoppen de Ti...

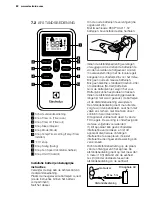
Страница 82: ...et milieu Mix geen oude en nieuwe batterijen Mix geen alkaline standaard Carbon zink of oplaadbare Ni Cad batterijen Gooi de batterijen niet weg in het vuur Batterijen kunnen exploderen of lekken Indien de afstandsbediening gedurende lange tijd niet wordt gebruikt de batterijen uit de afstandsbediening verwijderen De afstandsbediening dient met uiterste zorg te worden behandeld Laat hem niet valle...

Страница 83: ...inkerzijde van het LCD scherm weergeeft Tegelijkertijd verschijnt het low ventilator teken op het scherm Opmerking In deze mode kan de ventilatorsnelheid niet geselecteerd worden Fan Ventilator mode Druk op de mode mode knop totdat de linkerzijde van het LCD scherm weergeeft In deze mode kunt u de ventilatorsnelheid Hi Med Low of Auto kiezen door de ventilatorsnelheid knop in te drukken en naar he...

Страница 84: ...n mode mode of fan speed ventilatorsnelheid knop te drukken Opmerking In de mode Ventilator of Drogen kan de Sleep mode niet worden ingesteld Klep swing functie Druk op de swing swing knop om de klep swing functie in te schakelen en de bovenkant van het scherm zal weergeven De klep op het bovenste paneel zal naar boven en naar beneden draaien Druk nogmaals op deze knop om de klep swing functie uit...

Страница 85: ...er off timer uit knop 7 3 Storingscode Indien de display AS weergeeft is er een storing met de ruimte temperatuur sensor Neem contact op met uw geautoriseerd Electrolux Service Centrum Indien de display ES weergeeft is er een storing met de verdamper temperatuur sensor Neem contact op met uw geautoriseerd Electrolux Service Centrum Indien de display P1 aangeeft is de bodembak vol Verplaats de eenh...

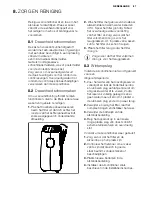
Страница 86: ...r uitstroomt Afvoeruitlaat bodem Druppeldop Druppelbak OPMERKING Om ervoor te zorgen dat al het condenswater verwijderd is de eenheid lichtjes aan de voorkant optillen totdat er geen condenswater meer uit de afvoeruitlaat komt Afvoerdop Afb 19 Garden hose Afb 20 OPMERKING Er kan condenswater uitstromen na het verwijderen van de afvoerdop indien de eenheid in Koelen of Auto mode werkt Indien u de t...

Страница 87: ... grondig Schud het overvloedige water voorzichtig van het filter af Zorg ervoor dat het filter volkomen droog is voor het terugplaatsen Of in plaats van wassen kunt u het filter ook schoon zuigen 3 Plaats het filter terug zodra het filter droog is Zorg ervoor dat het filter volkomen droog is voor het terugplaatsen 8 3 Winteropslag Indien de airconditioner niet wordt gebruikt voor een langere tijds...

Страница 88: ...ig filter Zie 8 Sectie zorg en reiniging Om te ontdooien stel op ventilator mode in De temperatuur is te laag ingesteld om s nachts te koelen Om te ontdooien stel u de ventilator mode in Dan stelt u de temperatuur hoger in De uitlaatslang is niet aangesloten of geblokkeerd Zie 5 1 Sectie uitlaat warme lucht De airconditioner koelt maar de ruimte is te warm ijsvorming op de koelspiraal achter de de...

Страница 89: ...he verwarmingen kachels of andere ontbrandingsbronnen te voorkomen Het apparaat dient zodanig opgeborgen te worden dat mechanische storing voorkomen wordt Personen die werken aan of het koelcircuit gebruiken dienen de juiste certificaten te hebben die uitgegeven zijn door een geaccrediteerde organisatie die competentie m b t de behandeling van koelmiddelen waarborgt in overeenstemming met een spec...

Страница 90: ... Produktnummerncode PNC Seriennummer Die Informationen finden Sie auf dem Typenschild Änderungen vorbehalten Warnhinweise Vorsichts und Sicherheitshinweise Allgemeine Informationen und Tipps Umwelttipps Hinweise zum Gebrauch Broschüren Fehlerbehebung Serviceinformationen zu erhalten www electrolux com webselfservice Besuchen Sie unsere Website um Registrieren Sie Ihr Produkt für einen besseren Ser...

Страница 91: ...st nicht zur Verwendung von Kleinkindern oder gebrechlichen Personen ohne Aufsicht vorgesehen Bei Kleinkindern empfiehlt sich die Aufsicht durch Erwachsene um zu verhindern dass das Klimagerät als Spielzeug verwendet wird Der maximal zulässige Geräuschpegel der von Klimageräten ausgeht wird von den Bestimmungen der Gemeindeverwaltung geregelt Das Ersetzen des Netzkabels darf ausschließlich von aut...

Страница 92: ...uchen Ziehen oder falsche Anwendung des Stromkabels kann zu Schäden am Gerät führen und einen elektrischen Schlag verursachen Ändern Sie keines der Teile an diesem Produkt Stecken Sie keine Gegenstände in irgendein Teil des Geräts Stellen Sie sicher dass die Stromversorgung über eine geeignete Bemessungsspannung verfügt Es darf nur eine Netzstromversorgung von 220 V 240 V 50 Hz und 10 A verwendet ...

Страница 93: ...ker ab oder oder entfernen Sie ihn nur für England Stecker Viereckiger Schutzkontaktstift 1 3 Vorsichtshinweise für die Verwendung Stellen Sie sicher dass das Gerät ausgeschaltet ist und das Stromkabel von der Steckdose getrennt wurde bevor Sie Reinigungs oder Wartungsarbeiten vornehmen Lassen Sie kein Wasser und auch keine Wasserspritzer in direkten Kontakt mit dem Gerät kommen Wasser kann zu ein...

Страница 94: ...bs warten Sie 3 Minuten bis das Gerät erneut gestartet wird Nachdem der Strom wieder hergestellt wurde starten Sie das Klimagerät erneut Wenn der Stromausfall kürzer als drei Minuten war stellen Sie sicher dass Sie mindestens drei Minuten warten bevor Sie das Gerät erneut starten Wenn Sie das Klimagerät innerhalb von drei Minuten erneut starten kann eine Schutzvorrichtung im Gerät den Kompressor a...

Страница 95: ...ttel fachkundig ist Dieses Produkt enthält eine Lithium Knopfzelle Falls eine neue oder gebrauchte Lithium Knopfzelle verschluckt wird oder in den Körper gelangt kann sie ernsthafte innerliche Verbrennungen verursachen und in weniger als zwei Stunden zum Tod führen Schließen Sie das Batteriefach immer vollständig Falls das Batteriefach nicht vollständig geschlossen wird verwenden Sie das Produkt n...

Страница 96: ...alsche Erdung kann zu einem elektrischen Schlag führen Kein Wasser in elektrische Bauteile laufen lassen Hierdurch kann das Gerät ausfallen oder es kann zu einem elektrischen Schlag kommen Stets einen Leistungsschalter installieren und für einen geeigneten Stromkreis sorgen Eine falsche Montage kann zu einem Brand und elektrischen Schlag führen Den Netzstecker des Geräts ziehen sobald ein eigenart...

Страница 97: ...it beiden Händen festhalten Ansonsten kann es zu einem elektrischen Schlag und Schäden kommen Betriebsschalter ausschalten wenn das Gerät für längere Zeit nicht verwendet wird Hierdurch kann das Gerät ausfallen oder es kann zu einem Brand kommen Niemals Gegenstände in den Lufteinlass oder den Luftauslass einführen Hierdurch kann das Gerät ausfallen oder es kann zu einem Unfall kommen Filter stets ...

Страница 98: ...ILE TEILENAME MENGE 1 Satz für die Fenstermontage Verbindungsstück A 1 Stck 2 Auslass Verbindungsstück B 1 Stck 3 Anbausatz für Fenster 1 Satz 4 Abluftschlauch 1 Stck 5 Schrauben 4 Stck 12 7 mm Schrauben 2 Stck 19 mm Schrauben 6 Sicherheitsverschluss 1 Stck 7 Bolzen 2 Stck 8 Schaumdichtung A 2 Stck 9 Schaumdichtung B 1 Stck 10 Fernbedienung 1 Satz 11 Batterien 2 Stck Überprüfen Sie ob sämtliches Z...

Страница 99: ...uben Abb 2 Abb 1 Die Seite des Schlauchs in die Länge ziehen Abb 2 2 Die andere Seite des Schlauchs in die Länge ziehen und an Verbindungsstück B Abb 3 anschrauben Abb 3 3 Verbindungsstück B in das Gerät einbauen Abb 4 Abb 4 Verschließen 2 Aufschieben 1 4 Verbindungsstück A in den Anbausatz für Fenster befestigen und schließen Abb 5 und 6 Vertikales Fenster Anbausatz für Fenster Minimum 67 5 cm Ma...

Страница 100: ...r passt 3 Den Fensterflügel fest gegen den Anbausatz für Fenster schieben Abb 11 4 Zwei 12 7 mm Schrauben einschrauben um den Anbausatz für Fenster am Fensterflügel zu befestigen Abb 11 5 Anbausatz für Fenster auf Fensterbank befestigen Abb 11 A Für Holzfenster Zum Befestigen sind 19 mm Schrauben erforderlich B Für vinylverkleidete Fenster 12 7 mm Sechskantschrauben zum Befestigen verwenden Abb 11...

Страница 101: ...es Fensters geringer als 67 5 cm Abb 10 ist Abb 15 Fensterbank Anbausatz für Fenster schrauben 67 5 cm 123 cm 3 Den Fensterflügel fest gegen den Anbausatz für Fenster schieben Abb 16 4 Zwei 12 7 mm Schrauben einschrauben um den Anbausatz für Fenster am Fensterflügel zu befestigen Abb 16 5 Zwei 19 mm Schrauben einschrauben um den Anbausatz für Fenster an der Fensterbank zu befestigen Abb 16 Abb 16 ...

Страница 102: ...s Cooling Kühlen In diesem Modus MUSS der Adapter für den Abluftschlauch verwendet werden 1 Drücken Sie die Taste Mode Modus bis die Anzeige für Modus Kühlen aufleuchtet 2 Drücken Sie die Taste Fan speed Lüfterstufe um die Lüfterstufe entsprechend der Anzeige für Lüfterstufe auszuwählen Sie können zwischen der Lüfterstufe Hi Hoch Med Mittel Low Niedrig oder Auto Auto wählen 3 Drücken Sie die Taste...

Страница 103: ... ein Das Gerät befindet sich im Standby Modus Drücken Sie die Taste Timer Timer Es erscheint die Timer Anzeige und die Zahl der Stunden auf dem Bildschirm blinkt Tippen Sie oder halten Sie den Pfeil UP AUFWÄRTS oder den Pfeil DOWN ABWÄRTS gedrückt um den Einschalttimer in Schritten von 0 5 Stunden bis zu 10 Stunden anschließend in Schritten von 1 Stunde bis zu 24 Stunden zu verzögern Nach 5 Sekund...

Страница 104: ...werden da sie schädlich für die Umwelt sind Alte und neue Batterien nicht zusammen verwenden Alkaline Standard Kohle Zink oder wiederaufladbare Nickel Cadmium Batterien nicht zusammen verwenden Batterien nicht ins Feuer werfen Sie könnten explodieren oder auslaufen Wenn die Fernbedienung für längere Zeit nicht verwendet wird nehmen Sie die Batterien aus dem Fach heraus Die Fernbedienung muss extre...

Страница 105: ...us bis die linke Seite des LCD Bildschirms anzeigt Gleichzeitig erscheint das Lüftersymbol Low Niedrig auf dem Bildschirm Hinweis In diesem Modus kann die Lüfterstufe nicht ausgewählt werden Modus Fan Lüften Drücken Sie die Taste Mode Modus bis die linke Seite des LCD Bildschirms anzeigt In diesem Modus können Sie die Lüfterstufen Hi Hoch Med Mittel Low Niedrig oder Auto Auto auswählen indem Sie a...

Страница 106: ...die Taste Sleep Nachtbetrieb Mode Modus oder Fan speed Lüfterstufe drücken Hinweis Im Modus Lüften oder Trocknen kann der Modus Nachtbetrieb nicht eingestellt werden Funktion Luftleitlamellen Drücken Sie die Taste Swing um die Funktion Luftleitlamellen zu aktivieren oben im Bildschirm wird angezeigt Die obere Luftleitlamelle bewegt sich hin und her Drücken Sie die Taste erneut um die Funktion Luft...

Страница 107: ...code Wenn auf der Anzeige AS steht besteht ein Fehler mit dem Raumtemperatursensor Kontaktieren Sie Ihren autorisierten Electrolux Service Center Wenn auf der Anzeige ES steht besteht ein Fehler mit dem Verdampfer Kontaktieren Sie Ihren autorisierten Electrolux Service Center Wenn auf der Anzeige P1 steht ist das untere Fach voll Transportieren Sie das Gerät vorsichtig an einen Ort an dem das Wass...

Страница 108: ...eßt Auslass für untere Entwässerung Wasserablaufprofil Auffangschale HINWEIS Um sicherzustellen dass das gesamte Restkondensat entfernt wurde kippen Sie das Gerät indem Sie es vorne etwas anheben bis kein Kondensat mehr aus dem Entwässerungsauslass kommt Verschlusskappe Abb 19 Gartenschlauch Abb 20 HINWEIS Wenn sich das Gerät im Modus Kühlen oder Auto befindet kann es sein dass nach dem Entfernen ...

Страница 109: ...n Sie überschüssiges Wasser vom Filter ab Stellen Sie sicher dass der Filter vor dem Wiedereinsetzen vollständig trocken ist Sie können den Filter aber auch absaugen 3 Setzen Sie den Filter wieder ein wenn er trocken ist Stellen Sie sicher dass der Filter vor dem Wiedereinsetzen vollständig trocken ist 8 3 Aufbewahrung im Winter Falls das Klimagerät für einen längeren Zeitraum nicht verwendet wird...

Страница 110: ...6 C Zum Auftauen der Spirale auf Modus Lüften stellen Luftfilter möglicherweise verschmutzt Filter reinigen Lesen Sie Kapitel 8 Abschnitt Pflege und Reinigung Zum Auftauen auf Modus Lüften stellen Temperatur ist für Kühlung über Nacht zu niedrig eingestellt Zum Auftauen der Spirale auf Modus Lüften stellen Stellen Sie dann die Temperatur höher ein Abluftleitung nicht angeschlossen oder verstopft S...

Страница 111: ...von elektrischen und elektronischen Geräten Werfen Sie keine Geräte mit dem Symbol in den Hausmüll Geben Sie das Produkt an Ihre Reststoffverwertungsanlage vor Ort zurück oder kontaktieren Sie Ihre Gemeindebehörde Wenn das Gerät in einem nicht belüfteten Raum aufgestellt betrieben oder aufbewahrt wird muss der Raum so ausgelegt sein dass ein vermehrtes Austreten von Kältemittel verhindert wird da ...

Страница 112: ...ianie bez uprzedzenia Ostrzeżenie Informacje dotyczące bezpieczeństwa Porady i informacje ogólne Informacje dotyczące środowiska Uzyskaj porady dotyczące obsługi broszury informacje o rozwiązywaniu problemów i informacje serwisowe www electrolux com webselfservice Odwiedź naszą stronę aby Zarejestruj swój produkt w celu uzyskania lepszej obsługi http www electrolux pl Support Register products Kup...

Страница 113: ...wać się z montażystą Klimatyzacji nie powinny użytkować młode dzieci lub osoby o ograniczonych zdolnościach fizycznych jeżeli nie są one nadzorowane Młode dzieci powinny być pod nadzorem by upewnić się że nie będą się bawić urządzeniem Istnieją przepisy samorządów lokalnych odnośnie maksymalnych dopuszczalnych poziomów hałasu emitowanych przez klimatyzacje Jeśli konieczna jest wymiana przewodu zas...

Страница 114: ...urzać go w wodzie Wyciąganie lub nieprawidłowe użycie przewodu zasilającego może skutkować uszkodzeniem urządzenia i porażeniem elektrycznym Nie modyfikować żadnej części tego urządzenia Nie wkładać żadnych przedmiotów do którejkolwiek części urządzenia Należy upewnić się że użyto zasilania o odpowiednim napięciu znamionowym Stosować tylko zasilanie z sieci elektrycznej 220V 240V 50Hz 10A Użycie z...

Страница 115: ...zania w trakcie użytkowania Odciągana woda może zamarzać wewnątrz węża powodując wylewanie się do pomieszczenia wody z wnętrza jednostki Jeśli przewód zasilający jest uszkodzony to w celu uniknięcia potencjalnych zagrożeń powinien zostać wymieniony przez producenta jego agenta serwisowego lub osoby posiadające podobne kwalifikacje Do wymiany stosować wyłącznie przewody określone przez producenta S...

Страница 116: ... niż trzy minuty należy upewnić się że odczekano co najmniej trzy minuty przed ponownym uruchomieniem urządzenia Jeśli uruchomi się je wcześniej urządzenie zabezpieczające w jednostce może spowodować wyłączenie kompresora Urządzenie zabezpieczające będzie wstrzymywać chłodzenie przed około 5 minut Wszelkie poprzednie ustawienia zostaną anulowane a urządzenie powróci do swoich ustawień początkowych...

Страница 117: ... lub wprowadzeniu do wnętrza ciała mogą spowodować poważne poparzenia wewnętrzne oraz doprowadzić do śmierci w ciągu nawet 2 godzin Zawsze należy dokładnie zabezpieczać gniazdo baterii Jeśli gniazdo baterii nie jest należycie zabezpieczone należy przestać używać urządzenia wyjąć baterie i przechowywać je poza zasięgiem dzieci Jeśli wystąpiło podejrzenie że baterie mogły zostać połknięte lub umiesz...

Страница 118: ...kuteczne uziemienie Nieprawidłowe uziemienie może skutkować porażeniem prądem elektrycznym Nie dopuszczać do zmoczenia części elektrycznych Może to skutkować awarią urządzenia lub porażeniem prądem Zawsze montować wyłącznik automatyczny oraz dedykowany obwód elektroenergetyczny Nieprawidłowa instalacja może spowodować pożar lub doprowadzić do porażenia prądem Odłączyć urządzenie jeśli wydobywają s...

Страница 119: ...Podłączać i odłączać przewód zasilający trzymając go za główkę Może to skutkować porażeniem prądem i usterką urządzenia Należy wyłączyć wyłącznik bezpieczeństwa w przypadku gdy urządzenie nie pracuje przez dłuższy okres czasu Może to skutkować awarią urządzenia lub pożarem Zabrania się blokowania wlotów i wylotów powietrza Może to skutkować awarią urządzenia lub wypadkiem Należy dokładnie wkładać ...

Страница 120: ...ie odpływu ciągłego 4 ZAŁĄCZONE AKCESORIA CZĘŚCI NAZWA CZEŚCI ILOŚĆ 1 Zestaw łączników z oknem A 1 szt 2 Łącznik wydechowy B 1 szt 3 Zestaw przesuwny do okna 1 zestaw 4 Wąż wydechowy 1 szt 5 Wkręty 4 szt wkręty 12 7 mm 2 szt wkręty 19 mm 6 Zamek bezpieczeństwa 1 szt 7 Śruby 2 szt 8 Uszczelka piankowa A 2 szt 9 Uszczelka piankowa B 1 szt 10 Pilot zdalnego sterowania 1 zestaw 11 Baterie 2 szt Sprawd...

Страница 121: ...ć drugą stronę węża i przykręcić go do łącznika B Rys 3 Rys 3 3 Zainstalować łącznik B na urządzeniu Rys 4 Rys 4 Zablokować 2 Nasunąć 1 4 Zamocować łącznik A na zestawie przesuwnym do okna i uszczelnić Rys 5 i 6 Okno pionowe Zestaw przesuwny do okna Minimum 67 5 cm Maksimum 123 cm Rys 5 Zestaw przesuwny do okna Minimum 67 5 cm Maksimum 123 cm Okno poziome Rys 6 Wąż można rozciągnąć z początkowej d...

Страница 122: ...zesuwny do parapetu Rys 11 A Dla okien drewnianych Do mocowania użyć wkrętów 19 mm B Dla okien PVC Do mocowania użyć sześciokątnych śrub z łbem zmniejszonym 12 7 mm Wkręty 12 7 mm Wkręty 19 mm lub sześciokątne śruby z łbem zmniejszonym 12 7 mm Parapet Zestaw przesuwny do okna Rys 11 6 By osadzić dolne skrzydło w jednym położeniu zamocować kątowy zamek bezpieczeństwa wkrętami 12 7 mm zgodnie z ilus...

Страница 123: ...ć skrzydło okienne dociskając je do zestawu przesuwnego Rys 16 4 Wkręcić dwa wkręty 12 7 mm by przymocować zestaw przesuwny do skrzydła okiennego Rys 16 5 Wkręcić dwa wkręty 19 mm by przymocować zestaw przesuwny do parapetu Rys 16 Parapet Zestaw przesuwny do okna Wkręty 12 7 mm Wkręty 12 7 mm Rys 16 6 Przyciąć uszczelkę B do odpowiedniej długości i zaplombować szczelinę między przesuwnym i zewnętr...

Страница 124: ...a zgodnie z podświetleniem wskaźnika prędkości Można wybrać prędkość wentylatora Hi Wysoka Med Średnia Low Niska oraz Auto Automatyczna 3 Wciśnij przyciski i by ustawić żądaną temperaturę W trybie Cool Chłodzenie nie jest konieczne użycie węża odpływowego Tryb Dry Suszenie Naciśnij przycisk mode tryb aż zapali się wskaźnik Suszenie Na wyświetlaczu pojawi się temperatura pomieszczenia Jednocześnie ...

Страница 125: ...zba godzin Dotknij lub przytrzymaj strzałkę w górę lub strzałkę w dół by zmienić czas opóźnienia uruchomienia z przyrostem 0 5 godzinnym aż do 10 godzin następnie z przyrostem 1 godzinnym aż do 24 godzin Po upływie 5 sekund wskaźnik timera i wyświetlacz przestaną migać Sterownik zacznie odliczanie czasu pozostałego do uruchomienia Jednostka uruchomi się w uprzednio ustawionym trybie Aby anulować w...

Страница 126: ...rych i nowych baterii Nie łączyć ze sobą baterii alkalicznych standardowych węglowo cynkowych lub akumulatorków niklowo kadmowych Nie wrzucać baterii do ognia Mogą one eksplodować lub wyciec Jeśli pilot zdalnego sterowania nie jest używany od dłuższego czasu należy usunąć baterie Z pilotem należy obchodzić się ostrożnie Nie należy go upuszczać ani wystawiać na bezpośrednie działanie promieni słońc...

Страница 127: ... stronie wyświetlacza pojawi się Jednocześnie na ekranie pojawi się symbol wentylatora low Uwaga W tym trybie nie można wybrać prędkości wentylatora Tryb Fan Wentylator Wciśnij przycisk mode tryb aż na lewej stronie wyświetlacza pojawi się W tym trybie można wybrać prędkość wentylatora Hi Wysoka Med Średnia Low Niska oraz Auto Automatyczna wciskając przycisk fan speed prędkość wentylatora oraz odn...

Страница 128: ...ahanie Żaluzji Wciśnij przycisk swing wahanie by uaktywnić funkcję wahania żaluzji zaś w górnej części wyświetlacza pojawi się Żaluzja na górnym panelu zacznie się poruszać do dołu i do góry Aby anulować funkcję wahania należy ponownie nacisnąć ten przycisk Funkcja F C Wciśnij przycisk F C F C by przełączyć się pomiędzy skalą Fahrenheita a Celsjusza W trybie Suszenie Wentylator nie można zmieniać ...

Страница 129: ...j Skontaktuj się z autoryzowanym serwisem Electroluxa Jeśli na wyświetlaczu pojawi się ES awarii uległ czujnik temperatury parownika Skontaktuj się z autoryzowanym serwisem Electroluxa Jeśli na wyświetlaczu pojawi się P1 dolna taca jest pełna Ostrożnie przenieś urządzenie do miejsca odciągania wody wyjmij dolny korek spustowy i pozwól żeby woda spłynęła Zrestartuj urządzenie aż zniknie symbol P1 J...

Страница 130: ...wyjścia dolnego odpływu gdy skroplona woda przestanie wypływać Dolne wyjście odpływu Okapnik Taca ociekowa UWAGA By upewnić się że cała skroplona woda została usunięta przechyl urządzenie podnosząc je lekko do góry z przodu aż woda przestanie wypływać z wyjścia odpływu Wąż ogrodowy Rys 20 UWAGA Skropliny mogą wypłynąć po wyjęciu korka spustowego jeśli urządzenie działa w trybie Chłodzenie lub Auto...

Страница 131: ...r Delikatnie wytrząsnąć nadmiar wody z filtra Upewnić się że przy wkładaniu filtra jest on całkowicie suchy Można też oczyścić filtr za pomocą odkurzacza 3 Włożyć filtr na miejsce po tym jak wyschnie Upewnić się że przy wkładaniu filtra jest on całkowicie suchy 8 3 Przechowywanie sezonowe Jeśli planowana jest dłuższa bezczynność urządzenia 1 Osuszyć całkowicie zbiornik wody i pozostawić korek spus...

Страница 132: ...y odmrozić chłodnicę ustawić tryb Wentylator Filtr powietrza może być zabrudzony Wyczyścić filtr Patrz dział 8 Pielęgnacja i czyszczenie By odmrozić ustawić tryb Wentylator Temperatura ustawiona za nisko do nocnego chłodzenia By odmrozić chłodnicę ustawić tryb Wentylator Następnie ustawić temperaturę na wyższą Przewód wydechowy nie podłączony lub zablokowany Patrz dział 5 1 Wydmuchiwanie gorącego ...

Страница 133: ...ycieków chłodziwa skutkujących ryzykiem pożaru lub eksplozji z powodu zapłonu chłodziwa wywołanego przez ogrzewacze elektryczne piekarniki lub inne źródła zapłonu Urządzenie należy przechowywać w sposób zapobiegający uszkodzeniom mechanicznym Osoby które obsługują lub pracują przy układzie chłodzącym muszą posiadać odpowiednie świadectwo wydane przez akredytowaną organizację które zapewni o zakres...

Страница 134: ...ítku Mohou se měnit bez předchozího upozornění Upozornění Bezpečnostní pokyny Obecné informace a tipy Informace o životním prostředí Rady pro použití brožury řešení potíží informační servis můžete získat na adrese www electrolux com webselfservice Navštivte naše webové stránky na adrese Pro získání lepších služeb svůj produkt zaregistrujte na adrese www registerelectrolux com Příslušenství spotřeb...

Страница 135: ...obraťte na instalačního technika Klimatizační zařízení není určeno k použití malými dětmi nebo nemohoucími bez dohledu Je nutno zajistit aby si s klimatizační jednotkou nehrály malé děti Ve vaší oblasti existují místní nařízení týkající se maximální přípustné hladiny hluku vydávaného klimatizacemi Je li nutno vyměnit napájecí kabel smí výměnu provádět jen oprávněné osoby Montážní práce musí být pr...

Страница 136: ...jecí konektor pevně zatlačte do zásuvky a zkontrolujte zda není uvolněný Za napájecí šňůru netahejte nedeformujte ji ani upravte nebo ji neponořujte do vody Tahání nebo špatné zacházení s napájecím kabelem může způsobit poškození zařízení a způsobit úraz elektrickým proudem Žádnou část tohoto produktu neupravujte Do jakékoli části zařízení nic nevkládejte Zajistěte aby napájení mělo odpovídající j...

Страница 137: ...m použití pod bodem mrazu Vypouštěná voda může uvnitř hadice zamrznout a voda uvnitř přístroje může přetéct do místnosti Je li napájecí kabel poškozen musí být v rámci prevence rizika vyměněn výrobcem jeho servisním střediskem nebo podobně kvalifikovanými osobami Při výměně použijte pouze výrobcem specifikovaný napájecí kabel Toto zařízení musí být uzemněno Toto zařízení je vybaveno kabelem se zem...

Страница 138: ... tři minuty nezapomeňte před opětovným spuštěním jednotky vyčkat alespoň tři minuty Pokud klimatizaci restartujete během tří minut ochranné zařízení v jednotce může způsobit vypnutí kompresoru Toto ochranné zařízení chlazení znemožní asi na 5 minut Veškerá předchozí nastavení budou zrušena a jednotka se vrátí do původního nastavení Provoz při nízké teplotě Zamrzá vaše jednotka K zamrzání může dojí...

Страница 139: ...leniny a během krátkého období dvou hodin může vést ke smrti Přihrádku na baterii vždy dokonale zabezpečte Pokud přihrádku pro baterie nelze bezpečně uzavřít přestaňte produkt používat baterie vyjměte a uschovejte ji mimo dosah dětí Pokud si myslíte že mohlo dojít k požití baterií nebo k jejich vniknutí do kterékoli části těla okamžitě vyhledejte lékařskou pomoc V rámci prevence zranění uživatele ...

Страница 140: ...ěte funkční uzemnění Nesprávné uzemnění může způsobit úraz elektrickým proudem Nedovolte aby do elektrických součástí vnikla voda Mohlo by dojít k selhání jednotky nebo k úrazu elektrickým proudem Vždy nainstalujte jistič a samostatný elektrický okruh Při nesprávné montáži může dojít k úrazu elektrickým proudem Pokud z jednotky vychází podivné zvuky zápach nebo kouř odpojte ji Mohlo by dojít k pož...

Страница 141: ...k zvlhnutí interiéru a promočení bytového nábytku Při odpojování zařízení držte zástrčku jen za vidlici Mohlo by dojít k úrazu elektrickým a ke škodám Pokud jednotku delší dobu nepoužíváte vypněte hlavní vypínač Mohlo by dojít k selhání produktu nebo k požáru V okolí přívodu vzduchu nebo dovnitř výfuku vzduchu nestavte žádné překážky Mohlo by dojít k selhání přístroje nebo k úrazu Filtry vždy vklá...

Страница 142: ...alý odtok vody 4 DODÁVANÉ PŘÍSLUŠENSTVÍ LETADLA NÁZEV SOUČÁSTI MNOŽSTVÍ 1 Konektor okenní sady A 1 ks 2 Výfukový konektor B 1 ks 3 Okenní vložka 1 sada 4 Výfuková hadice 1 ks 5 Šrouby 4 ks šroubů 12 7 2 ks šroubů 19 6 Bezpečnostní zámek 1 ks 7 Svorníky 2 ks 8 Pěnové těsnění A 2 ks 9 Pěnové těsnění B 1 ks 10 Dálkový ovladač 1 sada 11 Baterie 2 ks Zkontrolujte zda balení obsahuje veškeré příslušenst...

Страница 143: ...áhněte druhou stranu hadice a přišroubujte ji ke konektoru B obr 3 Obr 3 3 Konektor B nainstalujte do jednotky obr 4 Obr 4 Uzamkněte 2 Nasaďte 1 4 Konektor A připojte k posuvné okenní sadě a utěsněte jej Obr 5 a 6 Vertikální okno Okenní vložka Minimálně 67 5 cm Maximálně 123 cm Obr 5 Okenní vložka Minimálně 67 5 cm Maximálně 123 cm Horizontální okno Obr 6 Hadici je možno z původní délky 38 cm prod...

Страница 144: ...k parapetu obr 11 A U dřevěného okna Pro upevnění použijte 19 mm šrouby B U oken Vinyl Clad Pro upevnění použijte 12 7mm šrouby s šestihrannou hlavou Šrouby 12 7 mm 19mm šrouby nebo šrouby 12 7 s půlkulatou hlavou Okenní parapet Okenní vložka Obr 11 6 K upevnění spodního křídla použijte pravoúhlý zámek křídla a šrouby 12 7 mm jak je znázorněno obr 12 Okna Vinyl Clad je obtížné zamknout bezpečnostn...

Страница 145: ...ak aby bezpečně dosedlo na okenní vložku Obr 16 4 Zašroubujte dva 12 7 mm šrouby zajišťující okenní vložku k okennímu křídlu Obr 16 5 Zašroubujte dva 19 mm šrouby zajišťující okenní vložku k okennímu křídlu Obr 16 Okenní parapet Okenní vložka Šrouby 12 7 mm Šrouby 12 7 mm Obr 16 6 Pěnové těsnění B nařežte na vhodnou délku a utěsněte otevřenou mezeru mezi posuvné křídlo a vnějším okenním křídlem ja...

Страница 146: ...speed rychlost ventilátoru a podle svítícího indikátoru vyberte rychlost ventilátoru Můžete si vybrat nastavení rychlosti ventilátoru hi vysoká med střední low malá nebo auto auto 3 Pro volbu požadované teploty stiskněte tlačítko nebo V režimu cool chlazení není použití odtokové hadice nutné Režim Dry odvlhčování Stiskněte tlačítko mode režim dokud se nerozsvítí kontrolka režimu Dry Odvlhčování Na...

Страница 147: ...iskněte tlačítko timer časovač na displeji se rozbliká indikátor časovače a počet hodin Pro změnu doby odložení časovače spuštění v krocích po půlhodinách do 10 hodin nebo potom v krocích po 1 hodině až do 24 hodin klepněte nebo podržte šipku NAHORU nebo šipku DOLŮ Kontrolka časovače a displej přestanou blikat po 5 sekundách Ovladač bude odpočítávat čas zbývající do spouštění Přístroj se spustí v ...

Страница 148: ...rdní alkalické zinko uhlíkové a nabíjecí nikl kadmiové baterie Baterie neházejte do ohně Mohou v něm explodovat nebo vytéct Pokud nebudete dálkové ovládání delší dobu používat vyjměte z něj baterie S dálkovým ovládáním je nutno zacházet s co nejvyšší opatrností Neházejte je na zem ani je nevystavujte přímému slunečnímu svitu nebo zdrojům tepla Toto zařízení je v souladu s Částí 15 pravidel FCC Jeh...

Страница 149: ...a levé straně LCD displeje nezobrazí Současně se na dispeji zobrazí symbol low malé rychlosti ventilátoru Poznámka V tomto režimu nelze volit rychlost ventilátoru Režim Fan Ventilátoru Mačkejte tlačítko mode režim dokud se na levé straně LCD displeje nezobrazí V tomto režimu můžete tlačítkem rychlosti ventilátoru a podle nákresu zvolit rychlost ventilátoru hi vysoká med střední low malá nebo auto ...

Страница 150: ...žimu Ventilátor nebo Odvlhčování nelze nastavit režim Spánek Funkce změna směru proudění Pro aktivaci funkce pohybu klapek stiskněte tlačítko swing změna směru proudění a v horní části displeje se zobrazí Klapky na horním panelu se budou pohybovat nahoru a dolů Opakovaným stiskem tohoto tlačítka funkci pohybu klapek vypnete Funkce F C Pro přepínání mezi stupni Fahrenheita a Celsia stiskněte tlačít...

Страница 151: ...ty v místnosti selhalo Kontaktujte autorizované servisní středisko firmy Electrolux Pokud se na displeji zobrazí ES čidlo teploty výparníku selhalo Kontaktujte autorizované servisní středisko firmy Electrolux Pokud se na displeji zobrazí P1 je spodní miska plná Jednotku opatrně přesuňte na místo vypouštění vody odstraňte spodní vypouštěcí zátku a nechte vodu vytéct Restartujte počítač dokud symbol...

Страница 152: ...podní výpust odtoku Uzávěr odkapávače Odkapávací miska POZNÁMKA Chcete li zajistit odstranění všech zbytků kondenzátu nakloňte jednotku tak že ji zepředu mírně nadzvednete směrem nahoru až z odtokového otvoru žádný kondenzát nevytéká Zahradní hadice Obr 20 POZNÁMKA Pokud jednotka běží v režimu chlazení nebo v automatickém režimu může po odstranění uzávěru odtoku vytékat kondenzát Chcete li zahradn...

Страница 153: ...40 C Filtr opláchněte důkladně Přebytečnou vodu z filtru opatrně vytřepte Před opětovným nasazením se ujistěte zda je filtr zcela suchý Místo mytí můžete filtr také dočista vysát 3 Filtr po uschnutí znovu nasaďte Před opětovným nasazením se ujistěte zda je filtr zcela suchý 8 3 Zazimování Pokud nebudete klimatizaci používat po delší časové období 1 Úplně vypusťte sběrnou nádrž na vodu a nechte spo...

Страница 154: ...chový filtr Vyčistěte filtr Postupujte podle části 8 Péče a čištění Pro rozmrazení nastavte režim ventilátoru Teplota je pro noční chlazení nastavena příliš nízko Pro rozmrazení spirály nastavte režim ventilátoru Potom teplotu nastavte na vyšší hodnotu Výfukové potrubí není připojeno nebo je zablokováno Přečtěte si část 5 1 Výfuk horkého vzduchu Klimatizace chladí ale v místnosti je příliš teplo n...

Страница 155: ...dováno v nevětraném prostoru musí být místnost navržena tak aby se zabránilo akumulaci vytékajícího chladiva která by vedla k riziku požáru nebo výbuchu v důsledku vznícení chladiva způsobeného elektrickými přímotopy kamny nebo jinými zdroji vznícení Zařízení musí být uloženo takovým způsobem aby nedošlo k mechanické selhání Osoby kteří provozují nebo pracují na chladícím okruhu musí mít odpovídaj...

Страница 156: ...ng of waste electrical and electronic equipment The separate collection and recycling of your waste equipment at the time of disposal will help to conserve natural resources and ensure that it is recycled in a manner that protects human health and the environment For more information about where you can drop off your waste equipment for recycling please contact your local city office your househol...

Страница 157: ......

Страница 158: ......

Страница 159: ......

Страница 160: ...www electrolux com shop ...

Отзывы: