background image

10.9 Interrupting a programme

and changing the options

You can change only some options

before they operate.

1. Press 

 .

The indicator flashes.

2. Change the options.
3. Press 

 again.

The programme continues.

10.10 Cancelling a running

programme

1. Press the button   for some

seconds to cancel the programme

and to deactivate the appliance.

2. Press the same button again to

activate the appliance. Now, you can

set a new washing programme.

Before starting the new

programme the appliance

could drain the water. In this

case, make sure that the

detergent is still in the

detergent compartment, if

not fill the detergent again.

10.11 Opening the door

CAUTION!

If the temperature and level

of the water in the drum are

too high and the drum still

rotates, you cannot open the

door.

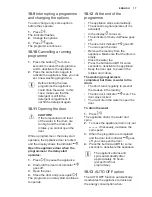
While a programme or the delay start

operates, the appliance door is locked
and the display shows the indicator 

.

Open the appliance door when the

programme or the delay start

operates:

1. Press 

 to pause the appliance.

2. Wait until the door lock indicator 

goes off.

3. Open the door.
4. Close the door and press again 

.

The programme or delay start continues

to operate.

10.12 At the end of the

programme

• The appliance stops automatically.

• The acoustic signal operates (if it is

activated).

• In the display   comes on.

• The indicator of theAvvio/Pausa goes

off.

• The door lock indicator 

 goes off.

• You can open the door.

• Remove the laundry from the

appliance. Make sure that the drum is

empty.

• Close the water tap.

• Press the button AutoOff for some

seconds to deactivate the appliance.

• Keep the door ajar, to prevent the

mildew and odours.

The washing programme is

completed, but there is water in the

drum:

• The drum turns regularly to prevent

the creases in the laundry.

• The door lock indicator 

 is on. The

door stays locked.

• You must drain the water to open the

door.

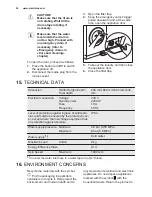
To drain the water:

1. Press 

.

The appliance drains the water and

spins.

2. To make the appliance drain only, set

. If necessary, decrease the

spin speed.

3. When the programme is completed

and the door lock indicator 

 goes

off, you can open the door.

4. Press the button AutoOff for some

seconds to deactivate the appliance.

The appliance drains and

spins automatically after

approximately 18 hours

(except for Wool

programme).

10.13 AUTO OFF option

The AUTO OFF function automatically

deactivates the appliance to decrease

the energy consumption when:

ENGLISH

17

Содержание EWF 1487 HDW

Страница 1: ...EWF 1487 HDW EN Washing Machine User Manual ...

Страница 2: ...ou use it you can be safe in the knowledge that you ll get great results every time Welcome to Electrolux Visit our website for Get usage advice brochures trouble shooter service information www electrolux com webselfservice Register your product for better service www registerelectrolux com Buy Accessories Consumables and Original spare parts for your appliance www electrolux com shop CUSTOMER CA...

Страница 3: ... involved Do not let children play with the appliance Children of less than 3 years should be kept away unless continuously supervised Keep all packaging away from children Keep all detergents away from children Keep children and pets away from the appliance door when it is open Cleaning and user maintenance shall not be made by children without supervision 1 2 General Safety Do not change the spe...

Страница 4: ...ry space between the appliance and the carpet Do not install the appliance where the appliance door can not be fully opened 2 2 Electrical connection The appliance must be earthed Always use a correctly installed shockproof socket Make sure that the electrical information on the rating plate agrees with the power supply If not contact an electrician Do not use multi plug adapters and extension cab...

Страница 5: ...rates The glass can be hot 2 5 Service To repair the appliance contact an Authorised Service Centre Use original spare parts only 2 6 Disposal WARNING Risk of injury or suffocation Disconnect the appliance from the mains supply Cut off the mains cable and discard it Remove the door catch to prevent children and pets to get closed in the appliance 3 PRODUCT DESCRIPTION 3 1 Appliance overview 1 2 3 ...

Страница 6: ...emperatura 5 Display 6 Prewash touchpad Prelavaggio 7 Delay start touchpad Partenza Ritardata 8 Extra rinse touchpad Extra Risciacquo 9 Easy iron touchpad Stiro Facile 10 Start Pause touchpad Avvio Pausa 11 Time Manager touchpads Time Manager 12 Favourite programme touchpad My Favourite 4 2 Display A B C D E F G H J I K A The Temperature area Temperature indicator www electrolux com 6 ...

Страница 7: ...he phase in operation flashes When a phase is complete the indicator of the phase remains on When the programme is completed the symbol of the last phase is on J The Eco Info indicator K The spin area The spin speed indicator The no spin indicator The Rinse Hold indicator The Extra Silent indicator 5 PROGRAMMES 5 1 Programme Chart Programme Temperature range Maximum load Maximum spin speed Program...

Страница 8: ... and to drain the water in the drum All fabrics Piumoni 60 C 30 C 3 kg 800 rpm Special programme for one synthetic blanket duvet bedspread and so on Sport 30 C 2 5 kg 800 rpm Synthetic and delicate items Light soil items or items to refresh 14 min 30 C 1 5 kg 800 rpm Synthetic and mixed fabric items Light soil and items to freshen up Steam programmes4 Steam can be used for dried washed or worn onc...

Страница 9: ...water consumption for washing normally soiled cotton laundry The water temperature of the washing phase may differ from the temperature declared for the selected programme 2 During this cycle the drum rotates slowly to ensure a gentle washing It can seem that the drum doesn t rotate or doesn t rotate properly Consider this as a normal functioning of the appliance 3 Set the spin speed Make sure it ...

Страница 10: ...ia the Woolmark symbol is a certification trademark 6 CONSUMPTION VALUES The data of this table are approximate Different causes can change the data the quantity and type of laundry the water and ambient tempera ture At programme start the display shows the duration programme for the maximum load capacity During the washing phase the programme duration is automatically cal culated and can be great...

Страница 11: ... information given in the chart above are in compliance with the EU Commission regulation 1015 2010 implementing directive 2009 125 EC 7 OPTIONS 7 1 Temperatura Set this option to change the default temperature Indicator cold water The display shows the set temperature 7 2 Centrifuga With this option you can decrease the default spin speed The display shows the indicator of the set speed Additiona...

Страница 12: ...event the creases The appliance decreases the spin speed uses more water and adapts the programme duration to the type of laundry The related indicator comes on 7 5 Partenza Ritardata With this option you can delay the start of a programme from 30 minutes to 20 hours The display shows the related indicator 7 6 Extra Risciacquo With this option you can add some rinses to a washing programme Use thi...

Страница 13: ...he delay start option with MyFavourite How to memorise a programme 1 Press the button to activate the appliance 2 Set the programme and the options that you want to memorise 3 Press MyFavourite until the display shows the text MEM How to set the memorised programme 1 Press the button to activate the appliance 2 Press shortly MyFavourite The delay start is not memorised 8 SETTINGS 8 1 Child Lock Wi...

Страница 14: ... laundry in the drum one item at a time 3 Shake the items before you put them in the appliance Make sure not to put too much laundry in the drum 4 Close the door firmly 10 2 Using detergent and additives 1 Measure out the detergent and the fabric conditioner 2 Put the detergent and the fabric conditioner into the compartments 3 Carefully close the detergent drawer 10 3 Detergent compartments CAUTI...

Страница 15: ...e the liquid detergent Do not use gelatinous or thick liquid detergents Do not put more liquid then the maximum level Do not set the prewash phase Do not set the delay start 10 5 Activating the appliance Press the button to activate or deactivate the appliance A tune sounds when the appliance is activated 10 6 Setting a programme 1 Turn the programme knob and set the programme The related programm...

Страница 16: ...for a short time when the appliance fills water After approximately 15 minutes from the start of the programme The appliance adjusts automatically the programme duration agree with the laundry load The display shows the new value 10 8 Starting a programme with the delay start 1 Press again and again until the display shows the delay you want to set The related indicator comes on the display 2 Pres...

Страница 17: ...he programme or delay start continues to operate 10 12 At the end of the programme The appliance stops automatically The acoustic signal operates if it is activated In the display comes on The indicator of theAvvio Pausa goes off The door lock indicator goes off You can open the door Remove the laundry from the appliance Make sure that the drum is empty Close the water tap Press the button AutoOff...

Страница 18: ...liance laundry without hems or with cuts Use a washing bag to wash small and or delicate items e g underwired bras belts tights etc A very small load can cause balance problems with the spin phase If this occurs adjust manually the items in the tub and start the spin phase again 11 2 Stubborn stains For some stains water and detergent is not sufficient We recommend that you pre treat these stains ...

Страница 19: ...ct 12 CARE AND CLEANING WARNING Refer to Safety chapters 12 1 External cleaning Clean the appliance only with soap and warm water Fully dry all the surfaces CAUTION Do not use alcohol solvents or chemical products 12 2 Descaling If the water hardness in your area is high or moderate we recommend that you use a water descaling product for washing machines Regularly examine the drum to prevent limes...

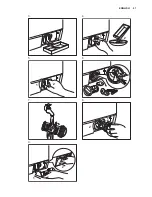
Страница 20: ...12 5 Cleaning the detergent dispenser 1 2 1 2 3 4 12 6 Cleaning the drain filter Do not clean the drain filter if the water in the appliance is hot 1 1 2 2 2 1 1 www electrolux com 20 ...

Страница 21: ...3 4 1 2 5 1 2 6 7 8 1 2 9 1 2 ENGLISH 21 ...

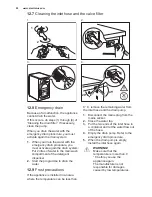
Страница 22: ...e detergent dispenser 2 Start the programme to drain the water 12 9 Frost precautions If the appliance is installed in an area where the temperature can be less than 0 C remove the remaining water from the inlet hose and the drain pump 1 Disconnect the mains plug from the mains socket 2 Close the water tap 3 Put the two ends of the inlet hose in a container and let the water flow out of the hose 4...

Страница 23: ... pressed the door and push the Avvio Pausa button at the same time until the indicator stops flashing see the picture below The mains supply is unstable Wait until the mains supply is stable No communication between electronic elements of the appliance Switch off and switch on again WARNING Deactivate the appliance before you do the checks 13 2 Possible failures Problem Possible solution The progr...

Страница 24: ...e sure that the drain hose has no kinks or bends Make sure that the drain filter is not clogged Clean the fil ter if necessary Refer to Care and cleaning Make sure that the connection of the drain hose is correct Set the drain programme if you set a programme without drain phase Set the drain programme if you set an option which ends with water in the tub The spin phase does not operate or the was...

Страница 25: ...time This is a normal behaviour of the appliance The washing results are not satisfactory Increase the detergent quantity or use a different deter gent Use special products to remove the stubborn stains before you wash the laundry Make sure that you set the correct temperature Decrease the laundry load You cannot set an op tion Make sure that you press only the wanted button s After the check acti...

Страница 26: ...850 mm 605 mm 639 mm Electrical connection Voltage Overall power Fuse Frequency 230 V 2200 W 10 A 50 Hz Level of protection against ingress of solid parti cles and moisture ensured by the protective cov er except where the low voltage equipment has no protection against moisture IPX4 Water supply pressure Minimum Maximum 0 5 bar 0 05 MPa 8 bar 0 8 MPa Water supply 1 Cold water Maximum Load Cotton ...

Страница 27: ...your local recycling facility or contact your municipal office ENGLISH 27 ...

Страница 28: ...www electrolux com shop 132919000 B 322015 ...

Отзывы: