background image

Press the On/Off button to activate

the appliance again.

The display shows the end of the last

programme.

Turn the programme dial to set a new

cycle.

If the dial is rotated to the "Reset"
position  , the appliance automatically

turns off in 30 seconds.

If you set a programme or an

option that ends with water

in the drum, the Stand-by

function doesn't deactivate

the appliance to remind you

to drain the water.

13. HINTS AND TIPS

WARNING!

Refer to Safety chapters.

13.1 The laundry load

• Divide the laundry in: white, coloured,

synthetics, delicates and wool.

• Obey the washing instructions that

are on the laundry care labels.

• Do not wash white and coloured items

together.

• Some coloured items can discolour

with the first wash. We recommend

that you wash them separately for the

first times.

• Turn multilayered fabrics, wool and

items with painted illustrations inside

out.

• Wash and pre-treat heavy soil stains

with a suitable detergent before

putting in drum.

• Be careful with the curtains. Remove

the hooks and put the curtains in a

washing bag or pillowcase.

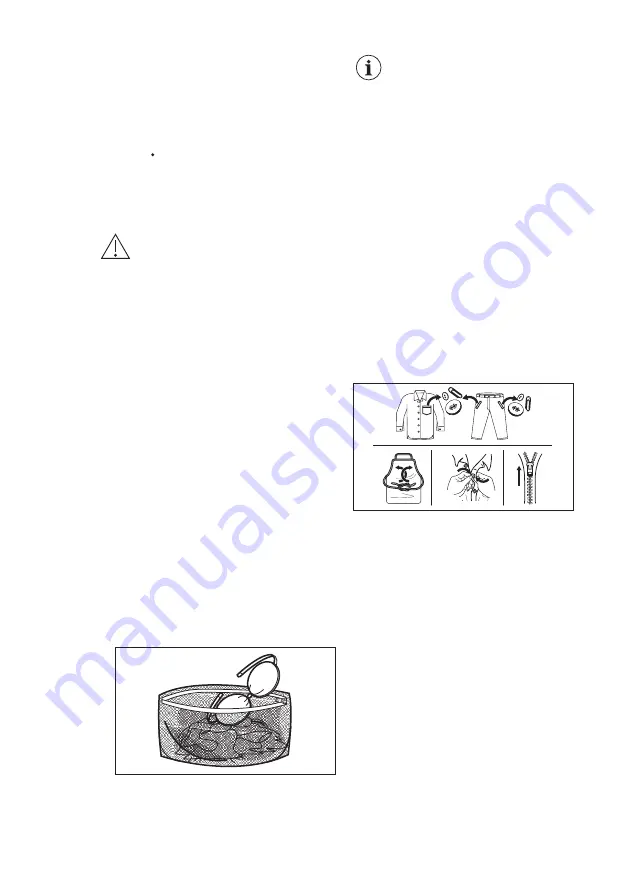
• Do not wash laundry without hems or

with cuts. Use a washing bag to wash

small and/or delicate items (e.g.

underwired bras, belts, tights,

shoelaces, ribbons, etc. ).

• A very small load can cause balance

problems with the spin phase leading

to excessive vibration. If this occurs:

- interrupt the programme and open

the door (refer to "Daily Use" chapter);

-manually redistribute the load so that

the items are spaced evenly around

the tub;

-press the Start/Pause button. The

spin phase continues.

• Button up pillowcases, close zippers,

hooks and poppers. Tie up belts,

cords, shoelaces, ribbons and any

other loose elements.

• Empty the pockets and unfold the

items.

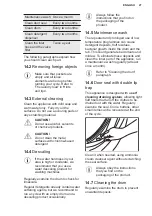
13.2 Stubborn stains

For some stains, water and detergent is

not sufficient.
We recommend that you pre-treat these

stains before you put the items in the

appliance.
Special stain removers are available.

Use the special stain remover that is

applicable to the type of stain and fabric.

13.3 Detergent type and

quantity

The choice of detergent and use of

correct quantities not only affects your

wash performance, but also helps to

avoid waste and protect the environment:
• Use only detergents and other

treatments specially made for

ENGLISH

25

Содержание EW6S5426E6

Страница 1: ...EW6S5426E6 EN Washing Machine User Manual ...

Страница 2: ...with you in mind So whenever you use it you can be safe in the knowledge that you ll get great results every time Welcome to Electrolux Visit our website to Get usage advice brochures trouble shooter service and repair information www electrolux com support Register your product for better service www registerelectrolux com Buy Accessories Consumables and Original spare parts for your appliance ww...

Страница 3: ...nd the hazards involved Children between 3 and 8 years of age and persons with very extensive and complex disabilities shall be kept away from the appliance unless continuously supervised Children of less than 3 years of age should be kept away from the appliance unless continuously supervised Do not let children play with the appliance Keep all packaging away from children and dispose of it appro...

Страница 4: ...er supply cable is damaged it must be replaced by the manufacturer its Authorised Service Centre or similarly qualified persons to avoid an electrical hazard Before any maintenance operation deactivate the appliance and disconnect the mains plug from the socket Do not use high pressure water sprays and or steam to clean the appliance Clean the appliance with a moist cloth Use only neutral detergen...

Страница 5: ...ble need to be replaced this must be carried out by our Authorised Service Centre Connect the mains plug to the mains socket only at the end of the installation Make sure that there is access to the mains plug after the installation Do not touch the mains cable or the mains plug with wet hands Do not pull the mains cable to disconnect the appliance Always pull the mains plug 2 3 Water connection T...

Страница 6: ... and related equipment including hoses valves filters and aquastops printed circuit boards electronic displays pressure switches thermostats and sensors software and firmware including reset software door door hinge and seals other seals door locking assembly plastic peripherals such as detergent dispensers Please note that some of these spare parts are only available to professional repairers and...

Страница 7: ...pth 59 5 cm 84 3 cm 41 1 cm Electrical connection Voltage Overall power Fuse Frequency 230 V 2000 W 10 A 50 Hz Level of protection against ingress of solid parti cles and moisture ensured by the protective cov er except where the low voltage equipment has no protection against moisture IPX4 Water supply pressure Minimum Maximum 0 5 bar 0 05 MPa 10 bar 1 0 MPa Water supply 1 Cold water Maximum Load...

Страница 8: ...rning the safety information in the User Manual Montage anweisun g Achtung Lesen Sie vor Beginn der Installation die Sicherheit shinweise in der Gebrauch sanweisun g Installatio n Instructio n Warning the safety informatio n in the User Manual 4 Put the front polystyrene packaging element on the floor behind the appliance Carefully put down the appliance onto its rear side 5 Remove the polystyrene...

Страница 9: ...eaks from the couplings Do not use an extension hose if the inlet hose is too short Contact the service centre for a replacement inlet hose 1 Connect the water inlet hose to the back of the appliance 20º 20º 45º 45º 2 Position it toward left or right depending on the positon of the water tap Make sure that the inlet hose is not in vertical position 3 If necessary loosen the ring nut to set it in t...

Страница 10: ...e inner diameter of the drain pipe min 38 mm min 1 5 must be larger than the external diameter of the drain hose 5 Without the plastic hose guide to a sink spigot Put the drain hose in the spigot and tighten it with a clamp Refer to the illustration Make sure that the drain hose makes a loop to prevent particles going into the appliance from the sink ø16 1 W011 2 Connect the drain hose to the spig...

Страница 11: ... failure to comply with the above safety precaution 6 ACCESSORIES 6 1 Available in www electrolux com shop or from authorised dealer Only appropriate accessories approved by ELECTROLUX ensure the safety standards of the appliance If unapproved parts are used any claims will be invalidated 6 2 Fixing plate kit 4055171146 If you install the appliance on a plinth secure the appliance in the fixing pl...

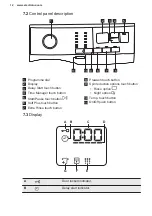
Страница 12: ...ger touch button 5 Start Pause touch button 6 Soft Plus touch button 7 Extra Rinse touch button 8 Prewash touch button 9 Spin reduction options touch button Rinse option Night option 10 Temp touch button 11 On Off push button 7 3 Display A B C D E F G A Door locked indicator B Delay start indicator www electrolux com 12 ...

Страница 13: ... the compatibility between options functions and washing programmes in the Programme Chart An option function can exclude another one in this case the appliance doesn t allow you to set incompatible options functions 8 2 On Off Press this button for a few seconds to activate or deactivate the appliance Two different tunes sound while switching the appliance on or off As the Stand by function autom...

Страница 14: ...ximately 18 hours 8 5 Prewash With this option you can add a prewash phase to a washing programme The relevant indicator illuminates Use this option to add a pre wash phase at 30 C before the washing phase This option is recommended for heavily soiled laundry especially if containing sand dust mud and other solid particles These options can increase the programme duration 8 6 Permanent Extra Rinse...

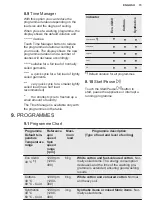
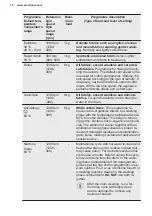
Страница 15: ...ble only with the programmes in the table indicator Eco 40 60 Cottons Synthetics 1 1 Default duration for all programmes 8 10 Start Pause Touch the Start Pause button to start pause the appliance or interrupt a running programme 9 PROGRAMMES 9 1 Programme Chart Programme Default tem perature Temperature range Reference spin speed Spin speed range rpm Maxi mum load Programme description Type of loa...

Страница 16: ...n the laundry and to drain the water in the drum Anti Allergy 60 C 1200 rpm 1200 400 6 kg White cotton items This programme re moves micro organisms thanks to a washing phase with the temperature maintained above 60 C for some minutes This helps in remov ing germs bacteria micro organism and parti cles The addition of vapour together with an additional rinsing phase ensures a proper re moval of de...

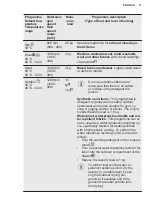
Страница 17: ...nthetic sport items This programme is designed to gently wash modern outdoor sportswear and is also suitable for gym cy cling or jogging clothes or similar The recom mended laundry load is 1 5 kg Waterproof waterproof breathable and wa ter repellent fabrics This programme can al so be used as a water repellency restoring cy cle specifically tailored for treating clothes with a hydrophobic coating ...

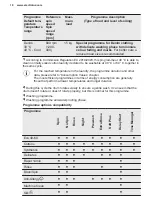
Страница 18: ...le For the reached temperature in the laundry the programme duration and other data please refer to Consumption Values chapter The most efficient programmes in terms of energy consumption are generally those that perform at lower temperatures and longer duration 2 During this cycle the drum rotates slowly to ensure a gentle wash It can seem that the drum doesn t rotate or doesn t rotate properly b...

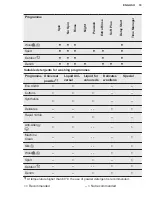
Страница 19: ...r washing programmes Programme Universal powder1 Liquid Uni versal Liquid for coloureds Delicates woollens Special Eco 40 60 Cottons Synthetics Delicates Rapid 14min Anti Allergy Machine Clean Silk Wool Sport Outdoor Denim 1 At temperature higher than 60 C the use of powder detergent is recommended Recommended Not recommended ENGLISH 19 ...

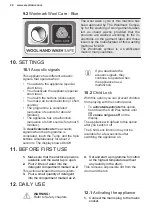
Страница 20: ...buttons simultaneously for about 2 seconds The display shows On Off If you deactivate the acoustic signals they continue to operate when the appliance has a malfunction 10 2 Child Lock With this option you can prevent children from playing with the control panel To activate deactivate this option hold down the Soft Plus button until comes on goes off on the display The appliance will default to th...

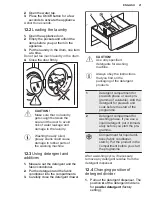
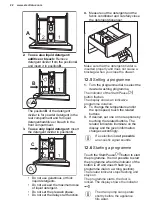
Страница 21: ...d the fabric conditioner into the compartments 3 Carefully close the detergent drawer 2 1 CAUTION Use only specified detergents for washing machine Always obey the instructions that you find on the packaging of the detergent products 1 Detergent compartment for prewash phase or soak pro gramme if available Add the detergent for prewash and soak before the start of the programme 2 Detergent compart...

Страница 22: ...en you close the drawer 12 5 Setting a programme 1 Turn the programme dial to select the desired washing programme The indicator of the Start Pause button flashes The display shows an indicative programme duration 2 To change the temperature and or the spin speed touch the related buttons 3 If desired set one or more options by touching the related buttons The related indicators illuminate on the ...

Страница 23: ...ting the weight of the load to calculate the real programme duration During this phase the Time Manager bars placed below the time digits play a simple animation 2 After about 15 20 minutes the Time Manager bars disappear and new cycle duration is displayed The appliance automatically adjusts the programme duration to the load to achieve perfect washing results in the minimum possible time 12 9 In...

Страница 24: ...nd of the previous programme Turn the programme dial to set a new cycle 2 Remove the laundry from the appliance 3 Make sure that the drum is empty 4 Keep the door and the detergent dispenser slightly ajar to prevent mildew and odours 5 Close the water tap 12 13 Draining water out after end of cycle If you have chosen a programme or an option that does not empty out the water of the last rinse the ...

Страница 25: ...ins in a washing bag or pillowcase Do not wash laundry without hems or with cuts Use a washing bag to wash small and or delicate items e g underwired bras belts tights shoelaces ribbons etc A very small load can cause balance problems with the spin phase leading to excessive vibration If this occurs interrupt the programme and open the door refer to Daily Use chapter manually redistribute the load...

Страница 26: ...tips Loading the appliance to the maximum capacity indicated for each programmes helps to reduce energy and water consumption With adequate pre treatment stains and limited soiling can be removed the laundry can then be washed at a lower temperature To use the correct quantity of detergent refer to the quantity suggested by the detergent producer and check the water hardness of you domestic system...

Страница 27: ...lready contain water softening agents but we recommend to run a cycle with an empty drum and a descaling product occasionally Always follow the instructions that you find on the packaging of the product 14 5 Maintenance wash The repeated and prolonged use of low temperature programmes can cause detergent deposits fluff residues bacterial growth inside the drum and the tub This could generate bad o...

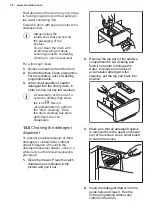
Страница 28: ...o perform the drum cleaning Once the drum cleaning has been performed the icon disappears 14 8 Cleaning the detergent dispenser To prevent possible deposits of dried detergent or clotted fabric softener and or formation of mould in the detergent dispenser drawer once in a while carry out the following cleaning procedure 1 Open the drawer Press the catch downwards as indicated in the picture and pu...

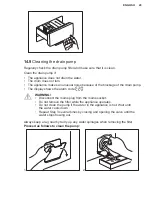
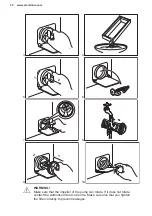
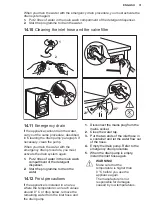
Страница 29: ...p The display shows the alarm code WARNING Disconnect the mains plug from the mains socket Do not remove the filter while the appliance operates Do not clean the pump if the water in the appliance is hot Wait until the water cools down Repeat Step 3 several times by closing and opening the valve until the water stops flowing out Always keep a rag nearby to dry up any water spillages when removing ...

Страница 30: ...1 2 10 WARNING Make sure that the impeller of the pump can rotate If it does not rotate contact the Authorised Service Centre Make sure also that you tighten the filter correctly to prevent leakages www electrolux com 30 ...

Страница 31: ...s of water in the main wash compartment of the detergent dispenser 2 Start the programme to drain the water 14 12 Frost precautions If the appliance is installed in an area where the temperature can reach values around 0 C or drop below remove the remaining water from the inlet hose and the drain pump 1 Disconnect the mains plug from the mains socket 2 Close the water tap 3 Put the two ends of the...

Страница 32: ... sure that the filter of the inlet hose and the filter of the valve are not clogged Refer to Care and cleaning The appliance does not drain the water Make sure that the sink spigot is not clogged Make sure that the drain hose has no kinks or bends Make sure that the drain filter is not clogged Clean the fil ter if necessary Refer to Care and cleaning Make sure that the connection of the drain hose...

Страница 33: ...e Make sure that the drain filter is not clogged Clean the fil ter if necessary Refer to Care and cleaning Adjust manually the items in the tub and start the spin phase again This problem may be caused by balance problems There is water on the floor Make sure that the couplings of the water hoses are tight and there is not water leakages Make sure that the water inlet hose and the drain hose have ...

Страница 34: ...roblem occurs again contact the Authorised Service Centre The necessary data for the service centre are on the rating plate 16 CONSUMPTION VALUES 16 1 Introduction See the web link www theenergylabel eu for detailed information about Energy Label The QR code on the energy label supplied with the appliance provides a web link to the information related to the performance of the appliance in the EU ...

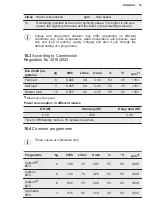
Страница 35: ...rding to Commission Regulation Eu 2019 2023 Eco 40 60 pro gramme kg kWh Litres h mm C rpm1 Full load 6 0 920 49 3 10 53 45 1151 Half load 3 0 535 39 2 25 53 35 1151 Quarter load 1 5 0 275 32 2 25 55 25 1151 1 Maximum spin speed Power consumption in different modes Off W Stand by W Delay start W 0 50 0 50 4 00 Time to Off Standby mode is 15 minutes maximum 16 4 Common programmes These values are in...

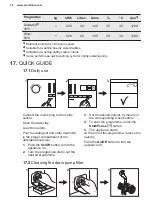
Страница 36: ...ins plug to the mains socket Open the water tap Load the laundry Pour the detergent and other treatment in the proper compartment of the detergent dispenser 1 Push the On Off button to turn the appliance on 2 Turn the programme dial to set the desired programme 3 Set the desired options by means of the corresponding touch buttons 4 To start the programme touch the Start Pause button 5 The applianc...

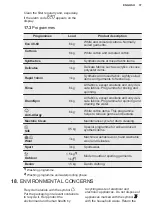
Страница 37: ...y deli cate fabrics Programme for spinning and draining the water Anti Allergy 6 kg White cotton items This programme helps to remove germs and bacteria Machine Clean Maintenance cycle for drum cleaning Silk 0 5 kg Special programme for silk and mixed synthetic items Wool 1 kg Machine washable wool hand washable wool and delicates Sport 3 kg Sportswear Outdoor 1 5 kg1 1 kg2 Modern outdoor sporting...

Страница 38: ...product to your local recycling facility or contact your municipal office www electrolux com 38 ...

Страница 39: ......

Страница 40: ...www electrolux com shop 155292540 A 492021 ...

Отзывы: